
Azure Cognitive Services REST API for Face Analysis
An implementation with Python
Artificial Intelligence and its applications have opened innovative paths in societies and organizations. Today we can simultaneously get a transcript, in any language, of someone’s speech, identify individuals’ identities via smart cameras, and so on.
Yet it all comes with a price: time and resources. Indeed, training algorithms behind any AI system is no joke: especially in the computer vision field, where the class of algorithms is that of Neural Networks, those latter could take days to properly train. Plus, in order to parallelize and speed up the process, one needs also to be provided with special hardware powered by GPUs. Last but not least, there is always the theme of data collection: ideally, a powerful algorithm is the one that, among other things, is trained on reasonably large datasets, and it seldom occurs that for a specific task we have the opportunity to collect that amount and quality of data.
That is the reason why, in recent times, the market started offering many options in terms of pre-trained networks and AI systems. In this article, I’m going to introduce you to Azure Cognitive Services and, more specifically, on their declination in the Computer Vision field for faces’ analysis.
For this purpose, you will need the following prerequisites:
- An Azure account (you can create your account for free here)
- A Computer Vision Resource in your Azure account
- Python 3.6+ installed on your local machine
To create a Computer Vision Resource, you can navigate through the portal, create a new resource and go under the class of “AI+Machine Learning”. Then select the Face Cognitive Service and set the required information.

For the pricing tier, select “free”, which allows up to 30000 free calls per month. You can monitor your quota utilization in the overview section under your resource:

For detailed instructions on how to set up a Cognitive Service resource, you can read the official documentation here.
With these prerequisites, we are ready to set up our environment.
Calling Face API from your code
The Face API of our service is able to address five different tasks: detection, verification, identification, similarity and grouping. As test images, I will rely on some footage from the Harry Potter series.
In this article, I’m going to dwell on the first two tasks: detection and verification.
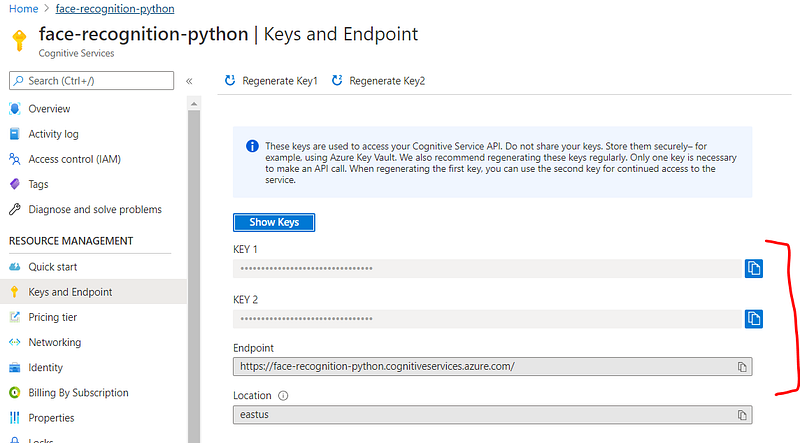
However, before deep-diving into these tasks, we will need to import all the necessary packages and retrieve two important elements from our Azure resource: one of the two Keys and the Endpoint. You can find them under the tab “Keys and Endpoint” of your resource:
Then, moving back to your Python environment, you will need to install the following packages and initialize a face client:
! pip install azure.cognitiveservices.vision.facefrom msrest.authentication import CognitiveServicesCredentials
from azure.cognitiveservices.vision.face import FaceClientdef get_face_client():
"""Create an authenticated FaceClient."""
SUBSCRIPTION_KEY = 'e89df68381e2470baae5cda6e2169cbb'
ENDPOINT = 'https://face-recognition-python.cognitiveservices.azure.com/'
credential = CognitiveServicesCredentials(SUBSCRIPTION_KEY)
return FaceClient(ENDPOINT, credential)The face client will perform the different tasks that we are going to examine in the following sections.
Detection
The detection task consists of detecting faces into images, in terms of locations (coordinates of faces within the image), landmarks (position of common face elements, like noses, eyes…) and attributes (facial features like emotion, smile, age…).
For this excercise, the research question will be understanding whether on not a person is wearing glasses (which is one of the above attributes). To do so, I will use the detect_with_url module and, and Harry Potter will be our main character here:
%matplotlib inlinefrom matplotlib.pyplot import imshow
from PIL import Image, ImageDraw, ImageFontimg = Image.open("harry-potter.jpg")
imshow(img)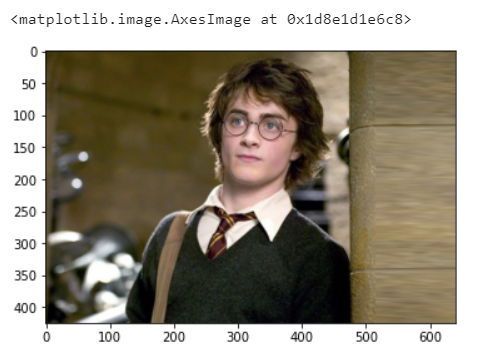
Now let’s initialize the face_client object and use it to detect the face. For this purpose, I will return some attributes, including glasses (of course, since it is our research question) but also emotion and smile (just to explore different features). Plus, I will also return the landmarks.
face_client = get_face_client()url = "https://style.corriere.it/wp-content/uploads/2020/03/harry-potter-la-pietra-filosofale-italia-1-tv-televisione-harry-potter-16-marzo-2020-harry-potter-la-saga-italia-uno-redcliffe-640x425.jpg"attributes = ["emotion", "glasses", "smile"]
include_id = True
include_landmarks = Truedetected_faces = face_client.face.detect_with_url(url, include_id, include_landmarks, attributes, raw=True)detected_faces.response.json()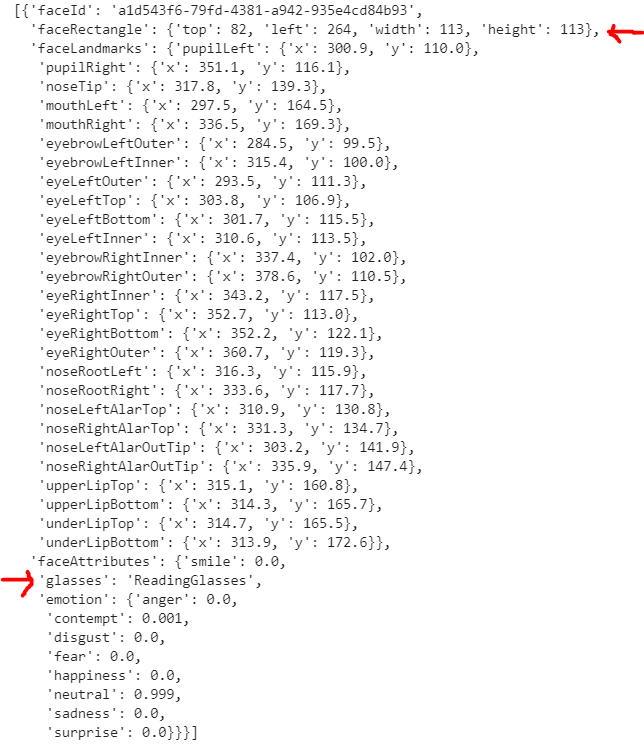
As you can see, the request returns a set of information about the image, including the coordinates of the face and the attribute glasses (that are correctly detected). You can also see all the typical facial features and their positions (landmarks).
Finally, let’s also have a look at the two further attributes inserted: smile and emotion. For the “smile” attribute, you can see a score indicating the confidence of the face to display a smile (in this case, equal to 0). In the “emotion” attribute, you can see a vector of probability (summing up to 1) with 8 entries, corresponding to the most common emotions. In this case, we have basically the certainty (99.9% of probability) that our face is expressing neutrality.
Let’s visualize the result on our image:
color="blue"
font = ImageFont.truetype("arial.ttf", 20)
if detected_faces is not None:
    draw = ImageDraw.Draw(img)
    for currFace in detected_faces.response.json():
        faceRectangle = currFace['faceRectangle']
        left = faceRectangle['left']
        top = faceRectangle['top']
        width = faceRectangle['width']
        height = faceRectangle['height']
        draw.line([(left,top),(left+width,top)],fill=color, width=5)
        draw.line([(left+width,top),(left+width,top+height)],fill=color , width=5)
        draw.line([(left+width,top+height),(left, top+height)],fill=color , width=5)
        draw.line([(left,top+height),(left, top)],fill=color , width=5)
        text = currFace['faceAttributes']['glasses']
draw.text((left, top+height), text = str('glasses: '+ text), font = font, color = 'blue')imshow(img)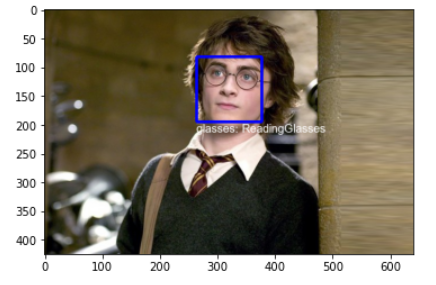
Verification
This task checks the likelihood that two faces belong to the same person. As input, it takes the face ID coming from the module Face-Detect used above. So for this purpose, I will use the following picture:

Then I will ask my module to compare the first two faces captured by the detect module. We except this task to return that those faces do not belong to the same person, so let’s see if it is accurate:
url = "https://style.corriere.it/wp-content/uploads/2020/03/harry-potter-la-pietra-filosofale-italia-1-tv-televisione-harry-potter-16-marzo-2020-harry-potter-la-saga-italia-uno-640x425.jpg"attributes = [] #we don't need them in this case
include_id = True
include_landmarks = Falseresults = face_client.face.detect_with_url(url, include_id, include_landmarks, attributes, raw=True)test = face_client.face.verify_face_to_face(results.response.json()[0]['faceId'], results.response.json()[1]['faceId'])test.as_dict()
As you can see, the confidence of the two faces of being identical is very low, indeed the output is False. Now let’s see what happens with an image showing the same person:

url = "https://i.pinimg.com/originals/9c/39/bd/9c39bd249168919860a6fee5a64ac4fa.jpg"attributes = [] #we don't need them in this case
include_id = True
include_landmarks = Falseresults = face_client.face.detect_with_url(url, include_id, include_landmarks, attributes, raw=True)test = face_client.face.verify_face_to_face(results.response.json()[0]['faceId'], results.response.json()[1]['faceId'])
test.as_dict()
As you can see, now our service returned that the two faces belong to the same person.
Of course, we can compare FaceIds belonging to different images that have been detected by the module Face-Detect.
Conclusions and further applications
In this article, we saw a very simple application of the Face API of Azure Cognitive Services. As you can see, for the two tasks there was no need for training and it only took a few seconds. We can leverage this pre-trained algorithm in modern applications. I will leave you with a very useful link where you can find feedback, customers’ stories, and ideas on different ways of utilizing those services.
I hope you enjoyed the reading! For further documentation, please refer to the resource section below.
Resources
- https://azure.microsoft.com/it-it/pricing/details/cognitive-services/face-api/
- https://azure.microsoft.com/en-au/free/
- https://docs.microsoft.com/it-it/azure/cognitive-services/cognitive-services-apis-create-account?tabs=multiservice%2Cwindows
- https://westus.dev.cognitive.microsoft.com/docs/services/563879b61984550e40cbbe8d/operations/563879b61984550f30395238
- https://feedback.azure.com/forums/932041-cognitive-services