
AWS Instance Scheduler: Automate Costs and Stop Paying for Idle Instances

In the cloud, every second counts, especially when it comes to your wallet.
Running idle AWS EC2 and RDS instances can become costly, eating into your budget and negating the cost-effectiveness of the cloud.
But don’t worry! I’d say there’s a hero in town: AWS Instance Scheduler.
What is AWS Instance Scheduler?
Think of it as your personal assistant for instance management. This handy solution automates the start and stop of your EC2 and RDS instances based on the schedules you set.
As a consequence, this solution helps you reduce operational costs by stopping resources that are not in use and starting resources when their capacity is needed.
Say goodbye to doing it manually — it’s all about saving costs and having peace of mind.
Features and Benefits
- Support for multiple accounts and regions: This solution includes a template that creates the AWS Identity and Access Management (IAM) roles necessary to start and stop instances in multiple accounts.
- Automated tagging: Instance Scheduler can automatically add tags to all instances it starts or stops. It also includes macros that allow you to add variable information to the tags.
- Configure schedules or periods using Scheduler CLI: This solution includes a command line interface (CLI) that provides commands for configuring schedules and periods. The CLI allows customers to estimate cost savings for a given schedule.
- Manage schedules using Infrastructure as Code (IaC): Instance Scheduler provides an AWS CloudFormation Custom Resource that can be used to manage schedules using Infrastructure as Code.
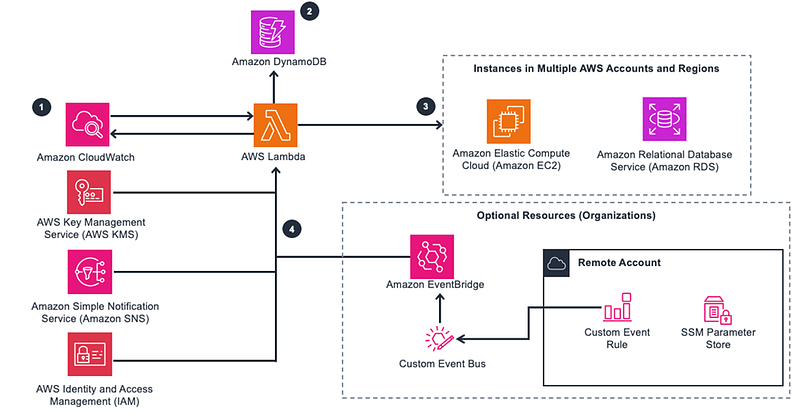
Architecture Overview
The AWS Instance Scheduler relies on AWS resource tags and AWS Lambda to automatically stop and start EC2 and RDS instances across various AWS regions and accounts according to a predefined schedule.
This schedule, as well as its configuration details like time zone and interval, is stored in an Amazon DynamoDB table.
Additionally, users have the option to set up Amazon Simple Notification Service (SNS) topics and leverage Amazon CloudWatch for notifications and logging purposes.
To ensure security, the solution establishes an AWS managed Custom Master Key (CMK), which is used to configure server-side encryption for both the SNS topic and DynamoDB tables.
The AWS Instance Scheduler is implemented using a CloudFormation template.
Pricing
Keep in mind that this is NOT a free solution.
The cost depends on whether you will run for both EC2 and RDS or only one instance.
At this moment, the cost of running the solution with default settings (only EC2 instances, one account) in the US WEST (California) region is approximately $2 per month.
The OPTIONAL custom CloudWatch metrics will cost an additional $0.60 to $1.20 per month for each metrics-enabled scheduled.
It is highly recommended you create a budget through AWS Cost Explorer to help manage the costs.
Keep an eye on 2024 AWS changes that might affect your costs.
Solution Deployment
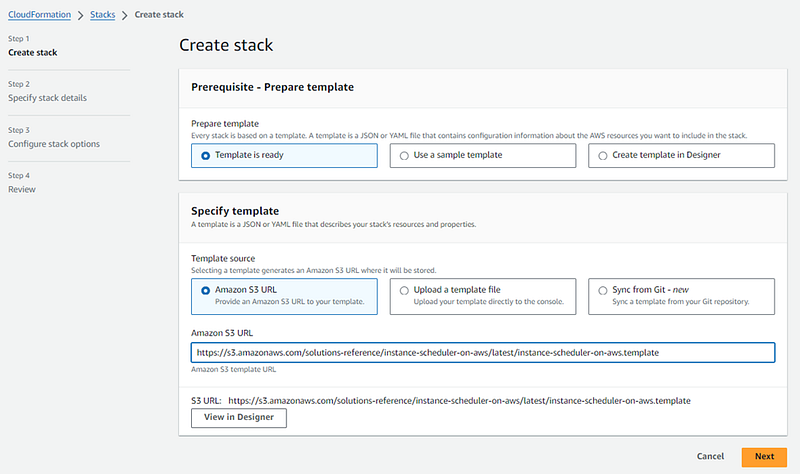
- Log in to your AWS console and select the region desired.
- Open CloudFormation and create a new stack. Select Template is ready. On Template source, select Amazon S3 URL and paste the URL below. Click Next. https://s3.amazonaws.com/solutions-reference/instance-scheduler-on-aws/latest/instance-scheduler-on-aws.template
3. Enter the Stack name. On my demo I used the name Schedule, and I will setup a schedule only for EC2 instance.
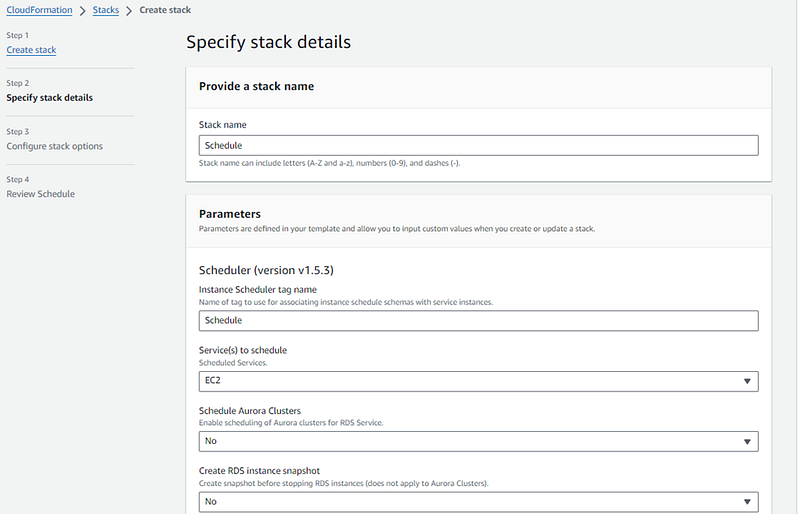
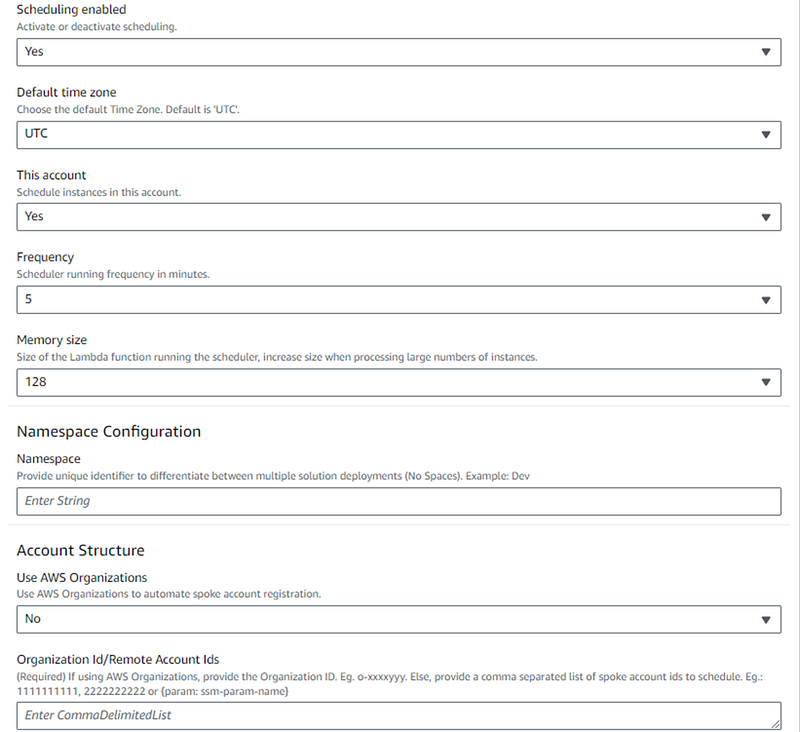
All the following options I will leave as default. Click Next.
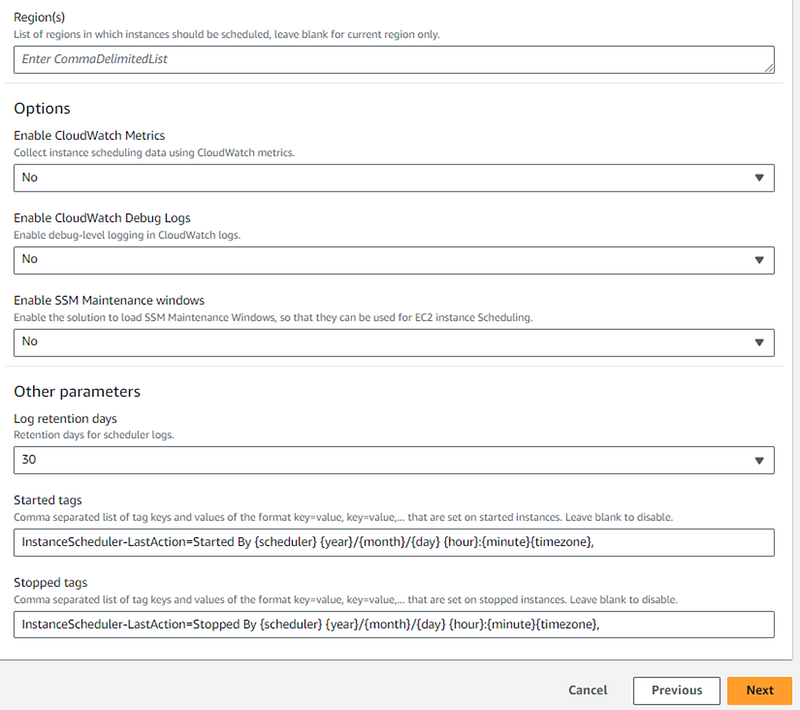
4. On Configure stack options, keep everything default and click Next.
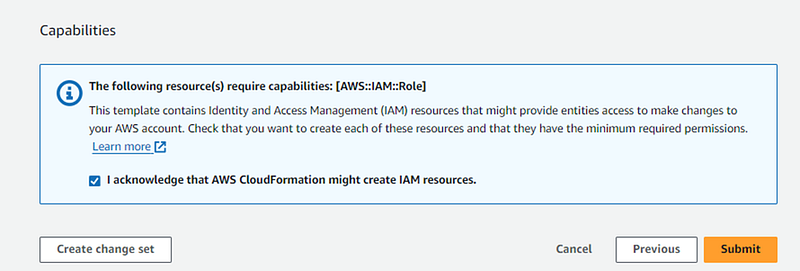
5. On Review Schedule. Review your settings. Check I acknowledge that AWS CloudFormation might create IAM resources. Click Submit.
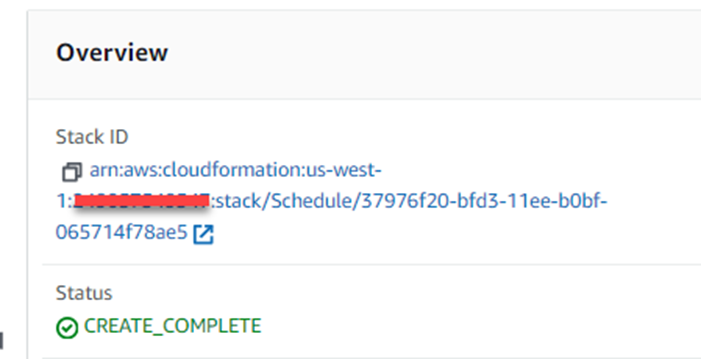
Wait for the CloudFormation stack to indicate CREATE_COMPLETE. It can take a couple of minutes.
How to configure your AWS Instance Schedule
As I mentioned previously, you can manage your schedules using the Scheduler CLI and Infrastructure as Code (IaC). In this example, I will use the DynamoDB console.
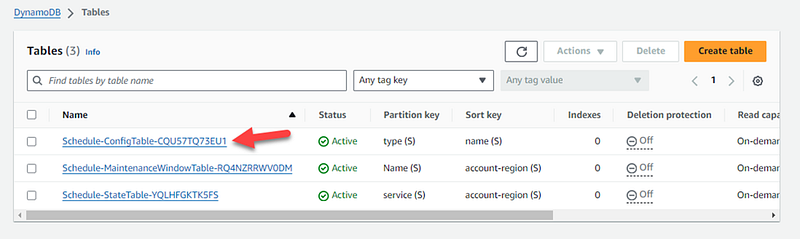
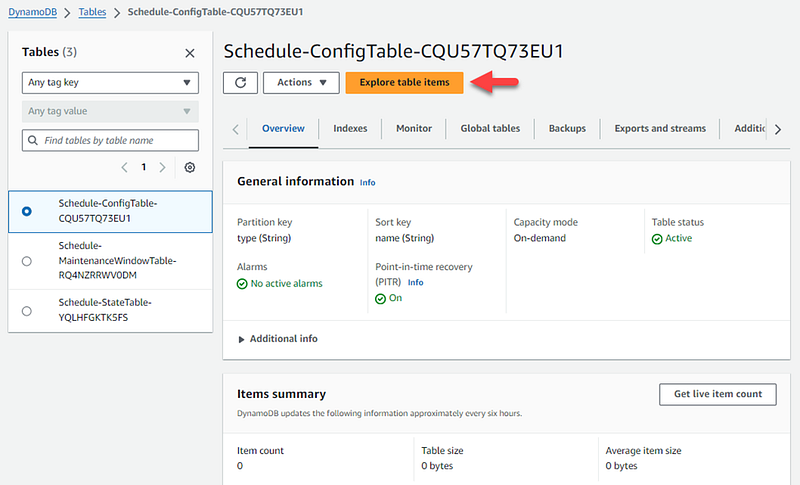
- Open Amazon DynamoDB console. On the left menu click Tables. You will see three tables have been created.
- The name of your tables will be slightly different. Click the table name such as Schedule-ConfigTable-………
3. Click Explore table items
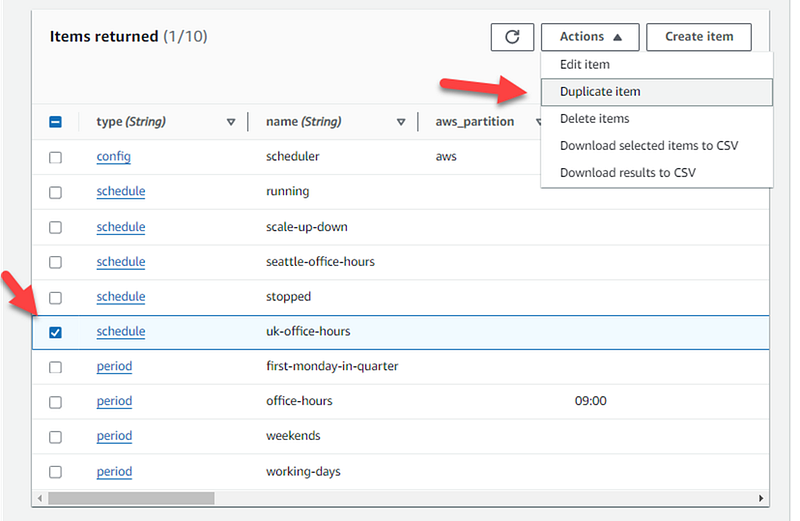
4. Now we will create our schedule. Scroll down and select the schedule uk-office-hours. Click Actions, then Duplicate item.
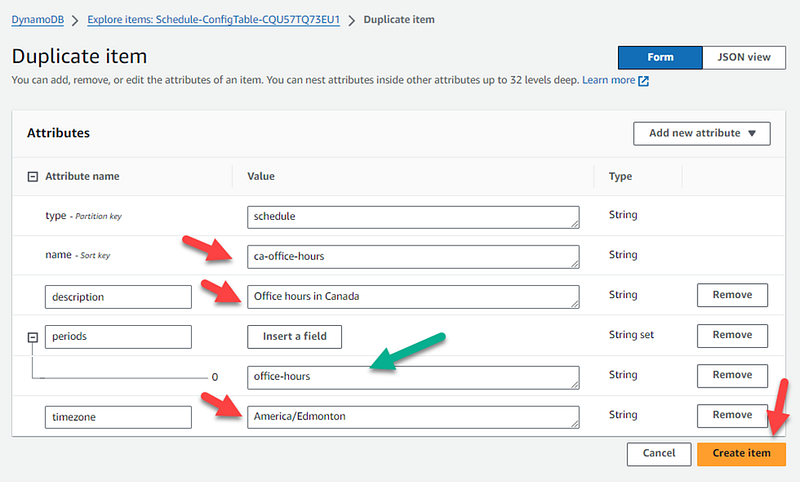
5. Modify the name. I used ca-office-hours. Modify the description. IMPORTANT. Modify the timezone based on your location.
Note that the type of this schedule is “period”, its name is office-hours. Click Create item.
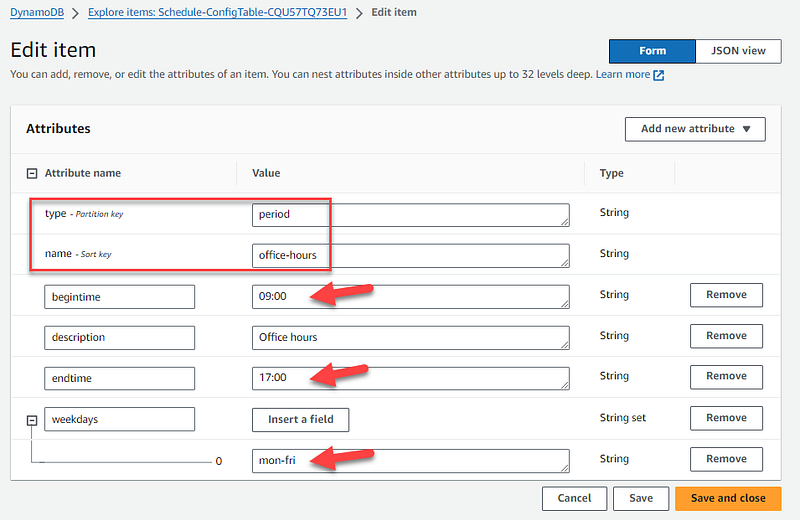
6. If you open the office-hours period, you will see the schedule is set to 9:00 to 17:00. Also it is set to run from Monday to Friday.
This means the instance will start at 9am and shut down at 5pm Edmonton time.
7. The schedule ca-office-hours we just created will be used to link the selected instances to the scheduler.
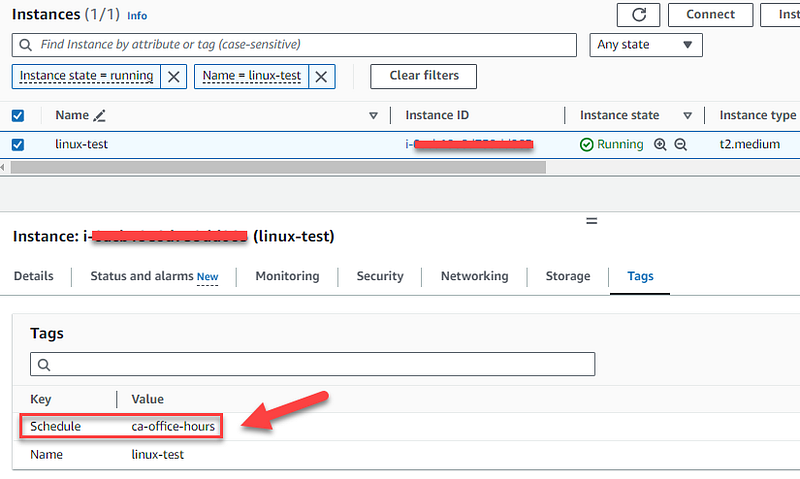
8. Open EC2 console and select the instance you will schedule the start/stop.
Click Tags, then click Manage tags.
Now we have to add the tag Key=Schedule and Value=<your_schedule_name> on the instance we want to trigger the scheduler.
Click Save.
9. According to my setup, my instance was shut down and an automatic tag has been created.

Congratulations. If you followed the steps correctly you will be able to save a substantial amount of money using this solution.
If this blog post helped you, drop a comment. Or leave a message if you have any questions and I will be glad to answer.