
AWS CloudFormation 101- How to Use !Ref to Assemble the relationship between Each AWS Resource (Part 2)

Introduction
In the previous post, I shared about what is cloud formation and also whether we should learn about it. If you coming from the previous post, I am happy for you that you “Find Your Why” to learn about AWS CloudFormation.
However, if you’re still wondering whether you need to learn it, take a look at the post and “Find Your Why”.
Besides, I also share the template structure of Cloud Formation and how to launch an EC2 Instance using the Cloud Formation template. So in this post, I will be taking another minimal step — which is adding a security group into the existing EC2 instance.
Without further ado, let’s start.
Tutorial — Adding Security Group to EC2 Instance
We created an EC2 Instance using the Cloud Formation template in the previous post. Refer to the gist below for the template code.
In this tutorial, we will be adding a security group to the TestInstance (EC2 Instance). Here are the requirements for this tutorial.
- Security group which allow port 80
- Security group which allow port 443
- Assigned the above security group to the EC2 Instance
Cloud Formation Template for AWS Security Group
Below is the structure we will be using for the Security Group. Here is the explanation for each field of the configuration.
- GroupDescription: — Required field, which used to describe what this Security Group is doing. ( Simple but important )
- SecurityGroupIngress: — The section where we define all the rules for incoming network traffic. By default, if you do not define anything to your EC2 Instance, your EC2 Instance will not be able to receive any incoming traffic.
- CidrIp: — Incoming IP address — For e.g, you could set to accept the traffic from IP 220.16.116.228
- FromPort: — Incoming Port
- IpProtocol: — What Internet Protocol, the common one is
TCPandUDP - ToPort: — To which port of your EC2 Instance
Using !Ref Shorthand to Assign Security Group Function
At this point, you might have already written the part where you create the Security Group Resource. Next, we will need to assign the security group to the EC2 Instance.
You can use!Ref the shorthand syntax in yaml to assign the security group to EC2 Instance. Below is an example of how you can use !Ref.
!Ref LogicalIDForTheResource
We will be taking the LogicalID for the resource we name in the template. So in this scenario, it will be!Ref HTTPSecurityGroup.
Hands-on Time 👨💻👩💻
It’s the time where we shall do some hands-on and enhance our learning.
You can find the existing CloudFormation code here and add the security group resource and continue the tutorial.
If you’re stuck, you can refer to the final answer here.
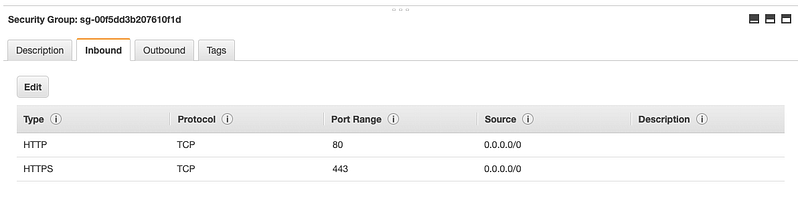
Expected Output
Here is the expected output. From the screenshot below, we created a security group that allows port 80 (HTTP) and port 443 (HTTPS).
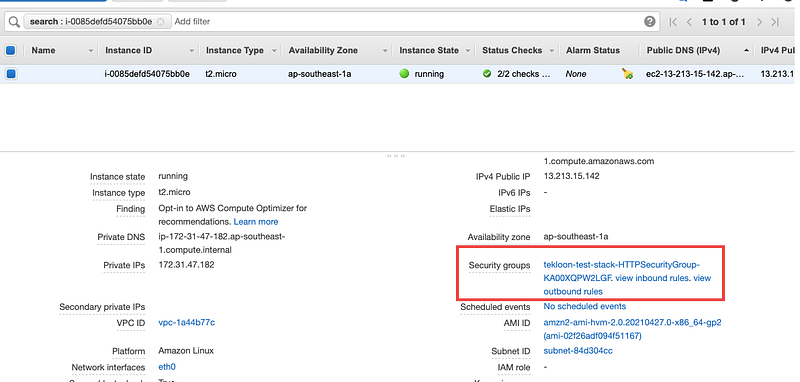
Last but not least, you also have to ensure the security group assigned to your EC2 Instance. You can find that from your EC2 Instance Dashboard. Refer to the screenshot below.
Conclusion
In this post, I shared how to provision Security Group via CloudFormation and most importantly how to use !Ref to assemble the relationship between resources such as
- !Ref security group in EC2 Instances.
That’s it for this article
Support Me
You can now support me by buying me a coffee so I can keep the article without a paywall. Appreciate your support!


