Automation of the reconnaissance phase during Web Application Penetration Testing III

This article is a continuation of the previous one available at this link and is the final article in the reconnaissance automation trilogy. After enumerating subdomains, selecting one of them, and further enumerating to find endpoints and queries, it is time to look for bugs.
In this episode, you will learn about the various techniques and tools that will help you detect those misconfigurations of the application being tested. You will also learn how to use them and automate the entire process.
Described research is based on the OWASP methodology and the methodology in the book “Hack Tricks” by Carlos Polop.
One thing to mension — I will not describe those vulnerabilities in this article. Rather I will focus on automation processs. If you are not familiar in described vulnerabilities click on the below links to learn more about each of them and practice how to find and exploit.
- Cross-Site Request Forgery (CSRF)
- Cryptographic issues in TLS/SSL servers
- Cross-Site Scripting (XSS): a) Reflected XSS b) DOM XSS c) Blind XSS
- URL rewriting via request header: a) X-Rewrite-Url b) X-Original-Url
- Out-of-bounds interaction (OOB): a) Blind Remote Code Execution (RCE) b) Blind Cross-Site Scripting (XSS) c) Blind SQL injection (SQLi) d) Blind Server Side Request Forgery (SSRF)
- Server-Side Template Injection (SSTI)
- Java insecure deserialization
- Carriage Return Line Feed Injection (CRLF)
- Reflected Open Redirect (OR)
- Bypassing 403/401 endpoints
- WordPress flaws: a) Broken Authentication b) Sensitive Data Exposure c) Enumeration of Components with Known Vulnerabilities d) Scanning Internal Network e) Server-side Request Forgery (SSRF)
- HTTP request smuggling
- Hop-by-hop deletion
- Broken links enumeration
- SQL injection (SQLi)
- JSON Web Tokens flaws (JWT)
- Directory Traversal / Path Traversal
- Local File Inclusion / Remote File Inclusion (LFI / RFI)
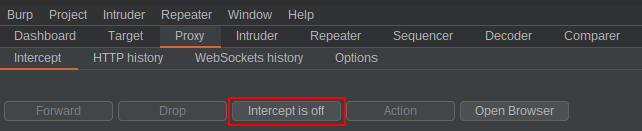
Before starting work, launch a new project in Burp Suite and turn off an interception, as shown in the screenshot below:
I assume you already have a properly prepared catalog with the results from the previous article. A correctly configured path with files is presented below:
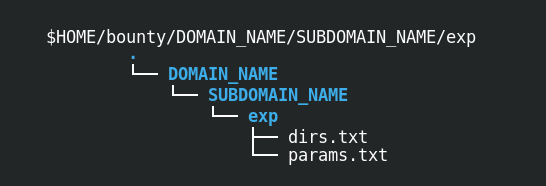
In case you want to create files for the ad hoc test, the files should contain the following content:
- dirs.txt — this file includes URLs with directories and files f.e.: http://subdomain.example.com/directory1/ http://subdomain.example.com/directory1/file1 http://subdomain.example.com/directory2/
- params.txt — this file contains URLs with queries f.e.: http://subdomain.example.com/directory1/file1?query1=a&query2=b http://subdomain.example.com/directory1/file2?query3=x&query4=z
Additionally, you will need the IP address of a publicly available web server listening on port 80. If you do not have a virtual private server and do not want to pay for it, you can get free 12 months of AWS VPS here or spare some cash at OVHcloud.
Then you have to unlock port 80 on the firewall. Here is how to do it on AWS EC2 instance, and you can learn how to do it on OVHcloud. Start a simple HTTP web server if you are equipped with a VPS with port 80 unlocked. The issue below command in your VPS terminal to do that:

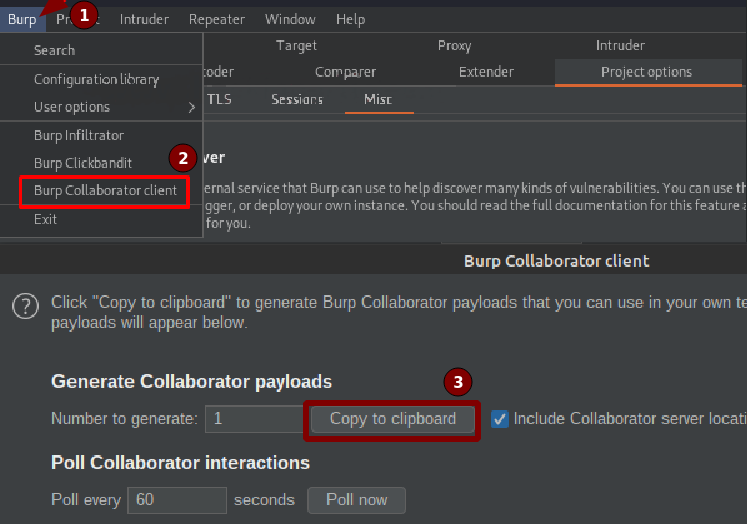
The last step is to get the address of the collaborator server. You can use the Burp Suite or create your private collaborator server to obtain this address.
In this article, I will use the publicly available collaborator provided in the Burp Suite. Follow the steps below, in order to get the address:
One more thing worth mentioning, all the commands that I will show that handle the cookie header will be used with that header. You can use these commands without a cookie or declare them as follows:

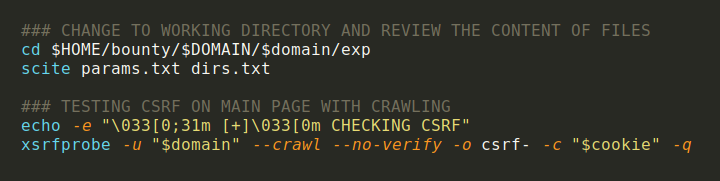
Now that you have everything ready, it is time for the right topic, i.e., automation of bug finding in web applications. First, switch to the working directory and manually review the content of “params.txt” and “dirs.txt”. Delete the URLs you are not interested in testing, save changes, and start the first tool, which crawls the primary domain and checks for CSRF vulnerabilities. The result of the XSRFProbe will be stored in the directory “csrf-$domain/”.
Tools used:
The screenshot below shows how you can automate this process using bash:
After XSRFProbe has finished, check for misconfiguration in TLS/SSL cryptography. In Bug Bounty programs, these kinds of vulnerabilities probably will not be accepted. Still, you should check them anyway, as they create a severe security hole for the man-in-the-middle (MITM) attacks. The command output will be stored in the “testssl.txt” file.
Tools used:
- testssl.sh
The screenshot below shows how you can automate this process using bash:

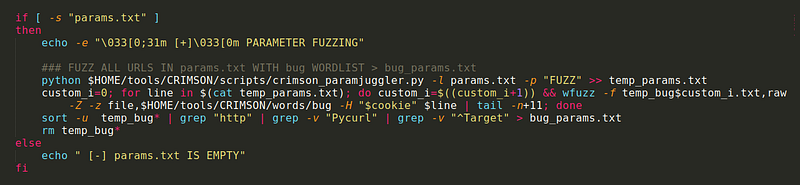
The next step will be time-consuming but may pay off the most in the entire process described. Yes, you are right. It will be fuzzing. The file with parameters “params.txt” and directories and files “dirs.txt” will be fuzzed. First, we will deal with the parameter's value from “params.txt”. We are going to do that for each URL, we put the placeholder “FUZZ” in place of the parameter value. For this purpose, we will use my program called crimson_paramjuggler.
Below is an example of an URL with two parameters before and after conversion in order to show what is going on:

After transformation, each new URL is fuzzed using a “bug” wordlist. The wordlist is constantly updated and modified by me to optimize the fuzzing time and the number of bugs found. You can download it here. After downloading, save it as:
- $HOME/tools/CRIMSON/words/bug
Tools used:
The screenshot below shows how you can automate this process using bash:
The second part of the fuzzing will cover files and directories in the “dirs.txt” list:

After completing the fuzzing, merge the “params.txt” and “dirs.txt” into one file, “all.txt”. Then perform the rest of the tests on it (in the meantime, you can analyze the output of both fuzzing — “bug_params.txt” and “bug_dirs.txt” . Look for anomalies in the response length and the status code).
Tools used:
The screenshot below shows how you can automate this process using bash:

Check for the low-hanging fruits — reflected XSS and DOM-based XSS on all URLs.
Tools used:
The screenshot below shows how you can automate this process using bash:

Then check if the “X-Rewrite-Url” or “X-Original-Url” is used. For this purpose, I have created a tool called crimson_rewriter. As a result, you will get a list of all URL addresses that supports “X-Rewrite-Url” and “X-Original-Url” headers.
Tools used:
The screenshot below shows how you can automate this process using bash:

The next step will be to test the out-of-bound interactions of each parameter value in the “params.txt” list. In this step, we check several vulnerabilities using RCE, SQLi, blind XSS, and SSRF payloads
The wordlist can be downloaded here. After downloading save it as:
- $HOME/tools/CRIMSON/words/exp/OOB
To use it, you can bring into play my next tool called crimson_oobtester. Generally, the wordlist includes payload schemes with “vps_ip” and “domain_collab“ placeholders. Those placeholders will be replaced automatically with the given VPS IP and collaborator’s domain address by crimson_oobtester and then sent to the given server.
Tools used:
The screenshot below shows how you can automate this process using bash:

Use your virtual private server ip address in place of $vps_ip, domain address of a collaborator in place of $collaborator_domain and save downloaded wordlist with payloads inside the .
crimson_oobtester logs all sent payloads with their identifier and sending time. After the program is finished, check your web server's logs and compare them with the “oob.txt“ file. Below is an example output of “oob.txt”:

Then run another scanner that will look for DNS interactions by sending POST requests with insecure JAVA deserialization gadget chain payload (URLDNS) in place of parameter values from “params.txt”.
The program will not work without the “ysoserial.jar” file located in:
- $HOME/tools/ysoserial/ysoserial.jar.
Tools used:
The screenshot below shows how you can automate this process using bash:

After the scan is complete, check DNS interactions on your collaborator server. Each ping will be marked with an identification number in the address of the collaborator’s domain to make it easier to find which exact parameter triggered the interaction and is potentially vulnerable.
Below you can see an example output of a testing 2 URLs (the first one has two parameters. Therefore, it is tested twice):
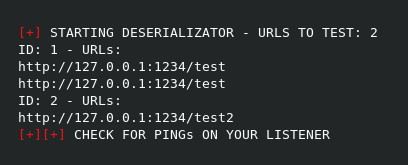
Here, however, you can see an example of an interaction with a collaborator. Note the number “2” in front of the domain name, signaling the interaction triggered by the payload:

Then test the injection of CRLF characters in the URL path.
Tools used:
The screenshot below shows how you can automate this process using bash:

The next step will be to test the open redirect vulnerability. For this purpose, we will use old but gold Wfuzz to fuzz the URLs from “dirs.txt” and the parameter values from “temp_params.txt” — file previously created by crimson_paramjuggler. The test will result in all URL addresses that have been redirected stored in the “OR.txt” file.
Tools used:
The screenshot below shows how you can automate this process using bash:

Next, test the Server-side Template Injection using crimson_templator, which injects SSTI payloads in parameters value from “params.txt” and checks if the payload is evaluated by the server and reflected in the response.
Tools used:
The screenshot below shows how you can automate this process using bash:

Then, if you did the reconnaissance described in the second article, you should have a “status_dir.txt” file in which all found URL addresses are saved along with the status code of the server’s responses. In this step, we try to bypass security with the help of the DirDar program and get to the directory despite the restrictions.
Tools used:
The screenshot below shows how you can automate this process using bash:

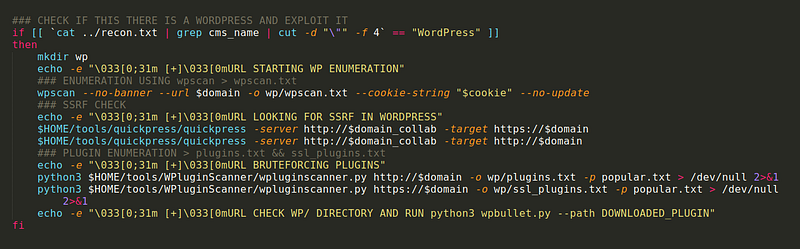
Suppose the website you are testing uses WordPress. In that case, you can use the scanners below to enumerate this CMS and check if there is an SSRF vulnerability, and also Bruteforce hidden plugins for further exploitation utilizing the program for static analysis of the source code.
Tools used:
The screenshot below shows how you can automate this process using bash:
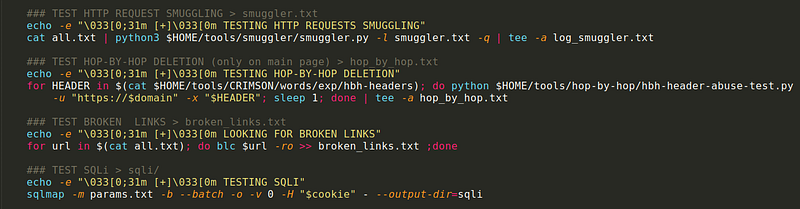
In the following steps, such vulnerabilities as HTTP request smuggling, hop-by-hop deletion, and SQL injection will be tested, and all broken links will be found.
Tools used:
The screenshot below shows how you can automate this process using bash:
The last test will cover the JWT token if it exists. First, decode the token to see what is inside, then perform a playbook scan using the provided token directly against the application to hunt for common misconfigurations.
Tools used:
The screenshot below shows how you can automate this process using bash:

Finally, all potentially reflected and DOM-based XSS vulnerabilities will be run in Firefox to confirm and manually test the vulnerabilities.
Tools used:

After all the above-mentioned process, it’s time to check the list of output files and hopefully find some bugs:
- bug_params.txt — output from parameter fuzzing.
- bug_dirs.txt — output from files and directories fuzzing.
- vuln_xss — filtered potentially vulnerable URLs from XSStrike.
- rewriter.txt — list of URL addresses that support rewriting headers.
- smuggler.txt —URLs potentially vulnerable to HTTP request smuggling.
- hop_by_hop.txt — output from hop-by-hop deletions test.
- broken_links.txt — broken URL addresses.
- Sqli/ — directory with sqlmap output.
- oob.txt — a file used to identify interactions with VPS and collaborator.
- CRLF.txt — output from CRLFuzzer.
- OR.txt — list of URL addresses potentially vulnerable to open redirection.
- dalfox.txt — output from Dalfox XSS scanner.
- ssti.txt — URLs potentially vulnerable to Server-side Template Injection.
- wp/ — directory with WordPress scanner results
- dirdar.txt — list of URL addresses bypassed 403/401 restricted areas.
- csrf-$domain/ — directory with CSRF scanner (xsrfprobe) output.
- jwt.txt — file with jwt_tool scanner results.
However, it is not over yet. In the previous article, all URLs in both “dirs.txt” and “params.txt” were proxied to the Burp Suite. The tool has many built-in automatic scanners, but it is worth adding to so-called extensions.
There are a lot of them, the list of extensions which I recommend to install additionally in the Burp Suite in order to maximize the chances of automatically finding misconfigurations is presented at this link, . You will find there not only automatic scanners, but also many tools that will support your manual work:
As a reminder, at the moment, human is irreplaceable, and the tools can be wrong. After completing the entire process, you should test the application manually according to the WSTG described here. The Autowasp extension will also be helpful.
The above process has been automated in one script called crimson_exploit. This is one of the three modules that are part of the crimson tool, that I am constantly creating and sharing at Github.
After this whole process, you should have a lot of files with potential vulnerabilities to review. After their analysis and confirmation, proceed to manual testing and exploitation of the vulnerabilities found to check their actual impact on the business.
This was my last article on web application reconnaissance automation. If you’re reading this article from the future, a lot could have changed, so I recommend following my project “CRIMSON” on Github, as I try to keep everything up-to-date.
References:


