
Simple coding guide to
Automating your job with Python
…and doing some other cool stuff with it
This article twirls around simple automation with PyAutoGUI. It is a Python module for programmatically controlling the mouse and keyboard. A little prior knowledge of programming (or Python data structures in general) is expected but not entirely necessary.

This article is divided in the following manner:
- A small introduction explaining why I took an interest in that topic;
- PyAutoGUI installation and setup;
- Tutorial about PyAutoGUI mouse and keyboard functions;
- Coding examples of automation.
If you want to skip the “boring” part, go to the section “Putting it all into practice“.
Intro
Many times in my past I’ve had a data entry job. Most data entry jobs can be divided into the following:
- Take data from tables (Excel, Google Sheets) and insert it somewhere else (a web page or some other table).
- Browse on the web (e-shops) or magazines, collect data and files (plain text and images) and copy them to a database.
Instead of having a fixed hourly salary, my income was based on performance: more entries, higher salary. Every time my performance was worth 4–6€/hour in the beginning but peaked at the 15–20€/hour level since I got faster and optimized my work to be more efficient.
How exactly did I do that is not important. A more important question would be: can I do it any faster? This is why I started looking into automation modules in Python and think that the answer is — “Yes, I can!”
Putting my coding gear on
As mentioned before, this article purely focuses on the PyAutoGUI module in Python. You can read the documentation and it’s manual HERE. The module itself can be downloaded quite simply within the command prompt:
pip install pyautoguiTo use it inside your script, you have to import it:
import pyautogui as pagThis “as pag” is simply used to type fewer characters in the following code: pag.click() is way shorter than pyautogui.click(), right?
Now we should be ready to do something neat.
Controlling your keyboard
Note: the following instructions are based on PyAutoGUI documentation. The following section will cover some of the examples provided there so that you would feel more comfortable reading more about it there. In this article, keyboard functions are inspected thoroughly, mouse functions have a brief overview and other functions are explained within coding examples.
The most important command controlling your keyboard is typewrite(). For example,
pag.typewrite("Hello world!")acts exactly like you would write “Hello world!” yourself but without pressing any keys. Cool!
To add a small delay between pressing each key, you can do the following:
pag.typewrite('Hello world!', interval=0.25)That writes each character with a quarter second interval.
Note: you can only type messages with this function. It is impossible to press enter or use a shift inside typewrite() function.
List of keyboard keys
Here’s a list of keyboard keys that you can pass either to press(), keyUp(), keyDown() or hotkey() function. Don’t worry, we’ll speak about those functions shortly after.
['\t', '\n', '\r', ' ', '!', '"', '#', '$', '%', '&', "'", '(',
')', '*', '+', ',', '-', '.', '/', '0', '1', '2', '3', '4', '5', '6', '7', '8', '9', ':', ';', '<', '=', '>', '?', '@', '[', '\\', ']', '^', '_', '`', 'a', 'b', 'c', 'd', 'e','f', 'g', 'h', 'i', 'j', 'k', 'l', 'm', 'n', 'o', 'p', 'q', 'r', 's', 't', 'u', 'v', 'w', 'x', 'y', 'z', '{', '|', '}', '~', 'accept', 'add', 'alt', 'altleft', 'altright', 'apps', 'backspace', 'browserback', 'browserfavorites', 'browserforward', 'browserhome', 'browserrefresh', 'browsersearch', 'browserstop', 'capslock', 'clear', 'convert', 'ctrl', 'ctrlleft', 'ctrlright', 'decimal', 'del', 'delete', 'divide', 'down', 'end', 'enter', 'esc', 'escape', 'execute', 'f1', 'f10', 'f11', 'f12', 'f13', 'f14', 'f15', 'f16', 'f17', 'f18', 'f19', 'f2', 'f20', 'f21', 'f22', 'f23', 'f24', 'f3', 'f4', 'f5', 'f6', 'f7', 'f8', 'f9', 'final', 'fn', 'hanguel', 'hangul', 'hanja', 'help', 'home', 'insert', 'junja', 'kana', 'kanji', 'launchapp1', 'launchapp2', 'launchmail', 'launchmediaselect', 'left', 'modechange', 'multiply', 'nexttrack', 'nonconvert', 'num0', 'num1', 'num2', 'num3', 'num4', 'num5', 'num6', 'num7', 'num8', 'num9', 'numlock', 'pagedown', 'pageup', 'pause', 'pgdn', 'pgup', 'playpause', 'prevtrack', 'print', 'printscreen', 'prntscrn', 'prtsc', 'prtscr', 'return', 'right', 'scrolllock', 'select', 'separator', 'shift', 'shiftleft', 'shiftright', 'sleep', 'space', 'stop', 'subtract', 'tab', 'up', 'volumedown', 'volumemute', 'volumeup', 'win', 'winleft', 'winright', 'yen', 'command', 'option', 'optionleft', 'optionright']
Functions keyDown() and keyUp() simulate pressing a key down and releasing it up, respectively. For instance
pag.keyDown("enter")
pag.keyUp("enter")
presses and releases the enter-key. Be careful and never leave a key down. :)
Function press() combines the previous two. The key you pass to the function is pressed down and released:
pag.press("enter")Previous two code snippets produce the same output!
To press multiple keys, you can pass the arguments as a list:
pag.press(['enter', 'tab', 'enter'])The last keyboard function is hotkey(). It makes using keyboard shortcuts more convenient. Simply pass it some keys that will be pressed down in order and then released in reversed order. For instance:
pag.hotkey('ctrl', 'alt', 'delete')is equivalent to this code:
pag.keyDown('ctrl')
pag.keyDown('alt')
pag.keyDown('delete')
pag.keyUp('delete')
pag.keyUp('alt')
pag.keyUp('ctrl')
Controlling your mouse
Locations on your screen are referred to by X and Y Cartesian coordinates. The X coordinate starts at 0 on the left side and increases going right and the Y coordinate starts at 0 on the top and increases going down.
0,0       X increases -->
+---------------------------+
|                           | Y increases
|                           |     |
|   1920 x 1080 screen      |     |
|                           |     V
|                           |
|                           |
+---------------------------+ 1919, 1079
To get to know your screen size, use the size function:
pag.size()It should return a tuple, for example (1920x1080), providing you with your screen resolution.
Here’s a list of other mouse functions:
pag.moveTo(600, 600)   # moves mouse to X of 600, Y of 600
pag.moveTo(100, 200, 2) # moves mouse to X of 100, Y of 200 over 2 secondspag.move(0, 50) # move the mouse down 50 pixels relative to its previous locationpag.dragTo(100, 200, button='left') # drag mouse to X of 100, Y of 200 while holding down left mouse buttonpag.dragTo(300, 400, 2, button='left') # drag mouse to X of 300, Y of 400 over 2 seconds while holding down left mouse buttonpag.click() #clicks the mouse
pag.click(x=100, y=200) # move to 100, 200, then click the left mouse button.pag.click(button='right') # right-click the mouse
pag.doubleClick() # perform a left-button double click
pag.click(clicks=2) # double-click the left mouse button
pag.click(clicks=2, interval=0.25) # double-click the left mouse button, but with a quarter second pause in between clickspag.scroll(10) # scroll up 10 "clicks"
pag.scroll(-10) # scroll down 10 "clicks"pag.hscroll(10) # scroll right 10 "clicks"
pag.hscroll(-10) # scroll left 10 "clicks"If you are interested in knowing more about the documentation, click HERE or HERE.
Putting it all into practice
Whenever you feel your job is rather repetitive, use PyAutoGUI. In my case, I feel like I should have made acquaintance with it before taking those data entry jobs.
Suppose you are a big boss in a big company and you want all of your 1,000,000 employees to have an account on a popular website. One way would be by doing it manually. If it takes 30 seconds for one user to register and you do this job 24/7 then it would take a few hours more than 347 days. Crazy, right? Instead, it would be easier to spend an hour on coding and let the computers do the work by itself. You would win 8333 hours minus the amount you put in developing your code. Let’s do this.
You have previously defined a list of all their email addresses:
emails = ["joe1@company.address", "linda2@company.address", "greg3@company.address", "hanna4@company.address", "oscar5@company.address", "helen6@company.address", ...]Let’s build the code. It should start with imports and opening the crazycoolwebsite platform (it should not work, I don’t promote this kind of spamming in general).
import pyautogui as pag
import webbrowserwebbrowser.open_new("crazycoolwebsite.com")Then you should add some code to navigate through the registration progress. Suppose it is currently as follows:
- Frontpage -> click “Get started”
- Pop-up window -> click “Sign up with email”
- Email entry window -> type your email and hit enter
- Done! Close the window and the user should have further instructions on their email address.
Codewise it would be something like this:
import pyautogui as pag
import webbrowser
emails = ["joe1@company.address", "linda2@company.address", "greg3@company.address", "hanna4@company.address", "oscar5@company.address", "helen6@company.address", ...]for email in emails:
webbrowser.open_new("crazycoolwebsite.com")
pag.click(x=xcoord1, y=ycoord1) #Get started
pag.click(x=xcoord2, y=ycoord2) #Sign up with email
pag.typewrite(email) #Type your email
pag.press("enter")
pag.hotkey('ctrl', 'w') #closes current tabAnd that’s it! If you know exact coordinates where to click ( xcoord1, ycoord1, xcoord2 and ycoord2) then that should do the trick. Treat this knowledge with respect and please do not use this as a spamming method.
Note: you must take time factor into account when automating whatever you do. You can never predict, how long is it going to take to open a file or how long does the web page load. Always find safe intervals to “pause your code” or implement functions that determine whether the page has loaded (let PyAutoGUI check if a certain number of pixels are either white (page is still loading) or some other color (page has loaded!)).
About data entry jobs in general: most of those jobs aren’t as easy as the example described above the whole process of taking data from A and inserting it to B remains pretty much the same. Only data structures and resources vary.
Using some imagination
This module can be used in many other ways as well. For example, there are some computer games where precision is important. Do you think you can drag your mouse or press the space button more accurately than your script would?
Scary maze game
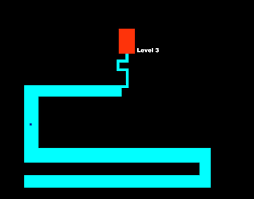
I think it was maybe 2010 when a friend of mine introduced me to the “scary maze game”. The objective is to move your cursor through the blue path. If you touch the black pixel, you go back to the start. Not scary!
The hardest part there, in my opinion, was the ending bit where the corridor is way too narrow. What if you could create a python script to complete the maze by itself?
Google Dino game
Another example: have you met this guy?

He’s probably the least favorite friend of all Chrome users since he only visits when there is no internet. Others can play the game HERE. The objective is simply to dodge obstacles that are approaching the Dino.
You can continuously take screenshots of your game screen and analyze the following:
- how fast is the obstacle moving?
- how high is the obstacle?
- is it day or night? note: the pixels alternate between black and white
- how many obstacles displayed currently?
- where should the obstacle be to trigger the jump/duck command?
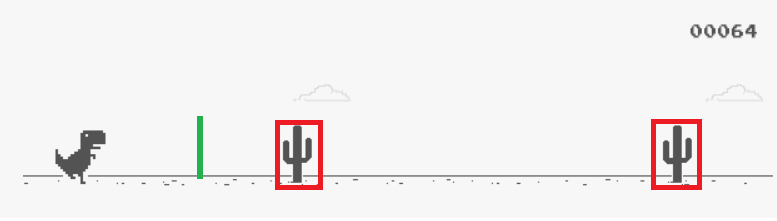
In this image, the obstacles are classified within red rectangles. The Dino should jump if the red box has touched the green line. There’s a little more math to it, but this is unimportant at the moment. If you have a working code you want to share, feel free to link it in the comments and add the highest score you have achieved by using it. As you can see, my high score is 2449 by doing it manually.
Postponing texts
Have you ever had the situation where you finish writing your letter/message at 3 AM and have no clue whether to send it instantly or wait until morning to avoid questions “why don’t you sleep at night like normal people”? Here’s a solution:
import pyautogui as pag
import timetime.sleep(21600) #this is equivalent to six hours
pag.press("enter")This script helps you to postpone sending the message by 6 hours (feel free to change the delay).
Chart reader
A few years back my friend and I discovered a web site with an amazing investment opportunity.
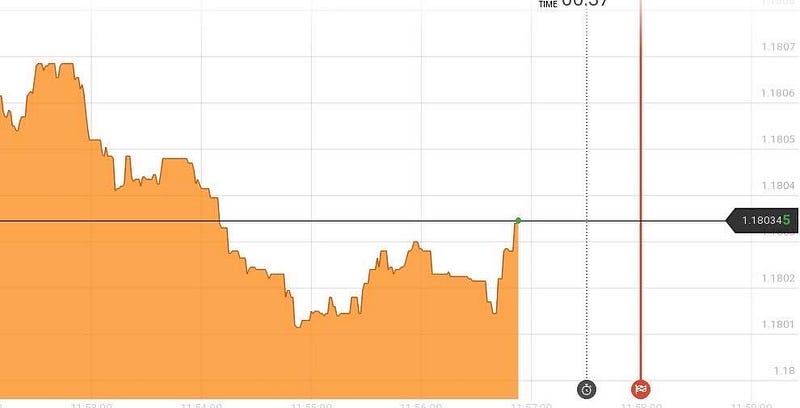
All you had to do was to decide, whether the price between the current moment and the red line has increased or decreased. You make a bet and if your opinion was correct, you will get your bet + 90% back. So we thought that we would need an algorithm that is statistically correct more than 56%. We hoped that we could make an algorithm that is correct at least 70–80% of all predictions and we would swim in the vast money ocean. Perhaps we weren’t the only ones like this “trading” method was shortly replaced with simple forex, stocks, crypto, etc. trading.
While making a trading algorithm, I found no way to access the same price data. Therefore I created a function that reads the graph with the captured screenshot. The idea was simple: I iterated through x-axis with a simple for loop. If x-coordinate was specified, I iterated along the y-axis with another for a loop until the pixel color was white instead of orange. This method returned a list of relative heights of data points in the figure. The corresponding code was:
def get_price_data(screen):
    price_data = np.array([])
    for x in range(var.xstart, var.xend):
        for y in range(var.ystart, var.yend):
            pixel_color = screen.getpixel((x, y))
            if pixel_color == (43, 171, 63):
                price_data = np.append(price_data, -y)
                return price_data
            elif pixel_color == (255, 167, 77):
                price_data = np.append(price_data, -y)
                break
Conclusion
PyAutoGUI is an amazing tool for automation and with a creative mind, there’s no action that a python script can’t copy. Feel free to share your ideas and code in the comments.