
Automate Dependency Updates in GitLab with Renovate: A Complete Guide
Learn to integrate Renovate into GitLab and never worry about outdated libraries again

Version management can be frustrating, especially when done incorrectly. Furthermore, if renovations are completed slowly, it may result in a significant increase in team workload. Like a snowball effect, breaking changes begin to pile up and conflict with each other, and an upgrade could take a couple of development sprints. And, of course, nobody wants to do this job because there is very little visible value with a lot of background work.
If it sounds familiar, there is a great solution — keep your upgrades constantly streamlined into development, almost as your production deployments 😉
Renovate is an excellent tool that does all the job for you—it tracks all the repositories for your dependencies and creates merge requests with suggested upgrades. With GitLab, each merge request is checked with the same pipeline, including tests, linting, and builds. And you can even auto-merge minor versions that pass the gate. No more lagging behind 🚀
Why renovate?
Even while the primary focus of this article is technical, and I want to go over how to enable Renovate for GitLab step by step, I’d like to elaborate on this decision.
There are two main version management tools on the market: Renovate and Dependabot.
But the Dependabot is built in GitHub and unavailable for other CI/CD solutions, making our option easy.
However, there is one more feature I enjoy about Renovate: the ability to bundle dependency updates together.
Let’s get things moving!
Now, we will add Renovate to our GitLab, configure the schedulers, pipelines, jobs, and auto-merge options, and make our lives easier 😎
Prerequisites
Before we begin, you need to make sure that you have the following:
- Enough rights on your GitLab account to create groups and projects.
- Access to or install at least 1 GitLab Runner with a docker executor. GitLab cloud runners are also acceptable, but remember that they cost you computing minutes.
- A GitHub account (even if we are going to use GitLab, it will be used by RenovateBot to get the release notes of the projects)
Access Rights
Renovate will create and merge requests, so it will need access to your projects.
There are a few options depending on which GitLab version you are using:
- Project Level Access Token/Group Level Access Token. This is preferred if you have a Premium or Ultimate GitLab subscription. If you use a project or group access token, GitLab creates an internal bot user. This bot user will be used to create merge requests and issues.
- Personal Access Token. This is your way to go when you have a Free GitLab subscription. Because for free accounts, you cannot add project or group access tokens.
Personal Access Token for Free Accounts
Create a free mail account for your renovatebot. GitLab requires email verification so that you will need it.
Next, create a free account on GitLab. Go to https://gitlab.com/users/sign_up and create a user by filling in all the fields:
For my example, I will call it Renovate Bot <[email protected]> , and the username renovatebot.

Enter the verification code:

And you are in. Now, we need to create an access token. Go to Profile — Preferences and choose Access Tokens from the left menu. Preferences can be found when you left-click on the avatar:

When in Access Tokens, click on the Add new token button and choose the following scopes:
read_userapiwrite_repository
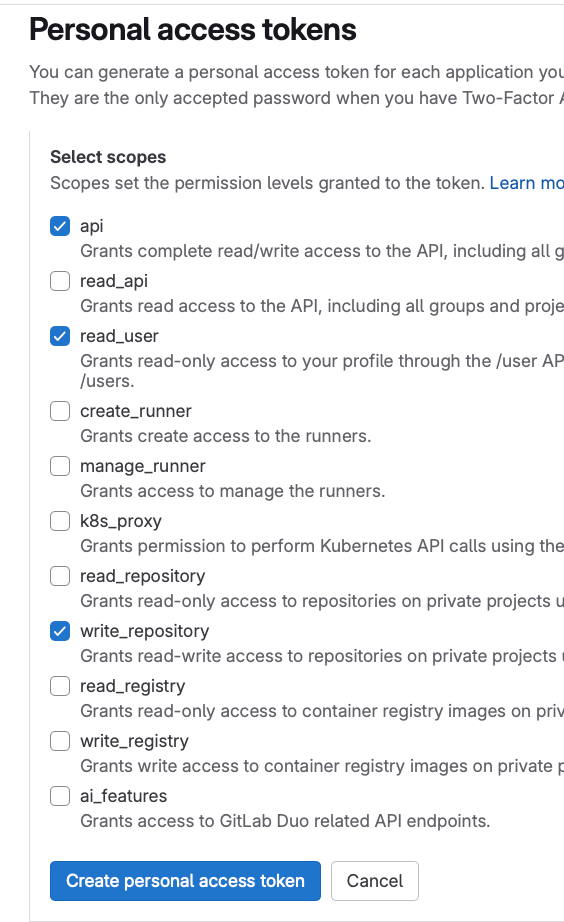
Give your token a name, such as RenovateBot, and click Create personal access token. Make sure to copy the token and store it somewhere! It will be shown only once.
Project Level Access Token/Group Level Access Token
If you are lucky enough to have a Premium or even Ultimate GitLab account, you can create a token specifically for a group or project to which GitLab will have access.
Open your project and go to Settings — Access Tokens:

Add a name to your token, for example, Renovate Bot, and choose the following scopes:
read_userapiwrite_repository
Click on Create access token. Make sure to copy the token and store it somewhere! It will be shown only once.
Renovate Project
Create a project by clicking the New Project Button and name the project renovate-runner. It will contain the configurations for the Renovate container.

If you are using a free account and a bot user, you need to add this user to the project by doing the following:
After the project is created, add renovatebot user by choosing a group — members — Invite Members button:

- Please make sure you are choosing the correct user and double-check the Renovate bot's username or email address!
- Add a relevant role, I suggest Maintener, as it has all the required privileges.
Token Variable
We need to grant Renovate access to our projects so that it can scan them.
Go to Renovate runner project, choose Settings — CI/CD-Variables, and click Add Variable.

When adding variable, use the following Settings:
- Type — Variable
- Environments — All
- Visibility — Masked and hidden (for your safety)
- Both Flags are unticked
- Key —
RENOVATE_TOKEN - Value—If you are a free user, use the Personal Access Token of the Renovate User bot we created earlier. If you are a premium user, use the group token to which the bot will have access that you have created earlier

GitHub Token Variable
We need to enable the possibility for Renovate to read the release notes of the versions and post them to merge requests. For that, a GitHub Personal access token is required.
You can find more about GitHub Personal Access Tokens in the Github official documentation.
For our purposes, if you are a free user and a solo developer, you can use your own GitHub account; that’s fine. But if you are an enterprise or team user, I suggest creating a GitHub account to hold this token so all required team members can access it, and it won’t be lost if you quit the project.
So, when you are logged in to GitHub, click on your avatar in the top-left corner and choose Settings. Then, in the left menu, select Developer Settings. Then, choose Personal Access Tokens—Classic and generate a token.
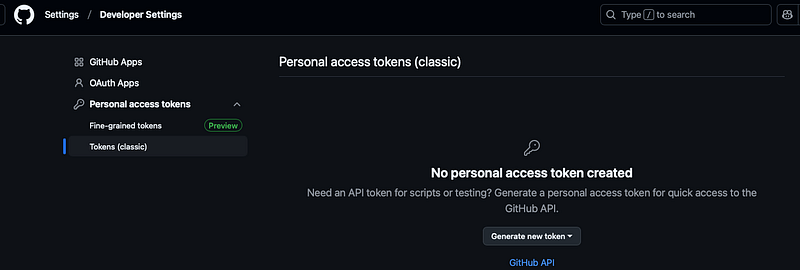
Add the following scope to the Token:
public_repo

Save this token because it will be shown only once!
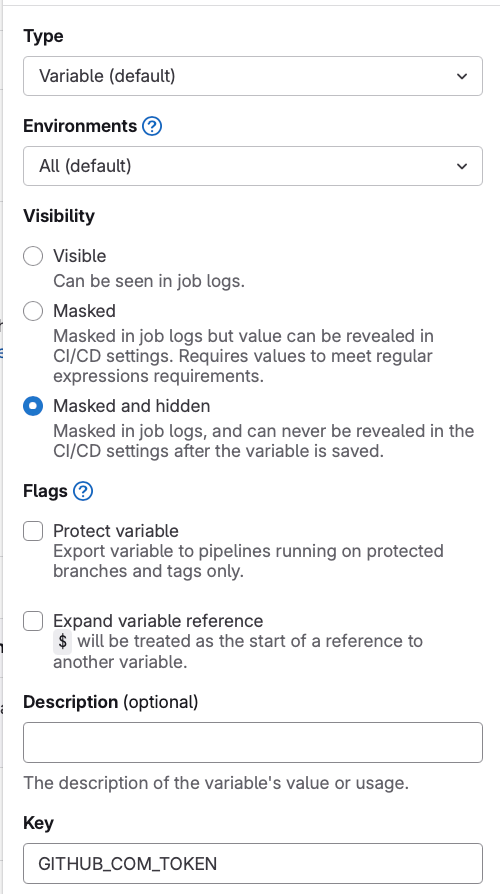
Now, let’s add it to the GitLab Renovate Runner Project. Go again to Settings — CI/CD-Variables, and click Add Variable. Choose the same settings, but the name and the value would be different, of course:
- Type — Variable
- Environments — All
- Visibility — Masked and hidden (for your own safety)
- Both Flags are unticked
- Key —
GITHUB_COM_TOKEN - Value — GitHub token that we have just created
Renovate flags configuration variable
Finally, we must decide how your bot should find projects to run against. By default, renovate won’t find any repo. You need to choose one of the existing options for RENOVATE_EXTRA_FLAGS.
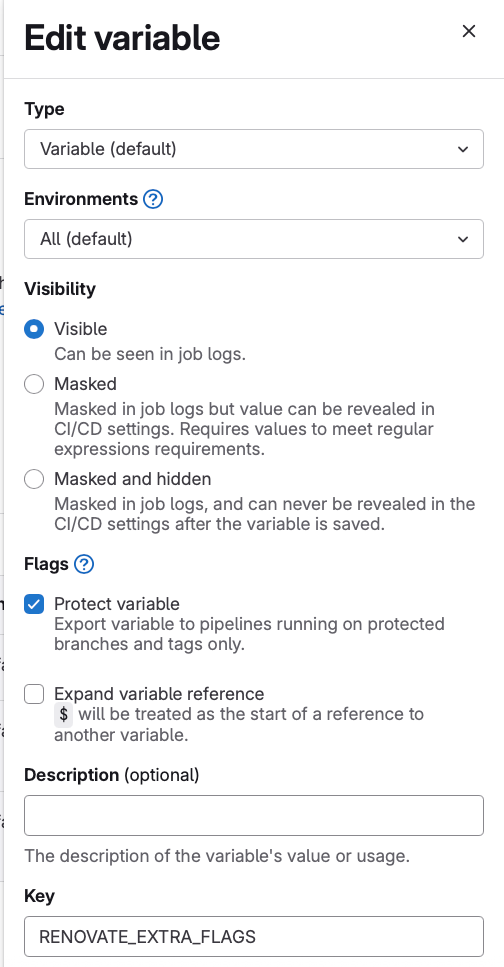
Go again to the variable creation and choose the following settings:
- Type — Variable
- Environments — All
- Visibility — Visible (the data in this variable is not sensitive )
- Both Flags are unticked
- Key —
RENOVATE_EXTRA_FLAGS - Value —
--autodiscover=true
Let’s talk a bit about the Value part. The flag I’ve added means that the bot will run against every project, which the RENOVATE_TOKEN PAT has access to and onboard any projects that don't yet have a configuration.
If you wish for your bot to run against projects that already have a renovate.json Similar config file, then add this variable: RENOVATE_EXTRA_FLAGS: --autodiscover=true --onboarding=false. This will mean no new projects will be onboarded.
However, for security reasons, I recommend applying an autodiscoverFilter value like the following so that the bot does not run on any stranger's project it gets invited to: RENOVATE_EXTRA_FLAGS: --autodiscover=true --autodiscover-filter=yourgroupname/* --onboarding=false. Check out Renovate docs for more information about GitLab security.
If you wish to specify which projects your bot runs against manually, then add this variable with a space-delimited set of project names: RENOVATE_EXTRA_FLAGS: group1/repo5 user3/repo1.
Renovate Pipeline
Now, we will configure a pipeline for the Renovate Runner project to execute an actual call to Mend Renovate.
Go to Renovate Runner — Build — Pipeline Editor and replace the initial content with the following:
include:
    - project: 'renovate-bot/renovate-runner'
      file: '/templates/renovate.gitlab-ci.yml'
This is the link to the official Renovate Runner project. It includes their pipeline file, and you will have all the updates.
Click on Commit Changes (yeah, we are violating rules here a bit, by pushing straight to main branch, but it is okay, it’s not a development project).
Configure the Schedule
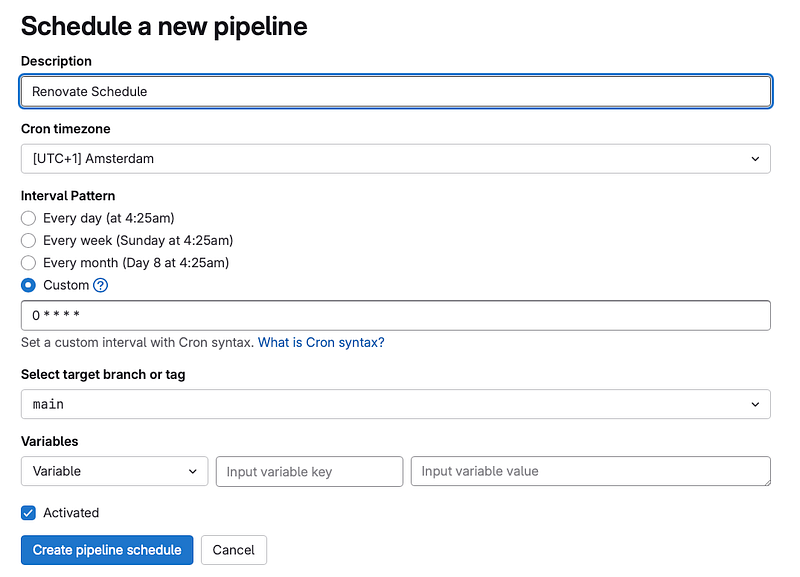
You need a schedule for Renovate to run regularly so that the pipeline we just added is triggered.
Add a schedule by going to Build > Pipeline schedules.
An official recommendation from Renovate is to run it hourly. The following runs Renovate on the zero minute every hour: 0 * * * *. You can also choose any cron expression that suits your needs. In my practice in development teams, we ran Renovate daily during non-working hours to avoid interfering with the development process.
⚠️ After creating the schedule, you need to run it manually to create an onboarding PR ⚠️
Click on the Play button and wait until the job is passed:

If everything is done correctly, in the Code-Merge Request You will see a “Configure Renovate” merge request:
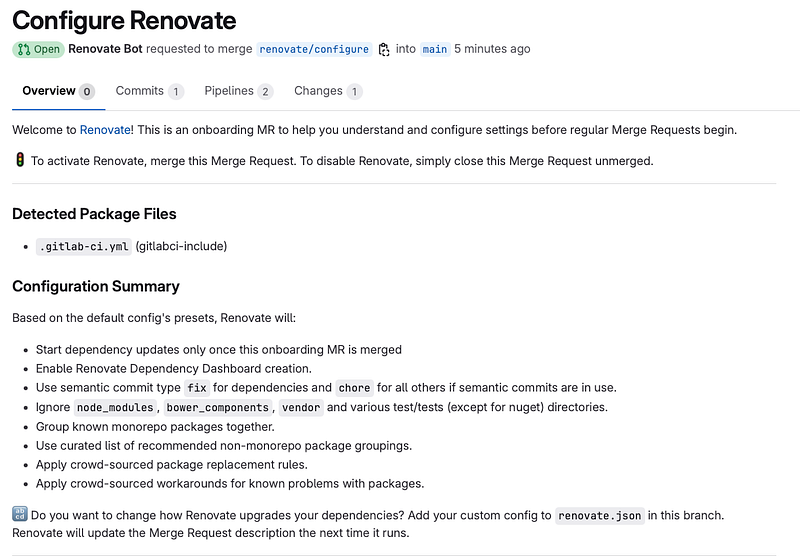
This merge request must be merged before Renovate can start working for you. Just click on merge, and you will be all set. Almost… 😅
Configuring the target projects
The default settings of Renovate are good, but I find one very important — Automerging. In all projects — big or small- there are a lot of dependencies, and it could take a lot of development time to go through all dependency upgrade requests and click on Merge. In most cases, all minor and patch dependencies are safe to auto-merge because we have tests in place, and if the build pipeline and tests are green, we can merge without the developer’s attention.
And, of course, we do not want that for major updates. As a last step, I recommend adding the following renovate.json to the root folder of projects that Renovate bot is scanning:
{
  "extends": [
    "config:base"
  ],
  "packageRules": [
    {
      "matchUpdateTypes": ["minor", "patch", "pin", "digest"],
      "automerge": true,
      "automergeType": "branch",
      "platformAutomerge": true
    }
  ]
}
With this, you enable Renovate to auto-merge changes without creating a merge request after the branch pipeline successfully passes. However, if you still want to create a merge request and then merge it, change “automergeType”: “branch” to “automergeType”: “pr” . If specific pipelines are enabled only when the merge request is created, you might want to do so.
Now, we are entirely done with adding a RenovateBot to the GitLab repository 🎉
You are amazing, and now your project will always be up-to-date!
If you enjoyed reading my article and find it helpful, please consider buying me a coffee 💗 and stay tuned to more articles about Java, tech, and AI 👩🏻💻


