
Neural Networks
Autoencoders (AE) — A Smart Way to Process Your Data Using Unsupervised Neural Networks
What is an Autoencoder, and how to build one in Python?
Intro
Autoencoders present an efficient way to learn a representation of your data that focuses on the signal, not the noise. You can use them for a variety of tasks such as:
- Dimensionality reduction
- Feature extraction
- Denoising of data/images
- Imputing missing data
This article will briefly introduce Autoencoders (AE) and dive deeper into a specific type known as Undercomplete Autoencoder, suitable for dimensionality reduction and feature extraction.
Meanwhile, my future articles will cover other varieties such as Variational, Denoising and Sparse Autoencoders. So, subscribe not to miss any of my future posts.
Contents
- Autoencoders’ place within the universe of Machine Learning algorithms
- How are the Autoencoders constructed, and how do they work?
- A complete Python example showing you how to build an Autoencoder in Python using Keras/Tensorflow.
Autoencoders’ place within the Machine Learning universe
The below chart is my attempt to categorize the most common Machine Learning algorithms.
While we often use Neural Networks in a supervised manner with labelled training data, we can also use them in an unsupervised or self-supervised way, e.g., by employing Autoencoders. Hence, I felt that the universality of Neural Networks and their unique approach to Machine Learning deserved a separate category.
The below graph is interactive, so please click on different categories to enlarge and reveal more👇.
If you enjoy Data Science and Machine Learning, please subscribe to get an email with my new articles. If you are not a Medium member, you can join here.
How are the Autoencoders constructed, and how do they work?
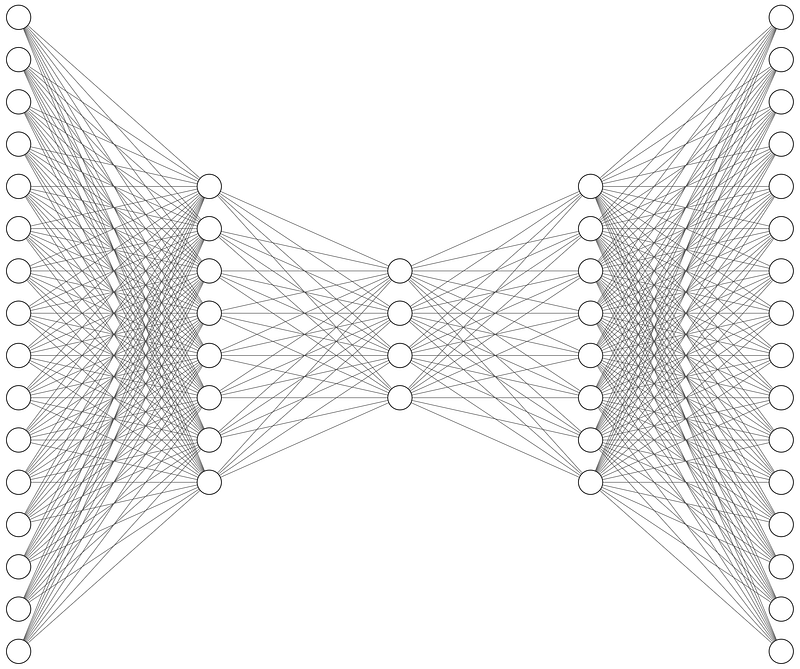
Let’s start by taking a high-level view displayed in the below diagram and review each of the parts.
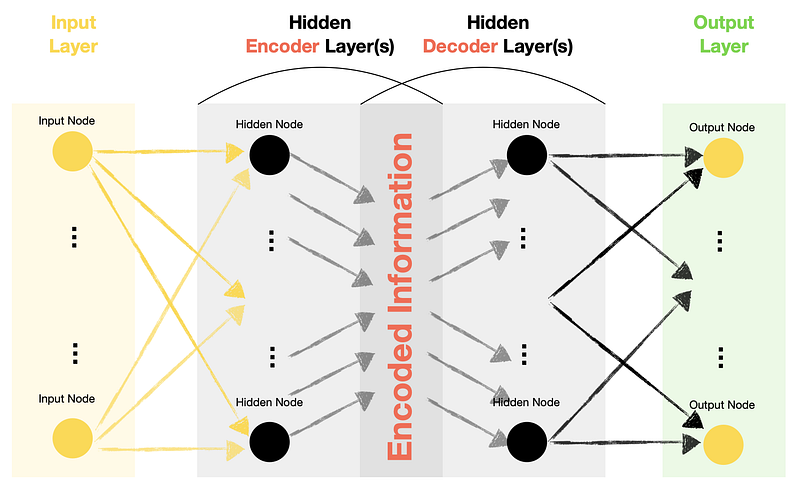
- Autoencoders have Input, Hidden and Output layers similar to that of other types of Neural Networks.
- Hidden layers of Autoencoders contain two significant parts: Encoder and Decoder.
- Output nodes within an Autoencoder match the input nodes. Hence, the Autoencoder Neural Network tries to recreate the same feature values that it receives in the Input layer.
- Since we are trying to recreate (predict) features themselves, we do not require labelled target data. Hence, we can refer to Autoencoders as Unsupervised models, although some literature refers to them as Self-Supervised models.
Types of Autoencoders
The relationship between the number of nodes in each layer determines the type of an Autoencoder.E.g.:
- Undercomplete Autoencoder (the focus of this article) — has fewer nodes (dimensions) in the middle compared to Input and Output layers. In such setups, we tend to call the middle layer a “bottleneck.”
- Overcomplete Autoencoder — has more nodes (dimensions) in the middle compared to Input and Output layers.
What is the point?
The critical question is, why would we want to pass data through the Neural Network to get to the same output values that we fed into the network as inputs?
In the case of Undercomplete Autoencoders, we are squeezing the information into fewer dimensions (hence the bottleneck) while trying to ensure that we can still get back to the original values. Therefore, we are creating a custom function that compresses the data, which is a way to reduce the dimensionality and extract meaningful information.
After training the Undercomplete Autoencoder, we typically discard the Decoder and only use the Encoder part.
Now, let’s build an Autoencoder in Python using Keras functional API to bring the examples to life.


How to build an Autoencoder in Python?
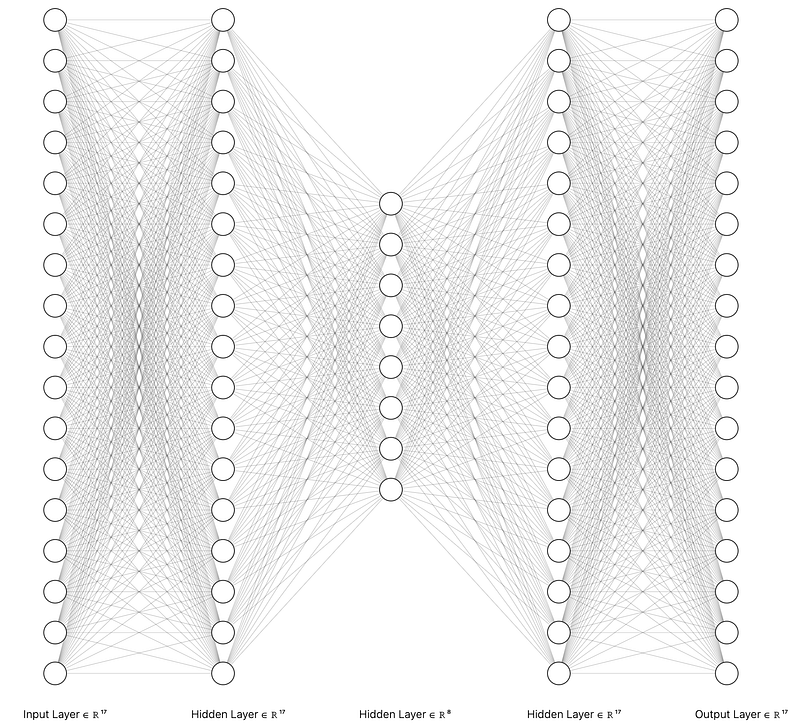
We will build an Undercomplete Autoencoder with 17 input and output nodes that we squeeze down to 8 in the “bottleneck” layer. Here is a drawing of the layers and connections of the Neural Network we are about to create:
Setup
We will need to get the following data and libraries:
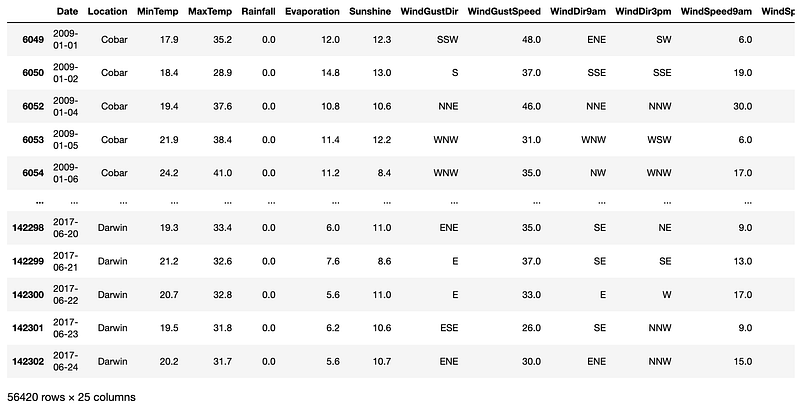
- Australian weather data from Kaggle (license: Creative Commons, the original source of the data: Commonwealth of Australia, Bureau of Meteorology).
- Pandas for data manipulation
- Matplotlib and Graphviz for some basic visualizations
- Scikit-learn library for feature scaling (MinMaxScaler) and for splitting the data (train_test_split)
- Tensorflow/Keras for building and Autoencoder Neural Network
Let’s import libraries:
The above code prints package versions I used in this example:
Tensorflow/Keras: 2.7.0
pandas: 1.3.4
sklearn: 1.0.1
matplotlib: 3.5.1
graphviz: 0.19.1
Next, download and ingest Australian weather data (source: Kaggle). Also, we perform some simple data manipulation and derive an additional variable called “RainTodayFlag.”
For a final data preparation step, we will add data into an array, apply Min-Max scaling and split it into train and test samples.
Building and training an Autoencoder model
We will use functional Keras API, which allows us to have greater flexibility in defining the model structure. It also makes it easy to discard the decoder part and only keep the encoder part after training the model.
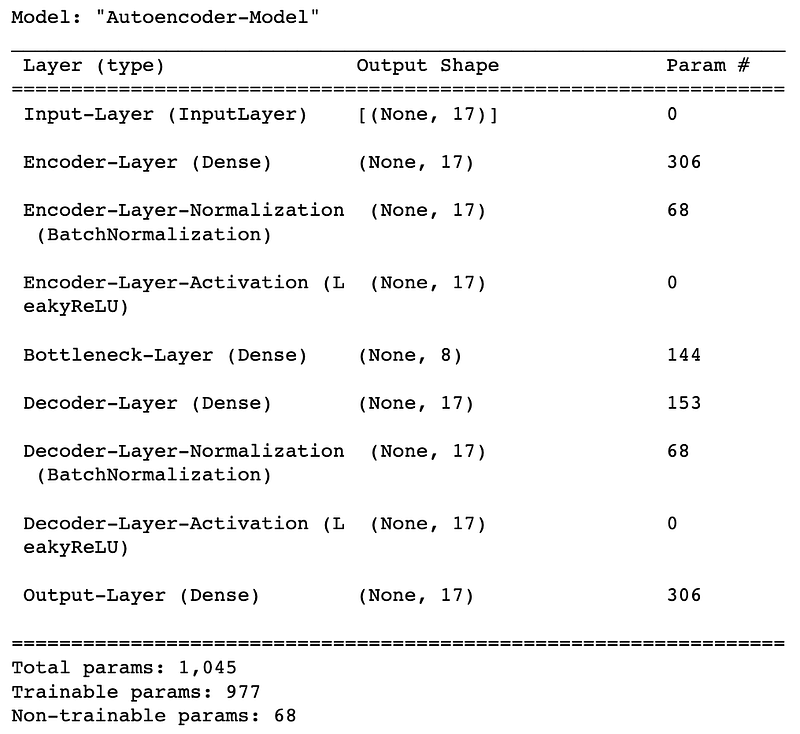
The below code assembles the model and prints the summary and the diagram. The number of features in our X_train data is 17. Hence, we will have 17 input nodes and 17 output nodes. The hidden layer will consist of an Encoder and Decoder, each with 17 nodes and a bottleneck with 8 nodes.
The above code prints two items. The first one is model summary:
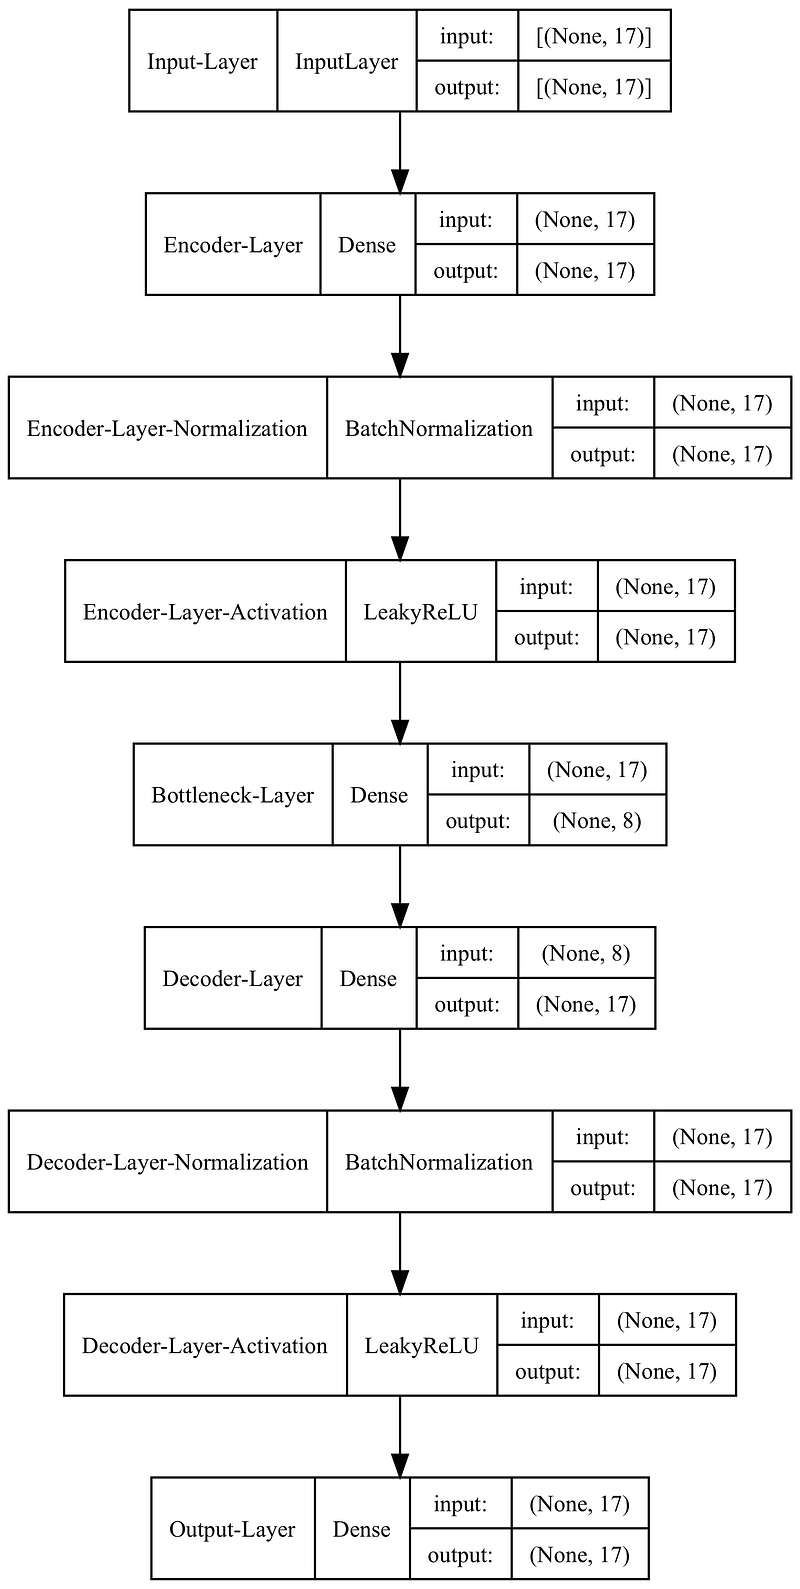
The second part is a slightly different way to look at the model structure, which some people prefer:
Note that we used batch normalization, which applies a transformation that maintains the mean output close to 0 and the output standard deviation close to 1. While it is not mandatory, it often helps with model performance.
With the model assembled, let’s train it over ten epochs and plot the loss chart.
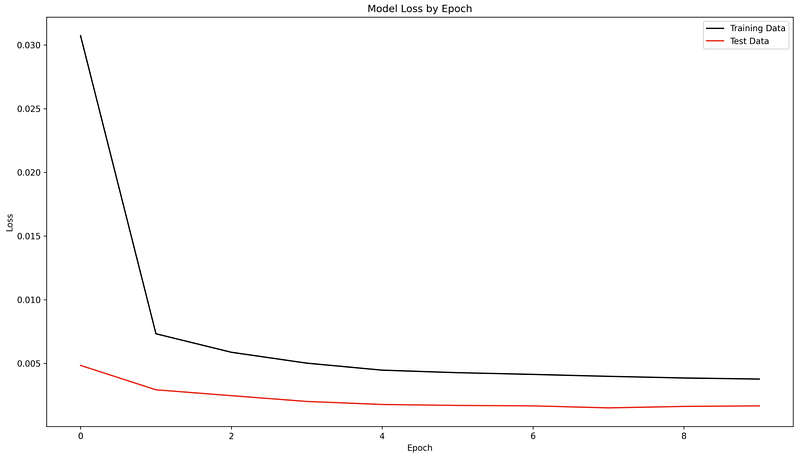
We can see that our Autoencoder model was able to reconstruct the data with only a minimal loss.
The final part separates Encoder from Decoder and saves the model.
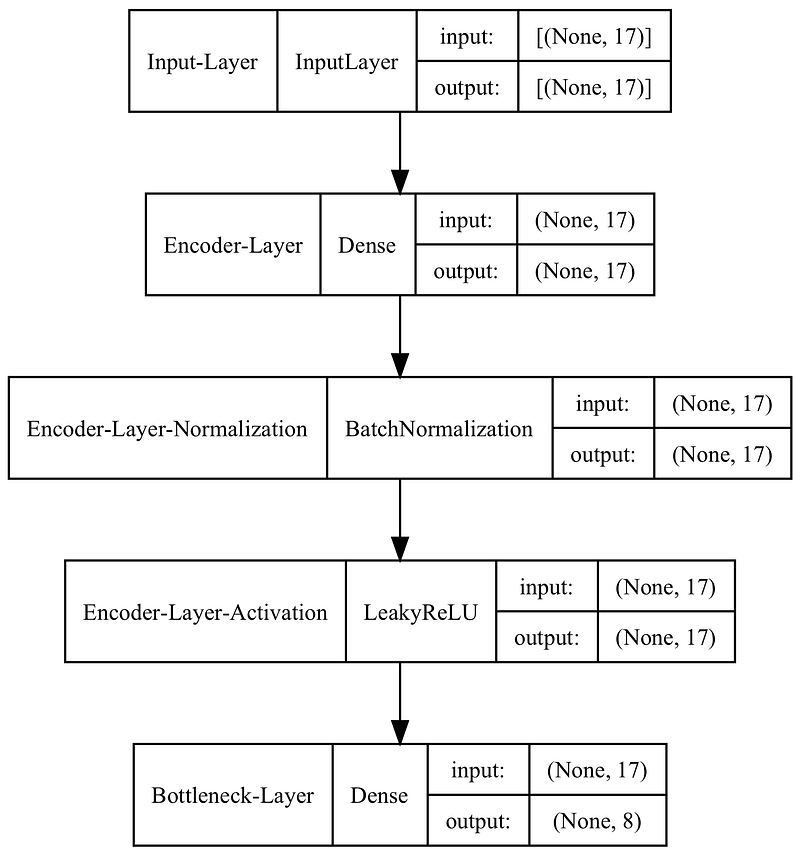
If required, you can also save the decoder part in the same way by changing inputs = bottlneck and outputs = output within the new decoder model.
Whenever you want to use the encoder model, you can load it and apply it in the way shown below, which takes 17 features (dimensions) and reduces it down to 8:
Final remarks
You have learned how to build, train and save an Autoencoder model. You can use it in various ways, from performing dimensionality reduction of your data to extracting features for supervised model training.
For your convenience, I have saved a Jupyter Notebook in my GitHub repository, which builds an Autoencoder model and uses the encoded features to train a supervised weather prediction model.
I sincerely hope that you found this article helpful. Don’t hesitate to get in touch if you have any questions or suggestions.
Cheers! 🤓 Saul Dobilas
Continue your Data Science learning journey by joining Medium with my personalized link below:


