
From 0 to 1
Auth With Firebase For Your Next.js React App In 2023
The Complete Guide To Setting Up & Managing Authentication/Authorization In Next.js 13 + React 18 With Firebase v9 & Jotai

Auth is probably one of the first milestones you tackle when starting a new project that’s going to require managing users access. It’s also one of the most stressful for me as it comes with several challenges, the main ones being security and global state management:
- 🔐 Security: You want your app to be secure to avoid malicious users from making damages. This requires to make sure you know the users interacting with your database with requests, aka authentication (do we know this person?) and authorization (does this person have the right to update that specific piece of data?). I’ve tried creating my own auth system from scratch a while back, using JWT and bcrypt, and although I had quite fun and learned a lot doing it, I sleep a lot better at nights knowing that my auth is handled by a trusted agent like Google, OAuth and consorts. That’s where Firebase comes in.
- 🌍 Global State Management: You want specific parts of your app to be aware of the user’s credentials but it’s not necessarily relevant to your entire app so you need a way to access that information from anywhere within your app in a clean, scalable and efficient way. That’s where Jotai comes in.
Those two solutions make setting up auth blazingly easy and fast as we’re going to see throughout this post. We’ll build a production-ready authentication workflow in a Next.js application, using React and TypeScript including global auth state management with Jotai.
Here’s an overview of the steps to get there:
- Set up a Next.js app with React and TypeScript.
- Use Firebase Auth with the awesome React Firebase Hooks library for sign up, sign in, sign out and auth state management. We’ll implement several sign in methods: with email and password, with external providers (ie: Google, Github, etc), and with a magic link.
- Use Firebase Functions to create a new user in our database on account creation. We’ll use Firestore for the database for the sake of the example but you could link to any backend of yours of course.
- Use Jotai to manage the state of the modal we’ll use for our auth workflow.
- Finally, we’ll deploy the app on Vercel.
Quick note before we start. We will focus only on the logic in this post so there won’t be any styling whatsoever in the code snippets to keep them more readable. I assume you’re here because you’re interested in the logic of implementing auth within your own Next.js + React application using Firebase or to use the starter repo for your next project and want to understand its concepts. I also assume you’re already familiar with React and TypeScript.
I created a repo with the final project which includes styles using Chakra UI so that you can clone and run the project and see the logic in action. So don’t hesitate to take a minute now to get that repo running to follow along.
By the way, this repo is intended as a free-to-use starter so clone/fork it and use it as you please.
Let’s get started!
#1 — Setting Up Next.js With React & TypeScript
Some of you might be wondering why we’re using Next.js and not a plain React application. There are two reasons for this.
First, there are some important gotchas that come with setting up such flow and managing state when you’re in an SSR environment like Next.js. You’ll face some errors and potential security risks that you wouldn’t meet in an CSR environment if you were to build a simple React app with Create React App or Vite for instance so I believe there’s more value in showing you how to handle this flow in an server-side rendered application.
Also, and this is reason #2, with the release of its new shining documentation react.dev, the React team has now made very clear how they think we should start React applications and it’s with frameworks. You can read their full explanation here.
React is a library. It lets you put components together, but it doesn’t prescribe how to do routing and data fetching. To build an entire app with React, we recommend a full-stack React framework like Next.js or Remix.
- The React Team
Front-end today involves much more than just HTML, CSS and some JS to animate the thing. It comes with data fetching, routing, code splitting, tree shaking, server-side rendering, static site generation and the list goes on. Whether you’re using React or any other library you’re going to face those challenges and therefore you’ll need some additional tools to tackle them. To avoid finding yourself with a huge bundle on your hands and loads of third-party libraries to manage it’s recommended now to start fresh with a framework that will offer all those options out of the box ready to use forwhen you’ll need them. Next.js is the most popular and complete React frameworks today so I think most of you will be more interested in learning in its environment (that being said, there’s Remix that I personally am very excited about which is now backed by Shopify since they acquired it, so I’ll probably write a similar post for it later).
Create Next.js App
Let’s create a new Next.js app using the TypeScript flag:
npx create-next-app@latest --typescript YOUR_PROJECT_NAME
You’ll be prompted with some configuration questions. Here are the choices I’m going for for this project:
- Install ESLint — Yes
- Install Tailwind CSS — No (I’ve used Chakra UI in the final to be faster)
- Use
src/directory - Yes - Use experimental
app/directory - No (this project aims to be production-ready so I’m passing no the “experimental” things) - Import alias:
@
After installation is finished you can cd in the folder and open it in your IDE.
Next.js Basics
To make sure we all have our basics straight, let’s recap the way routing works in a Next.js app. In the pages directory you have three files:
_app.tsx: this is the root component of your application, the parent of all your components and pages._document.tsx: this file takes care of rendering the HTML and CSS, this is where you can customize the<head/>for your entire application for instance. You can use the<Head />component fromnext/headin each single page to customize their own<head/>.index.tsx: this is the code that corresponds to your ‘/’ route, your first entry point or home if you will.
Every file and folders you put in the pages folder will be turned into a route of your application. So for instance:
pages/about.tsxwill show onwww.yourdomain.com/aboutpages/posts/index.tsxwherepostsis a folder inside thepagesfolder will show onwww.yourdomain.com/postspages/posts/[id].tsxwill create a dynamic route and match the id of a post in the URL, meaning it will show onwww.yourdomain.com/posts/this-is-a-postand onwww.yourdomain.com/posts/this-is-another-post
App Structure
Ok, now that we have those basics out of the way, let’s discuss shortly about what we’re going to build. We’re going to need a few components for our auth flow which will take place within a modal. We’ll handle the open/close state of the modal (where this flow will take place) at the global level using Jotai since you’ll want to trigger that modal from different place within the app (from a navbar, a login page, etc).
We’ll also create an example page that will only be accessible by authenticated users.
Our final folder structure will look like this:
functions/
src/
  |_ components/
    |_ SignUp.tsx
    |_ SignInWithEmailPassword.tsx
    |_ SignInWithProvider.tsx
    |_ SignInWithMagicLink.tsx
    |_ ResetPassword.tsx
    |_ AuthButtons.tsx
    |_ AuthModal.tsx

  |_ pages/
    |_ _app.tsx
    |_ _document.tsx
    |_ index.tsx
    |_ auth-required-page.tsx
    |_ sign-in-with-link.tsx

  |_ store/
    |_ authModalAtom.ts

  |_ firebase/
    |_ app.ts
Now that we have a better idea of where we’re heading, let’s move to next important piece of our app: Firebase.
#2 — Firebase
Needless to say, you need a Firebase account. If you don’t have one, start by creating one then head over to the Firebase console.
Here, create a new project:
- Click on the “+ Add project” tile
- Choose a name for your project (you can also modify the project id below the name input)
- Enable or not Google Analytics for your project. I disabled it since I won’t be using it for this project.
- Click “Create project”
After a few minutes your project we’ll be ready to use and you’ll be redirected to its main page:
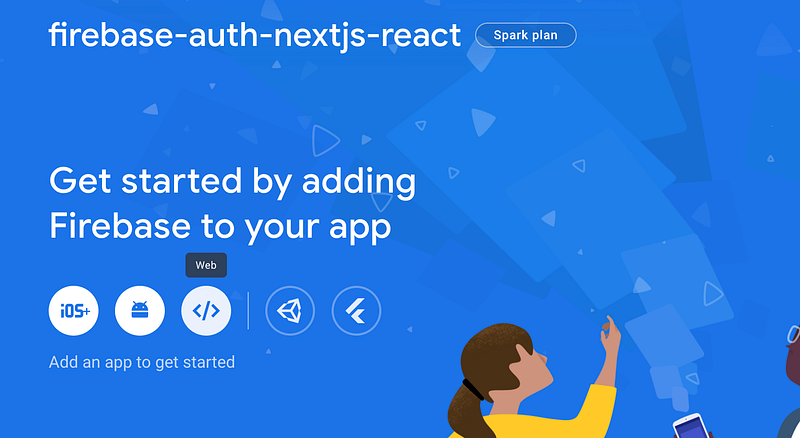
Click on the “Web” icon (since we’re building a Web app) and pick a name for your app. This name won’t be visible for users, only to you throughout the console. I kept the same same as previously for consistency sake.
You have the option to set up Firebase Hosting, I didn’t check the box as I won’t need hosting for this project (let me know in the comments if you’d be interested in learning about hosting with Firebase).
Then, you can click on “Register app” and you’ll be provided with the Firebase configuration for your application. Copy it, we’re going to use it in a few seconds.
Now you can head back to your terminal and install Firebase:
npm install firebase
Finally, go back to your code editor and let’s configure Firebase in our app.
Create a new folder within src called firebase and within it create a file called app.ts (or whatever you want to call it) and paste the configuration code provided by Firebase after registering your app. We’re going to initialize our Firebase client app in there.
Configuration Variables
Create a .env.local file at the root of your project (you can use the a .env.example file I created in the repo) and turn each of your project’s config object values in environment variables prefixed with NEXT_PUBLIC_ as required in Next.js:
NEXT_PUBLIC_FIREBASE_API_KEY=YOURS
NEXT_PUBLIC_FIREBASE_AUTH_DOMAIN=YOURS
NEXT_PUBLIC_FIREBASE_PROJECT_ID=YOURS
NEXT_PUBLIC_FIREBASE_STORAGE_BUCKET=YOURS
NEXT_PUBLIC_FIREBASE_MESSAGING_SENDER_ID=YOURS
NEXT_PUBLIC_FIREBASE_APP_ID=YOURS
Those will become process.env.NEXT_YOUR_ENV_VAR where the value is needed in the app.
Initialize Firebase for SSR
Firebase indicates that to initialize our Firebase client we need to use the initializeApp() method with our config object, like so:
const app = initializeApp(firebaseConfig);But, since we’re using Next.js our app will be rendered (and Firebase client initialized) server-side and then send to the client where client-side rendering will take over. And if the client calls this initializeApp(config) method again you’ll have an error. Therefore, we need to check is we have a running Firebase client app before calling this method:
const app = !getApps().length ? initializeApp(firebaseConfig) : getApp()We’re using getApps() which returns an array with all the initialized applications. If its length is 0 (which is falsy) then we know we don’t have a Firebase app already initialized and we can call the getApp() (note that if you have several apps in the same Firebase project you’ll need to pass the name of the app to that getApp function).
Set Up Firebase Services
Finally, we’re going to use several services from Firebase: Auth and Firestore (if you’re asking a profile picture to your user you’ll also need Storage to store the picture file, but we’re not covering that today).
In the end, your firebase/app.tsx file will look like this:
import { getApp, getApps, initializeApp } from 'firebase/app'
import { getAuth } from 'firebase/auth'
import { getFirestore } from 'firebase/firestore'

// Firebase configuration
const firebaseConfig = {
  apiKey: process.env.NEXT_PUBLIC_FIREBASE_API_KEY,
  authDomain: process.env.NEXT_PUBLIC_FIREBASE_AUTH_DOMAIN,
  projectId: process.env.NEXT_PUBLIC_FIREBASE_PROJECT_ID,
  storageBucket: process.env.NEXT_PUBLIC_FIREBASE_STORAGE_BUCKET,
  messagingSenderId: process.env.NEXT_PUBLIC_FIREBASE_MESSAGING_SENDER_ID,
  appId: process.env.NEXT_PUBLIC_FIREBASE_APP_ID,
}

// Initialize Firebase for SSR
const app = !getApps().length ? initializeApp(firebaseConfig) : getApp()

// Initialize Firebase services
const firestore = getFirestore(app)
const auth = getAuth(app)

// Expose the instances we'll need
export { app, firestore, auth }
Notice that we’re exporting our app and the instances for the Auth and Firestore services. We’ll be needing them each time we use one of those services.
Ok, now our app is connected to Firebase and we can move on to create the first pieces of our auth system: signing up & signing in.
Firebase Auth is really cool because it offers several methods for signing in users. We’re going to see three methods:
- with email an password (the classic),
- with external providers (Google and co),
- with a magical link (the coolest).
The first one requires your user to create and account with his email and define a password. Let’s start with that.
#3 — Signing Up With Email & Password
Create a SignUp.tsx component in our app src/components folder. In there, we’ll have three inputs and a submit button. And we’ll keep track of the form values with useState and simple handleChange function plugged to each input’s onChange event:
import { useCreateUserWithEmailAndPassword } from 'react-firebase-hooks/auth'
import { auth } from '@/firebase/app'

const SignUp: React.FC = () => {
	const [signUpForm, setSignUpForm] = useState({
    email: '',
    password: '',
    confirmPassword: '',
  })

const handleChange = (event: React.ChangeEvent<HTMLInputElement>) => {
    setSignUpForm((prev) => ({
      ...prev,
      [event.target.name]: event.target.value,
    }))
  }

const handleSubmit = () => {}

return (
    <form onSubmit={handleSubmit}>
      <Input
        required
        name="email"
        placeholder="email"
        type="email"
        onChange={handleChange}
      />
      <Input
        required
        name="password"
        placeholder="password"
        type="password"
        onChange={handleChange}
      />
      <Input
        required
        name="confirmPassword"
        placeholder="Confirm password"
        type="password"
        onChange={handleChange}
      />

      <Button type="submit">
        Sign Up
      </Button>
    </form>
  )
}

export default SignUp
React Firebase Hooks
Now, to sign up our users with their email and password, we have two options: using Firebase native methods or using the library React Firebase Hooks. I always try to have the least amount of external dependencies as possible but when I feel the library provides a wheel that I’m going to reinvent anyway I feel it’s a good bargain. That’s the case here. The API provided by Firebase is great. It’s clear and declarative. That being said React Firebase Hooks takes it a step further and provides you with all the surrounding parts that you would write yourself eventually, to handle loading, errors and so forth for instance.
So let’s go ahead and install it, hopefully you’ll see why I think it’s worth it when we will implement it:
npm i react-firebase-hooksNow, to sign up our user, we can use the useCreateUserWithEmailAndPassword(auth) hook, passing it our auth instance (the one we exported from our firebase/app.tsx file remember) along with the email and password of our user.
Here’s what our handleSubmit function would look like with some pre-call checks:
const [error, setError] = useState('')
const [createUserWithEmailAndPassword, user, loading, fbError] =
    useCreateUserWithEmailAndPassword(auth)

const handleSubmit = (e: React.FormEvent<HTMLFormElement>) => {
  e.preventDefault()

  // Reset the error before trying to submit the form
  if (error) setError('')

  // Check passwords match
  if (signUpForm.password !== signUpForm.confirmPassword) {
    setError('Passwords do not match')
    return
  }

  // Check password format
  const passwordRegex =
    /^(?=.*\d)(?=.*[a-z])(?=.*[A-Z])(?=.*[a-zA-Z]).{8,256}$/gm

  if (!passwordRegex.test(signUpForm.password)) {
    setError(
      'Minimum eight characters, at least one uppercase letter, one lowercase letter, one number and one special character.'
    )
    return
  }

  createUserWithEmailAndPassword(signUpForm.email, signUpForm.password)
}
As you can see, I’ve set up an error state in addition to the error returned by the useCreateUserWithEmailAndPassword() hook. That’s because the error returned from the hook is the Firebase error and I want to have my own errors from the validation checks done before submitting.
Quick note before moving to the next sign up method. As you can see the hook returns some useful values we can use to improve our user experience by providing information to our user:
- Loading We have a loading value that we can use to show a loader to our user when they click the submit button:
<Button type="submit" isLoading={loading}>
  Sign Up
</Button>- Error We have the Firebase error as I mentioned above so we can show it to our user:
{(error || fbError) && (
  <Text>{error || fbError?.message}</Text>
)}
Ok now our users can create an account if they want. Let’s now see how they would log in with that newly created account and also how they could sign in without creating an account.
#4 — Sign In
If you look at the list of auth hooks from Firebase React Hooks you’ll see you all the sign-in method you can use.
4.1. Signing In With Email & Password
To be able to use a sign in method we need to enable it in our project in Firebase. Head over to your Firebase console and go to the Authentication space (you can use the menu on the left to access it). Once there, click on the “Get started” button to find yourself in front of the sign-in methods options:
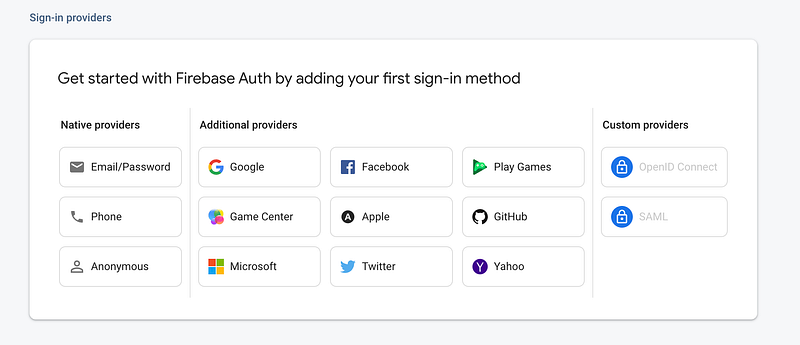
Click on the “Email/Password” button and enable the method:
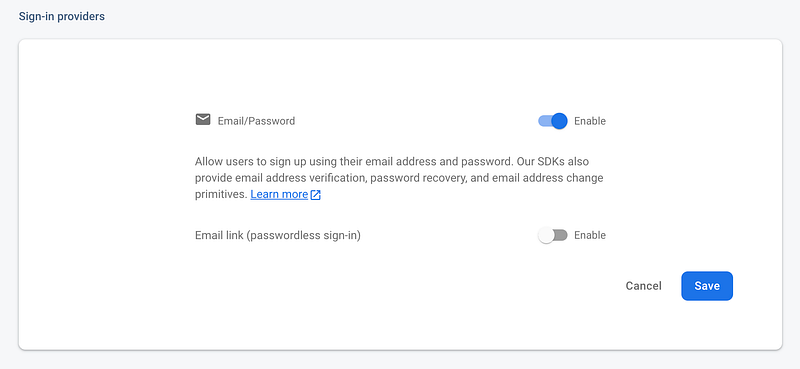
You see the “Email link” passwordless option there. Let’s hold on to that for now as we’ll cover it below when we’ll set up sign-in with a magic link.
Now we can implement this sign-in method in our app. Let’s create a SignInWithEmailPassword.tsx component in our src/components folder. Create two inputs to get the user’s email and password and a submit button. We’ll handle the change of the form values with useState and use the useSignInWithEmailAndPassword(auth) hook from React Firebase Hooks, passing it our auth instance as previously:
import { useSignInWithEmailAndPassword } from 'react-firebase-hooks/auth'
import { auth } from '@/firebase/app'

const SignInWithEmailPassword: React.FC = () => {
  const [signInForm, setSignInForm] = useState({
    email: '',
    password: '',
  })
  const [signInWithEmailAndPassword, user, loading, fbError] =
    useSignInWithEmailAndPassword(auth)
  const handleSubmit = (e: React.FormEvent<HTMLFormElement>) => {
    e.preventDefault()

    signInWithEmailAndPassword(signInForm.email, signInForm.password)
  }

  const handleChange = (event: React.ChangeEvent<HTMLInputElement>) => {
    setSignInForm((prev) => ({
      ...prev,
      [event.target.name]: event.target.value,
    }))
  }

  return (
    <form onSubmit={handleSubmit}>
      <Input
        required
        name="email"
        placeholder="email"
        type="Your email..."
        onChange={handleChange}
      />
      <Input
        required
        name="password"
        placeholder="password"
        type="Choose a strong password..."
        onChange={handleChange}
      />

      {fbError && <Text>fbError.message</Text>}

      <Button type="submit" isLoading={loading}>
        Sign In
      </Button>
    </form>
  )
}

export default SignInWithEmailPassword
4.2 Signing In With External Providers
Firebase offers quite a lengthy choice of providers for signing in: Apple, Facebook, Github, Google, Microsoft, Twitter and Yahoo. Let’s go with Google for our example since it’s probably the most widely used.
Like we did before, we need to enable the method in our Firebase console. Head back to your Authentication space, in the “Sign-in method” tab and click “Add new provider”. There select “Google”. You’ll have two informations to provide here:
- A public-facing name for your project: this name will be displayed, for example, in the transactional emails your users will receive (ie: the reset password email). This should be the public name of your app so that your users know who their receiving this email from.
- A support email address: this email will be displayed, for example, in the email your users will receive when they authenticate with Google. Therefore, you might want to have a professional email to use for this (ie: [email protected]).
Now that it’s set up, we can implement our “Sign In with Google” button. Since we might want to add more external providers later on, we’ll create a dedicated component for this. Create a SignInWithProvider.tsx file inside your components folder. In there, we’ll have a simple button and plug the signInWithGoogle() method returned by the useSignInWithGoogle(auth) hook from React Firebase Hooks:
import { useSignInWithGoogle } from 'react-firebase-hooks/auth'
import { auth } from '@/firebase/app'

const SignInWithProvider: React.FC = () => {
  const [signInWithGoogle, user, loading, fbError] = useSignInWithGoogle(auth)

  return (
    <Flex>
      <Button isLoading={loading} onClick={() => signInWithGoogle()}>
        Continue with Google
      </Button>

      {fbError && <Text>{fbError.message}</Text>}
    </Flex>
  )
}

export default SignInWithProvider
4.3. Signing In With A Magic Link
Finally, we’ve reach the method that I was most looking forward to. We see more and more password-less methods being used for auth now and that’s a great news. Most users use poorly defined passwords which puts them at risk. Asking for a password to users when they’re just starting to use your app is also a potential blocker. It creates friction in users who can feel discourage by the need to find yet another strong password that they think they’ll remember or that will have to store safely.
With that in mind, offering a password-less option for your users to access your app improves user experience and might impact your signup rate.
You can read more about this method in the Firebase docs.
Let’s go back to the Firebase console to enable the method. In the “Sign-in method” tab, click on the “Email/Password” method you’ve enabled before and, in there, enable the “Email link (password-less sign-in)”.
The code for this component looks very much like the one we’ll use for the reset password in the way that it asks the user for their email. Behind the scenes there is some additional work for you to do. The method requires an ActionCodeSettings object. This object provides Firebase with instructions on how to construct the log in link. It takes the following properties:
url: This is the URL you want to redirect your user to to complete sign-in. This is also the deep link for mobile redirects. The domain (www.example.com) for this URL must be whitelisted in the Firebase Console.handleCodeInApp: This must be set totruebecause the the sign-in operation must always be completed within the app because at the end of the flow the user is expected to be signed in and their their Auth state persisted within the app. Unlike other out of band email actions like a password reset.iOS&android: The apps to use when the sign-in link is opened on an Android or Apple device. We won’t use that since we don’t have mobile apps for this project. But if you do, you’ll want to check the doc to configure Firebase dynamic links for mobile apps.dynamicLinkDomain: this is for projects where multiple custom dynamic link domains are defined, which is not our case so we won’t have that either.
How to define our `ActionCodeSettings` URL property?
To understand better how this URL will be used it’s useful to read the doc and especially the section on the security concerns around this sign-in flow:
“To prevent a sign-in link from being used to sign in as an unintended user or on an unintended device, Firebase Auth requires the user’s email address to be provided when completing the sign-in flow. For sign-in to succeed, this email address must match the address to which the sign-in link was originally sent.”
So the link we specify here needs to be a route in our app where Firebase will be able to check that email match for Firebase to complete the sign-in flow.
This could be cumbersome for our users so we want to implement a way for our users that will stay in the same device (which will probably be most users) to not have to enter their email again. We should not pass the user’s email as param in the URL we pass to our ActionCodeSettings object since this may enable session injections. Instead we’ll follow Firebase’s recommendation and use localStorage:
- We’ll add the user’s email to localStorage when they submit their request for a magic link.
- The user will receive a link from Firebase over email.
- This link will redirect them to the page we’ll have specified as
urlin ourActionCodeSettingsobject. - Their we’ll check localStorage for the email. If there’s one, we’ll pass it to Firebase for match check, otherwise we’ll request the email to the user explaining that we need to confirm their identity.
- Finally, when sending the check request to Firebase we’ll remove the from localStorage.
Other than that, the link we specify in ActionCodeSettings should be an HTTPS URL to avoid it link being potentially intercepted by intermediary servers in production.
During development I’ve been using the following URL successfully:
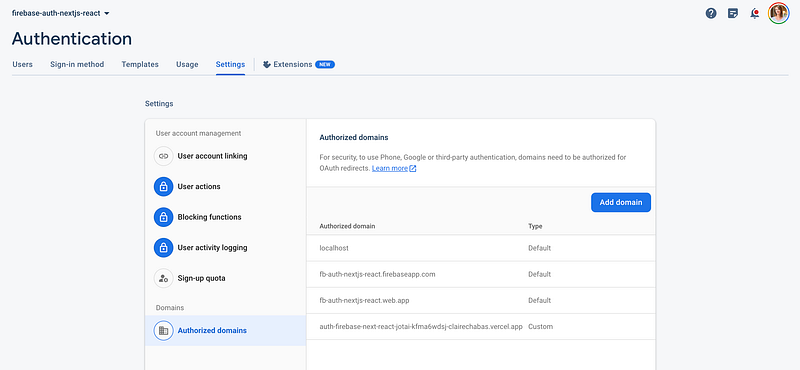
http://localhost:3000/sign-in-with-linkNote, that when you’ll want to use that code in production you’ll need to do two things:
- Use an HTTPS URL
- Add that URL to the list of authorized domains in your Firebase Authentication dashboard (in the “Settings” tab):
Lastly, some potential gotcha to be aware of: if you ever need to change this URL but that your old URL is being cached by Firebase you’ll need to indicate to Firebase that there’s a new version of the URL to use, and you can do that by adding a version parameter to your URL like so:
http://localhost:3000/sign-in-with-link?version=2Now, that we understand better how this feature’s flow is going to work, let’s implement the first part of it: the component that will send the request for the magic sign-in link.
Sending Sign-In With Magic Link Request
First, let’s create a SignInWithMagicLink component. In there, we’ll have a form with a single input to ask the user for their email and we’ll handle the change with useState.
The hook we need from React Firebase Hooks is useSendSignInLinkToEmail(auth). And within our handleSubmit we’ll set an isSuccess boolean to true if our call to that method was successful so we can inform our user that they can check their inbox.
Finally, we’ll store the user’s email in localStorage if the request
import { useSendSignInLinkToEmail } from 'react-firebase-hooks/auth'
import { auth } from '@/firebase/app'

const SignInWithMagicLink: React.FC = () => {
  const [sendSignInLinkToEmail, sending, fbError] =
    useSendSignInLinkToEmail(auth)
  const [email, setEmail] = useState('')
  const [isSuccess, setIsSuccess] = useState(false)
  const setAuthModalState = useSetAtom(authModalState)

  const actionCodeSettings = {
    url: process.env.NEXT_PUBLIC_FIREBASE_MAGIC_LINK_CONTINUE_URL as string,
    handleCodeInApp: true,
  }

  const handleSubmit = async (e: React.FormEvent<HTMLFormElement>) => {
    e.preventDefault()

    await sendSignInLinkToEmail(email, actionCodeSettings)

    // Temporarily store user's email in localStorage for match-check on sign-in page
    window.localStorage.setItem('emailForSignIn', email)

    setIsSuccess(true)
  }

  return (
    <Flex>
      <Text>Sign In With Magic Link</Text>

      {isSuccess ? (
        <Text>Check your email 💌</Text>
      ) : (
        <>
          <Text>
            Enter your email and we will send you a link to sign in.
          </Text>
          <form onSubmit={handleSubmit}>
            <Input
              required
              type="email"
              name="email"
              placeholder="email"
              onChange={(e) => setEmail(e.target.value)}
            />

            {fbError && <Text>{fbError.message}</Text>}

            <Button type="submit" isLoading={sending}>
              Send Link To Sign-In
            </Button>
          </form>
        </>
      )}
    </Flex>
  )
}

export default SignInWithMagicLink
Landing Page To Sign In With Magic Link
Next, we need to create the page for our users to land on after clicking their magic link. For that we’ll create a new file in our pages folder and name it as per the name specified in the url we passed in our ActionCodeSettings object. So sign-in-with-link.tsx in our case.
In there, we first need to check if we have an email in localStorage. We’ll do this check in a useEffect on component mount. If we don’t have any email in localStorage we’ll display an input to our user asking them to confirm their email.
We’ll create a function to take care of the call to the signInWithEmailLink Firebase method. This method takes two arguments: the email to check (which will either come from localStorage or from the user’s input entry) and the current URL which Firebase needs to perform the match check.
Finally, we’ll clear localStorage and redirect our user to the home page.
import { useSignInWithEmailLink } from 'react-firebase-hooks/auth'
import { auth } from '@/firebase/app'
import { useRouter } from 'next/router'
import React, { useEffect, useState } from 'react'

const SignInWithLinkPage: React.FC = () => {
  const [signInWithEmailLink, user, loading] = useSignInWithEmailLink(auth)
  const [email, setEmail] = useState('')
  const router = useRouter()

  const handleSubmit = async (e: React.FormEvent<HTMLFormElement>) => {
    e.preventDefault()

    signInAndRedirect(email)
  }

  const signInAndRedirect = async (email: string) => {
    try {
      const currentUrl = `${window.location.origin}${router.asPath}`

      await signInWithEmailLink(email, currentUrl)

      // Clean localStorage
      window.localStorage.removeItem('emailForSignIn')

      // Redirect user to home page
      await router.push('/')
    } catch (error) {
      console.log('Error in signInAndRedirect: ', error)
    }
  }

  useEffect(() => {
    const emailFromStorage = window.localStorage.getItem('emailForSignIn')

    if (emailFromStorage) {
      signInAndRedirect(emailFromStorage)
    }
  }, [])

  return (
    <Flex>
      <Heading>Signing In With Magic Link</Heading>

      {loading ? (
        <Text>⏱️ Wait while we're authenticating you...</Text>
      ) : (
        <>
          <Text>
            {`Please, confirm the email you used to request this sign-in link
             so we can confirm your identity.`}
          </Text>
          <form onSubmit={handleSubmit}>
            <Input
              required
              type="email"
              name="email"
              placeholder="Enter email used to sign-in..."
              onChange={(e) => setEmail(e.target.value)}
            />

            {fbError && <Text>{fbError.message}</Text>}

            <Button type="submit" isLoading={loading}>
              Confirm Email & Log In
            </Button>
          </form>
        </>
      )}
    </Flex>
  )

}
export default SignInWithLinkPage
And there we have it! A full sign-in flow with three different methods.
Let’s see quickly the reset password flow so we can move on to the auth management flow.
#5 — Reset Password
This one is going to be event simpler than the previous ones. Create a ResetPassword.tsx file in your components folder. This component is going to work exactly like the one we just created to sign-in with a magic link, you just need to change the hook to useSendPasswordResetEmail(auth):
import { useSendPasswordResetEmail } from 'react-firebase-hooks/auth'
import { auth } from '@/firebase/app'

const ResetPassword: React.FC = () => {
  const [email, setEmail] = useState('')
  const [isSuccess, setIsSuccess] = useState(false)
  const [sendPasswordResetEmail, sending, fbError] =
    useSendPasswordResetEmail(auth)

  const handleSubmit = async (e: React.FormEvent<HTMLFormElement>) => {
    e.preventDefault()

    await sendPasswordResetEmail(email)

    setIsSuccess(true)
  }

  return (
    <Flex>
      <Text>Reset your password</Text>

      {isSuccess ? (
        <Text>Check your email :)</Text>
      ) : (
        <>
          <Text>
            {`Enter the email associated with your account and we'll
            send you a reset link.`}
          </Text>
          <form onSubmit={handleSubmit}>
            <Input
              required
              type="email"
              name="email"
              placeholder="email"
              onChange={(e) => setEmail(e.target.value)}
            />

            {fbError && <Text>{fbError.message}</Text>}

            <Button type="submit" isLoading={sending}>
              Reset Password
            </Button>
          </form>
        </>
      )}
    </Flex>
  )
}
export default ResetPassword
And that’s about it!
#6 — Sign Out
The simplest of all! We’ll display our log out button on our home page when the user signed in. For this we’ll need our user state using useAuthState(auth) and the signOut(auth) from React Firebase Hooks:
{user ? (
  <Button onClick={() => signOut(auth)}>Log Out</Button>
) : (
  {/* Show the auth buttons */}
  [...]
)}
#7 — Adding/Removing User In DB On Creation/Deletion With Cloud Functions
As I mentioned at the beginning of this post, Firebase Auth is focused on the auth flow and doesn’t take care of creating users in any database. In any application, you’re going to want to add information on a user object, like contact information for a checkout flow, profile picture, groups a user has subscribed to if you’re in a social applications, these kind of informations.
So what we want to do is watch or listen for all new user sign up in Firebase Auth and to create a new entry for that user in database. That’s very easy to do with Firebase Cloud Functions, so let’s take care of that now.
Set Up Cloud Functions
First, head over to your Firebase console to enable Cloud Functions. In the left menu, in the “Build” section, click on “Functions”.
Here you’ll see that you need to upgrade your project to move to a “pay as you go” billing plan. This is because Functions billing is based on requests so you’ll need to add a credit card but don’t worry about getting billed, Firebase free tier has a very high threshold. For instance, you can invoke up to 2 million Cloud Functions per month.
Still, make sure you don’t leak your Firebase config info and that your Firebase security rules are set up correctly (we’ll tackle that at the end of this project).

Click on “Upgrade project” and follow the steps. You’ll be asked to define a budget. I’ve put in €1. You get notified over email when your project starts billing and that the billing reach 50% of your budget (€0.50 in my case), then again at 90% (€0.90), and at 100% (€1.00). In a real life scenario this gives you time to take the necessary actions before going over budget.
Once your done the “Upgrade project” button will change to “Get started”. Click on it and let’s start.
You’ll be prompted to install the Firebase Tools, this gives you access to Firebase CLI globally on your machine:
npm install -g firebase-tools
You might get an error saying you don’t have permissions, in which case just add sudo at the beginning of that command.
🦸♀️ sudo stands for “Super User DO” and gives you the super power to execute a command at the system (root) level.
Once its done, click “Continue” and now we need to initialize Firebase Functions in our project. For this run the following command in your terminal at the root of your project:
firebase initYou’ll be prompted for a few things, let go over each:
- First, the Firebase services you want to initialize. We only need Functions so select it by hitting the space key and click Enter.
- Next, you can either select an existing project or create a new project. We want to select our existing project so hit Enter on that and then select your project from the list that will appear.
- Whether you want to us JS or TS for your functions. We’re using TypeScript so select that and hit Enter.
- Then, if you want to use ESLint, hit “y” for “yes” and “n” for “no”. You do you here. I selected yes but modified the ESLint config file that Firebase create to use my own linting rules. This is not the topic of this post but if you’re interested in learning about linting let me know :)
- Finally, select yes to install the dependencies now so we don’t have to do it ourselves.
The set up takes a few minutes and when it’s done you should have a brand new functions folder at the root of your project with its own package.json and dependencies. This is your very own serverless backend. In here you can write functions that you want to run on Google’s servers and deploy them with the firebase deploy command.
You also have two other new files at the root of your project:
.firebaserc: this is a configuration file used by Firebase to let you specify different projects for different environments. We only have a “default” project for now but we could add “development”, “preprod”, and “prod” projects. By default, the commandfirebase deploywill deploy the project indicated as “default” in the “projects” part of this file. If you had more entries in this file you could deploy the one you want by using the—projectflag like this for instance:firebase deploy —project preprod.firebase.json: this is also a configuration file but for hosting and other Firebase services this time. There’s a lot you can configure here but it’s related to services we won’t need so I won’t get into that.
Writing Our Cloud Functions
Let’s now write our functions. We can do that right in our index.tsx file in our functions directory. What we want to do is trigger a function on user creation.
First, we need to initialize an admin app instance that will let us make changes to our Firestore database. And we’ll need the functions module from Firebase Functions.
Create User In Firestore On Sign Up
For this one, we’ll use the functions.auth.user().onCreate() method. This takes a callback that will be triggered when a user is created through Firebase Auth.
In this callback, we have access to a bunch of information on the newly created user so what we’ll do is create a newUser object to only keep what we need in our DB and then create a new document (Firestore is NoSQL database which works with collections and documents which corresponds roughly to tables and rows in SQL databases) in our “users” collection. This collection doesn’t exist yet but we don’t have anything to do it will be created automatically the first time we try to create a document in it.
Here is the final code to do this:
import * as admin from 'firebase-admin'
import * as functions from 'firebase-functions'

// Firebase Admin SDK to access Firestore.
admin.initializeApp()
const db = admin.firestore()

/**
 * Create user in Firestore on user account creation through Firebase Auth.
 */
export const createUser = functions.auth
  .user()
  .onCreate(async (user) => {
    /**
     * Cherry pick user data to only send
     * what we actually need to the client.
     */
    const newUser = {
      uid: user.uid,
      email: user.email,
      displayName: user.displayName,
      providerData: user.providerData,
    }

    db.collection('users').doc(user.uid).set(newUser)
  })
Remove User From Firestore On User Account Deletion
As we would expect from an API as declarative as that of Firebase, we’ll use the functions.auth.user().onDelete() method for this. It also takes a callback that will be triggered when a user is deleted through Firebase Auth.
/**
 * Delete user in Firestore on user account deletion through Firebase Auth.
 */
export const deleteUserDocument = functions.auth
  .user()
  .onDelete(async (user) => {
    db.collection('users').doc(user.uid).delete()
  })
Deploying Our Cloud Functions
And now, all that’s left is deploy our functions and we do that with the following command:
firebase deploy --only functionsOnce the deploy finished you can refresh your Functions dashboard and you should see your brand new functions:

Fire Up Firestore
Now before we can test our function we have one final thing to do and it’s initialize our Firestore database. So within your Firebase console, in the left menu, under “Build”, click on “Firestore Database” and once on the Firestore page click on “Create database”.
This is where you’ll first be introduced to Firestore security rules. Those rules will let you protect your database from being modified by unauthorized users. Select production mode and we’ll write the rules we need.
If you want you can also choose the test mode to start without constraints and you can change your rule later.
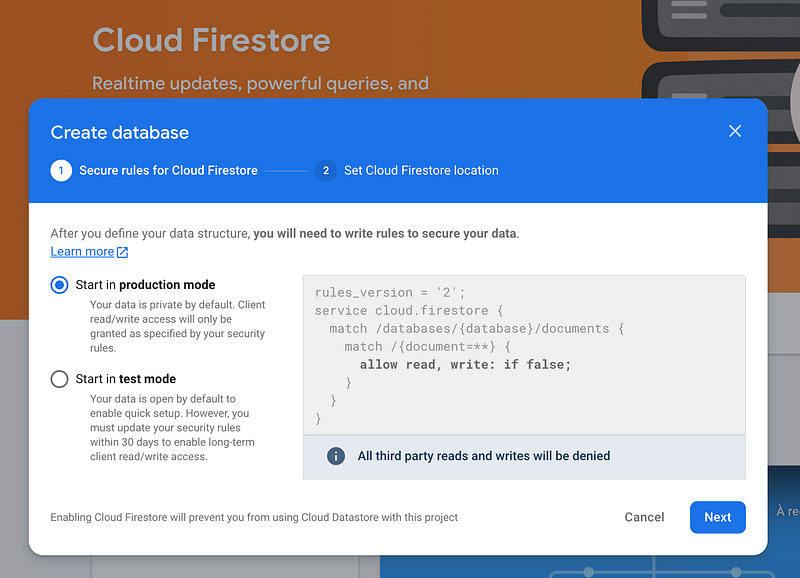
Next, you’ll need to choose a region. This will define where you storage bucket will be located and you cannot change this later so choose the region that’s the closest to the majority of your users.
Once you enabled Firestore you’ll be introduced to the Firestore dashboard. Here go to the “Rules” tab and you’ll see the same rules as in the screenshot above.
Firestore Security Rules
You can read all about writing Firebase security rules conditions in the doc here. What you need to know is that for each “match” statement we define a set of rules for the collections and documents we want those rules to match to. The format looks like this:
match /collection/{documentId} {
  // Rules
}
Let’s illustrate with an example. If you were to create a Twitter clone, you could have the following rules for the tweets:
match /tweets/{tweetId} {
  allow read;
  allow write: if request.auth.uid == request.resource.data.authorId
  allow delete: if request.auth.uid == resource.data.authorId
  allow update: if request.auth.uid == resource.data.authorId
}
The request.auth variable contains the authentication information for the client requesting data (if you’re using Firebase Auth like we are here).
The resource variable refers to the requested document, and resource.data is a map of all of the fields and values stored in the document.
In plain english, those rules means:
- Everyone can read tweets, even not authenticated users.
- Users can create tweets only for themselves. Meaning, imagine a tweet as an object, it would have a
textand anauthorIdto identify its author, and when creating a tweet we would have thisauthorIdin therequest.resource.data(which is the body of the request) and we would want to make sure this authorId matches the ID of the user making the request (request.auth.uid). - A user can delete or update a tweet only if the request is authenticated and the id of user making the request matches the ID of the creator of the tweet.
In our case, we only have a “users” collection so what I want to do is give you the rules to protect this collection. Basically, if a user modifies their data (if you implement such feature later on) you want a user to be able to do so only for its own account. Similarly, you want a user to only have “read” access to their own data, not that of another user. Therefore you want to restrict any read and write actions to a user’s document to that specific user. You do so with 2 conditions:
if request.auth != null: the request must include authentication credentialsuserId == request.auth.uid: the user performing the request for a specific document (userId) must be that same user.
Which results in the following rules:
rules_version = '2';
service cloud.firestore {
  match /databases/{database}/documents {
    match /users/{userId}/{restOfPath=**} {
    	allow read, write: if request.auth != null &&
      	userId == request.auth.uid
    }
  }
}
And now, if we try to create a new user using either of the three methods we set up earlier, you will see a new user in your Authentication space like before but you will now also have a new “users” collection in Firestore with your new user document in it.
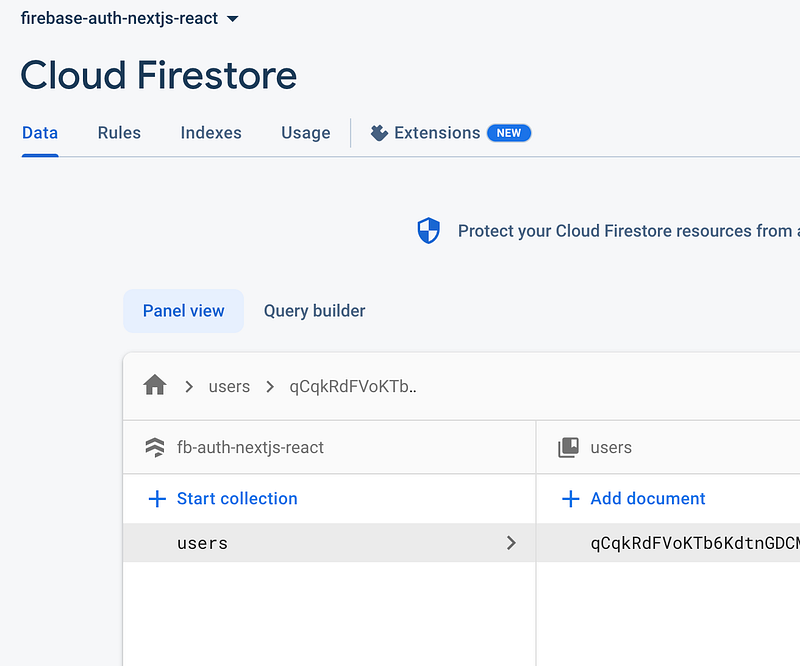
And if you delete the user account in your Firebase Authentication panel, the document associated to that user will be deleted as well.
#7 — Authorization: Managing Auth State
Now it’s time to put it all together and use the state of our user to authorize certain actions and routes within our app. We’ll also discover Jotai and how to manage global state with to very easily create an authentication flow using a modal.
For this, I created an AuthModal component which you can find in the repo for this project. As I said we’re focusing on logic only so I assume you’re following along with the repo’s code.
To start, let’s install Jotai:
npm i jotaiAnd plug it to our app. Head back to _app.tsx and here we have 2 things to do:
import AuthModal from '@/components/AuthModal'
import theme from '@/theme'
import { ChakraBaseProvider } from '@chakra-ui/react'
import type { AppProps } from 'next/app'
import { Provider } from 'jotai'

export default function App({ Component, pageProps }: AppProps) {
  return (
  // 1. Wrap our whole app in the `Provider` component
    <Provider>
      {/* 2. Add the auth modal */}
      <AuthModal />
      <Component {...pageProps} />
    </Provider>
  )
}
In the repo you’ll see that there’s also the Chakra UI provider in there. I’ve removed it to keep the code snippets clean from any styling considerations.
Regarding the modal positioning, as you can see I’m choosing to put it at the highest level in my app tree. This is because in a real life application, I would have a single modal component being instantiated at any given time and would handle it’s view, or content, using state like we’re going to see below. I’m recommending this approach because it makes it easy to make sure you can never have two modals displayed at the same time the app, and also to have the modal appear on top of every other components (I’ve had stacking context issues in the past with modals places lower in the app tree).
Jotai In SSR Mode
Regarding Jotai, note that, by default it works in “provider-less” mode with an implicit global state, meaning in a client-side rendered application you could use its global store without a Provider. But this is prone to bugs and security risks in an SSR environment like Next.js because then this global store is kept alive on the server where its generated making it potentially accessible by another user making a request.
Therefore, we need to limit the lifetime of the store to the scope of one request. To do so we use a Provider at the root of our app (or a subtree if you’re using Jotai only for a part of your application). This way, the Provider holds the values of the states we use in its subtree, not of the global store. And since the Provider is recreated when the app is recreated, which happens on each SSR request, we essentially limit the lifetime of the store to each single request.
Now, with our app ready to manage state using Jotai we can set up our authentication flow. We’re basically going to handle two kind of state:
- The state of our user using the useAuthState() provided by React Firebase Hooks
- The state and views of our modal with Jotai
We have 4 different views to handle in our modal:
- Sign In
- Sign In With Magic Link
- Sign Up
- Reset Password
Auth Modal State
A piece of state in Jotai is called an “atom”. You can read and modify an atom from any component using Jotai’s useAtom hook. Just like React’s useState, It returns the atom value and its setter function as a tuple.
We also have two very useful hooks:
useAtomValue: which returns the value of the atom we pass to ituseSetAtom: which returns the setter function for the atom we pass to it
Therefore you first need to create an atom using the atom() method, and pass it the default value of the atom, like so:
const someAtom = atom<someAtomType>(0)Let’s create the atom that will hold the state of our auth modal. As we seen earlier, it’s going to handle the open state of the modal and the view or content of the modal.
Create a a new folder in your src in which you’ll store all your atoms. I named it store but you can name it however you want (jotai, state, atoms, ...). And inside, create an authModalState.tsx file with the code for our auth modal atom:
import { atom } from 'jotai'

// Using an enum for the modal views that we can reuse everywhere
// improves consistency and developer experience.
export enum AuthModalView {
  signIn = 'signIn',
  signInWithLink = 'signInWithLink',
  signUp = 'signUp',
  resetPassword = 'resetPassword',
}

export interface AuthModalState {
  open: boolean
  view: AuthModalView
}

const defaultModalState: AuthModalState = {
  open: false,
  view: AuthModalView.signIn,
}

export const authModalState = atom<AuthModalState>(defaultModalState)
Now, let’s look at a very minimalist example of how we would use that state inside our modal:
[...]
import { authModalState, AuthModalView } from '@/store/authModalState'
import { useAtom } from 'jotai'
const AuthModal: React.FC = () => {
// 1. Get the value and setter for our auth modal state
const [modalState, setModalState] = useAtom(authModalState)
// 2. Update the state when user closes the modal
const handleClose = () => {
setModalState((prev) => ({
...prev,
open: false,
}))
}
// 3. Use our auth modal state to define the open/close and content of our modal
return (
<>
<Modal isOpen={modalState.open} onClose={handleClose}>
<ModalOverlay />
<ModalContent>
<ModalHeader>
{modalState.view === AuthModalView.signIn && 'Sign In'}
{modalState.view === AuthModalView.signInWithLink && 'Sign In With Link'}
{modalState.view === AuthModalView.signUp && 'Sign Up'}
{modalState.view === AuthModalView.resetPassword && 'Reset Password'}
</ModalHeader>
<ModalCloseButton />
<ModalBody>
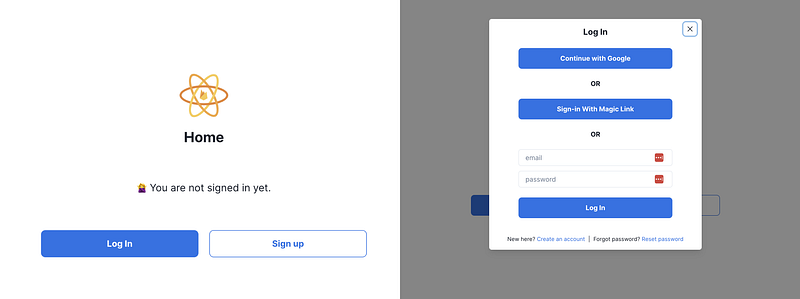
{modalState.view === AuthModalView.signIn && (
<>
<SignInWithProvider />
<Text>OR</Text>
<SignInWithMagicLink />
<Text>OR</Text>
<SignInWithEmailPassword />
</>
)}
{modalState.view === AuthModalView.signUp && <SignUp />}
{modalState.view === AuthModalView.resetPassword && <ResetPassword />}
</ModalBody>
</ModalContent>
</Modal>
</>
)
}
export default AuthModalAnd we can use access the state anywhere else in our app (within the Provider’s subtree). Let’s look at an example of a link which triggers a change of view for the modal:
import {
  authModalState as authModalAtom,
  AuthModalView,
} from '@/store/authModalAtom'
import { useSetAtom } from 'jotai'

[...]

// Within your component
const setAuthModalState = useSetAtom(authModalAtom)

[...]

// Within your render
<Link
  onClick={() =>
    setModalState((prev) => ({
      ...prev,
      view: AuthModalView.signIn
    }))
  }
>
 Back to Log In
</Link>
As simple as that. This took so little code and the API is so straightforward, Jotai really makes managing state in React a breeze.
Accessing User Auth State
Now, to have access to the user’s authentication state all we need to do is call the useAuthState hook from React Firebase Hooks. It monitors and provides the user authentication state from Firebase:
const [user, loading, error] = useAuthState(auth, options);A simple example of using this state would be showing some Log In/Sign Up buttons if the user is not authenticated, and switching to a Log Out button otherwise:
import { auth } from '@/firebase/app'
const [user] = useAuthState(auth)

{user ? (
  <Button onClick={() => signOut(auth)}>Log Out</Button>
) : (
  <>
    <Button
      onClick={() =>
        setAuthModalState({ open: true, view: AuthModalView.signIn })
      }
    >
      Log In
    </Button>
    <Button
      variant="outline"
      onClick={() =>
        setAuthModalState({ open: true, view: AuthModalView.signUp })
      }
    >
      Sign up
    </Button>
  </>
)}
And that’s it, we’re done building our auth system! 🎉
#8 — Deploying
To test the sign-in with magic link in production I deployed the application on Vercel. Doing so I stepped on a bug that I didn’t expect so I thought I’d share this last piece to close this article.
Just a quick step-by-step for those of you who haven’t deployed on Vercel yet:
- Create a Vercel Account and connect your Github.
- On your Vercel dashboard click “Add new project”.
- Select your project’s Github repository
- Add your environment variables (from your .env.local file), you can keep the rest of the default settings.
- Click “Deploy”.
- That’s it! You’ll be provided with a Vercel URL that you can replace with your custom domain if you want. Then each new commit pushed to the associated Github repository will trigger a new build and re-deploy the app.
Now about that bug I mentioned. If you try to deploy the app as is, you might see the build in Vercel fail with the following error:
type error: cannot find module 'firebase-admin' or its corresponding type declarations.
This is happening because the functions folder in our project seems to be taken into account in our build. But since Firebase Functions are deployed independentally on Firebase we don’t want to include them in this build. Therefore all we need to to is add the functions folder to our exclude array in our tsconfig.json file (thank you StackOverflow
{
  "compilerOptions": { ... },
	[...],
	"exclude": ["node_modules", "functions"]
}
And it’s alive!
Here is the final repo for this project which includes the fully working system with a modal, Chakra UI styles, and all the auth features we saw in this post:
Planning to go to prod?
There’s one important thing missing from this project before it can be used in production with confidence and that’s tests. As it happens, I’m in the process of writing an article around testing and I’ll use that repo as base so stay tuned it will soon include tests.
Wrapping Up
I hope you enjoyed using Firebase Auth, Firestore and Cloud Functions. As you can see, it makes it incredibly easy to set up chore user flows within any application in a matter of hours. Firebase also comes with an impressive free tier which makes it a great choice to fire up any new real world project without fear to see a huge bill pill up before you had a chance to have enough users.
Let me know your thoughts and questions in the comments.
Happy building
Level Up Coding
Thanks for being a part of our community! Before you go:
- 👏 Clap for the story and follow the author 👉
- 📰 View more content in the Level Up Coding publication
- 💰 Free coding interview course ⇒ View Course
- 🔔 Follow us: Twitter | LinkedIn | Newsletter
🚀👉 Join the Level Up talent collective and find an amazing job