
6 Simple Ways to convert your S3 Bucket into Athena Database
Are you struggling to convert your S3 data into actionable insights? Look no further than Amazon Athena. Athena is a serverless query service that allows you to analyze data directly in Amazon S3 using standard SQL syntax. With Athena, you can quickly and easily create tables from your S3 data, and start querying it right away.
In this article, we will explore the different ways to convert your S3 data into insights using Athena. We will explore the following ways:
- Add columns One By One
- Add Bulk Columns
- Create table using Query
- Using Python code (Boto3)
- Using AWS Wrangler
- Create Athena table directly from DataFrame
Step 1: Prepare Your Data in S3
Before you can start using Athena, you need to have data stored in S3. Amazon S3 is a scalable, durable, and highly available cloud storage service that can store and retrieve any amount of data from anywhere on the web. You can use S3 to store data such as web logs, sensor data, or customer information. To use S3 with Athena, your data must be stored in a CSV, TSV, JSON, Textfile with custom delimiter, ORC or Parquet format.
To create an S3 bucket, log in to the AWS Management Console and navigate to the S3 service. Click the “Create Bucket” button and follow the prompts to create your bucket. Once you have your bucket, you can upload your data using the web interface or the AWS CLI.
Step 2: Create an Athena Table
Once your data is in S3, you can create a table in Athena to make it queryable. To create a table, you need to define the table schema, which specifies the column names and data types of your data. You can create a table in Athena using the Athena web interface or the AWS CLI.
Method 1: Add columns One By One
To create a table in Athena from S3, you can follow these steps:
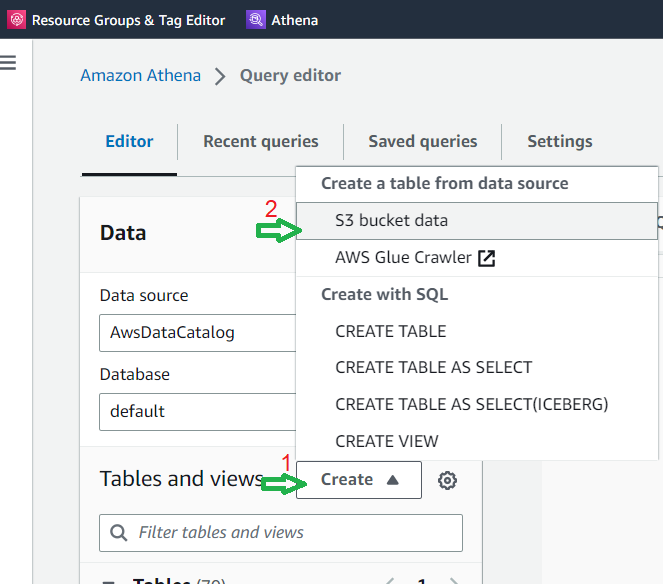
a. Open the Athena console in the AWS Management Console. b. Click on the “Create” button and then click “S3 bucket data” to create a table from S3 bucket files.
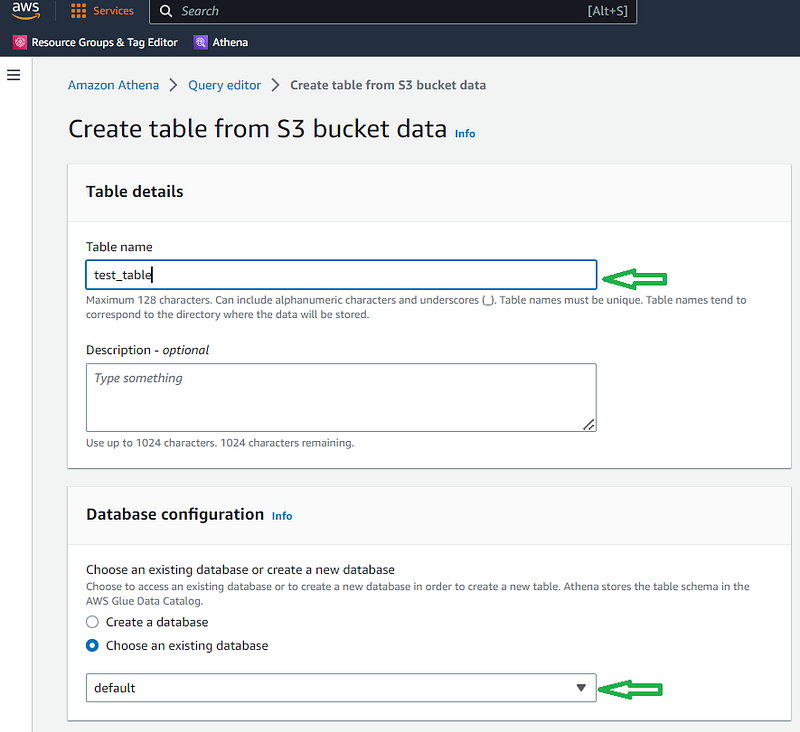
c. In the “Table name” dialog box, enter a name for your table. d. In the “Database configuration” section, either create a new database or choose any pre-existing database
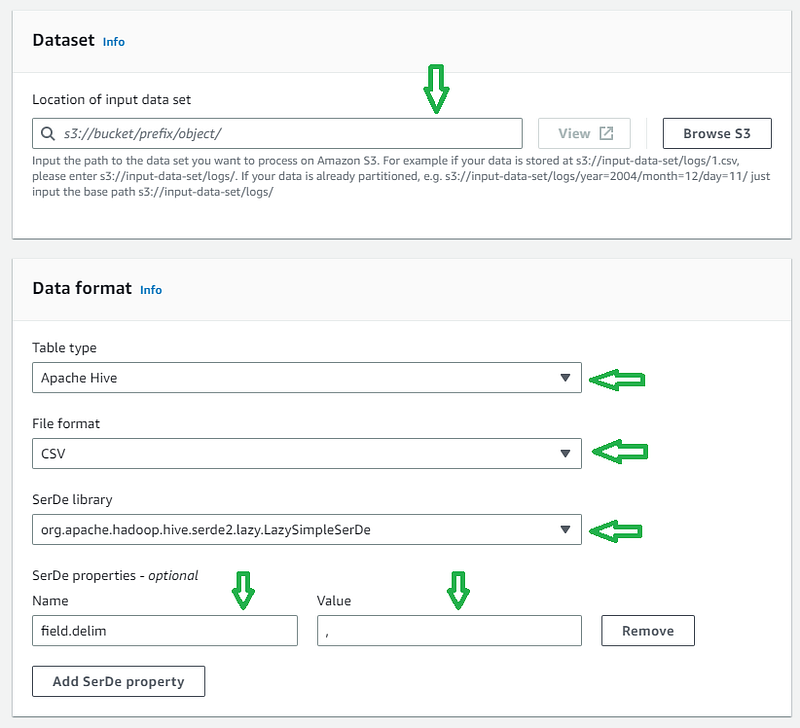
e. Scroll down and inside the Dataset section, choose the S3 bucket where data files are stored f. Since I have CSV files in my S3 bucket from which I want to create a table, I have chosen the file format as ‘csv ’and the corresponding SerDe Library.
In Apache Hive, LazySimpleSerDe and OpenCSVSerDe are two popular serializers/deserializers (SerDe) used to read and write CSV files. LazySimpleSerDe is the default SerDe used by Hive to process CSV files. It is a simple and fast SerDe that supports unquoted fields separated by a delimiter. On the other hand, OpenCSVSerDe is a more flexible SerDe that supports various CSV formats, including quoted fields, escaped quotes, and new-line characters within a field.
g.1. In the SerDe Library, you can use LazySimpleSerDeif there is unquoted data. In the SerDe Properties, I have defined csv delimiter as comma. Please choose the appropriate file format and delimiter according to your S3 files.
g.2. In the SerDe Library, you can use OpenCSVSerDeif there is quoted data. In the SerDe Properties, I have defined separatorChar as ,, quoteChar as “ and escapeChar as \\. Please choose the appropriate file format and delimiter according to your S3 files.

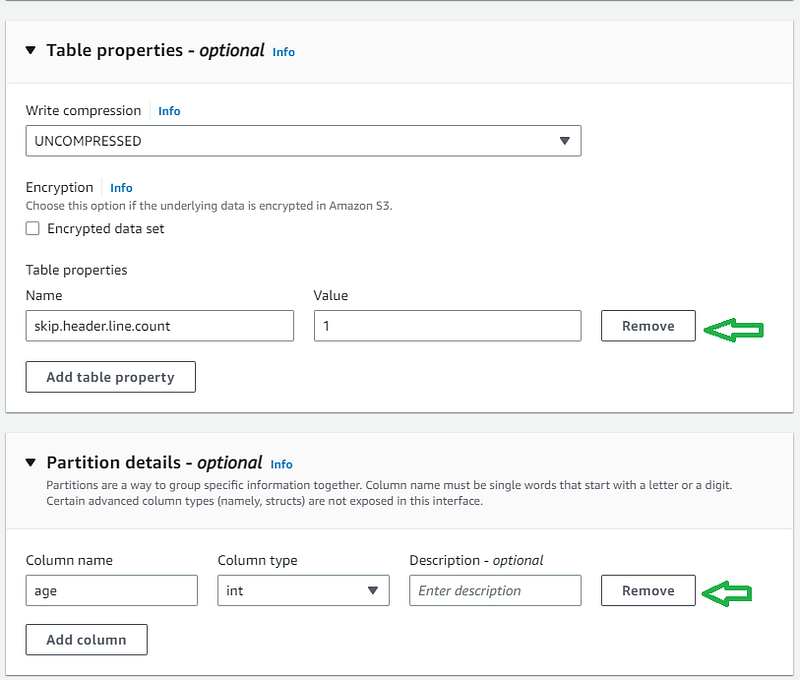
h. Scroll down and inside the Column details section, define the column name and column type of the columns inside the S3 data files. In my S3 CSV files, I have only three columns. You can add more columns by clicking “Add a column” button. i. Optionally, you can add other table properties, such as skipping the first row (header row) of every csv file. j. Optionally, you can add partition columns. Partition columns in Athena are used to organize data into logical groupings based on common values. When you create a table with partition columns, Athena creates a separate directory for each partition in the S3 bucket where the data is stored. This allows Athena to query only the relevant partitions when executing a query, rather than scanning the entire dataset.
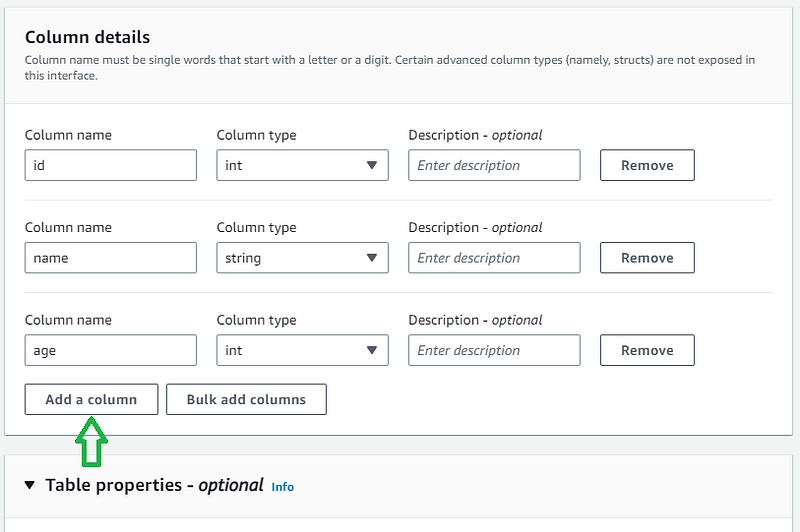
k. Scroll down and click “Create Table” button to create the Athena table.
Method 2: Add Bulk Columns
Bulk add column is a feature provided by Athena that allows you to add multiple columns to a table at once. This can be useful in several scenarios:
- When you have a large number of columns: If your data has a large number of columns, it can be tedious to add each column one by one using the
ADD COLUMNcommand. In such cases, bulk add column can save time and effort by allowing you to add all the columns in one go. - When you have a fixed schema: If your data has a fixed schema that rarely changes, you can use bulk add column to add all the columns at once during table creation. This can help you avoid the need to add new columns manually every time your data schema changes.
- When you are creating a new table from scratch: If you are creating a new table from scratch and have all the necessary column information available, you can use bulk add column to add all the columns at once. This can help you create tables quickly and efficiently.
You can follow the below steps for adding columns in bulk
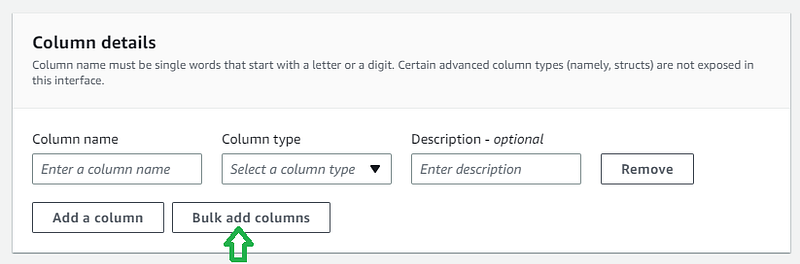
a. Follow the steps till step g from Method 1. b. In the Column details section, click “Bulk add columns” button
c. Define the columns of the table by adding columns as column name and data type pair separated by comma. Once you mention all the columns, click on “Add” button.
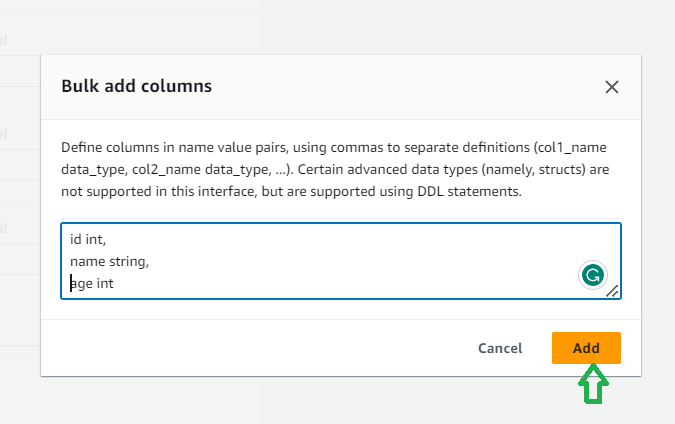
d. Check if all the columns are correctly added e. Follow the steps i, j and k of Method 1 to create the Athena table
Method 3: Create table using Query
You can create a table directly from S3 files by executing SQL query into Athena query editor. Below is the sample query which can be used to create table from S3 files
CREATE EXTERNAL TABLE IF NOT EXISTS `default`.`test_table` (`id` int, `name` string, `age` int)
PARTITIONED BY (`age` int)
ROW FORMAT SERDE 'org.apache.hadoop.hive.serde2.lazy.LazySimpleSerDe'
WITH SERDEPROPERTIES ('field.delim' = ',')
LOCATION 's3://test-bucket/test-folder/'
TBLPROPERTIES (
  'classification' = 'csv',
  'skip.header.line.count' = '1'
);
Method 4: Using Python code (Boto3)
You can create an Athena table from existing S3 files using the AWS SDK for Python (Boto3). Here’s an example Python code snippet that demonstrates how to do this:
import boto3

# Create Athena client
client = boto3.client('athena')

# Define S3 input location and table name
s3_input_location = 's3://your-bucket-name/your-folder/'
table_name = 'your-table-name'

# Define create table SQL statement
create_table_sql = '''
CREATE EXTERNAL TABLE IF NOT EXISTS {table_name} (
  column1 string,
  column2 int,
  column3 double
)
ROW FORMAT SERDE 'org.apache.hadoop.hive.serde2.lazy.LazySimpleSerDe'
WITH SERDEPROPERTIES (
  'serialization.format' = ',',
  'field.delim' = ','
) LOCATION '{s3_input_location}'
TBLPROPERTIES ('classification' = 'csv')
'''.format(table_name=table_name, s3_input_location=s3_input_location)

# Submit query to create table
response = client.start_query_execution(
    QueryString=create_table_sql,
    QueryExecutionContext={
        'Database': 'your-database-name'
    },
    ResultConfiguration={
        'OutputLocation': 's3://your-bucket-name/your-output-folder/'
    }
)

# Wait for query to complete
query_execution_id = response['QueryExecutionId']
result = client.get_query_execution(QueryExecutionId=query_execution_id)
state = result['QueryExecution']['Status']['State']
while state == 'RUNNING':
    result = client.get_query_execution(QueryExecutionId=query_execution_id)
    state = result['QueryExecution']['Status']['State']

# Check if table was created successfully
if state == 'SUCCEEDED':
    print(f'Table {table_name} created successfully!')
else:
    print('Table creation failed.')
In this example, you first create an Athena client using the Boto3 library, then define the S3 input location and table name that you want to create. You then define the SQL statement to create the table, specifying the column names and data types, as well as the location of the S3 input files. You submit the SQL statement using the start_query_execution method of the Athena client, and then wait for the query to complete using a loop that checks the query execution state. Finally, you check if the table was created successfully and print a message to the console.
Note that you’ll need to have the appropriate AWS credentials set up in your environment to run this code, and you’ll need to replace the values for your-bucket-name, your-folder, your-table-name, your-database-name, and your-output-folder with your own S3 bucket and folder names, table name, database name, and output folder name, respectively.
Method 5: Using AWS Wrangler
AWS Wrangler library simplifies the process of creating an Athena table from existing S3 files in Python, by providing a convenient interface to define the table schema and create the table. Below is a sample code
import awswrangler as wr

wr.catalog.create_csv_table(
    database='default',
    table='my_table',
    path='s3://bucket/prefix/',
    columns_types={'col0': 'bigint', 'col1': 'double'},
    partitions_types={'col2': 'date'},
    description='My own table!',
    columns_comments={'col0': 'Column 0.', 'col1': 'Column 1.', 'col2': 'Partition.'}
)
Method 6: Create Athena table directly from DataFrame
You can create an Athena table directly from a Pandas DataFrame using AWS Wrangler and save the data in S3. Here is the sample code
# Import the necessary libraries
import awswrangler as wr
import pandas as pd

# Generate a Pandas DataFrame
df = pd.DataFrame({
    'col1': [1, 2, 3, 4],
    'col2': ['a', 'b', 'c', 'd'],
    'col3': [0.1, 0.2, 0.3, 0.4]
})

# Define the table schema
columns_types = {
    'col1': 'int',
    'col2': 'varchar(10)',
    'col3': 'double'
}

# Define S3 bucket and S3 path
bucket_name = 'my-bucket'
s3_path = f's3://{bucket_name}/my-folder'

# Save the dataframe to table and S3
wr.s3.to_parquet(
    df=df,
    path=s3_path,
    dataset=True,
    mode='append',
    database='my_database',
    table='my_table',
    partition_cols=['col2'],
)

# Execute a SQL query
result_df = wr.athena.read_sql_query(
    sql='SELECT * FROM my_database.my_table',
    database='my_database')
Note that in the to_parquet() function, we use dataset=True to automatically infer the schema from the DataFrame and partition_cols to define the partitioning for the Athena table. If you don't need partitioning, you can omit this parameter.
Overall, this approach allows you to create an Athena table directly from a DataFrame and save the data in S3 using AWS Wrangler.
Step 3: Query Your Data
Once you have created your Athena table, you can start querying your data using standard SQL syntax. For example, to retrieve all the rows in your table, you can run the following SQL statement:
SELECT * FROM mytable;
This will return all the rows and columns in your mytable table. You can also use more advanced SQL queries to perform analysis on your data. For example, you can aggregate data using the GROUP BY clause, filter data using the WHERE clause, and join data from multiple tables using the JOIN clause.
Conclusion
In this article, we have explored how to use Amazon Athena to convert your S3 data into valuable insights. With Athena, you can create tables, run queries, and get results in seconds, without the need for complex ETL processes. By following the steps outlined in this article, you can start leveraging the power of Athena to gain insights from your data and make data-driven decisions for your business.
If you enjoyed the article, please consider clapping for it using the clap button at the bottom of the page. Feel free to leave a comment below sharing your thoughts, feedback, or any additional tips and tricks. Join the medium membership to access unlimited content at any time using the link Get Membership
Thank you for reading this post! I hope you found it informative and helpful. If you enjoyed it and would like to see more, be sure to follow and subscribe me. I would greatly appreciate it if you could show your support by clapping for it and leaving a comment. I look forward to sharing more with you in the future. Thanks again!
If you’re new to Medium and would like to support my work further, please consider signing up using my referral link. It’s a fantastic way to help me continue producing valuable content. Thank you once again for reading, and I’m looking forward to connecting with you soon!


