
Applying LLMs to Threat Intelligence
A Practical Guide with Code Examples

LLMs, or Large Language Models, are an exciting technology designed to leverage natural languages with various technologies. Specifically in Cybersecurity, and more so in Threat Intelligence, there are challenges that can be partially addressed with LLMs and generative AI.
While much of the focus is on prompt engineering skills, there’s more to consider than just choosing the right word to interact with a model.
In this blog, I will discuss the potential of LLMs for threat intelligence applications. I will first introduce some common challenges, then define what prompt engineering is and how it can be applied to practical use cases. Next, I will discuss some techniques such as few-shot learning, RAG, and agents. Everything will be illustrated with code examples. Stay with me, as we’re about to dive deep and acquire real skills, rather than just skimming the surface.
🔥Threat Intelligence Challenges
In Threat Intel, there are several challenges to deal with. First, the sheer volume of information produced today can be overwhelming, and no one has the time to read it all. Second, investigating a threat can be time-consuming, and junior analysts might lack the necessary background to conduct the investigation effectively. Additionally, the dynamic nature of threats means that analysts often have to keep up with rapidly changing tactics, techniques, and procedures, which can be daunting even for seasoned professionals.
With these challenges in mind, let’s explore how LLMs can be utilized to enhance analysts’ capabilities.
⌨️What is Prompt Engineering?
We cannot discuss LLMs without defining what is Prompt Engineering.
Prompt Engineering is the discipline and science of crafting effective prompts to guide AI models, particularly LLMs, toward desired outputs. Much like a potter, wood carver, or a “tailleur de pierre” (stone cutter), prompt engineering is the essential tool.

To craft the ideal prompt, there are several basics to follow:
- Clarity: Define the task you want the model to perform clearly.
- Specificity: Provide as much detail as necessary to eliminate ambiguity.
- Iteration: Continuously refine prompts based on feedback from the AI.
However, there are also common pitfalls to be wary of:
- Over-complexity: Refrain from making prompts excessively detailed.
- Ambiguity: Avoid vague prompts as they can lead to generic answers.
- Blind Trust in the Model: Relying too much on the model’s capabilities without adequate verification.
- No Examples: Omitting example inputs and outputs.
- Misplaced Belief in Model’s Understanding: Assuming the model grasps your intent without clarity.
- Ignoring Obsolescence: Neglecting to refresh prompts in tandem with model updates or changes in relevant data.
The following example demonstrates an ideally crafted prompt:
But while many individuals are focusing on crafting the perfect prompt, they are essentially overlooking the true potential of LLMs and their vast capabilities.
Now, let’s talk about the genuine strength of LLMs and explore how we can pragmatically create our own applications with it.
🤓 Practical Application of LLMs
There are multiple techniques that can be used in conjunction with a model. In this section, I will explore some of them to provide you with the keys to delve into this technology independently and achieve a better understanding of it.
Few-Shot Prompting
Few-shot prompting is an interesting technique that can be employed to instruct an LLM using a very limited amount of data.
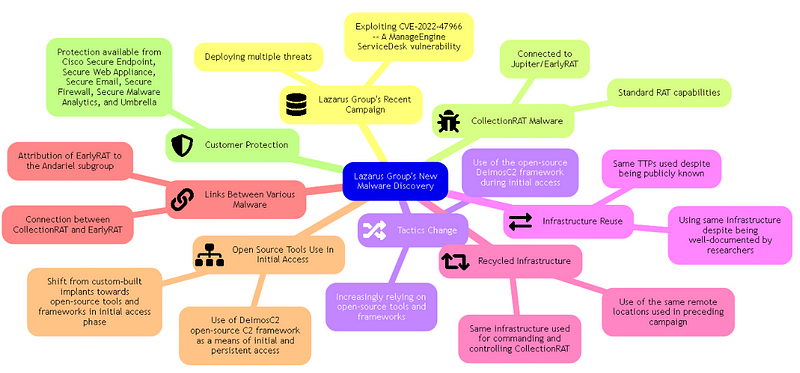
The idea is to supply your model with some examples of what you expect so it can replicate them directly. For instance, in the code below, I ‘teach’ the model a desired output — in this case, a mermaid mindmap — so that it can produce similar mindmaps in the future.
# Function to generate a mindmap (few shot technique).
# NB: the more shot you add the better the result will be
def run_models(input_text):
  response = openai.ChatCompletion.create(
      model="gpt-4",
      messages= [
          {
              "role": "system",
              "content":"You are tasked with creating an in-depth mindmap designed specifically for a threat analyst. This mindmap aims to visually organize key findings and crucial highlights from the text. Please adhere to the following guidelines: \n1. Avoid using hyphens in the text, as they cause errors in the Mermaid.js code \n2. Limit the number of primary nodes branching from the main node to four. These primary nodes should encapsulate the top four main themes. Add detailed sub-nodes to elaborate on these themes \n3. Incorporate icons where suitable to enhance readability and comprehension\n 4. Use single parentheses around each node to give them a rounded shape."
          },
          {
              "role": "user",
              "content": "Title: \ud83e\udda0 Lazarus Group's Infrastructure Reuse Leads to Discovery of New Malware\n\nThe Lazarus Group, a North Korean state-sponsored actor famous for its relentless cyber offensive actions, continues to adjust its tactics and expand its arsenal. Recently, the revealed an exploitation of the ManageEngine ServiceDesk vulnerability (CVE-2022-47966) in another campaign. This exposure led to deploying multiple threats, with a new one identified as CollectionRAT, alongside an already used threat named QuiteRAT. \n\nThe advanced malware CollectionRAT has standard remote access trojan (RAT) capabilities, being able to run arbitrary commands on an infected system. Our intense analysis linked CollectionRAT to Jupiter/EarlyRAT, a malware family somewhat known to be associated with Andariel, a subgroup under the Lazarus Group umbrella. Interestingly, the group is gradually increasing its reliance on open-source tools and frameworks in the initial access phase of its attacks, as shown by Lazarus' use of the DeimosC2 framework. \n\nThe Lazarus Group's unchanging use of certain infrastructures, despite them being well-documented by security researchers, is another noteworthy observation. Their modus operandi, captured in the repeated use of the same tactics, techniques, and procedures (TTPs), shows audacious assurance in their operations. But this approach also offers intelligence opportunities for security analysts on tracking these reusable infrastructure components. \n \nDespite their blatant actions, the Lazarus Group's dynamism is evident by their increasingly heavy reliance on using dual-use utilities for activities like reverse tunneling. Some of the reused infrastructure components hosted the new CollectionRAT malware, and an altered copy of PuTTY's Plink utility was downloaded onto compromised endpoints, further demonstrating Lazarus Group's rapid evolution. \n\nIn conclusion, the Lazarus Group continues to reuse and recycle its well-worn tactics while pushing ahead with new threats and evolving TTPs. This information highlights why there's a need for organized cooperation among threat researchers and the critical importance of staying up-to-date with the latest threat intelligence.",
          },
          {
              "role": "assistant",
              "content": "mindmap\nroot(Lazarus Group Threat Analysis)\n    (Infrastructure Reuse)\n      ::icon(fa fa-sync-alt)\n      (Used in latest campaign)\n      (Includes Plink, an open-source tool)\n      (Indicates confidence in operations)\n    (New Malware - CollectionRAT)\n      ::icon(fa fa-bug)\n      (Remote Access Trojan)\n      (Allows running arbitrary commands on infected system)\n      (Similarities to EarlyRAT malware)\n    (Shifting Tactics)\n      ::icon(fa fa-exchange-alt)\n      (Increased use of open-source tools and frameworks)\n      (Including DeimosC2 framework)\n    (Protection Measures)\n      ::icon(fa fa-shield-alt)\n      (Detection and blocking with Cisco security products)\n      (Indicators of Compromise available on GitHub)\n    (Threat Report Significance)\n      ::icon(fa fa-exclamation-circle)\n      (Highlighted continued activity of Lazarus Group)\n      (Essential for enhancing detection and response capabilities)",
          },
          {"role": "user", "content": input_text},
      ],
  )
  return response.choices[0].message['content']
In the code above, I provide some examples to clarify what I’m expecting for the output. The information breaks down as follows:
- System: I assign the role of “system” to my tool and detail what I anticipate from this system. For this example, I’m aiming for a mindmap.
- User: The second line designates the role of “user.” This line presents examples of user inputs.
- Assistant: With the “assistant” role (representing the model), I provide an illustration of the expected output — in this instance, the mermaid mindmap code.
- Finally, I capture the user input, allowing the assistant to generate the subsequent mindmap based on that input.
An example of the resulting mindmap can be seen below:
I wrote another blogpost about this technique and how I implemented this concept for my newsletter. Click here to learn more about it! 🤩
Retrieval Augmented Generation (RAG)
The models we use are trained on a specific set of data up to a particular date. This implies that more recent data might not be recognized by the model, and most importantly, your personal/private data isn’t known to it either.
RAG presents an interesting approach that enables you to supplement the model with your own data, thereby expanding its capabilities. RAG is a technique that melds retrieval-based and generative models.
Two Phases: Retrieval & Generation
- Retrieval: This phase searches the database of your data you provided.
- Generation: This phase produces a context-relevant response based on the retrieved information from your database.
The primary objective here is to enhance a model using your data. But how does it work under the hood?
RAG operates in multiple stages. The subsequent diagram offers a streamlined visualization of the process.
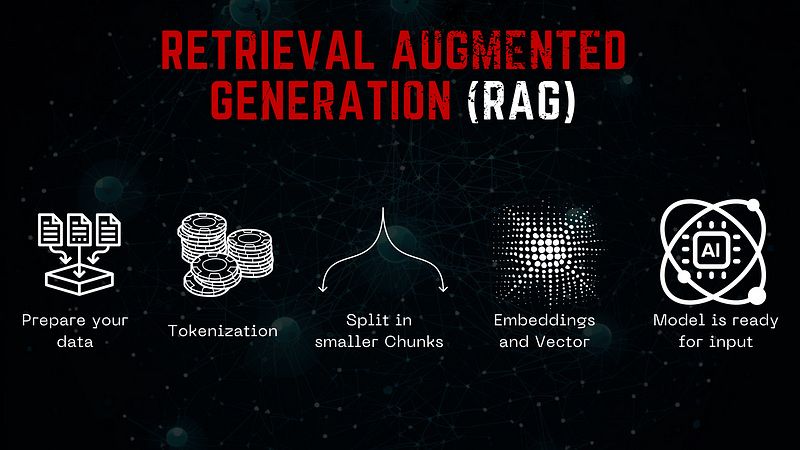
My friend, Roberto Rodriguez, conducted in-depth research on this topic using the Mitre ATT&CK Groups as data source.
For the sake of this blog, I’ve adapted his code to be compatible with Jupyter Notebook and create an interface using pywidget. I’ll walk you through each step to construct your own RAG. In this example, we used LangChain, which is an open-source library designed for interacting with an LLM.
Prepare Your Data (No, Really!)
You might have heard that when working with machine learning, deep learning, or AI models, it’s essential to clean your dataset. This step is crucial for obtaining the most accurate results.
Ensuring that your entire dataset is well-formatted and consists of clean data is of utmost importance. Once your data is prepped, you can begin crafting your RAG.
In this example, we used data exported from the Mitre ATT&CK groups. After downloading the data to your local system, you can begin loading it using Langchain.
Note: For this example, the data is stored in Markdown format, but you can use any type of data.
from langchain.document_loaders import UnstructuredMarkdownLoader
# Using glob to find all Markdown files in the knowledge_directory
# The "*.md" means it will look for all files ending with .md (Markdown files)
group_files = glob.glob(os.path.join(knowledge_directory, "*.md"))

# Initializing an empty list to store the content of Markdown files
md_docs = []

# Loop through each Markdown file path in group_files
for group in group_files:

    # Create an instance of UnstructuredMarkdownLoader to load the content of the current Markdown file
    loader = UnstructuredMarkdownLoader(group)

    # Load the content and extend the md_docs list with it
    md_docs.extend(loader.Load())
Here we are using the group knowledge to load into our RAG.
Tokenisation
Tokenization is the process of converting a sequence of text into individual units, known as “tokens.” These tokens can range from being as small as characters to as long as words, depending on the specific needs of the task and the language in question. Tokenization is an essential pre-processing step in Natural Language Processing (NLP) and text analytics models. Tokenisation can be done using the library Tiktoken.
In our context, tokenization isn’t strictly required. However, it proves beneficial if you aim to manage the amount of data sent and for optimization and cost-control purposes.
Splitting into Smaller Chunks
Dividing your imported data into smaller chunks is a strategy designed to make it easier for the model to access the imported data.
In this instance, we’re using the `RecursiveCharacterTextSplitter` from LangChain. This method attempts to divide the text based on a set sequence of characters until the resulting chunks reach a desired size. By default, the characters used for splitting are [“\n\n”, “\n”, “ “, “”]. The method strives to maintain the integrity of paragraphs, sentences, and words as they’re typically semantically connected. The size of each chunk is determined by its character count.
The following code demonstrates how to employ this method with our MITRE ATT&CK Groups data.
# Import the RecursiveCharacterTextSplitter class from the langchain library
from langchain.text_splitter import RecursiveCharacterTextSplitter

# Create an instance of RecursiveCharacterTextSplitter with specified parameters
text_splitter = RecursiveCharacterTextSplitter(
    chunk_size=500,  # Maximum number of tokens in each chunk
    chunk_overlap=50,  # Number of tokens that will overlap between adjacent chunks
    length_function=tiktoken_len,  # Function to calculate the number of tokens in a text
    separators=['\n\n', '\n', ' ', '']  # List of separators used to split the text into chunks
)
Embeddings
Embeddings provide a means to convert words or phrases into numerical representations, or vectors, so they can be easily processed by computers. Why is this useful? By transforming text into numerical form, it becomes simpler to gauge the similarity between words or sentences, facilitating tasks such as search and classification.
A vector, in essence, is a list of numbers. In embeddings, each number in this list captures some aspect or feature of the text. Such vectors allow computers to grasp and compare concepts. For instance, the vector for “apple” might bear more similarity to the one for “fruit” than to that of “car.” This helps a computer discern that apples are more akin to fruits than to vehicles.
In simpler terms, embeddings convert text into vectors. As you might glean, these vectors provide a convenient means to store data for our RAG and model.
In the example below, we use FAISS. Developed by Facebook, FAISS aids in swiftly identifying items that resemble a particular item based on their numerical (vector) representation. To illustrate, imagine a vast library of books, and you wish to pinpoint the ones most similar to a specific title. FAISS expedites this task, even with an extensive collection.
from langchain.embeddings.openai import OpenAIEmbeddings
from langchain.vectorstores import FAISS


embeddings = OpenAIEmbeddings()

# Send text chunks to OpenAI Embeddings API
db = FAISS.from_documents(chunks, embeddings)

retriever = db.as_retriever(search_kwargs={"k":5})
query = "What are some phishing techniques used by threat actors?"
print("[+] Getting relevant documents for query..")
relevant_docs = retriever.get_relevant_documents(query)
Alright, our retriever is now up and running. The next step is to integrate this retriever with our LLM.
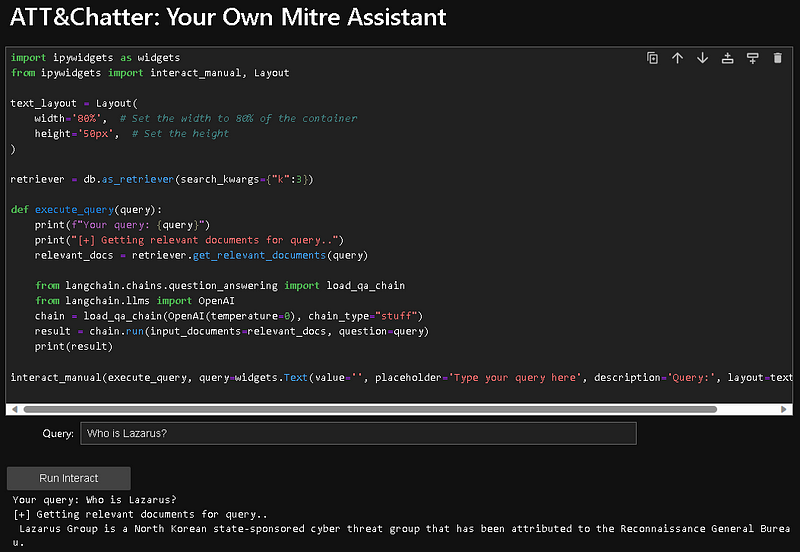
Retriever and LLM
Once we can interact with our data, we can then employ our LLM to formulate the expected answer. The below screenshot shows you the Jupyter notebook with the code discussed. 👇
We now have our RAG operational. But one thing that’s bothersome is that our model doesn’t remember what we’ve discussed previously…
RAG + Memory
Being able to interact with your own data is quite powerful; you can essentially feed any type of data and let your LLM work with your personalized or internal data.
However, as seen in our previous example, the model doesn’t retain the memory of prior interactions, which can be somewhat frustrating when trying to gather multiple pieces of information about the same threat actor.
By configuring memory in your RAG tools, you can maintain a record of previous interactions, ensuring a continuous flow of information without needing to pose the same questions repeatedly.
This can be seamlessly achieved using Langchain.
from langchain.chains import ConversationalRetrievalChain
from langchain.memory import ConversationBufferMemory
from langchain.llms import OpenAI
from langchain.prompts.prompt import PromptTemplate
import json

# Initialize your Langchain model
model = ChatOpenAI(model_name="gpt-4", temperature=0.3)

# Initialize your retriever (assuming you have a retriever named 'db')
retriever = db.as_retriever(search_kwargs={"k": 8})

# Define your custom template
custom_template = """You are an AI assistant specialized in MITRE ATT&CK and you interact with a threat analyst, answer the follow up question. If you do not know the answer reply with 'I am sorry'.
Chat History:
{chat_history}
Follow Up Input: {question}
Answer: """
CUSTOM_QUESTION_PROMPT = PromptTemplate.from_template(custom_template)

# Initialize memory for chat history
memory = ConversationBufferMemory(memory_key="chat_history", return_messages=True)

# Initialize the ConversationalRetrievalChain
qa_chain = ConversationalRetrievalChain.from_llm(model, retriever, condense_question_prompt=CUSTOM_QUESTION_PROMPT, memory=memory)
Now, we can initiate a dialogue with our RAG:
To make things easier, I’ve put together a comprehensive Jupyter notebook available on my website for you to tailor the code to your specific needs.
ReAct and Agents
The next concept I’d like to discuss is the ReAct framework and the agent features offered by LangChain.
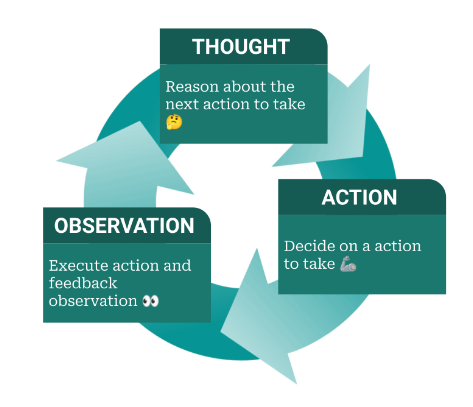
ReAct is a logical framework designed for crafting intelligent agents. Its chief purpose is to endow agents with the ability to carry out complex tasks through a series of actions. Central to ReAct are two core components: ‘Reason’ and ‘Act’. The ‘Reason’ facet reflects the agent’s cognitive process, where it ponders and decides the subsequent action. In contrast, ‘Act’ symbolizes the tangible action the agent executes based on its prior reasoning.
You can think of ReAct’s operational flow as an “Action → Observation → Thought Cycle”. Initially, the agent performs an action. It then observes and evaluates the results of that action. After observing, the agent ponders or reasons about its next step. This iterative process ensures the agent continually adapts and responds to the dynamic conditions of its surroundings.
This notion is incredibly powerful and can be seamlessly integrated with various tools. Remember, in LangChain, an agent can represent anything, allowing you to essentially craft your own applications atop this foundation.
In the example that follows, I’ve employed the agent functionality of LangChain in synergy with MSTICpy, constructing an agent that leverages MSTICpy’s features.
NB: MSTICpy is the Python library dedicated to threat intelligence investigation.
from msticpy.sectools.tilookup import TILookup
from langchain.chat_models import ChatOpenAI
from langchain.agents import Tool
from langchain.agents import initialize_agent
from langchain.agents import AgentType

llm = ChatOpenAI(model_name="gpt-4", temperature=0.3)

class TIVTLookup:
    def __init__(self):
        self.ti_lookup = TILookup()

    def ip_info(self, ip_address: str) -> str:
        result = self.ti_lookup.lookup_ioc(observable=ip_address, ioc_type="ipv4", providers=["VirusTotal"])
        details = result.at[0, 'RawResult']
        sliced_details = str(details)[:3500]
        return sliced_details

    def communicating_samples(self, ip_address: str) -> str:
        domain_relation = vt_lookup.lookup_ioc_relationships(observable = ip_address, vt_type = 'ip_address', relationship = 'communicating_files', limit = "10")
        return domain_relation

    def samples_identification(self, hash: str) -> str:
        hash_details = vt_lookup.get_object(hash, "file")
        return hash_details

ti_tool = TIVTLookup()

tools = [
    Tool(
        name="Retrieve_IP_Info",
        func=ti_tool.ip_info,
        description="Useful when you need to look up threat intelligence information for an IP address.",
    ),
    Tool(
        name="Retrieve_Communicating_Samples",
        func=ti_tool.communicating_samples,
        description="Useful when you need to get communicating samples from an ip or domain.",
    ),
    Tool(
        name="Retrieve_Sample_information",
        func=ti_tool.samples_identification,
        description="Useful when you need to obtain more details about a sample.",
    ),
]
This example demonstrates how to craft agents. In this scenario, my agents utilize three functions from MSTICpy:
- Retrieve_IP_Info: This function queries VirusTotal for a specific IP address and relays the obtained information back to the model.
- Retrieve_Communicating_Samples: This function fetches from VirusTotal the samples that communicate with a particular IP, as provided by the user.
- Retrieve_Sample_Information: Here, we obtain details about a specific sample.
It’s worth noting that numerous other functions can be integrated into our code. However, for the purpose of this demonstration, we’ll maintain simplicity.
agent = initialize_agent(
tools, llm=llm, agent=AgentType.ZERO_SHOT_REACT_DESCRIPTION, verbose=False, agent_kwargs=agent_kwargs, memory=memory
)
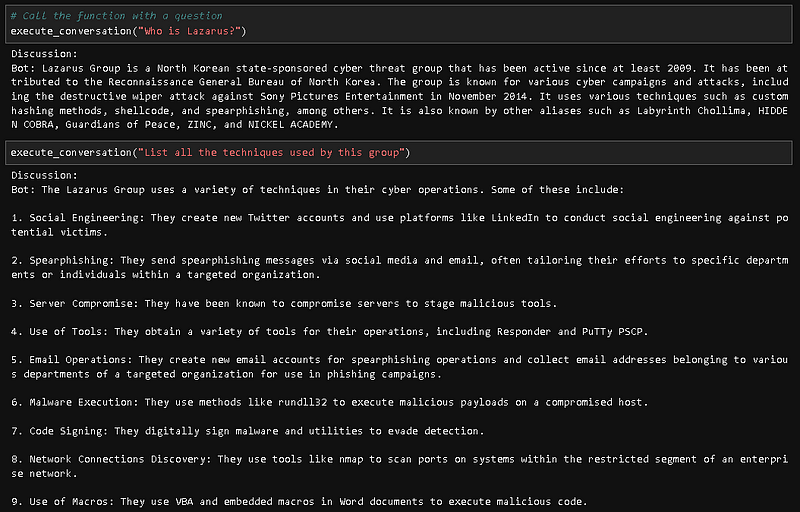
agent.run("Can you give me more details about this ip: 77.246.107.91? How many samples are related to this ip? If you found samples related, can you give me more info about the first one?")In the provided example, I seek information regarding a specific IP. What’s remarkable about pairing agents with LLMs is the innate ability of the model to determine which agent to invoke based solely on the given description. the description you provide is crucial, as it’s interpreted as a prompt and serves as directives for the model.
Upon executing this example, my code activates the MSTICpy agents to get the details. These details are then fed to the model to generate the final response, as illustrated below.

In detail, the code will run MSTICpy automatically as shown below.
🦾Conclusion
In this blog, I explored some interesting LLM features that allow you to build your own application. I created some proof-of-concept implementations that can be easily adapted for your own use case.
I started with a deep dive into prompt engineering concepts and few-shot learning, and then looked at how to build a RAG with your own data. Lastly, I discussed Agents and how they can be used in conjunction with your existing tools.
I hope you enjoyed the journey. If you want to explore more about these concepts, check out the resources below. 👇
That’s it! If you like this blog, you can share it and like it. You can follow me on Twitter @fr0gger_ for more stuff such as this one. ❤
You can also subscribe to my newsletter ‘The Intel Brief’ 💌
Consider becoming a Medium member if you appreciate my content and want to help me as a writer. It cost $5 per month and gives you unlimited access to Medium content. I’ll get a little commission if you sign up via my link and that will help supporting my community projects. Thanks!🤓
Ressources
- OTRF/GenAI-Security-Adventures (github.com)
- Retrieval Augmented Generation (RAG) | Prompt Engineering Guide (promptingguide.ai)
- Agents | 🦜️🔗 Langchain
- microsoft/msticpy: Microsoft Threat Intelligence Security Tools (github.com)
- https://peterroelants.github.io/posts/react-repl-agent/
- TheIntelBrief (securitybreak.io)


