
API Documentation with Swagger in Java Spring: Tricks, Benefits, and More
API documentation is a critical component of any software project. It serves as a bridge between developers, enabling them to understand how to use a particular API effectively, and stakeholders who need insights into the application’s functionality. In Java Spring development, creating clear and concise API documentation is crucial for the success of a project. This is where Swagger comes into play. In this article, we will explore what Swagger is, how to seamlessly integrate it into your Java Spring applications, and the numerous benefits it brings. Let’s dive in.
Firstly, explanation of Swagger
Swagger is an open-source framework that simplifies the process of creating, documenting, and consuming RESTful APIs. It provides a range of tools for developers to design, build, and document APIs with ease. Swagger’s journey began as the “Swagger Specification” and has evolved into a robust ecosystem for API development. What sets Swagger apart is its ability to generate interactive and visually appealing documentation directly from your API code.
Key Benefits of Using Swagger
Swagger is a powerful tool that revolutionizes API development, particularly for Java Spring developers. It offers a range of benefits that streamline the API documentation process, provide an interactive interface, ensure consistency between code and documentation, and promote standardized API design. In this article, we’ll delve deeper into these key advantages and illustrate how Swagger simplifies the API development experience for Java Spring projects.
Automated Documentation:
Traditionally, API documentation was a labor-intensive chore, often prone to errors and inconsistencies. Developers had to manually update documentation whenever the API evolved, which consumed valuable time and introduced the possibility of discrepancies between documentation and code.
Swagger, however, transforms this process into an automated and error-resistant endeavor. It scans your Java Spring project’s source code, encompassing controllers, models, and endpoints. From this code, Swagger dynamically generates comprehensive documentation. This automation not only saves developers significant time but also minimizes the risk of documentation inaccuracies. Any code changes are immediately reflected in the documentation, ensuring it stays up-to-date.
Example: Here’s a snippet demonstrating how Swagger annotations can be used in a Java Spring controller class to document an API endpoint:
import io.swagger.annotations.Api;
import io.swagger.annotations.ApiOperation;
@RestController
@RequestMapping("/api")
@Api(tags = "User Management")
public class UserController {

    @Autowired
    private UserService userService;
    @ApiOperation("Get a list of all users")
    @GetMapping("/users")
    public List<User> getAllUsers() {
        // Implementation
    }
    // Other endpoints
}
Interactive Interface:
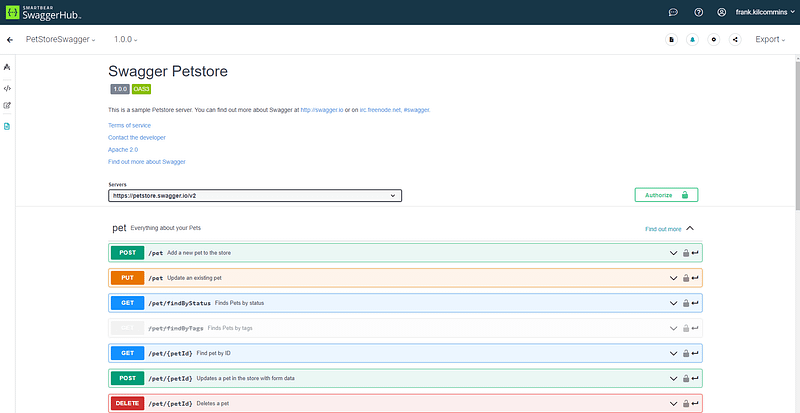
Swagger’s interactive interface, Swagger UI, transforms the API development landscape. It caters to both developers and API consumers, providing an intuitive and interactive platform for exploring and interacting with APIs.
Developers leverage Swagger UI for real-time API endpoint testing. They can create sample requests, specify query parameters, headers, and request payloads, and instantly view the responses. This functionality significantly streamlines the development and testing processes, enabling developers to validate API behavior without leaving the documentation.
Example: Here’s a screenshot of Swagger UI displaying an API endpoint for testing:
Consistency:
Maintaining consistency between API documentation and actual code has long been a challenge in software development. Manual documentation can easily fall out of sync with code changes, leading to confusion and errors for both developers and consumers.
Swagger addresses this challenge by seamlessly synchronizing documentation with the codebase. As developers modify their Java Spring projects, Swagger automatically updates the corresponding documentation. This tight integration ensures that the documentation consistently aligns with the API implementation, reducing the likelihood of misunderstandings or mistakes.
Example: Suppose a developer updates a controller method, such as changing the request mapping path. Swagger’s automated synchronization ensures that the updated path is reflected in the documentation without manual intervention.
Standardization:
Swagger adheres to the OpenAPI Specification, a widely accepted standard for designing and documenting RESTful APIs. By aligning with this industry-standard specification, Swagger promotes consistency and best practices in API design.
Developers who utilize Swagger are encouraged to design APIs in a manner that adheres to established conventions, making it easier for other developers to comprehend and collaborate on those APIs. Additionally, Swagger’s compliance with the OpenAPI Specification fosters interoperability, enabling the sharing of API definitions with developers who may not directly use Swagger. This interoperability ensures that API designs are accessible and understandable by a broader audience.
Example: Swagger’s compliance with the OpenAPI Specification ensures that API documentation includes critical details like endpoints, request and response formats, and status codes, adhering to industry-standard practices.
In conclusion, Swagger significantly elevates the API development experience for Java Spring developers. It streamlines documentation, provides an interactive testing environment, ensures consistency, and promotes standardized API design. Embracing Swagger empowers developers to create well-documented, user-friendly APIs that enhance collaboration and facilitate the creation of robust applications.
Comparing Swagger to Other Documentation Tools:
When evaluating Swagger as a documentation tool, it’s crucial to compare its features and benefits to other methods to appreciate its advantages fully.
Swagger vs. Manual Documentation:
Pros of Swagger:
- Automated Documentation: Swagger’s automated approach significantly reduces the potential for human errors when documenting APIs. Manual documentation often leads to inconsistencies and inaccuracies.
- Interactive Interface: Swagger’s interactive interface, Swagger UI, simplifies API testing and aids in understanding endpoints. Developers can test API requests and responses in real-time directly from the documentation.
- Synchronization: Swagger ensures that documentation stays synchronized with the codebase. Any changes to the API, such as adding new endpoints or modifying request parameters, are reflected in the documentation automatically.
Example: Consider the following Swagger annotation for documenting a Java Spring REST endpoint:
import io.swagger.annotations.ApiOperation;

@RestController
@RequestMapping("/api")
public class UserController {

    @ApiOperation("Get a list of all users")
    @GetMapping("/users")
    public List<User> getAllUsers() {
        // Implementation
    }

    // Other endpoints
}
Cons of Swagger:
- Initial Setup: While Swagger’s benefits are substantial, setting it up initially may require some effort. Configuring Swagger properties and annotations might be unfamiliar to developers new to the tool.
Swagger vs. Postman:
Pros of Swagger:
- Integration with Java Spring: Swagger seamlessly integrates with your Java Spring project, allowing you to generate API documentation directly from your code. This integration simplifies the documentation process.
- Automated Documentation Generation: Swagger generates documentation for all API endpoints automatically. Developers don’t need to manually specify each endpoint, reducing documentation efforts.
- Consistency: Swagger ensures consistency between documentation and code, minimizing the risk of disparities. This consistency promotes clarity and avoids misunderstandings.
Example: Below is a snippet demonstrating how to integrate Swagger into a Java Spring project’s configuration:
@Configuration
@EnableSwagger2
public class SwaggerConfig {

    @Bean
    public Docket api() {
        return new Docket(DocumentationType.SWAGGER_2)
            .select()
            .apis(RequestHandlerSelectors.basePackage("com.example.controller"))
            .paths(PathSelectors.any())
            .build();
    }
}
Cons of Swagger:
- Advanced Features: While Swagger offers comprehensive documentation capabilities, Postman provides more advanced features for API testing and monitoring. Postman includes functionalities like API request collections, environment variables, and testing automation.
Security Considerations:
It’s essential to note that API security is a critical aspect of API documentation. While Swagger facilitates the documentation process, it doesn’t inherently address all security concerns. To fortify security in your Java Spring applications, consider implementing best practices outlined in my related article below:
Swagger’s automated documentation, interactive interface, and synchronization benefits make it a robust choice for documenting Java Spring APIs. While it may require initial setup effort, its advantages, especially in consistency and automation, make it an invaluable tool for developers. However, for advanced API testing and monitoring capabilities, Postman remains a strong alternative.
Top Swagger Tricks For Documentation
Creating exceptional Swagger documentation is a critical step in ensuring your Java Spring API is well-understood and easy to use. To achieve this, we’ll dive into five expert-level tricks that will transform your Swagger documentation into an invaluable resource for developers and consumers alike.
Method-Level Documentation
In the realm of Swagger documentation, method-level documentation is the cornerstone of clarity. We’ll harness Swagger’s annotations, like @ApiOperation, @ApiParam, and @ApiResponse, to leave no stone unturned when it comes to documenting your API methods.
For example:
@ApiOperation(value = "Get user by ID", notes = "Provide an ID to look up a user", response = User.class)
@ApiResponses(value = {
    @ApiResponse(code = 200, message = "User found"),
    @ApiResponse(code = 404, message = "User not found")
})
@GetMapping("/users/{id}")
public ResponseEntity<User> getUserById(@ApiParam(value = "User ID", required = true) @PathVariable Long id) {
    // Implementation
}
This snippet showcases the power of method-level documentation. It enables you to articulate the purpose of each endpoint, elucidate input parameters, and specify expected responses. Additionally, you can include examples and usage scenarios, making your documentation an educational treasure trove.
Now, let’s uncover the next expert tip:
Model and Response Documentation
Great Swagger documentation goes beyond endpoints; it meticulously documents your data models or DTOs (Data Transfer Objects). We’ll leverage Swagger’s @ApiModel and @ApiModelProperty annotations to achieve this:
@ApiModel(description = "User details")
public class User {
    @ApiModelProperty(notes = "Unique user identifier")
    private Long id;
    @ApiModelProperty(notes = "User's full name")
    private String fullName;
    // Other properties
}
By clearly defining model properties and their descriptions, you provide both developers and API consumers with a comprehensive view of your data structures.
Now, onto the next enhancement:
Customize Swagger UI
Swagger UI is the portal through which developers interact with your API. We’ll explore how to tailor it to match your application’s branding and style:
@Bean
public Docket api() {
    return new Docket(DocumentationType.SWAGGER_2)
        .select()
        .apis(RequestHandlerSelectors.basePackage("com.example.controller"))
        .paths(PathSelectors.any())
        .build()
        .apiInfo(apiInfo())
        .useDefaultResponseMessages(false);
}

private ApiInfo apiInfo() {
    return new ApiInfoBuilder()
        .title("My API Documentation")
        .description("Custom Swagger UI for my API")
        .version("1.0")
        .build();
}
This customization not only enhances the appearance of Swagger UI but also makes it more informative and tightly integrated with your application.
Authentication and Authorization
Security is paramount. If your API requires authentication and authorization, we’ll show you how to clearly document these requirements:
@ApiOperation(value = "Create a new user (admin only)", authorizations = { @Authorization(value = "oauth2") })
@PostMapping("/users")
public ResponseEntity<User> createUser(@RequestBody UserRequest userRequest) {
    // Implementation
}
With Swagger annotations, you can describe security schemes such as OAuth2 or API keys. This ensures developers understand which endpoints are protected and how to authenticate for access.
And now, our final expert trick:
Regularly Update Documentation
Documentation is a living entity that evolves with your API. Whenever you modify an endpoint, update the associated Swagger annotations to maintain accuracy. Regularly review and improve your Swagger documentation based on user feedback and evolving API requirements.
Remember, while Swagger simplifies the documentation process, maintaining a well-documented API is an ongoing endeavor. These expert-level tricks will empower you to create informative, accurate, and user-friendly Swagger documentation for your Java Spring API.
In Closing: Swagger Unleashes Your API’s Full Potential
As we wrap up this journey into the world of Swagger for Java Spring development, it’s clear that Swagger is more than just a documentation tool — it’s a game-changer. By automating the documentation process and providing an interactive interface, Swagger redefines how we create, manage, and share API documentation.
With Swagger by your side, you’re not merely documenting APIs; you’re crafting an experience for developers and consumers alike. Your API becomes more than a set of endpoints; it’s a gateway to innovation and collaboration.
While alternative documentation methods exist, Swagger’s ability to effortlessly synchronize documentation with your codebase and its user-friendly interface set it apart. It’s a versatile, indispensable tool for modern Java Spring projects.
So, why wait? Dive into the world of Swagger today and embark on a journey to streamline your API documentation efforts. Deliver documentation that’s not just clear and consistent, but also interactive, making your APIs more accessible and inviting for everyone.
With Swagger, your API’s full potential is within reach. Start documenting with swagger and watch your API ecosystem thrive. Happy documenting!