
API development with nodejs, express and typescript from scratch — DTO, Interface and Authentication

This is the fifth part of the series “API development with nodejs, express and typescript from scratch” and it is all about the structure of data and security.
We will cover the following steps:
- Schema Validation
- DTOs
- Interfaces
- Authentication
- Advanced Postman Features
- Final Thoughts
We will continue building our API that we started in a previous part of the series. If you have not seen the previous parts, follow the link below to get an overview. You can also check out github, clone the individual parts of the series from the github repository and use npm install to get started.
Make sure to set everything up and without further ado, let’s get started.
Schema Validation
Schema validation is the process of checking if the data sent to an API endpoint (such as a request body) conforms to a specific structure or format. This helps ensure that the API only receives valid data, and can also help to prevent security issues such as SQL injection.
TypeScript can be used in conjunction with Express and the class-validator library to provide type checking and improved code-completion for your schema definitions. This can help to catch errors early in the development process, and make it easier to write and maintain your code.
In the context of schema validation, DTOs (Data Transfer Objects) and interfaces serve different purposes but are related in that they both describe the structure of data in your application.
While DTOs are used to define the structure of data that is sent to or received from an API endpoint, interfaces provide a clear contract between the different parts inside of your application.
Let’s have a look on what they are and how we can implement DTOs and interfaces in our application.
DTOs
A DTO (Data Transfer Object) is an object that defines the structure of data that is sent to an API endpoint. DTOs are used to ensure that data sent to the API conforms to a specific structure, and to provide a clear contract between the API and its clients.
By using DTOs, you can ensure that data sent to the API is in the correct format and contains all the necessary information, and that data received from the API can be processed correctly by the client.
We will be using a library called class-validator. Let’s install them first:
npm i class-validatorClass-validator allows the use of decorator and non-decorator based validation.
To keep our structure well organized, we are creating a new directory called dtos under src/ and a new file called users.dto.ts :
src/dtos/users.dto.ts
We will import the class-validator and create a new “Data Transfer Object”:
import { IsString, IsEmail, IsNotEmpty } from 'class-validator';

export class CreateUserDto {
  @IsEmail()
  @IsNotEmpty()
  email: string;

  @IsString()
  @IsNotEmpty()
  name: string;
}
In TypeScript, both classes and interfaces can be used to define Data Transfer Objects (DTOs). The choice between using classes or interfaces will depend on the specific requirements of your application.
Interfaces are commonly used to define DTOs because they allow you to describe the structure of an object without providing an implementation for its methods. Interfaces are a lightweight way to enforce type safety in your code, and to provide a clear contract between different parts of your application.
Classes, on the other hand, can provide more functionality than interfaces, as they allow you to define both the structure and implementation of an object. Classes are often used when you need to define complex data structures that have methods or other behavior.
We are using a class to define our dto, because we also use some class validator decorators.
In general, if you only need to describe the structure of a DTO, an interface is the preferred choice. However, if you need to add methods or other behavior to your DTO, a class may be a better option.
Until now, if we create a new user, we do not have to provide a valid email. You can try it by using any other string. However, this is why we defined our dto. To make use of our dto we have to make some changes to our code.
We will implement our validation in our users.controller.ts file so that we can pass the validated inputs to our services. Let’s import the following to our controller:
import { CreateUserDto } from '@/dtos/users.dto';
import { validate } from 'class-validator';
Now we can perform the validation with the validate function from class-validator like this:
  public createUser = async (req: Request, res: Response): Promise<void> => {
    try {
      const createUserDto = new CreateUserDto();
      createUserDto.email = req.body.email;
      createUserDto.name = req.body.name;

      const errors = await validate(createUserDto);
      if (errors.length > 0) {
        res.status(400).json({ errors });
        return;
      }

      const user: User = req.body;
      const newUser: User = await this.usersService.createUser(user);
      res.status(201).json({ user: newUser });
    } catch (e) {
      res.status(500).json({ error: e.message });
    }
  };
This approach separates the validation logic into a separate DTO class, which can be reused across your application, and keeps your controller and service code focused on their respective responsibilities.
When we test our validation by sending the following request:
{
    "email": "useremail.com"
}
We get the following response:
{
    "errors": [
        {
            "target": {
                "email": "useremail.com"
            },
            "value": "useremail.com",
            "property": "email",
            "children": [],
            "constraints": {
                "isEmail": "email must be an email"
            }
        },
        {
            "target": {
                "email": "useremail.com"
            },
            "property": "name",
            "children": [],
            "constraints": {
                "isNotEmpty": "name should not be empty",
                "isString": "name must be a string"
            }
        }
    ]
}
As you can see, we are validating the email and the name property and the validate function also returns all the constraints. We can also access the the ValidationErrors array and creating a new object with the property as the key and the constraints as the value. Like this, we can define how the response should look like:
  public createUser = async (req: Request, res: Response): Promise<void> => {
    try {
      const createUserDto = new CreateUserDto();
      createUserDto.email = req.body.email;
      createUserDto.name = req.body.name;

      const errors = await validate(createUserDto);
      if (errors.length > 0) {
        const constraints = {};
        errors.forEach(error => {
          const propertyName = error.property;
          const errorConstraints = Object.values(error.constraints);
          constraints[propertyName] = errorConstraints;
        });
        res.status(400).json({ constraints });
        return;
      }
If we send the invalid request from above again, we now get this response:
{
    "constraints": {
        "email": [
            "email must be an email"
        ],
        "name": [
            "name should not be empty",
            "name must be a string"
        ]
    }
}
Interfaces
An interface, on the other hand, is a way to define a custom type in TypeScript. Interfaces are used to define the structure of objects and ensure that they conform to a specific shape.
When you write TypeScript code, the TypeScript compiler compiles your code into JavaScript. During this compilation process, the TypeScript compiler takes into account the interfaces you have defined, and generates JavaScript code that implements the behavior described by those interfaces.
However, it’s important to note that the interfaces themselves are not present in the generated JavaScript code. The JavaScript code generated by the TypeScript compiler only implements the behavior defined by the interfaces, but the interfaces themselves are not part of the generated code.
This means that, when you run the generated JavaScript code, it will not have any knowledge of the interfaces you defined in your TypeScript code, keeping the bundle smaller compared to classes. However, the generated JavaScript code will still have the behavior that was described by the interfaces, and will still be type-safe and correctly implement the contracts defined by the interfaces.
At this point, when we create a new user, we return the whole object including the generated id. If we do not want to return the id for example, we can make use of interfaces to define how the response should look like.
Let’s start by creating a new directory called interfaces in our src directory and create a new file called users.interface.ts like so:
src/interfaces/users.interface.ts
Let’s define our CreateUserResponse interface:
export interface CreateUserResponse {
  email: string;
  name: string;
}
Now we can import it and use it like this in our users.controller.ts file :
import { CreateUserResponse } from '@/interfaces/users.interface'; public createUser = async (req: Request, res: Response): Promise<void> => {
try {
const createUserDto = new CreateUserDto();
createUserDto.email = req.body.email;
createUserDto.name = req.body.name;
const errors = await validate(createUserDto);
if (errors.length > 0) {
const constraints = {};
errors.forEach(error => {
const propertyName = error.property;
const errorConstraints = Object.values(error.constraints);
constraints[propertyName] = errorConstraints;
});
res.status(400).json({ constraints });
return;
}
const user: User = req.body;
const newUser: User = await this.usersService.createUser(user);
const { email, name } = newUser;
const createUserResponse: CreateUserResponse = { email, name };
res.status(201).json({ user: createUserResponse });
} catch (e) {
res.status(500).json({ error: e.message });
}
};When we now create a new user, the response will look like this:
{
    "user": {
        "email": "[email protected]",
        "name": "user"
    }
}
Authentication
At the moment, we can call all of our API endpoints without authentication. However, we want to secure some of the endpoints so that you can only call the API when you are authenticated.
In an Express application, authentication typically involves the following steps:
- User provides their credentials (e.g. username and password) to the server via a login form or API endpoint.
- The server verifies the user’s credentials, usually by checking them against a database of user accounts.
- If the credentials are valid, the server generates an authentication token (e.g. a JSON Web Token or JWT) and sends it to the client.
- The client stores the token (e.g. in a cookie or in local storage) and sends it with each subsequent request to the server.
- The server checks the validity of the token on each request and grants access to protected resources only if the token is valid.
First we need to edit our user model so that we can authenticate users by using a password.
Let’s edit our schema.primsa file:
model User {
  id      String   @id @default(auto()) @map("_id") @db.ObjectId
  email   String   @unique
  name    String
  password String
}
Now use this command to generate the new client:
npx prisma generate
Note that if the type User is not updated in other files after importing, close and open the editor again.
Let’s also add the password to our Dto:
  @IsString()
  @IsNotEmpty()
  password: string;
Next we create a new interface called auth.interface.ts where we define the structures that we need for our auth service:
import { Request } from 'express';
import { User } from '@prisma/client';

export interface DataStoredInToken {
  id: string;
}

export interface TokenData {
  token: string;
  expiresIn: number;
}

export interface RequestWithUser extends Request {
  user: User;
}
The reason you need this interface is that you want to attach additional properties to the standard
Requestobject in Express.js. In this case, you want to attach auserproperty to theRequestobject that represents the authenticated user making the request.
The
RequestWithUserinterface extends theRequestinterface from theexpressmodule, and adds auserproperty of typeUserfrom the Prisma client. This allows you to access theuserproperty in subsequent middleware or route handlers, without having to typecast theRequestobject every time.
The
DataStoredInTokenandTokenDatainterfaces are used to define the structure of the JSON Web Token that is generated and returned to the client during authentication.
DataStoredInTokendefines the structure of the data that will be stored in the token, which in this case is just theidof the user.
TokenDatadefines the structure of the JSON Web Token itself, which consists of atokenproperty containing the actual token string, and anexpiresInproperty indicating the expiration time of the token in seconds. These interfaces are used by thecreateTokenmethod in yourAuthServiceto generate and return the JWT token.
Let’s also define our a new class called HttpException . For this we create a new directory called exceptions and a new file called HttpException.ts with the following code:
export class HttpException extends Error {
  public status: number;
  public message: string;

  constructor(status: number, message: string) {
    super(message);
    this.status = status;
    this.message = message;
  }
}
The
HttpExceptionclass allows you to define a consistent structure for your errors, by including astatusproperty that represents the HTTP status code to send in the response, and amessageproperty that represents the error message to send. By creating custom errors that conform to this structure, you can ensure that your error-handling middleware can easily handle and respond to errors in a consistent and predictable way.
Before we create the auth service, we want to install the libraries that we need for authenticating users with JWT:
npm i jsonwebtoken bcrypt cookie-parser
jsonwebtoken: This package is used for generating and verifying JSON Web Tokens (JWT), which are a standard for securely transmitting information between parties. You can use JWT to implement stateless authentication in your application, where the client sends the JWT token with each request to access protected resources.
bcrypt: This package is used for hashing and verifying passwords, and is a popular way to securely store passwords in databases. When a user creates an account or resets their password, you can use bcrypt to hash the password and store the hash in the database. When the user logs in, you can use bcrypt to verify the password against the stored hash.
cookie-parser: This package is used for parsing cookies in the request headers, and makes it easier to work with cookies in your application. You can use cookies to implement server-side sessions and maintain the user's authentication state across requests.
We can go ahead and add the cookie parser to our index.ts file:
import cookieParser from 'cookie-parser';// App Configuration
const app = express();
app.use(helmet());
app.use(cors());
app.use(express.json());
app.use(cookieParser());
We will also need a SECRET_KEY env variable so go ahead and add it to the .env file:
SECRET_KEY=yoursecretAlso make sure to add to to our validation in validate.Env.ts :
SECRET_KEY: str(),Now let’s create our auth.service.ts file and define our services:
import { compare, hash } from 'bcrypt';
import { sign } from 'jsonwebtoken';
import { PrismaClient, User } from '@prisma/client';
import { CreateUserDto } from '@dtos/users.dto';
import { DataStoredInToken, TokenData } from '@interfaces/auth.interface';
import { HttpException } from '@exceptions/HttpException';
import * as dotenv from 'dotenv';

dotenv.config();

const SECRET_KEY = process.env.SECRET_KEY;

class AuthService {
  public users = new PrismaClient().user;

  public async signup(data: CreateUserDto): Promise<User> {
    const findUser: User = await this.users.findUnique({ where: { email: data.email } });
    if (findUser) throw new HttpException(409, `This email ${data.email} already exists`);

    const hashedPassword = await hash(data.password, 10);
    const createUserData: Promise<User> = this.users.create({ data: { ...data, password: hashedPassword } });

    return createUserData;
  }

  public async login(data: CreateUserDto): Promise<{ cookie: string; findUser: User }> {
    const findUser: User = await this.users.findUnique({ where: { email: data.email } });
    if (!findUser) throw new HttpException(409, `This email ${data.email} was not found`);

    const isPasswordMatching: boolean = await compare(data.password, findUser.password);
    if (!isPasswordMatching) throw new HttpException(409, 'Password is not matching');

    const tokenData = this.createToken(findUser);
    const cookie = this.createCookie(tokenData);

    return { cookie, findUser };
  }

  public async logout(data: User): Promise<User> {
    const findUser: User = await this.users.findFirst({ where: { email: data.email, password: data.password } });
    if (!findUser) throw new HttpException(409, "User doesn't exist");

    return findUser;
  }

  public createToken(user: User): TokenData {
    const dataStoredInToken: DataStoredInToken = { id: user.id };
    const secretKey: string = SECRET_KEY;
    const expiresIn: number = 60 * 60;

    return { expiresIn, token: sign(dataStoredInToken, secretKey, { expiresIn }) };
  }

  public createCookie(tokenData: TokenData): string {
    return `Authorization=${tokenData.token}; HttpOnly; Max-Age=${tokenData.expiresIn};`;
  }
}

export default AuthService;
Now we can create the auth.controller.ts file:
import { NextFunction, Request, Response } from 'express';
import { User } from '@prisma/client';
import { CreateUserDto } from '@dtos/users.dto';
import { RequestWithUser } from '@interfaces/auth.interface';
import AuthService from '@services/auth.service';
import { validate } from 'class-validator';

class AuthController {
  public authService = new AuthService();

  public signUp = async (req: Request, res: Response, next: NextFunction): Promise<void> => {
    try {
      const createUserDto = new CreateUserDto();
      createUserDto.email = req.body.email;
      createUserDto.name = req.body.name;
      createUserDto.password = req.body.password;

      const errors = await validate(createUserDto);
      if (errors.length > 0) {
        const constraints = {};
        errors.forEach(error => {
          const propertyName = error.property;
          const errorConstraints = Object.values(error.constraints);
          constraints[propertyName] = errorConstraints;
        });
        res.status(400).json({ constraints });
        return;
      }
      const userData: CreateUserDto = req.body;
      const signUpUserData: User = await this.authService.signup(userData);

      res.status(201).json({ data: signUpUserData, message: 'signup' });
    } catch (error) {
      next(error);
    }
  };

  public logIn = async (req: Request, res: Response, next: NextFunction): Promise<void> => {
    try {
      const userData: CreateUserDto = req.body;
      const { cookie, findUser } = await this.authService.login(userData);

      res.setHeader('Set-Cookie', [cookie]);
      res.status(200).json({ data: findUser, message: 'login' });
    } catch (error) {
      next(error);
    }
  };

  public logOut = async (req: RequestWithUser, res: Response, next: NextFunction): Promise<void> => {
    try {
      const userData: User = req.user;
      const logOutUserData: User = await this.authService.logout(userData);

      res.setHeader('Set-Cookie', ['Authorization=; Max-age=0']);
      res.status(200).json({ data: logOutUserData, message: 'logout' });
    } catch (error) {
      next(error);
    }
  };
}

export default AuthController;
Before we create our auth routes, we want to create a new middleware, so that we can easily reuse it to secure all the routes that we want to secure with one simple command. Go ahead and create a new directory called middlewares and a new file called auth.middleware.ts with the following code:
import { NextFunction, Response } from 'express';
import { verify } from 'jsonwebtoken';
import { PrismaClient } from '@prisma/client';
import { HttpException } from '@exceptions/HttpException';
import { DataStoredInToken, RequestWithUser } from '@interfaces/auth.interface';
import * as dotenv from 'dotenv';

dotenv.config();

const SECRET_KEY = process.env.SECRET_KEY;

const authMiddleware = async (req: RequestWithUser, res: Response, next: NextFunction) => {
  try {
    const Authorization = req.cookies['Authorization'] || (req.header('Authorization') ? req.header('Authorization').split('Bearer ')[1] : null);

    if (Authorization) {
      const secretKey: string = SECRET_KEY;
      const verificationResponse = (await verify(Authorization, secretKey)) as DataStoredInToken;
      const userId = verificationResponse.id;

      const users = new PrismaClient().user;
      const findUser = await users.findUnique({ where: { id: userId } });

      if (findUser) {
        req.user = findUser;
        next();
      } else {
        next(new HttpException(401, 'Wrong authentication token'));
      }
    } else {
      next(new HttpException(404, 'Authentication token missing'));
    }
  } catch (error) {
    next(new HttpException(401, 'Wrong authentication token'));
  }
};

export default authMiddleware;
Now we can create the auth.routes.ts file:
import { Router } from 'express';
import AuthController from '@controllers/auth.controller';
import authMiddleware from '@middlewares/auth.middleware';
const authRouter = Router();
const authController = new AuthController();
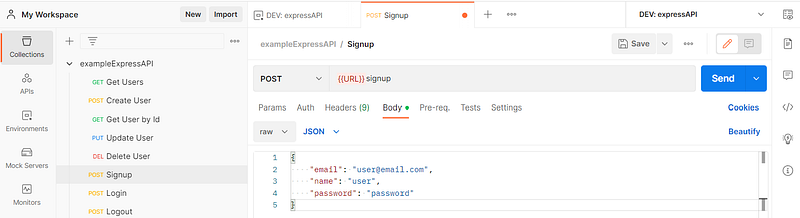
authRouter.post('/signup', authController.signUp);
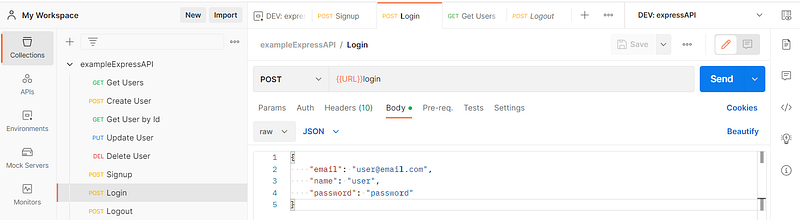
authRouter.post('/login', authController.logIn);
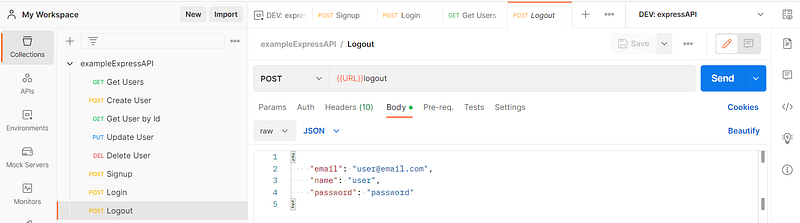
authRouter.post('/logout', authMiddleware, authController.logOut);
export default authRouter;And use it in our index.ts file:
import authRouter from '@/routers/auth.routes';app.use('/', authRouter);Great! Now we are ready to secure our endpoints! As we have now created a Signup route, we can now comment out or delete the createUser route.
//usersRouter.post('/users', usersController.createUser);If we now want to secure specific routes, we simply have to add our auth middleware. Let’s import it in our users.routes.ts file and secure all of the routes:
import { Router } from 'express';
import UsersController from '@controllers/users.controller';
import authMiddleware from '@middlewares/auth.middleware';

const usersRouter = Router();
const usersController = new UsersController();

usersRouter.get('/users', authMiddleware, usersController.getUsers);

usersRouter.get('/users/:id', authMiddleware, usersController.getUserById);

//usersRouter.post('/users', usersController.createUser);

usersRouter.put('/users/:id', authMiddleware, usersController.updateUser);

usersRouter.delete('/users/:id', authMiddleware, usersController.deleteUser);

export default usersRouter;
To test it, we are going to make use of some features in Postman in the next section.
To get a response with the error message, we also want to create an error middleware. Go ahead and create a new file called error.middleware.ts in the middleware directory with the following code:
import { NextFunction, Request, Response } from 'express';
import { HttpException } from '@exceptions/HttpException';

const errorMiddleware = (error: HttpException, req: Request, res: Response, next: NextFunction) => {
  try {
    const status: number = error.status || 500;
    const message: string = error.message || 'Something went wrong';

    res.status(status).json({ message });
  } catch (error) {
    next(error);
  }
};

export default errorMiddleware;
Now use it in the index.ts file:
import errorMiddleware from '@middlewares/error.middleware';app.use(errorMiddleware);Advanced Postman Features
In this section, we are going to make use of some of the advanced features of Postman.
The first feature that we are going to use are Environments. Let’s go ahead and create a new Environment called DEV: expressAPI.
The main reason why we call this DEV: is, because with Postman environments, you can quickly switch between different sets of variables. This is useful when you need to test your API against different environments, such as development, staging, or production.
We will use it to create a variable for URL and JWT as shown in the following image.
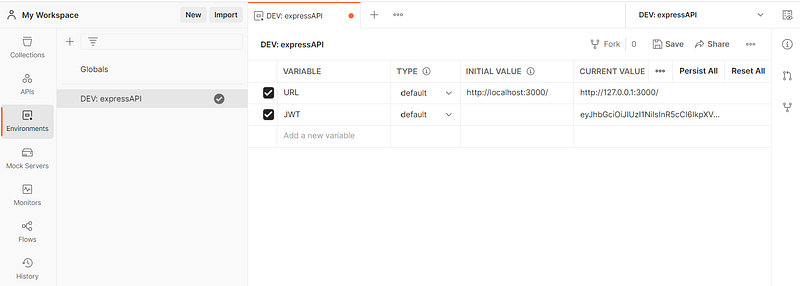
You can now use the URL variable in your requests by using {{URL}} as shown in the following. Make sure to select the correct environment in your request as well as you can see in the top right corner. You can go ahead and do this for all of your requests.
Let’s also create a request for Login and Logout as shown above.
Login:
Logout:
With implementing authentication, testing our API has become more challenging. We can no longer can test the endpoints without being authenticated. In order that we do not have do login and copy the JWT token to the request so that we can send an authenticated request, we already made a good decision and decided to use cookies for authentication.
However, I quickly want to show you how you can automate this process in Postman when using a Bearer token that you receive as json.
You can set the following command in your request under Tests so that the access_token that comes as json is automatically stored in an environment variable called JWT that we created.
pm.environment.set("JWT”,pm.response.sjon().access_token);
Now you can use the access token in other requests inside the Auth tab as type Bearer Token like this {{JWT}}
After login, you can check the tab Cookies and see that we got our JWT token as value and we can also see when it was created in the Expires column.

After a successful login, you can test all of the secured API endpoints without any problem.
Final Thoughts
There are still some final steps that you could do before deploying to production. At this point you have a good understanding of how an express API works under the hood. You can go ahead and check out this github repo, that also includes features that we did not cover. There you can find complete production ready project starters for different ORMs. I hope this series provided enough information so that you can go ahead and use these project starters on your own and understand the structure, as well as all the features that are implemented. The project starters also include the following:
- Object Oriented Approach
- Create other Reusable Middleware
- Sophisticated Error Handling
- Testing with Jest
- Documentation with SwaggerUI
- Docker and PM2
You can also find complete project starters for different ORMs including:
- graphql
- knex
- mikro-orm
- mongoose
- prisma
- routing-controllers
- sequelize
- typegoose
- typeorm
This series was meant to teach you everything that you need to know to understand how an express API works under the hood. Now you are able to use the different project starters from the github repo mentioned above.
If you want to explore API Development with python and fastapi, I can recommend the following tutorial. It is a great course if you want to know everything from start to finish and you want a video that you can follow. It includes everything, even how to dockerize your application, how to deploy it and a CI/CD pipeline as well. You can also use some parts for our API project here.
I hope you find this series helpful, feel free to clap and follow me to stay up to date with all the articles from myself. More tutorials and insights are on the way.
If you want to get unlimited, ad-free access to all the stories on Medium, you can subscribe by using my referral link below :)