
Angular: State Management With NGXS
Understand the fundamentals of NGXS and build a sample CRUD application

NGXS is essentially a state management library for Angular. You might have come across other state management solutions for Angular, such as NgRx and Akita. The following are two articles that I have written before about using NgRx for state management:
In this piece, I intend to cover the below topics.
- What is NGXS?
- Fundamental concepts of NGXS
- Building a sample CRUD application
What is NGXS?
As already stated above, NGXS is a state management solution specifically developed for Angular. Before we go further into details, let’s try to understand the concept of state in an Angular application.
State
Theoretically, the application state is the entire memory of the application. In simple terms, the application state is composed of data received by API calls, user inputs, presentation UI state, application preferences, etc. A simple, concrete example of an application state would be a list of customers maintained in a CRM application.
Let’s try to understand the application state in the context of an Angular application. As you are well aware, an Angular application is typically made up of many components. Each of these components has its own state and has no awareness of the state of the other components. In order to share information between parent-child components, we use @Input and@Output decorators. However, this approach is practical only if your application consists of a few components, as shown below.

When the number of components grows, it becomes a nightmare to pass the information between components solely via @Input and @Output decorators. Let’s take the following figure to elaborate on this.

If you have to pass information from component three to component six, you will have to hop four times and involve three other components. As you can see, it’s a very cumbersome and error-prone way of managing the state. Having a state management solution such NGXS can come in handy in a situation like this. It will simply transform the above data transfer model something similar to the below.
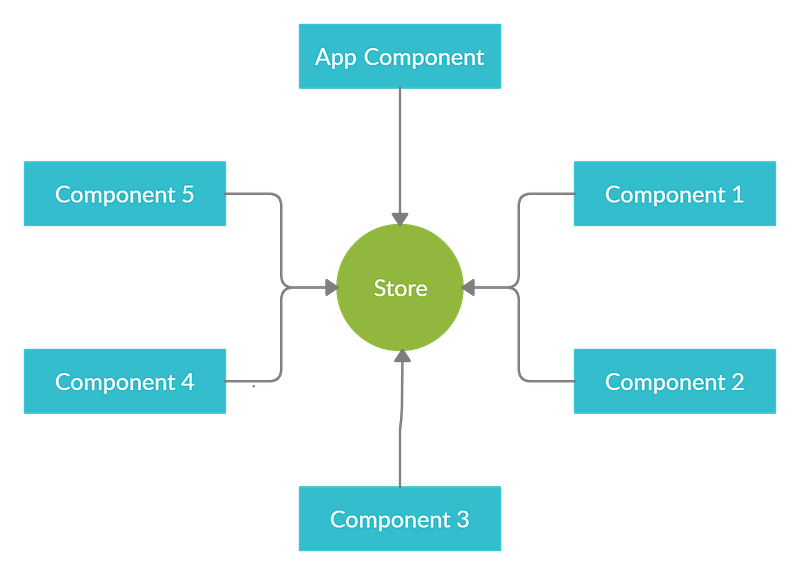
According to this architecture, data flows between the store and the components, instead of from component to component.
Fundamental Concepts of NGXS
NGXS comprises four major concepts — Store, Actions, State, and Selects.
Store
The store is the key element in the entire state management process. It facilitates the interaction between the components and the state. You can obtain a reference to the store via Angular dependency injection, as shown below.
constructor(private store: Store) { }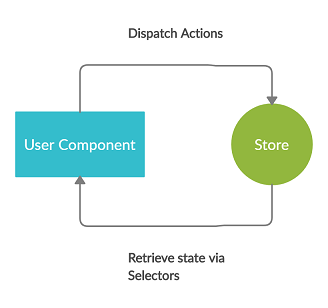
This store reference can be subsequently used for two primary operations:
- To dispatch actions to the store via the
store.dispatch(…)method, which will, in turn, trigger the state modifier functions. - To retrieve the application state via Selects.
State
In the context of NGXS, States are classes that define a state container. These classes hold different portions of the overall application state. Suppose your application consists of two feature modules called User and Product. Each of these modules handles different parts of the overall state. Product information will always be maintained in the products section in the state. User information will always be maintained in the user section of the state. These sections are also called slices.

In NGXS, state classes are typically defined as follows.
Actions
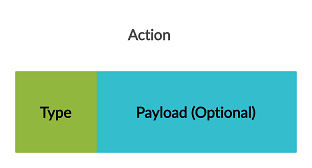
An action is an instruction that you dispatch to the store, optionally with some metadata (payload). Based on the action type, the store decides which operations to execute. Each action contains a type field that is its unique identifier. Metadata that is optionally embedded inside the action will be used by the state modifier functions to modify the state.
The following is a simple action without any metadata. It will have the type attribute, which essentially describes the purpose of the action. State class will have a method that listens to this action, and in turn, retrieve users via the backend API and updates the application state.
The following is an action definition with metadata. Again, the State class will have a method that listens to this action and will invoke the backend API to create a user. State class function will obtain user object embedded inside the action and passes it to the API call.
Select
Selects are functions that slice a specific portion of State from the global state container. You can basically use the Select functions to query the application state. In NGXS, there are two methods to select State — you can either call the select method on the Store service or use the @Select decorator. First, let's look at the @Select decorator.
Select decorators: You can select slices of data from the store using the @select decorator. The following code snippet illustrates this technique.
@Select(AppState.users) user$: Observable<User[]>;Store select function: The Store class also has a select function that you can use to read portions of the application state.
constructor(private store: Store) { this.users$ = this.store.select(state => state.users);}
Building a Sample CRUD Application
Throughout the rest of this article, we will be building a simple course management system by using NGXS. As shown below, you will be able to perform all the CRUD operations on the course entity via this simple web application.

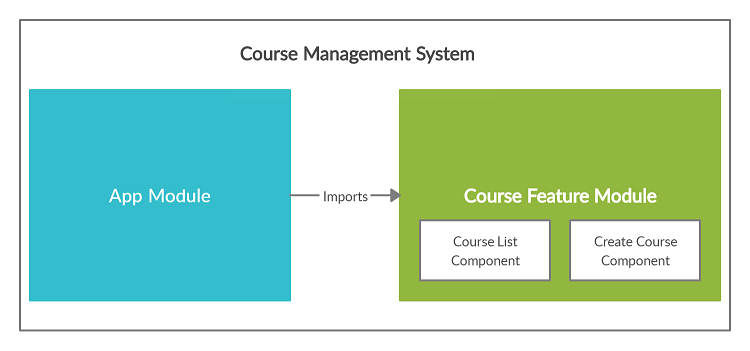
Project structure
As the following figure illustrates, our application will consist of two primary modules, namely App and Course. The course module, in turn, will have two custom components, namely Course List and Create Course.
REST API
In general, an Angular application interacts with a REST API to perform CRUD operations on data.
Therefore, I implemented a simple REST API in Spring Boot that exposes the below endpoints. We will use this API to connect from the Angular application and carry out data operations.
// Retrieve all courses
GET     http://localhost:8080/api/courses
// Create a course
POST http://localhost:8080/api/courses// Delete a course
DELETE http://localhost:8080/api/courses/{courseId}// Update a course
PUT http://localhost:8080/api/courses/{courseId}Full source code
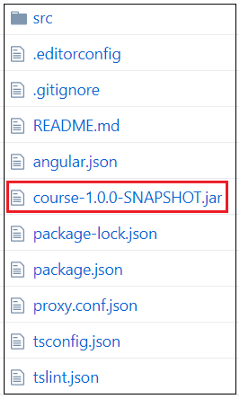
You can find the complete source code of this sample application on GitHub. Please note that I have also added the executable JAR file (course-1.0.0-SNAPSHOT.jar) of the Spring Boot application (REST API) to the same repository.
Setting Up the Project
Software versions used
- Angular CLI: 8.0.1
- Node: 11.6.0
- Angular: 8.0.2
- NGXS: 3.6.2
- Bootstrap: 4.4.1
Project initialization
Step 1: Execute the below command and create a new project.
ng new ngxs-crud-appStep 2: We will use Bootstrap to add styles to our application. You can install Bootstrap with the command below.
npm install bootstrap --saveStep 3: Import Bootstrap by updating the angular.json file as shown below.
Step 4: Install NGXS dependencies.
npm install @ngxs/store --save
npm install @ngxs/logger-plugin @ngxs/devtools-plugin --save-dev
Adding NGXS Support to Root Module
In order to add NGXS support to your application, you will have to update the app.module.ts file as follows.
Please note that we will make few additional tweaks to this file before completing the application.
Special notes
NgxsReduxDevtoolsPluginModulemodule is registered in order to integrate the application with Redux Devtools extension.NgxsLoggerPluginModuleis a simple console log plugin to log actions as they are processed.
Creating and Setting Up the “Course” Feature Module
Generating the “course” module
As stated earlier, our application consists of two major modules, App and Course. Now is the time to create the Course module with the below command.
ng generate module courseThe command will create a sub-folder named course directly under the app folder. In addition, a new file named course.module.ts will be created and placed under the app/course folder.
The following is the initial version of course.module.ts file. Note that this file will be altered downstream to declare components and to declare service providers.
Defining the “course” model
As the next step, you have to define the model interface that represents the Course entity. Create a file called course.model.ts and place it under the app/course/model folder. The content of this file should be as follows.
Defining the service class
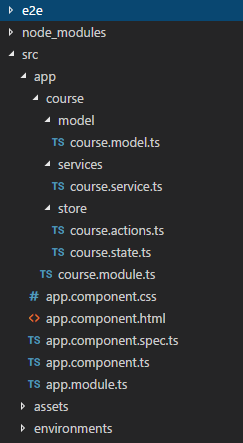
Service is used to interact with the REST API and perform data operations. In order to define the service class, create a file named course.service.ts and place it under the app/course/services folder.
The content of this file should be as follows.
As you can see, it has methods to retrieve, create, update, and delete Course entities via the REST API. Once the service class is defined, you have to register it in the course.module.ts file as shown below.
The following figure illustrates the folder structure of our application at this point.

Adding NGXS Artifacts to “Course” Module
As the next step, you have to define NGXS artifacts such as state class, actions, and selects. These artifacts will be created inside a directory called store which in turn is located under the app/course directory.
Defining NGXS actions (course.actions.ts)
We have defined four actions — AddCourse, GetCourses, UpdateCourse, and DeleteCourse—for the four different CRUD operations.
Defining the State and Selects (course.state.ts)
Special notes:
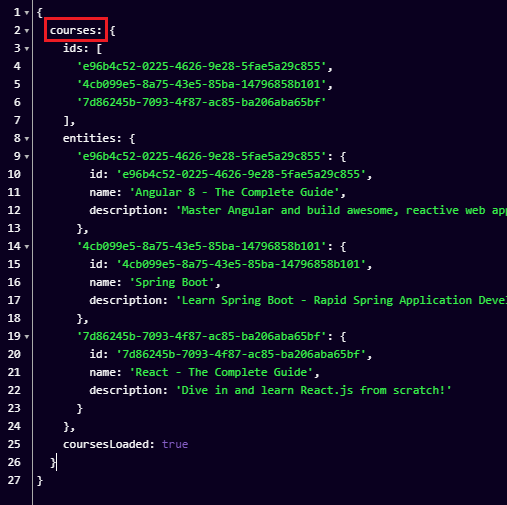
- Defining the application state (@State): As already stated in a previous section, in NGXS, States are classes that define a State container. These classes hold different portions of the overall application state. In the above file,
CourseStateholds the state slice pertaining to the course module. The format of this state slice is defined as shown below.coursesattribute holds an array of Course entities loaded into the state.areCoursesLoadedis a boolean flag which is used to indicate whether the courses are already loaded into the state or not.
export class CourseStateModel {courses: Course[];
areCoursesLoaded: boolean;}
- Defining the state slice identifier: The
nameattribute in the below code snippet indicates the name of the state slice that represents the course module. In this instance,coursesslice contains the information related to all the courses.
@State<CourseStateModel>({ name: 'courses', defaults: { courses: [], areCoursesLoaded: false}
})
- Defining the selects (@Selector): In the above file, we have defined two selects respectively to retrieve a list of courses from the state and to check the value of
areCoursesLoadedflag. - Defining the action listeners (@Action): These are functions that listen to different actions dispatched to the store. Based on the action type specified in @Action decorator, the corresponding functions will be invoked. For example, if you dispatch an action of type
GetCoursesto the store, the following function will be invoked.
At this stage, your project folder structure should look like the below.
Registering CourseState in the NGXS Module
After NGXS artifacts are defined, you have to attach the CourseState to the parent NGXS module. As shown in a previous section, the NGXS module is defined in the app.module.ts file. Let’s make a small tweak in that file and register CourseState in the NGXS parent module.
Creating Components and Defining Routes
As we discussed earlier, our application is made up of two main modules, namely App and Course. The course module consists of two components, namely courses-list and create-course.
Our next step is to create these two components and define the corresponding routes. Note that the courses-list and create-course directories will be created under the app/course/component directory.
Defining “courses-list” component
Template: courses-list.component.html
Component: courses-list.component.ts
Special notes:
This component is responsible for facilitating the list, updating, and deleting operations.
Defining “create-course” component
Template: create-course.component.html
Component: create-course.component.ts
Declaring the components in the Course module
You have to declare the above components in the course.module.ts file, which is already created. In addition, these components will be used in the app.module.ts file to defined the routes. In order to expose these components to the app.module.ts file, you have to define these components in the exports array. Please note that I have also imported FormsModule and HttpClientModule which will be used by templates and service respectively.
Configuring routes
Now is the time to define the routes and associate corresponding components with those routes. This has to be done in the app.module.ts, as shown below.
Defining the router outlet
As the final step, you have to define the router outlet in the app.component.html.
At this stage, your folder structure should look like the below.

Configuring a Proxy to Access the REST API
As mentioned at the start of this article, we are using a simple REST API written in Spring Boot to connect from the Angular application.
The Spring Boot application runs on localhost:8080, whereas the Angular application runs on localhost:4200. This mismatch will cause a Cross-Origin Resource Sharing (CORS) error when the Angular application tries to access the REST API. To overcome this issue we have to create a proxy.
Creating a proxy file
Create a file called proxy.conf.json inside the project’s root folder (the same level where package.json file exists), and add the below content to it.
Registering the proxy file
In the CLI configuration file, angular.json, add the proxyConfig option to the serve target:
Running the Application
The application should be started as a two-step process. You have to first start the Spring Boot application (REST API) and then the Angular application.
Running the Spring Boot application (REST API)
The Spring Boot application is packaged into an executable JAR file with the name course-1.0.0-SNAPSHOT.jar and placed here (GitHub).
Note that you have to have Java 8 installed on your system to execute this JAR file. If Java 8 is installed, you can execute the below command and start the application.
java -jar {path_to_the_jar_file}/course-1.0.0-SNAPSHOT.jarRunning the Angular application
The Angular application can be started by executing the below command.
ng serveWhen the application is started successfully, navigate to http://localhost:4200/courses from your browser, and you should see the below screen.
Conclusion
The prime objective of this story was to provide a step-by-step guide to build an NGXS-based Angular application. If you have worked with NgRx before, you would understand that NGXS has less boilerplate code compared to NgRx. In my next article, I hope to implement a similar CRUD application by using Akita as the state management system. Subsequently, we can do a comparison of NgRx, NGXS, and Akita as state management systems.


