
Angular Interceptor
Angular Interceptors: The Complete Guide
What is an Angular Interceptor? How does it work? How to create and provide one to an application? How to bypass them? Read to learn more.

The Angular interceptor, also known as the HTTP interceptor, is one of my favorite HTTP features in Angular. The reason I like interceptors is that they promote clean code. You write a few lines of code in a single place, and they apply it globally to every HTTP request and response.
In this article, we are going to study:
- what is an Angular interceptor and how does it work
- how to implement and provide one or multiple interceptors to our application
- how to mutate requests and responses using an Angular interceptor
- how to bypass specific or all interceptors if needed
- other use cases as part of a demo application
So, let’s get started!
What is an Angular Interceptor?
Simply put, interceptors in Angular are services that implement the HttpInterceptor interface. They are built for intercepting HTTP client-server communication.
The official documentation of the HttpInterceptor interface states:
Interceptors sit between the
HttpClient interface and theHttpBackend.
Let’s explain what this means with the help of a diagram.
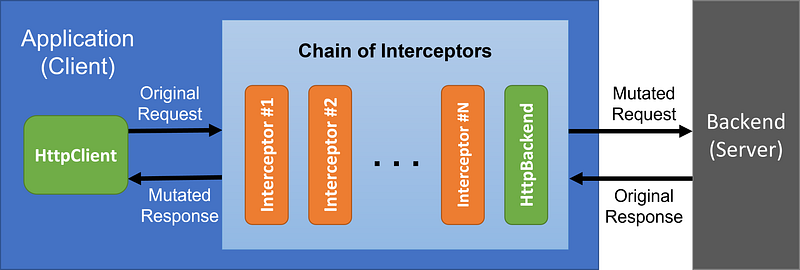
On one end, there is our application (client) that uses the HttpClient to create requests. On the other end, there is the backend (server) that’s going to respond to these requests. Before requests are dispatched from our application, they pass through a chain of interceptors.
This chain contains all the interceptors we provide to the application (more on that soon). At the end of this chain, there will always be a final handler added by Angular, the HttpBackend. So, the chain will always have at least one handler.
The HttpBackend dispatches the requests to the server. We’ll see how we can use HttpBackend to bypass the previous handlers in the following section.
In all other cases, requests and responses pass through the entire chain of interceptors. This makes interceptors the perfect place to globally mutate requests and responses.
Creating an Angular Interceptor
To create an interceptor, we simply need a service to implement the HttpInterceptor interface. This interface has only one method which we need to implement, the intercept method.
The first parameter req, with the HttpRequest type, represents the actual request on its way to the server.
The second parameter next, with the HttpHandler type, represents the next interceptor in the chain.
Finally, the returned type is an Observable of the HttpEvent type. In most cases, this represents the response to ordinary HTTP requests.
Note: We say ordinary HTTP requests because there is an enumeration called
HttpEventType, whose values represent separate events, such as upload/download progress events, etc.
Providing HTTP Interceptors
Like any other service, we can’t use an interceptor, unless we provide it to the application. However, interceptors are provided differently than ordinary services. They need to be provided in a NgModule.
We pass the HTTP_INTERCEPTORS token to the provide property inside the providers array. Even though we may have multiple interceptors, we use the same token for all of them.
Next, we pass the name of the class containing the interceptor to the useClass property.
Lastly, we set the multi property, which should be set to true for interceptors. This configures the provide token to be injected by the Dependency Injection (DI) mechanism as an array of values. This “array of values” contains the interceptors we provided.
An important detail is that interceptors are applied in the order they are provided. In other words, order matters. Now, looking at our previous diagram, it should be easy to tell that requests are processed in the order we provide the interceptors, while responses are processed in the opposite order.
For example, in the previous snippet, the order of processing for requests is: LogInterceptor>CacheInterceptor>AuthInterceptor>MockInterceptor, while the order of processing for responses is the opposite: MockInterceptor>AuthInterceptor>CacheInterceptor>LogInterceptor.
Mutating Requests & Responses
Because all requests will pass through the chain of interceptors, interceptors are the perfect place to globally mutate requests and responses.
To mutate a request, the first thing we need to do in the intercept method is to clone the request. We have to do this as the request object is read-only. Thus, we can’t just modify it. We need to create a copy, mutate the copy, and then pass the mutated copy on to the next handler in the chain.
The returned type of the intercept method is an Observable. Therefore, we can mutate the response by using RxJs pipeable operators, such as the map operator, as shown in the previous snippet.
Similar to what we did with the request, we need to clone the event, mutate the copy, and return the mutated copy.
Passing Metadata to Interceptors
In some cases, we may want to pass some information to one of the interceptors. One way to do this would be using a service as an intermediary. But there is another way to do this with less code overhead.
In our demo, the AuthInterceptor sets the Authorization header to all requests. When logging into an application, the login request doesn’t require an authorization token to be set in its headers. Also, since we’re not logged in yet, we don’t have a token at all.
How can we tell to the AuthInterceptor to ignore login requests?
Enter HttpContextToken.
We define an HttpContextToken in the same file with the AuthInterceptor. We set the default value to false. We also implement how this token will be consumed by the interceptor. In our case, we just want to ignore any request that has this context token set to true.
Then, in the login method, we set the context token to true.
The AuthInterceptor will consume this token and pass the request without mutating it. Unless set explicitly, the token for the rest of the requests will have the default value, which is false.
This is just for demonstration purposes. We could simply do a check on the token to determine whether to bypass the interceptor or not. The point is that we can use an HttpContextToken in the same way to pass any piece of information we may want.
Note: We don’t have an actual backend. So, in the StackBlitz at the end of this article, you’ll find a different implementation that doesn’t ignore the request. Instead, it creates a mock JWT token and returns it.
Bypassing the Chain of Interceptors
Lastly, in some rare cases, we may want to bypass the chain of interceptors completely.
To bypass the chain, we simply inject the HttpBackend handler and provide it to a local HttpClient instance. Using this instance to make requests will not trigger any of the provided interceptors.
Use Cases of the Angular Interceptor
We’ve covered pretty much all you need to know about Angular interceptors. Now, let’s see some use cases.
Logging
One thing we can do with interceptors is to log request/response metadata such as the method and the URL of the request, the status code and text of the response, and so on.
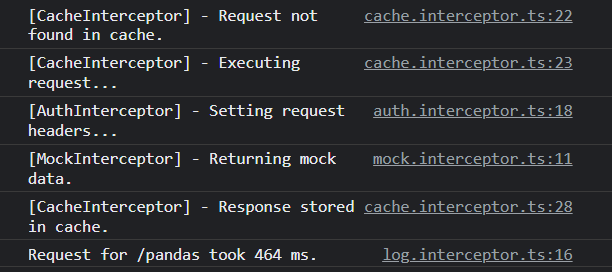
In our demo, we log the elapsed time of each response. Note that this is just a demo. We want to highlight the benefits of caching the responses, so we consciously chose to provide LogInterceptor first.
Caching
Another great use of an HTTP interceptor is for caching the responses of requests. This can bring many benefits such as reduced network utilization, reduced load on backend servers, and improved responsiveness and user experience.
The only responses we can cache are for GET requests. The CacheInterceptor checks whether the response is in the cache. If it is, it returns the cached response. Otherwise, it passes the request to the next handler.
Adding Request Headers
Our third interceptor in the chain is the AuthInterceptor, which adds the Content-Type and Authorization header to all requests passing through.
Instead of setting headers to each request, we use this interceptor to intercept all requests and add the desired headers before passing them to the next handler.
We provide the AuthInterceptor after the CacheInterceptor because if the response is already cached, the request won’t be dispatched and thus there’s no need to set any headers.
Mocking Responses
The last interceptor we provide is the MockInterceptor. Since we don’t have a backend server, we create a mock response with some data. We also added a mocked delay for demonstration purposes.
Demo Application
You can find a working demo at the StackBlitz below, or just the code in this GitHub repository. Don’t forget to subscribe to my newsletter to stay tuned for more content like this.
The first time we visit the /pandas page, it requests the data. The following logging is printed in the console and the data appear after the mocked delay.
The next time we visit the page the response is retrieved from the cache. The chain stops at the CacheInterceptor, so we don’t see any logging from the next interceptors. Finally, the elapsed time drops to 0ms, and the data appear immediately.

Conclusion
In this article, we studied interceptors in Angular. We explained what they are and how they work. We created and provided several interceptors to our application.
We also covered cases like passing metadata to an Angular interceptor or bypassing the chain of interceptors with the HttpBackend. Finally, we presented a demo application to see them in action.
Thank you for reading.
More content at PlainEnglish.io. Sign up for our free weekly newsletter. Follow us on Twitter and LinkedIn. Check out our Community Discord and join our Talent Collective.


