
Angular 15 & Net 7: Secure WebAPI with JSON Web Token and Security Policy | Tutorial 12

Preface
I’m thrilled to launch a blog series focused on creating dynamic and user-friendly web applications with Single Page Application (SPA) architecture using Angular 15, Bootstrap 5, and .NET 7 API. The series includes a comprehensive project demo and multiple blog posts that delve into full-stack components, offering the latest tools and techniques in the industry.
Introduction
Get ready to join us on an exciting journey as we delve into Tutorial 12 of our Angular 15 and NET 7 blog series! In this installment, we will explore the world of Web API security and the powerful JSON Web Token (JWT). Brace yourself for a comprehensive solution to Role-Based Access Control (RBAC) that leverages NetCore middleware.
Demo Application Overview
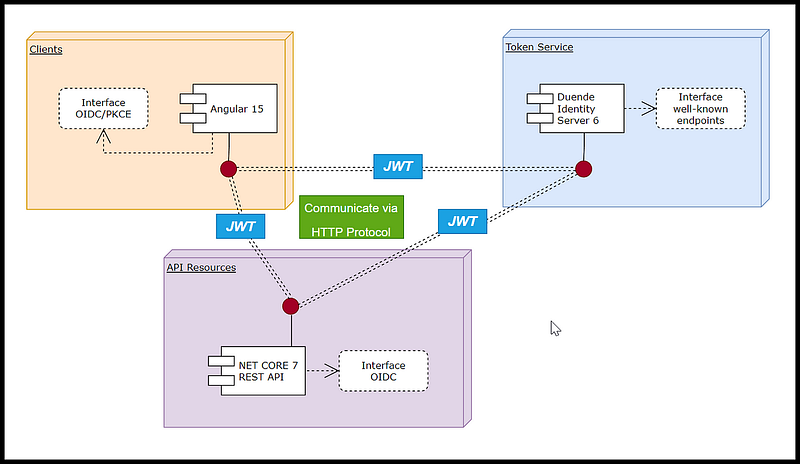
The architecture of the Talent Management demo application follows the Clients, API Resources, and Token Service (CAT) pattern, which promotes tight integration and loose coupling. The components communicate with each other using the HTTP protocol to exchange and validate JSON Web Token (JWT).
Figure 1 illustrates the interface among the components as follows:
- Clients: The Angular application leverages the OpenID Connect (OIDC) protocol to request JWTs from the Token Service server. The JWT is then passed through the header when accessing API Resources.
- API Resources: The .NET Core 7 REST API decodes the JWT to validate the identity of the client and authorize access to requested resources.
- Token Service: The Duende IdentityServer issues JWTs to the Angular client and validates them when requested by the REST API.
In this blog post, we’ll delve into the internal security of API Resources, exploring the C# source code that relates to Authorize and Policy and how they protect endpoints. By dissecting the code, you’ll gain a deeper understanding of how it all works. The best part? The demo project includes pre-written code that you can easily integrate into your own project, making login implementation a breeze!
Source Code Discussed in This Blog Post
This blog series comes with a demo app called Talent Management. Please refer to the blog post entitled Fullstack Angular 15, Bootstrap 5 & .NET 7 API: Project Demo for instructions to download and run the demo project on localhost.
Prerequisites
- Familiarity with Token Service concepts and technologies (e.g. Duende IdentityServer).
- Familiarity with the Fullstack Angular 15, Bootstrap 5 & NET 7 API blog series and its demo project.
Table of Contents
Chapter 1: Introduction to Secure Web APIs with JSON Web Tokens (JWTs)
- Overview of Web APIs and their security challenges
- Introduction to JWTs and their benefits for Web API security
Chapter 2: Overview of Web API Security in the Demo Project
- Securing the Talent Management App with JWTs
- Handling JWTs in C# Web API middleware
Chapter 3: Code Walkthrough of Web API Authentication and Authorization
- Configuring Web API authentication to use JWTs issued by Duende IdentityServer
- Setting up Role-Based Access Control (RBAC) policy for authorization
- Applying the Authorize attribute in the Controller to enforce RBAC policy
Chapter 1: Introduction to Secure Web APIs with JSON Web Tokens (JWTs)
Overview of Web APIs and their security challenges
When a Single Page Application (SPA) communicates with a C# Web API that uses IdentityServer as its Token Service, it can send a JSON Web Token (JWT) to authenticate the user.
First, the SPA needs to obtain an access token from the IdentityServer Token Service. This access token is a JWT that contains information about the user and their authorized scopes. To obtain this access token, the SPA sends a request to the IdentityServer Token Service with the appropriate parameters, such as the client ID, client secret, and scope.
Once the SPA has obtained the access token, it can include it in the headers of any subsequent requests it sends to the C# Web API. Specifically, the access token should be included in the “Authorization” header as a bearer token, just like before. This header will look something like:
authorization: Bearer <access_token>
In the C# Web API, the access token can be validated and used to authenticate and authorize the user. This validation is typically done by validating the signature of the access token and checking the expiration time, as well as verifying that the token was issued by the expected IdentityServer instance.
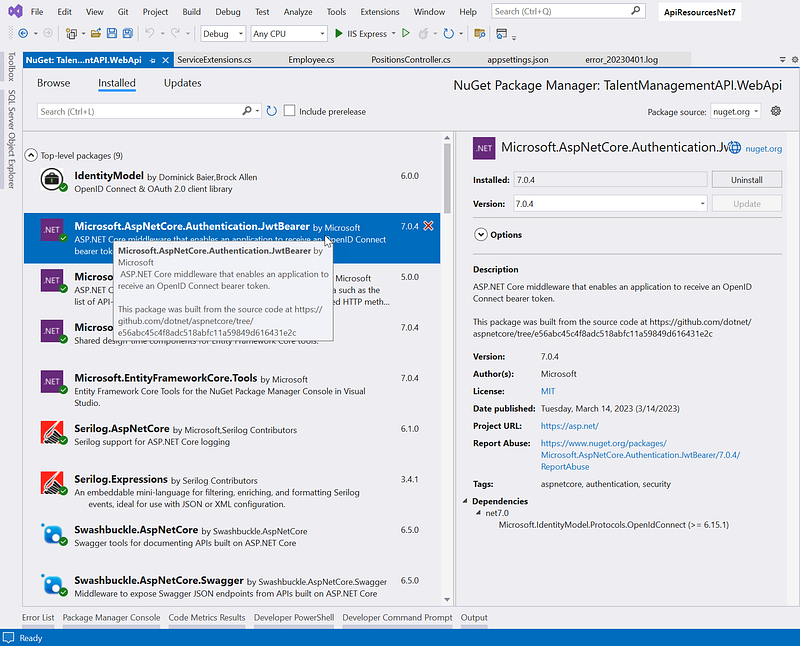
Microsoft.AspNetCore.Authentication.JwtBearer is a middleware that provides JSON Web Token (JWT) authentication support in ASP.NET Core applications. It is a part of the ASP.NET Core authentication middleware pipeline and provides a way to authenticate and authorize HTTP requests using JWT tokens.
JWT Bearer authentication works by using a token that is sent as a bearer token in the HTTP Authorization header. The middleware extracts the token from the header and validates it using a symmetric or asymmetric encryption algorithm. Once validated, the token is used to authenticate the request and authorize access to the requested resource.
To use JWT Bearer authentication in an ASP.NET Core Web API, the Microsoft.AspNetCore.Authentication.JwtBearer package must be installed in the project. See Figure 2 for a screenshot of the installed package in the Manage Nuget Packages in Visual Studio.
Then, the AddAuthentication method should be called in the ConfigureServices method of the Program.cs class, passing in JwtBearerDefaults.AuthenticationScheme as the authentication scheme to use. This registers the JWT Bearer authentication middleware in the application’s middleware pipeline.
Next, the AddJwtBearer method should be called to configure the JWT bearer authentication options, such as the Authority, and RequireHttpsMetadata.
Finally, the [Authorize] the attribute can be added to the controller or action methods to enforce authentication and authorization for the requested resource.
In summary, Microsoft.AspNetCore.Authentication.JwtBearer is a middleware that provides JWT authentication support in ASP.NET Core applications. It is used in ASP.NET Core Web APIs for security purposes by authenticating and authorizing HTTP requests using JWT tokens.
We will delve into the implementation of Web API security in Chapter 3, where we’ll provide a detailed code walkthrough.
Introduction to JWTs and their benefits for Web API security
There are several benefits to using JSON Web Tokens (JWTs) for securing Web APIs, including:
- Stateless: JWTs are self-contained and contain all the necessary information, including user information and expiration time. This eliminates the need for servers to maintain a session state and makes it easier to scale APIs.
- Cross-domain support: Since JWTs are sent in the HTTP header, they can be used across different domains or subdomains.
- Reduced network overhead: JWTs are typically smaller in size compared to traditional authentication mechanisms like cookies, which means they can reduce the amount of data transferred over the network.
- Security: JWTs can be signed with a secret key, making them difficult to tamper with or forge. This provides a secure way of verifying the authenticity of the token and the user associated with it.
- Flexibility: JWTs can store additional information beyond just authentication, such as user roles or permissions, which can be used for authorization purposes.
Overall, JWTs provide a secure and efficient way to authenticate and authorize users in Web APIs.
Chapter 2: JWT integration between Angular frontend and backend WebAPI Net 7
Securing the Talent Management App using JSON Web Tokens (JWTs)
Please watch the video below for a quick demonstration of the demo application. The Home, Employee, and About pages are accessible to anonymous users. However, the Position listing page is restricted to authenticated users only. Furthermore, access to the drill-down Position details is limited to users in the HRAdmin role.
The demo Talent Management app security model is as follows:
- To view a listing of positions, a user must be logged in.
- To view the details of a position, a user must be logged in.
- To add a new position, a user must be in the HR Admin role
- To delete a Position, a user must be in the HR Admin role.
Handling JWTs in C# Web API middleware
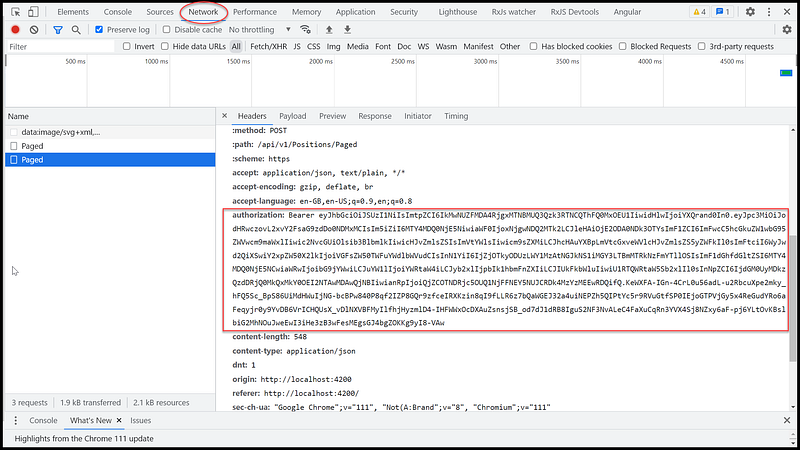
After login the demo Talent Management app, you can inspect the Network tab in the Developer’s console and view the Access Token passing thru the authorization header as shown in Figure 3.
In a C# web API, the middleware responsible for picking up the JWT token from incoming HTTP requests is the JWT Bearer authentication middleware Microsoft.AspNetCore.Authentication.JwtBearer (discussed in Chapter 1). This middleware is responsible for validating the JWT token in the request header and establishing the user’s identity based on the contents of the token.
When the middleware receives a request, it inspects the request headers for the presence of an Authorization header. If the header is present, it checks to see if the header value starts with the Bearer scheme. If it does, the middleware extracts the JWT token from the header value and attempts to validate it using the configured validation parameters. If the token is valid, the middleware sets the user’s identity based on the contents of the token and allows the request to proceed to the protected endpoint. If the token is invalid, the middleware rejects the request with an appropriate error response.
Chapter 3: Configuring Web API Authentication and Authorization
In this chapter, we will provide a detailed code walkthrough for the following tasks:
Task 1: Configuring Web API authentication to use JWT issued by Duende IdentityServer
Task 2: Setting up a Role-Based Access Control (RBAC) policy
Task 3: Applying the Authorize attribute in the Controller
Task 1: Configuring Web API authentication to use JWT issued by Duende IdentityServer
Set up the settings in the appsettings.json
In C#, appsettings.json is a configuration file used in .NET Core and ASP.NET Core applications. It’s a JSON file that contains a set of key-value pairs, which can be used to configure various aspects of an application, such as database connections, logging behavior, email settings, and more.
The appsettings.json file is typically located in the root folder of a .NET Core or ASP.NET Core project and is read at runtime to configure the application. The file can be edited directly, or values can be overridden using environment variables or command-line arguments.
Here are the settings that pertain to IdentityServer and Roles security in the appsettings.json.
//https://github.com/workcontrolgit/TalentManagement-ApiResources-Net7/blob/master/TalentManagementAPI/TalentManagementAPI.WebApi/appsettings.json
"Sts": {
    "ServerUrl": "https://localhost:44310"
  },
  "ApiRoles": {
    "EmployeeRole": "Employee",
    "ManagerRole": "Manager",
    "AdminRole": "HRAdmin"
  },
This JSON configuration file contains settings for an application. Here’s a breakdown of what each section represent:
- Sts: Specifies the URL of a Secure Token Service (STS) for authentication.
- ApiRoles: Defines constants for different roles within the application, including Employee, Manager, and Admin.
Configure authentication in the Web API to use the token issued by IdentityServer
AddJwtBearer is a method in ASP.NET Core that is used to configure the JWT bearer authentication scheme. JWT (JSON Web Token) is a compact and self-contained way to transmit information between parties as a JSON object. JWT tokens can be used to authenticate and authorize users in web applications.
Here is code snippet of using AddJwtBearer to configure the JWT bearer authentication scheme in the source code file ServiceExtensions.cs
// https://github.com/workcontrolgit/TalentManagement-ApiResources-Net7/blob/master/TalentManagementAPI/TalentManagementAPI.WebApi/Extensions/ServiceExtensions.cs
public static void AddJWTAuthentication(this IServiceCollection services, IConfiguration configuration)
{
    services.AddAuthentication(JwtBearerDefaults.AuthenticationScheme)
        .AddJwtBearer(JwtBearerDefaults.AuthenticationScheme, options =>
        {
            options.RequireHttpsMetadata = false;
            options.Authority = configuration["Sts:ServerUrl"];
        });
}
This is a C# extension method for configuring JWT (JSON Web Token) authentication in an ASP.NET Core application. The method extends the IServiceCollection interface, which is used to configure the dependency injection services that are available within an application’s service container.
The method accepts two parameters:
services, which represents the IServiceCollection instance being extendedconfiguration, which is an instance of IConfiguration, an interface that provides access to an application’s configuration settings
Inside the method, the AddAuthentication method is called to add authentication services to the application’s service collection. The JwtBearerDefaults.AuthenticationScheme constant is passed to specify the authentication scheme to be used, which in this case is JWT Bearer.
The AddJwtBearer method is then called to add the JWT Bearer authentication scheme with its associated options. The options set include:
RequireHttpsMetadata: A boolean value indicating whether HTTPS is required for the metadata address (set to false in this case)Authority: The base URL of the token issuer’s authentication server, which is retrieved from theSts:ServerUrlconfiguration setting
Overall, this method sets up the JWT Bearer authentication scheme and its associated options, making it possible for an ASP.NET Core application to authenticate requests using JWTs issued by a specific authentication server.
Task 2: Setting up a Role-Based Access Control (RBAC) policy
In ASP.NET Web API, security policies are a way to control access to resources based on user roles or claims. A security policy is a set of rules that define who can access a specific resource or action in an API.
To use security policies in ASP.NET Web API, you need to add the Authorization middleware to the pipeline and define one or more authorization policies in the ConfigureServices method of the Program.cs file.
Authorization policies are defined using the AuthorizationPolicyBuilder class, which provides methods for defining rules that determine whether a user is authorized to access a particular resource or action. The AuthorizationPolicyBuilder class provides methods for defining authorization rules based on claims, roles, and other criteria.
Once you have defined your authorization policies, you can apply them to individual resources or actions in your API using the [Authorize] attribute. The [Authorize] attribute specifies the name of the authorization policy that should be used to control access to the resource or action.
When a user requests a resource or action that is protected by an authorization policy, the Authorization middleware checks whether the user is authorized based on the rules defined in the policy. If the user is authorized, the request is allowed to proceed. If the user is not authorized, the Authorization middleware returns an HTTP 401 Unauthorized response.
Using security policies in ASP.NET Web API is a powerful way to control access to resources and actions in your API based on the user’s role or claims, and helps to ensure that your API is secure and protected against unauthorized access.
Below is code snippet of using AddAuthorization builder to configure the security policies in the source code file ServiceExtensions.cs
public static void AddAuthorizationPolicies(this IServiceCollection services, IConfiguration configuration)
  {
      string admin = configuration["ApiRoles:AdminRole"],
              manager = configuration["ApiRoles:ManagerRole"], employee = configuration["ApiRoles:EmployeeRole"];

      services.AddAuthorization(options =>
      {
          options.AddPolicy(AuthorizationConsts.AdminPolicy, policy => policy.RequireAssertion(context => HasRole(context.User, admin)));
          options.AddPolicy(AuthorizationConsts.ManagerPolicy, policy => policy.RequireAssertion(context => HasRole(context.User, manager) || HasRole(context.User, admin)));
          options.AddPolicy(AuthorizationConsts.EmployeePolicy, policy => policy.RequireAssertion(context => HasRole(context.User, employee) || HasRole(context.User, manager) || HasRole(context.User, admin)));
      });
  }
public static bool HasRole(ClaimsPrincipal user, string role)
  {
      if (string.IsNullOrEmpty(role))
          return false;

      return user.HasClaim(c =>
                          (c.Type == JwtClaimTypes.Role || c.Type == $"client_{JwtClaimTypes.Role}") &&
                          System.Array.Exists(c.Value.Split(','), e => e == role)
                      );
  }
This is a C# code snippet that defines an extension method for the IServiceCollection interface in ASP.NET Core to add authorization policies for a web API.
The AddAuthorizationPolicies method takes two parameters: IServiceCollection services and IConfiguration configuration. The IServiceCollection parameter is used to add authorization policies to the service collection, while the IConfiguration parameter is used to retrieve configuration data related to the API roles.
The method retrieves the values of three configuration keys related to API roles: AdminRole, ManagerRole, and EmployeeRole. These keys are assumed to be stored in the configuration section “ApiRoles”.
The method then calls the AddPolicy method on the options object passed to the AddAuthorization method to define three authorization policies: AdminPolicy, ManagerPolicy, and EmployeePolicy. Each policy is defined with a RequireAssertion method that takes a lambda expression as a parameter. This lambda expression uses the HasRole method to determine if the user has the required role(s) to access the policy.
The HasRole method takes a ClaimsPrincipal object, which represents the user’s claims, and a string parameter that represents the required role. The method returns a boolean value that indicates whether the user has the required role.
The method checks if the role parameter is null or empty and returns false if it is. Then, it uses the HasClaim method of the ClaimsPrincipal object to check if the user has a claim that matches the role parameter. The method checks the type of the claim, which is expected to be role or client_role (depending on the type of token used), and checks if the value of the claim contains the required role. If it does, the method returns true; otherwise, it returns false.
Overall, this code defines authorization policies for an ASP.NET Core web API based on the roles defined in configuration data. The HasRole method is used to check if a user has the required role(s) to access a policy.
Task 3: How to configure security for Web API endpoints inside controllers
In Web API, a controller is a class that handles incoming HTTP requests and generates HTTP responses. It acts as the main entry point for the application and is responsible for processing and routing requests to the appropriate methods and actions.
The controller contains a set of actions, which are methods that correspond to specific HTTP verbs (GET, POST, PUT, DELETE, etc.). When a request is received by the controller, it is routed to the appropriate action method based on the HTTP verb and the URL of the request.
Securing Web API endpoints in a controller in C# can be achieved through several steps:
- Configure authentication in the Web API to use the token issued by IdentityServer
- Add the
[Authorize]attribute to the API endpoint in the controller. To protect the API endpoint, add the[Authorize]attribute to the action method in the controller. This attribute specifies that only authenticated users can access the endpoint.
Code walkthru: PositionsController.cs
using Microsoft.AspNetCore.Authorization;
using Microsoft.AspNetCore.Http;
using Microsoft.AspNetCore.Mvc;
using System;
using System.Collections.Generic;
using System.Diagnostics;
using System.Security.Claims;
using System.Threading.Tasks;
using TalentManagementAPI.Application.Features.Positions.Commands.CreatePosition;
using TalentManagementAPI.Application.Features.Positions.Commands.DeletePositionById;
using TalentManagementAPI.Application.Features.Positions.Commands.UpdatePosition;
using TalentManagementAPI.Application.Features.Positions.Queries.GetPositionById;
using TalentManagementAPI.Application.Features.Positions.Queries.GetPositions;
using TalentManagementAPI.WebApi.Extensions;

// For more information on enabling Web API for empty projects, visit https://go.microsoft.com/fwlink/?LinkID=397860

namespace TalentManagementAPI.WebApi.Controllers.v1
{
    [ApiVersion("1.0")]
    public class PositionsController : BaseApiController
    {

        /// <summary>
        /// Gets a list of positions based on the provided filter.
        /// </summary>
        /// <param name="filter">The filter used to query the positions.</param>
        /// <returns>A list of positions.</returns>
        [HttpGet]
        public async Task<IActionResult> Get([FromQuery] GetPositionsQuery filter)
        {
            return Ok(await Mediator.Send(filter));
        }

        /// <summary>
        /// Gets a position by its Id.
        /// </summary>
        /// <param name="id">The Id of the position.</param>
        /// <returns>The position with the specified Id.</returns>
        [HttpGet("{id}")]
        public async Task<IActionResult> Get(Guid id)
        {
            return Ok(await Mediator.Send(new GetPositionByIdQuery { Id = id }));
        }

        /// <summary>
        /// Creates a new position.
        /// </summary>
        /// <param name="command">The command containing the data for the new position.</param>
        /// <returns>A 201 Created response containing the newly created position.</returns>
        [HttpPost]
        [Authorize]
        [ProducesResponseType(StatusCodes.Status201Created)]
        [ProducesResponseType(StatusCodes.Status400BadRequest)]
        public async Task<IActionResult> Post(CreatePositionCommand command)
        {
            var resp = await Mediator.Send(command);
            return CreatedAtAction(nameof(Post), resp);
        }

        /// <summary>
        /// Sends an InsertMockPositionCommand to the mediator.
        /// </summary>
        /// <param name="command">The command to be sent.</param>
        /// <returns>The result of the command.</returns>
        [HttpPost]
        [Route("AddMock")]
        //[Authorize]
        public async Task<IActionResult> AddMock(InsertMockPositionCommand command)
        {
            return Ok(await Mediator.Send(command));
        }

        /// <summary>
        /// Retrieves a paged list of positions.
        /// </summary>
        /// <param name="query">The query parameters for the paged list.</param>
        /// <returns>A paged list of positions.</returns>
        [HttpPost]
        [Authorize]
        [Route("Paged")]
        public async Task<IActionResult> Paged(PagedPositionsQuery query)
        {
            // debug
            var user = HttpContext?.User!;
            var userId = user.FindFirst(ClaimTypes.NameIdentifier)?.Value;
            var name = User.FindFirst("name")?.Value;

            // print debug information to the console
            Debug.WriteLine($"User ID: {userId}");
            Debug.WriteLine($"Name: {name}");


            return Ok(await Mediator.Send(query));
        }

        /// <summary>
        /// Updates a position with the given id using the provided command.
        /// </summary>
        /// <param name="id">The id of the position to update.</param>
        /// <param name="command">The command containing the updated information.</param>
        /// <returns>The updated position.</returns>
        [HttpPut("{id}")]
        [Authorize(Policy = AuthorizationConsts.ManagerPolicy)]
        public async Task<IActionResult> Put(Guid id, UpdatePositionCommand command)
        {
            if (id != command.Id)
            {
                return BadRequest();
            }
            return Ok(await Mediator.Send(command));
        }

        /// <summary>
        /// Deletes a position by its Id.
        /// </summary>
        /// <param name="id">The Id of the position to delete.</param>
        /// <returns>The result of the deletion.</returns>
        [HttpDelete("{id}")]
        [Authorize(Policy = AuthorizationConsts.AdminPolicy)]
        public async Task<IActionResult> Delete(Guid id)
        {
            return Ok(await Mediator.Send(new DeletePositionByIdCommand { Id = id }));
        }
    }
}
This is a C# ASP.NET Core Web API controller that handles CRUD operations for positions. The controller has five endpoints:
Get: This endpoint returns a list of positions based on the provided filter. It takes aGetPositionsQueryobject as a query parameter, which is used to filter the positions.Get{id}: This endpoint returns a position with the specified ID. It takes the ID of the position as a route parameter.Post: This endpoint creates a new position. It takes aCreatePositionCommandobject as the request body, which contains the data for the new position.Paged: This endpoint returns a paged list of positions. It takes aPagedPositionsQueryobject as the request body, which contains the query parameters for the paged list.Put{id}: This endpoint updates a position with the given ID using the provided command. It takes the ID of the position as a route parameter and aUpdatePositionCommandobject as the request body, which contains the updated information.Delete{id}: This endpoint deletes a position by its ID. It takes the ID of the position as a route parameter.
The controller also has authorization attributes set on some of its endpoints. For example, the Get{id}, Post, Paged, Put{id}, and Delete{id} endpoints have the [Authorize] attribute set, which requires the user to be authenticated to access these endpoints. Additionally, the Put{id} and Delete{id} endpoints have the [Authorize(Policy = AuthorizationConsts.AdminPolicy)] attribute set, which requires the user to have the "Admin" policy to access these endpoints.
The controller inherits from the BaseApiController class and uses the Mediator property to send commands and queries to the application layer. The Mediator property is injected into the controller using dependency injection.
The TalentManagementAPI.WebApi.Extensions namespace is also used to extend the functionality of the controller.
Recommended Contents
- Understanding Microsoft.AspNetCore.Authentication.JwtBearer and Its Role in Securing ASP.NET Core Web APIs☻
- Understanding IServiceCollection in Net Core ☻
- What are LocalStorage And SessionStorage in the browser?
- What is REST API?
- Seven Object-Oriented Programming Jokes ☻
Summary
Why didn’t the teddy bear want any dessert?
He was already stuffed.

Microsoft.AspNetCore.Authentication.JwtBearer is a middleware that provides authentication and authorization functionality for secure Web APIs in .NET Core. It supports JSON Web Tokens (JWT) as a mechanism for authentication and can be used with any JWT issuer, including Duende IdentityServer.
Once the authentication middleware is set up, you can use policy-based authorization to enforce access control rules based on the user’s role or other criteria. Policies can be defined in the ConfigureServices method of the Program.cs and then applied using the Authorize attribute in the controller or action methods.
Overall, using Microsoft.AspNetCore.Authentication.JwtBearer and policy provides a comprehensive solution for securing Web APIs in .NET Core, enabling role-based access control and other authentication and authorization features.
Thanks for reading! Hope you found it useful. Want more? Please follow me and become a member on medium for more articles. With your support, I’ll keep creating awesome content for you. Have a great day ahead! — Fuji Nguyen


