
Android Studio Kotlin Live Templates
How to make your life as an Android developer easier with Live Templates

Live Templates are a powerful tool to facilitate the life of a developer. The feature is included in Android Studio and is available for Kotlin since version 4.0.0.
Summarized, Live Templates provide a shortcut to easy access often used code snippets with the option for customization on demand. If you didn’t know of this feature before and you are an Android Developer I can almost guarantee you that you unknowingly already used it.
Code snippets defined in form of Live templates can be included in the auto code completion (IntelliSense). Out of the box, there are already plenty of them provided for you within Android Studio 4.0.0 and above.
Live Templates
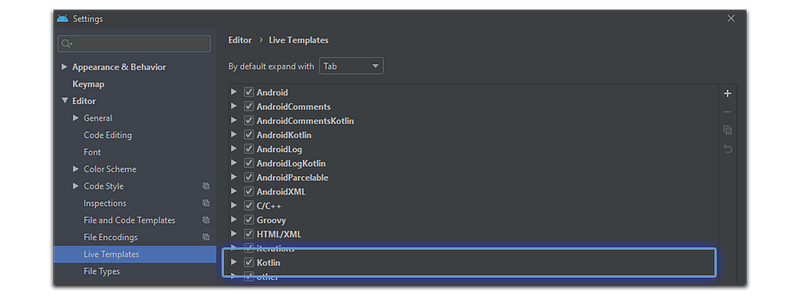
To look up which Live Templates Android Studio already offers you for your Kotlin code, go to File → Settings → Editor → Live Templates → Kotlin. Besides the Kotlin tab, you can also take a look at the AndroidKotlin tab.
For example, you are tired of writing the same code when you just want to show a Toast message over and over again? Instead of writing the whole statement, just type in “toast” and hit “STRG + space” or “cmd+ space” when you are using a MAC.

As you can see the auto-completion offers you a Live Template for creating a new Toast . Hit enter and you will see the following:

Your cursor automatically jumps to the context input parameter field. You now just need to put in your Context and hit Enter. The text parameter as the next field will automatically gain focus and you just need to type in your desired message. Hit Enter once again and your whole statement is finished. That was quick, wasn’t it?
Like you could see with this example, Live for these templates means that you can dynamically put parameters into the template “live” while coding.
Creating your own Live Templates
Think a bit. What recurring code snippet you write over and over again?
As long as the code snippet is contained in only one file, you can create almost any code snippet you could think of.
The only limitation is that Live Templates cannot create files. If you have a use case where you want to create a whole file with the help of a template, you better take a look at File and Code Templates. We will briefly discuss this topic in a later section within this article.
No matter what kind of template, all of the mentioned use the Velocity Template Language (VTL). Even if it may look a little bit abstract at the beginning you will quickly get used to it.
Because we just had the example for creating a Toastvia pre-defined Live Template, I will now show you a practical example of how you can create your own Live Template for showing a simple Snackbar.

We now want to write the statement from the screenshot as a Live Template. First, open up Android Studio and go to File → Settings → Editor → Live Templates.
Because we want to add a Live Template for creating an Android component with Kotlin, select the AndroidKotlin tab. The tab has no direct influence on where the Live Template will be shown to you. It is just helpful to categorize your Live Templates. If you want to turn off a Live Template category, just uncheck it.
Now, with the selected AndroidKotlin tab, at the very right click on the + symbol → Live Template. A new screen will pop-up at the bottom of the Settings dialog and asks you for an abbreviation.
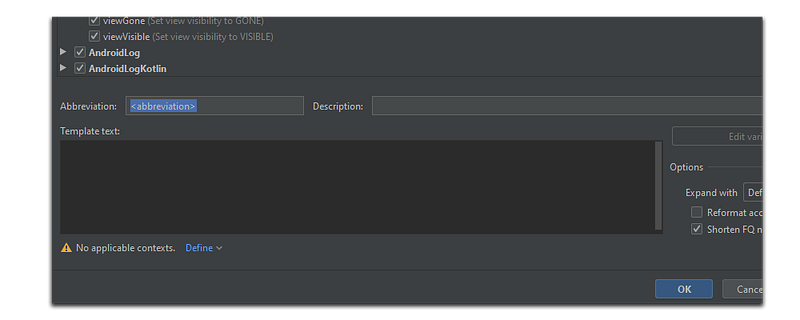
The abbreviation will later be the statement you can type in to trigger the auto-completion. Because we want to write a Live Template for creating a Snackbar template I will go for “snack” (without the quotes) as the abbreviation.
The description field is optional. It will be shown to you in the auto-completion besides the abbreviation. So if you ever forget what the respective abbreviation stands for, you can give yourself a hint.
Now we come to the main part of the Live Template. The writing of the VTL. Write the following VTL snippet into the Template text field:
For Live Templates, we don’t have the possibility to specify imports. Therefore we always need to write the whole package path to components we use. When you apply the Live Template from auto-complete, in most cases the respective import will directly be applied to your class.
- $view$ stands for the view parameter for the make function of the Snackbar to find a parent from.
- $message$ is the respective message you want to show in your Snackbar
Below the template text field, you will still see the warning “No applicable contexts”. The Live Templates that will be shown to you via auto-complete, depend on the active project context. For example, if you add a Live Template to the Java context, it won’t be shown to you if you are working on a Kotlin project.
Because we wrote a Kotlin template, we click on Define and check the top-level Kotlin context. For each of the contexts, you have further possibilities to customize the context where you want your Live Template to be shown. For our Snackbarexample and the sake of clarity the Kotlin context is sufficient.
After you hit apply to save your Live Template, you can return to your code. Try out your Live Template by typing snack (or your respective own abbreviation) and hit “STRG + space” or “cmd+ space” to trigger auto-completion.
If you followed the previous steps you should see the following:

Hit Enter and the following statement will be automatically created for you:

Congratulations, you successfully created your very first own Live Template!
Comparison to File and Code Templates
Another method for using predefined code templates is the File and Code Templates section. You can access it by going to File → Settings → Editor → File and Code Templates.
With File and Code Templates you can even create code snippets but even whole classes. A very cool feature is that you can dynamically fill in variables that you can define via dialog at runtime as you know it from class creation via Android Studio.
For example, have you ever wondered how a new Kotlin class is generated when you go for Right-Click → File → New Kotlin Class/File?
Just navigate to the File and Code Templates → Files and select Kotlin Class and you will see the code from the “KotlinClassFileTemplate” below.
Doesn’t the code snippet seem familiar to you?
- ${PACKAGE_NAME} stands for the package name
- ${NAME} is the class name you define in the known input dialog for creating a new Kotlin class that you can see in the screenshot below.

Nevertheless, at least for Android Studio, it has its limitations when it comes to creating multiple files at once.
If you want to automatically create a whole package structure with all the files you need like an Activity, a respective Layout, automatically generate the code for creating and adding a Fragment, a ViewModel, and so on, you will probably need to take a look at Plugin development for Android Studio.
However, if you just want to avoid the recurrent writing of similar code for creating files like you often do for a RecyclerView adapter, for example, File and Code templates are the right choices for you.
Conclusion
In this article, I showed you the basics of Live Templates, how to use them and how you can easily create your own. Additionally, I have compared and differentiated File and Code Templates.
To summarize the key takeaways: Live Templates are designed to make a developer’s day easier by allowing repetitive code snippets to be generated while typing with the help of auto-complete.
In contrast, file and code templates are more suitable for generating classes that have a very similar structure.
Leave a clap if you liked my article and hit the follow button for more.


