
Android Biometric Authentication With BiometricManager
This is one of the methods to protect sensitive information. Biometric Authentication is a way for users to authenticate using face or fingerprint recognition. It’s very important especially for financial and healthcare apps that require authentication every time the user opens the app.

For those that want to jump straight to the code:
1. Declare the dependency:
You can check the latest release here.
dependencies {
    implementation("androidx.biometric:biometric:1.1.0")
    ...
}
2. Choose Authentication Type
BIOMETRIC_STRONG— Class 3 biometric, find out more about it hereBIOMETRIC_WEAK— Class 2 biometric, find out more about it hereDEVICE_CREDENTIAL— User is prompted with LockScreen PIN/Pattern/Password
I won’t go into much detail about the differences between STRONG and WEAK as it would be too long a topic. You can read about them in the most recent Android version docs. https://source.android.com/docs/compatibility/14/android-14-cdd?hl=en#7310_biometric_sensors
You can also choose multiple types together:
BIOMETRIC_STRONG or DEVICE_CREDENTIAL
3. Check whether the Authentication is available
Double-check imports to make sure you’re using androidx.biometric.*
I’ll use BIOMETRIC_STRONGin the following examples. Some devices might not have biometric Authentication. Here we have 4 possibilities:
val biometricManager = BiometricManager.from(this)
when (biometricManager.canAuthenticate(BIOMETRIC_STRONG)) {
    BiometricManager.BIOMETRIC_SUCCESS -> {
        // Authenticate using biometrics
    }

    BiometricManager.BIOMETRIC_ERROR_NO_HARDWARE -> {
        // Biometric features hardware is missing
    }

    BiometricManager.BIOMETRIC_ERROR_HW_UNAVAILABLE -> {
        // Biometric features are currently unavailable.
    }

    BiometricManager.BIOMETRIC_ERROR_NONE_ENROLLED -> {
        // The user didn't enroll in biometrics that your app accepts, prompt them to enroll in it
        if (Build.VERSION.SDK_INT >= Build.VERSION_CODES.R) {
            val enrollIntent =
                Intent(Settings.ACTION_BIOMETRIC_ENROLL).apply {
                    putExtra(
                        Settings.EXTRA_BIOMETRIC_AUTHENTICATORS_ALLOWED,
                        BIOMETRIC_STRONG or DEVICE_CREDENTIAL
                    )
                }
            startActivityForResult(enrollIntent, REQUEST_CODE)
        }
    }
}
4. Create the Prompt
If we received BIOMETRIC_SUCCESSwe can prompt the user with the biometric authentication dialog. We’ll need 2 things:
- Dialog called
PromptInfo
private fun createPromptInfo(): BiometricPrompt.PromptInfo =
    BiometricPrompt.PromptInfo.Builder()
        .setTitle("Authenticate with biometrics")
        .setAllowedAuthenticators(BIOMETRIC_STRONG)
        .setConfirmationRequired(false)
        .setNegativeButtonText("Login with password")
.build()Promptwith callback
private fun createBiometricPrompt(): BiometricPrompt {
    val callback = object : BiometricPrompt.AuthenticationCallback() {
        override fun onAuthenticationError(errorCode: Int, errString: CharSequence) {
            super.onAuthenticationError(errorCode, errString)
            if (errorCode == BiometricPrompt.ERROR_NEGATIVE_BUTTON) {
                // If you've added negative button to prompt dialog
            }
        }

        override fun onAuthenticationFailed() {
            super.onAuthenticationFailed()
            // Failure with unknown reason
        }

        override fun onAuthenticationSucceeded(result: BiometricPrompt.AuthenticationResult) {
            super.onAuthenticationSucceeded(result)
            // Authenticated successfully!
        }
    }

    val executor = ContextCompat.getMainExecutor(this)
    return BiometricPrompt(this, executor, callback)
}
5. Show the prompt
Now that we have all set, you can show the prompt:
BiometricManager.BIOMETRIC_SUCCESS -> {
    val prompt = createBiometricPrompt()
    prompt.authenticate(createPromptInfo())
}
If the user authenticates successfully, the onAuthenticationSuceeded inside the callback will be invoked.
BONUS: Debugging Biometrics on Emulator
If you want to debug Biometrics on Emulator, you’ll need to add a Lock Screen and Fingerprint, which you should get prompted for when trying to unlock with biometrics. You can test Fingerprint in the emulator by following the steps in this image:
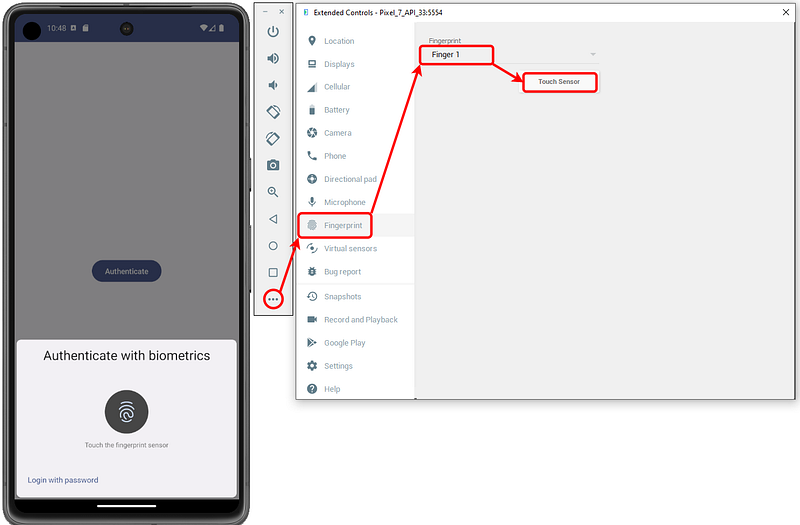
If you’ve had trouble setting it all up, clone the example app to see how it works together:
There is also the possibility of using BiometricAuthentication with CryptoObject. If that’s what you need, check out this guide.
If you’ve learned something new and want others to find it too, please 👏 and follow me for more.
Based on:


