
An Introduction to pyttsx3: A Text-To-Speech Converter for Python
A Python-based alternative for text-to-speech conversion that works offline

This article is a guide for dummies to learn text-to-speech conversion in Python. By reading this article, you’ll be exposed to the proper steps to set it up and get to know some of the basic functionalities available in the module. According to the official site for pyttsx3:
“ … is a text-to-speech conversion library in Python. Unlike alternative libraries, it works offline, and is compatible with both Python 2 and 3.”
In addition, this module has been tested and is known to work on the following systems:
- SAPI5 on Windows XP, Windows Vista, and Windows 8, 8.1, 10
- NSSpeechSynthesizer on Mac OS X 10.5 (Leopard) and 10.6 (Snow Leopard)
- eSpeak on Ubuntu Desktop Edition 8.10 (Intrepid), 9.04 (Jaunty), and 9.10 (Karmic)
I’ll demonstrate the capabilities of this module using the following languages:
- English (male, female)
- Chinese (female)
- Japanese (female)
There are four sections in this tutorial:
- Setup
- Basic API
- Results
- Conclusion
Let’s move on to the next section to find out more.
1. Setup
The proper way to install this module is by cloning the repository and installing via the setup Python file.
This is mainly because the published version in PyPI isn’t the latest version at the time of this writing. You can do a pip install in the future if it the developer has published the latest version on PyPi. EDIT: The package has been updated as of July 2020. You can install it easily via the following command.
pip install pyttsx3Python module
First, clone the repository from the official GitHub site, and unzip it to a directory of your choice.
Then, open up a command line, and activate the virtual environment you prefer. Once you’re done, change the directory to the root of the master folder. It should have a file called setup.py. Run the following command:
python setup.py installOnce the installation has completed, kindly check if you have the following module:
pip show pyttsx3If you’re using Windows, you need to verify the pypiwin32 module as well.
pip show pypiwin32Kindly install it using the following command if the module is not present:
pip install pypiwin32Text to speech
The text-to-speech features for this module are based on languages installed in your operating system.
By default, it should come together with the language pack during the installation of the operating system. You need to install the language pack manually if you intend to use other languages.
For Windows user, head over to the Language setting. You should be able to see the following user interface.
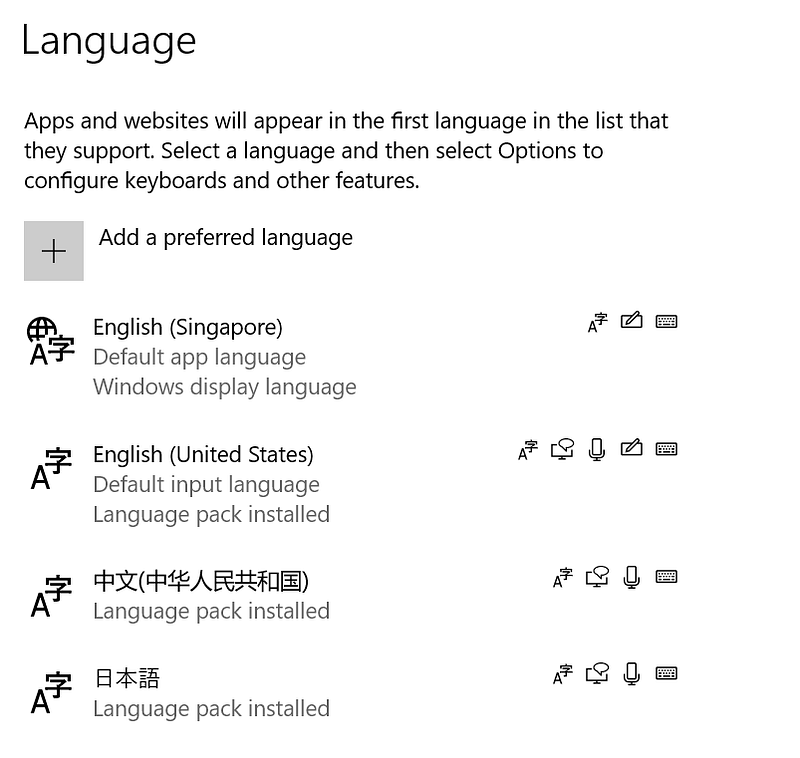
Apart from the default language pack (English), I have installed additional languages (such as Chinese and Japanese). Click on the Add button to add a preferred language. You should see the following pop-up.

Make sure the language pack has the text-to-speech icon.
In the example given above, we can see French (France) supports text to speech in the language pack. You can select it and click Next to install the language pack.
Let’s proceed to the next section to start testing the available API.
2. Basic API
In this section, we’ll be exploring some of the useful functionalities provided in the module. If you installed this module via the pip method, some of the features won’t be available. Kindly refer to the previous section to do a proper installation before you continue.
Import
Let’s start with a simple import statement
import pyttsx3Initialization
The initialization is pretty straightforward — you can just type the following code:
engine = pyttsx3.init()If you encountered errors related to a missing driver, you can try to pass in the driver’s name. There are four available built-in drivers:
dummy.py — Test driver that does nothing. You can use the structure as reference to implement your own driver.espeak.py — Driver for other platforms, such as Ubuntunsss.py — Driver for MacOSsapi5.py — Driver for Windows operating system
Example for initialization with the driver’s name is as follows:
engine = pyttsx3.init("sapi5")Text to speech
Let’s try out the following code to say something simple. Save it in a Python file, and run it.
import pyttsx3
engine = pyttsx3.init()engine.say('Welcome to Medium')
engine.runAndWait()You should be able to hear the voice say, “Welcome to Medium.”
Property
The engine object has the following variables that can be fine-tuned:
rate— Integer speech rate in words per minute. The base value is 200.voice— String identifier of the active voicevolume— Floating point volume in the range of 0.0 to 1.0 inclusivevoices— List ofpyttsx3.voice.Voice descriptor objects
You can set them via the setProperty function.
engine.setProperty('rate', 150)You can get the value of the property using the getProperty function.
engine.getProperty('volume')Voice property
The voice property has the following variables:
age— Integer age of the voice in years. Defaults toNoneif unknown.gender— String gender of the voice: male, female, or neutral. Defaults toNoneif unknown.id— String identifier of the voice. Used to set the active voice viapyttsx3.engine.Engine.setPropertyValue(). This attribute is always defined.languages— List of string languages supported by this voice. Defaults to an empty list of unknown.name— Human-readable name of the voice. Defaults toNoneif unknown.
You can use the following code to identify all the available voices in your system. Add the following code after the init function.
voices = engine.getProperty('voices')
for voice in voices:
    print("Voice: %s" % voice.name)
    print(" - ID: %s" % voice.id)
    print(" - Languages: %s" % voice.languages)
    print(" - Gender: %s" % voice.gender)
    print(" - Age: %s" % voice.age)
    print("\n")
You should see the following output when you run it (depends on the language packs you’ve installed)

Let’s try changing the voice to Zira (female version). You need to use the ID as a parameter, and the order will be exactly what we’ve printed out just now. I will be passing 1 as the index for Zira based on the following order:
- David (English male)
- Zira (English male)
- Haruka (Japanese)
- Huihui (Chinese)
Let’s add the following code after the for loop and before the say function.
engine.setProperty("voice", voices[1].id)Rerun the file, and you should hear a female voice saying “Welcome to Medium.” Feel free to input your own text and test the text-to-speech conversion.
Save to a file
The developer has added a new functionality to save the audio stream to a file for MacOS and Windows. You can easily call it via the save_to_file function. Make sure that you placed it before the engine.runAndWait() function. Let’s try it out!
engine.save_to_file("How do you do?", "output.mp3")The function accepts two parameters:
text— The text for text-to-speech conversionfilename— The name of the file. You can use either the mp3 or wav extension.
3. Result
I just tested the program on the following data in various language:
- Simple greetings
- Random text
- A paragraph from a short story or light novel
- A paragraph from a news article
I am linking the results to my GitHub repository. Feel free to check them out.
English (male)
- Welcome to Medium
- Unlike alternative libraries, it works offline and is compatible with both Python 2 and 3
- The Hare was much amused at the idea of running a race with the Tortoise, but for the fun of the thing he agreed. So the Fox, who had consented to act as judge, marked the distance and started the runners off.
- Begun in 1988, the Human Genome Project intends to map the 23 chromosomes that provide the blueprint for the human species.
English (female)
- Welcome to Medium
- Unlike alternative libraries, it works offline, and is compatible with both Python 2 and 3
- The Hare was much amused at the idea of running a race with the Tortoise, but for the fun of the thing he agreed. So the Fox, who had consented to act as judge, marked the distance and started the runners off.
- Begun in 1988, the Human Genome Project intends to map the 23 chromosomes that provide the blueprint for the human species.
Japanese
- こんにちは!今日はいい天気ですね。
- その店は若い人たちで混んでいた。
- 27日付の、南ア紙タイムズによると、2人は、貴重な野生動物の所持などを、禁じた同国の法律に、違反した疑いがあるとして、9月に逮捕されていた。
- そのデタラメな思考をもとに、不自然なほど進は、半ばウキウキで、草原を歩く。それも、この旅先に、来る前は、仕事仕事でプライベートも、まともに充実していなかった。
Chinese
- 您好,欢迎光临
- 老娘叫安娜斯塔西亚尼古拉耶维奇切尔亚尼克伊凡诺夫娜亚历山大彼得罗夫斯基康斯坦丁萨维里奥诺维奇波波莎奥尔良基伊万诺耶夫娜
- 走了一段路,该穿越森林了。林子里空气新鲜,味道甜美。还没走到一百码远,公主见到四棵大树之间,极粗的银链上吊着一座美丽的银制城堡。吊得非常稳当,如有一阵微风吹过,就会轻微摆动,催人入眠。
- 12月4日消息,当地时间12月3日,在巴黎世界教育论坛上,马云呼吁改变教育前先改革考试。他表示文凭只是学费的收据,真正的文凭是生活中奋斗来的。
Based on the results, this module works great for news and professional articles. The emotion is quite lacking, and the pacing isn’t that great — especially for Japanese. I’ve purposely placed quite a lot of commas in between sentences to break up the sentences further. Feel free to test it on your own.
4. Conclusion
Let’s recap what we’ve learned today. First, we started off with installing the Python module and the language pack for the language we desired.
We moved on to learn some of the available functions provided by the module. We learned to set and get the property of the object as well as the text-to-speech function. Besides, we also tried outputting the available voices present in the operating system.
Other than that, I also linked a few examples I’ve tested out on four different domains for three languages.
Have fun testing it on your own, and hope you enjoyed this article. See you again in the next article.


