
An Introduction to k6: An API Load-Testing Tool
Build an API that can handle your traffic

By reading this piece, you’ll learn to perform load and stress testing on your RESTful API using a free and open-source load-testing tool called k6. k6 was previously known as Load Impact and is a full-fledged tool for:
- Smoke testing — verify that your system doesn’t throw errors under a minimal load
- Load testing — access the performance of your system during normal and peak loads
- Stress testing — verify the reliability and stability of your system under a heavy load or extreme conditions
- Spike testing — access the performance of your system when there’s a sudden surge of traffic
- Soak testing — verify the reliability and stability of your system over an extended period of time
k6 is a great tool if you prefer to code the testing scripts in JavaScript. Also, it does have template support for TypeScript as well. You can even generate testing scripts from OpenAPI or Postman.
Let’s proceed to the next section for the setup and installation.
Setup
Installation is quite straightforward, although it depends to a degree on the operating system of your machine.
Windows
k6 comes with its own MSI installer for Windows users. Simply download the installer via the link below. Install it normally, and you’re good to go.
Mac
For Mac users, the easiest method is to run the following command:
brew install k6Debian/Ubuntu
Run the following command in your terminal to install it via apt-get.
sudo apt-key adv --keyserver hkp://keyserver.ubuntu.com:80 --recv-keys C5AD17C747E3415A3642D57D77C6C491D6AC1D69echo "deb https://dl.k6.io/deb stable main" | sudo tee /etc/apt/sources.list.d/k6.listsudo apt-get updatesudo apt-get install k6If you’re unable to get the key due to firewalls or proxies, try the following alternative:
curl -s https://dl.k6.io/key.gpg | sudo apt-key add -Red Hat/CentOS
You can install k6 via the following command (use either dnf or yum for older version):
sudo dnf install https://dl.k6.io/rpm/repo.rpmsudo dnf install k6You need to disable the verification when installing on CentOS older than version 8:
sudo yum install --nogpgcheck k6Test the Life Cycle
In this section, we’re going to learn the basic concepts behind k6. Each k6 test consists of four distinct life cycles:
initsetupVU(virtual user)teardown
k6 requires each test script to contain at least one default function, representing the entry point for the VU code. VU will call the VU code over and over again until all conditions are fulfilled.
On the other hand, init code will only run once per VU. Apart from that, the setup and teardown cycles will be called only once per test — at the start and end of the whole test life cycle.
You might be wondering about the differences between init and setup. Unlike init, you can actually call all of the k6 APIs, such as HTTP requests, in setup and teardown. For example, you can make a call in the setup code to obtain a token that’ll be used inside of the VU code.
HTTP Requests
HTTP GET request
You can define your first test case by utilizing the built-in http module. Create a new JavaScript file in your working directory. I’ll just call it script.js. Then, add the following code, which represents a simple GET request:
import http from 'k6/http';
import { sleep } from 'k6';
export default function () {
http.get('http://example.com/test');
sleep(1);
}Each VU will execute the code inside the default function sequentially from start to end. Once it has reached the end, it’ll loop back, and the process will be repeated all over again.
It’s always a good idea to pace out your VUs by adding a sleep statement at the end of the default function. This simulates how real users use your system. You can set the value lower to 0.1 for simulating aggressive behaviors. If you intend to simulate users that constantly call your API, simply remove the sleep statement.
If you don’t have an API at the moment and just want to test k6, you can use the following test API provided by k6:
http://test.k6.ioRun the following code in your terminal:
k6 run script.jsResult output
You should see the following output in your terminal
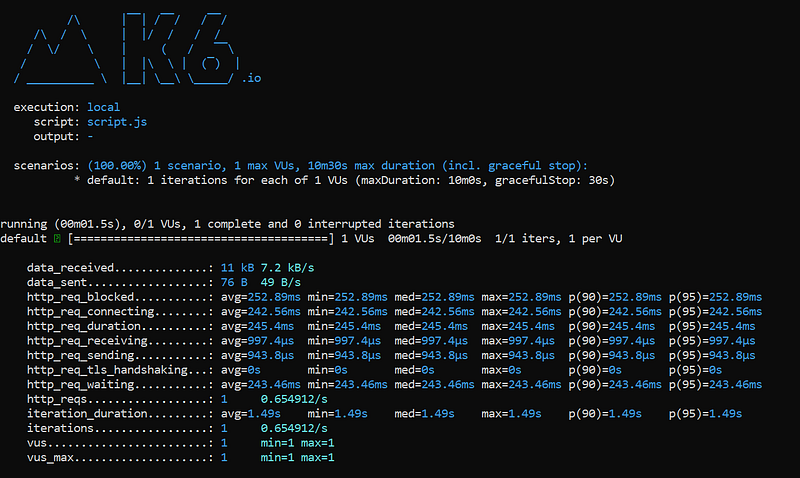
By default, k6 will collect the following metrics each time you run a test:
vus— number of active virtual usersvus_max— maximum virtual users allocated for the testiterations— aggregated number of times thedefaultfunction is callediteration_duration— the total time it took to execute thedefaultfunctiondropped_iterations— number ofiterationsthat couldn’t be starteddata_received— amount of data receiveddata_sent— amount of data sentchecks— rate of successful checks (will be discussed later)
In addition, it’ll generate the following output as well if you’re calling HTTP requests:
http_reqs— total requests generated by k6http_req_blocked— time spent waiting for a free TCP connection before initiating the requesthttp_req_connecting— time spent establishing a TCP connectionhttp_req_tls_handshaking— time spent on TLS handshakinghttp_req_sending— time spent on data sendinghttp_req_waiting— time spent waiting for a response from the remote hosthttp_req_receiving— time spent on data receivinghttp_req_duration— total time for the request. It’s calculated based onhttp_req_sending+http_req_waiting+http_req_receiving.
You can specify other arguments as well. Simply run the following to get the full list of the available arguments:
k6 helpAvailable HTTP methods
At the time of this writing, k6 comes with the following HTTP methods.
batch — multiple HTTP requests in paralleldelgetoptionspatch — PATCH requestpost — POST requestput — PUT requestreques —
HTTP POST request
Here’s another example of HTTP POST, which takes JSON data as its input parameters.
If you are instead to test it on a form-data submission. Simply change the content type to application/x-www-form-urlencoded.
Options
In fact, you can specify additional arguments when running k6 the command line. For example, the following command will run the test with 10 VUs.
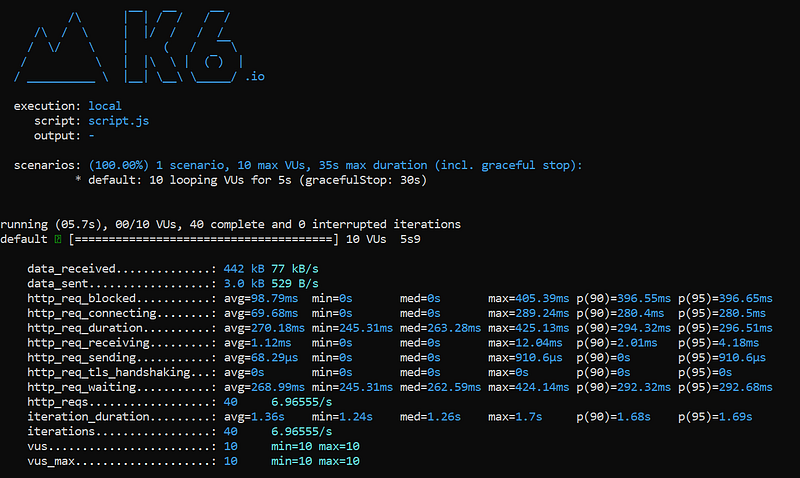
k6 run --vus 10 script.jsHaving said that, you can specify such options in your code as well — providing you with better control over it. Let’s use our first example, but this time, we’re going to test it with 10 VUs with a duration of five seconds instead.
import http from 'k6/http';
import { sleep } from 'k6';
export let options = {
vus: 10,
duration: '5s',
};export default function () {
http.get('http://example.com/test');
sleep(1);
}Then, you can simply run it normally using the following command:
k6 run script.jsThe following output will be displayed on your terminal.
A good way to test your APIs is to ramp up and down the VU levels. The following code illustrates how you can configure it to run in stages.
export let options = {
  stages: [
    { duration: '10s', target: 20 },
    { duration: '1m10s', target: 10 },
    { duration: '10s', target: 0 },
  ],
};- Going from 1 to 20 VUs for the first 10 seconds
- Slowly transitioning to 10 VUs in the next 70 seconds
- Going from 10 to 0 VUs in the last 10 seconds
Options (load testing)
For load testing, you should ramp up the VU to a good amount and maintain it for a fixed period of time before ramping it down to 0. Have a look at the following example, which uses 100 VUs.
export let options = {
  stages: [
    { duration: '5m', target: 100 },
    { duration: '10m', target: 100 },
    { duration: '5m', target: 0 },
  ],
};
Options (stress testing)
On the other hand, stress testing involves the constant ramping up of VUs gradually over a period of time. You can start with 100 VUs and then increment it by 100 VUs each time. Then, you ramp it down as part of the recovery phase.
export let options = {
  stages: [
    { duration: '1m', target: 100 },
    { duration: '5m', target: 100 },
    { duration: '1m', target: 200 },
    { duration: '5m', target: 200 },
    { duration: '1m', target: 300 },
    { duration: '5m', target: 300 },
    { duration: '1m', target: 400 },
    { duration: '5m', target: 400 },
    { duration: '5m', target: 0 },
  ],
};
Options (spike testing)
Spike testing aims to overwhelm your system with a sudden surge of a load within a short period of time. You can easily configure it as follows:
export let options = {
  stages: [
    { duration: '10s', target: 100 },
    { duration: '2m', target: 100 },
    { duration: '10s', target: 1000 },
    { duration: '2m', target: 1000 },
    { duration: '10s', target: 100 },
    { duration: '2m', target: 100 },
    { duration: '10s', target: 0 },
  ],
};
Notice that I’ve ramped up from 100 to 1,000 VUs within a 10-second time frame. This helps to evaluate the performance of our system when there’s a sudden surge of users.
Checks
k6 provides a way for you to assert the returned response. It’s called check. Please note that check doesn’t halt the execution.
HTTP response
For your information, each HTTP method will return an HTTP response that contains the following:
bodyheadersstatustimingstimings.blockedtimings.connectingtimings.tls_handshakingtimings.sendingtimings.waitingtimings.receivingtimings.duration
Checking if status is 200
The most useful fields are body and status. You can simply assign the returned HTTP response to a variable and check if its status is 200 as follows:
import { check } from 'k6';
import http from 'k6/http';
export default function () {
let res = http.get('http://example.com/test');
check(res, {
'is status 200': (r) => r.status === 200,
});
}Conclusion
Let’s recap what we’ve learned today.
We started off with installing k6 on our local machine based on the operating system.
Next, we explored the fundamental concepts behind k6 — topics like testing the life cycle, which consists of four parts.
We moved onto creating a simple test scripts based on the built-in http module provided by k6. This allows us to make different HTTP methods call to test our APIs.
After that, we learned to configure options to setup load testing, stress testing and even spike testing. Also, we learned to configure and adding assertion to our code via check function.
Thanks for reading — I hope to see you again in the next article!


