
An Excuse to Deploy 802.1X at Home
Learn how to deploy 802.1X on your wireless network with Ubiquiti appliances and perform A/B testing scenarios for security control considerations.
This week I’ve had the pleasure of dealing with lots of wireless (WLAN) de-authentication attacks on my Wireless AP’s (WAPs) with attempts to crack my WPA2 key. The reason why I found it quite enjoyable was because it gave me an excuse to implement 802.1X WLAN Security using my new toys. 802.1X authentication greatly increases your security posture over shared secrets when deployed correctly.
Particularly, I purchased a Ubiquiti UDM-PRO and UAP-PRO-AC products to replace my toaster of a PFsense box and other WAP’s. There’s certainly lots of room for privacy and security improvement in the products; but the simple interfaces gave me some analytics that helped me come up with a mini A/B test troll experiment for the would be “script kiddie” knocking down my wireless network.
This article will be broken up into the following section(s):
- My A/B testing data observing the attacker’s engagement levels
- Vendor agnostic architecture overview and requirements to implement 802.1X
- Deployment of 802.1X using Ubiquiti’s stack
This allowed me over the course of a week to capture the varying uses like a honeynet; only I was focused on how the attacker behavior changes based on dynamic restrictions. While my experiment is not considered huge by any means; it was an important learning experience to see what these up and coming hackers or cyber security professionals are interested in abusing my network for. I also got to maximize my new network setup on the UDM-Pro’s feature sets and learn some of the limitations I ran into.
Imperfect A/B Testing and Observations
Disclaimer: First let me state that our mini troll of A/B testing from this security event is not empirical; and therefore don’t use the data for any serious data analysis or statistics. One issue with this data is that it is against a single target population and the control and variation of network changes can’t be concurrent with a single sample population. You can however use the same test cases over an appropriate sample size with a randomization without replacement to achieve the empirical findings you would need to take to your CISO in an enterprise.
The short of my scenario is someone of proximity to my home network (highly likely to be a neighbor) began de-authorizing attacks against my SSID on both wireless AP’s. I spent a week serving different variations of mixed controls seeing what the individual(s) would do and what would make them engage even more to abuse the network. To keep the observed behaviors measurable against a specific control; only one control was deployed at any given time and reset to baseline the next day.
When it was clear that the attacker was still attempting to de-auth and perform odd WEP-like replay injections after about 4 hours; I just decided to open up the SSID and name it to something simple like “Linksys” so that that he or she would think I just did a factory reset and let it “fail open”. With no authentication I could take packet captures, put Snort in NIDS, and watch DNS logging on my Raspberry Pi-Hole setup. An interesting issue that the Ubiquiti UDM-PRO series has is no native support for DNS over HTTP/S which is why I use the Pi-Hole setup along side Cloudflare’s tunnel agent.
The data and my observations as prior to cutting off access for a calendar week are as follows:

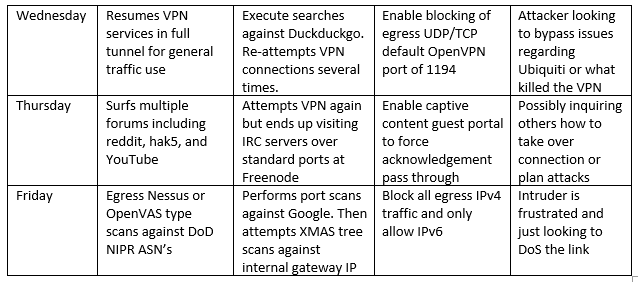
Quick Refresher on 802.1X Components and Flaws
As we can see from our observations this wasn’t just a curious person looking for free Internet usage; they were slowly creeping towards multiple forms of abuse pending their success rate of varying enumeration and access. While we were able to detect a good portion of attacks; we can’t just leave open wireless access out forever. Time to implement 802.1X against our WLAN implementations. The structure is the same for wired implementations with only configuration differences between vendors. There are 3 primary components of an 802.1X setup:
- Supplicant
- Authenticator
- Authentication Server
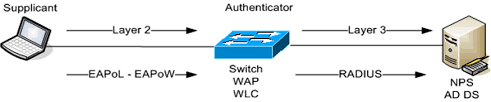
In the above SANS photo we see that the supplicant is pretty much the client with the authenticator performing the port level authority to join the network or not on behalf of the supplicant. This decision is based on the authentication server’s response. The supplicant authenticates either user credentials and or client certificates over the EAP (Extensible authentication protocol). While this sounds fool proof, it really isn’t. There are 2 common implementation flaws:
- Weak challenges and or exposed hashes in the clear for sniffing; man-in-the-middle attacks perform cracking or hash matching. EAP should always be wrapped in TLS
- Supplicant is willing to accept any server certificate or the Authenticator is willing to accept any client. Even with MAC address filtering that is easily spoofed. Client certificates are the most preferable but at minimum validation of server certificate fingerprints and to refuse non-trusted connections are key
Implementing 802.1X in Ubiquiti Stack
One of the benefits of moving to the UDM-PRO is the integrated WAP controller that pushes policies and profiles to the WAPs. It also includes its own RADIUS hosting service and automatically has certificates generated for you in a few simple clicks. While these are specific to the UDM-PRO firmware stable release (1.71) that the principles remain the same in deployment:
- Create a compatible AAA server such as RADIUS and create users and certificates required
- Configure your WAP’s or switches in 802.1X routing mode to forward the EAP related traffic to the RADIUS server and specify any VLAN tagging to user assignment on a RADIUS profile. Set a default or ‘fail back’ VLAN so that non-auth supplicants are sent to an isolation VLAN if so desired
- Configure the supplicant clients like on Windows 10.x to use the connection to your local network specified with your desired settings
First thing is first. We need ensure we trust the server certificate of the RADIUS on the Ubiquiti controller. Use Putty’s PSCP to accomplish this and force the “ — scp” option or you will get a default SFTP failure when using something like WinSCP or FileZilla. In windows you have to unfortunately specify the entire destination file path as well or it will fail. The syntax to use PSCP is below:
pscp -v -scp root@<your radius server controller ip>:/config/raddb/certs/ca.pem <your\full\destination\ca.pem>A successful transfer is shown below:
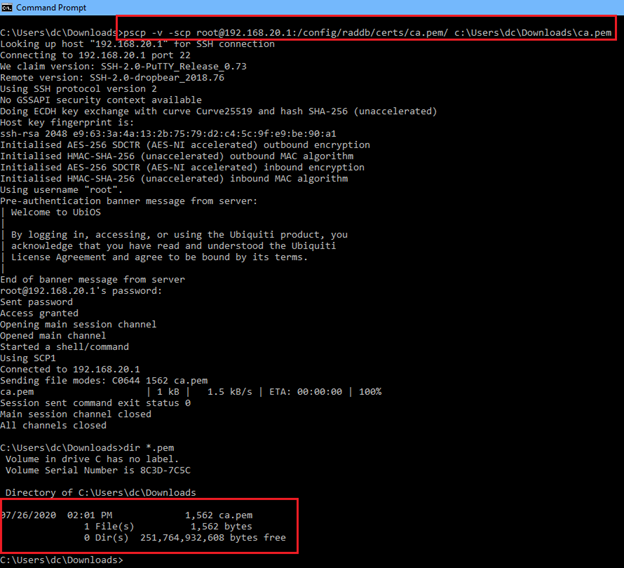
Notice that we want the CA to import, not the server certificate or keys. Next enable your RADIUS service and create a nice and long secret pass phrase which is inside the “classic” web interface under settings > services > radius > server. This step is not required if you’re providing your own RADIUS server such as Microsoft NPS and plan to hook it with Active Directory.
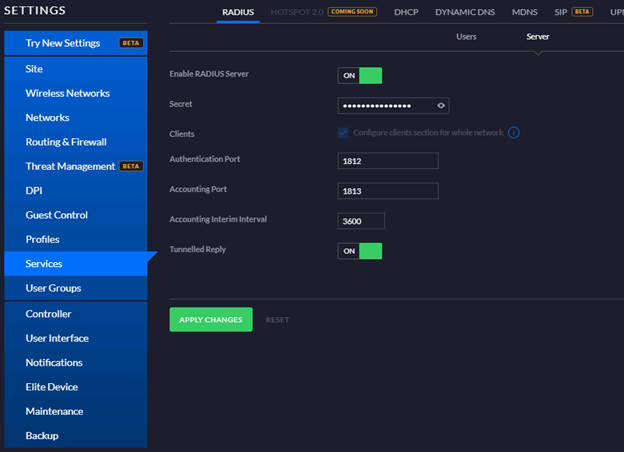
Next you will need to create your RADIUS users for authentication under the same drop down menu, just switch to the “Users” sub menu:
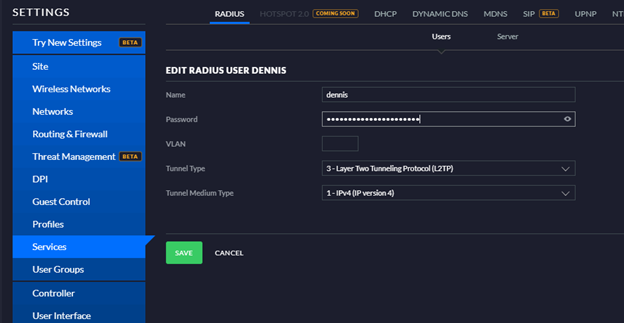
Set our appropriate VLAN if applicable and the tunnel type to L2TP over IPv4. Don’t worry, you’re still using EAP-TLS. This is just for things like the VPN if you’ve set one up.
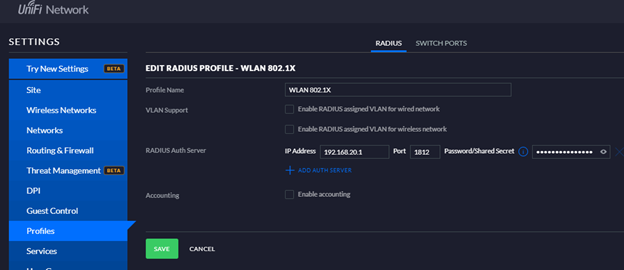
Now create a RADIUS profile so we can apply it to a specific network. Label it something appropriate and fill out the auth server to be your inside interface IP address of your UDM-PRO controller. Enter the shared secret you made earlier and save. You can find this under the classic menu > Settings > Profiles > RADIUS.
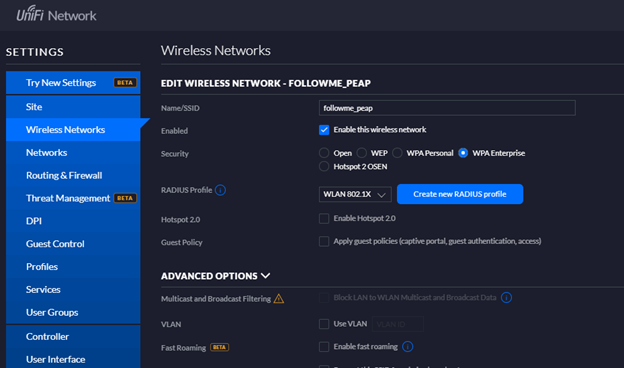
Now it’s time to create network objects to apply the profiles to. Head over to the Classic Menu > Settings > Wireless Networks and add a new WLAN network using the WPA Enterprise (WPA-2-Enterprise) security type. Now set the RADIUS Profile by selecting what you crated early. Set any other applicable settings as you wish and save. Note: As soon as you click save, you may be booted from your WAP as the controller is pushing new configurations. You may also have to disable and re-enable your adapter to refresh the SSID listings.
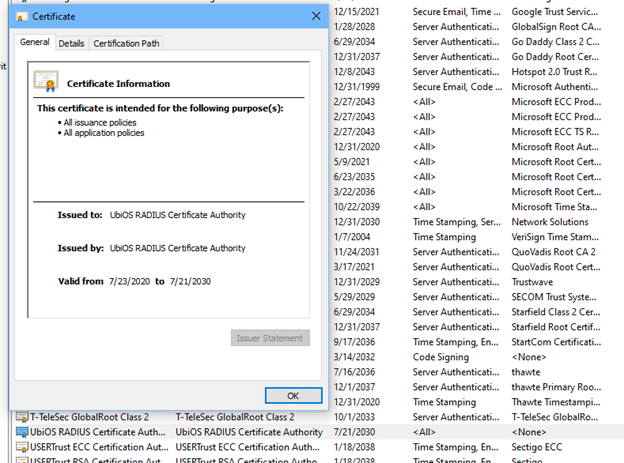
If attempt to create a connection to the PEAP WLAN site in your system tray, you will be prompted with the certificate. Ensure this certificate fingerprint matches the one you just SCP downloaded to yourself:
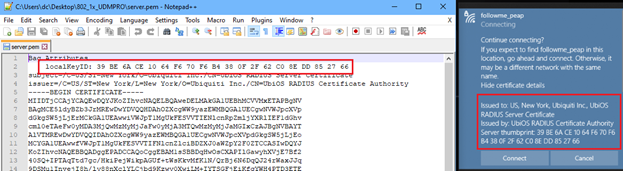
If it does not match, you have the wrong certificate or RADIUS server as shown above. DO NOT ‘connect’ as you need to setup the connection manually later in a secure method so that you do not automatically accept any certificate without importing into your certificate store.
We now need to import “CA.pem” into our trusted root CA store. Do a start > run > mmc.exe > open the application and add snap in called “certificate manager”. Drill down to the Trusted Root CA’s store for your local computer:
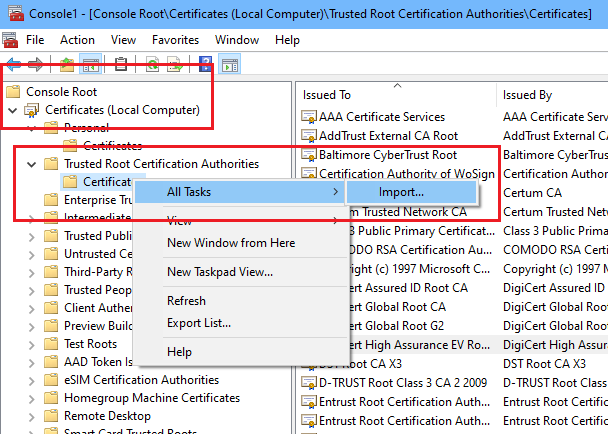
Right click on the certificates folder of the trusted Root CA’s and then click all tasks > import. Follow the steps to import your certificate and it should look like this afterwards in your list:
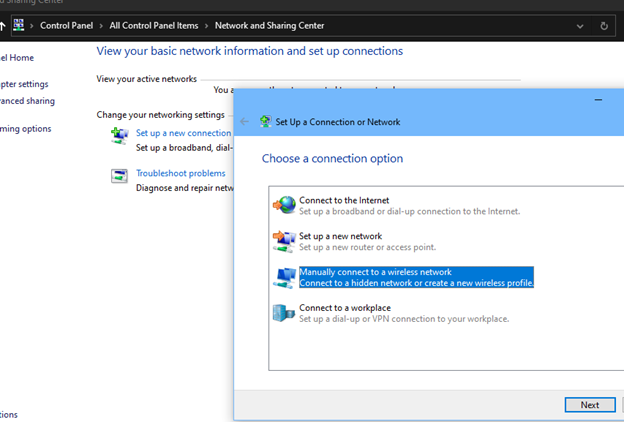
Now to *securely* configure the Windows 10 supplicant. To do so, do not click on you wireless connection and blindly enter in your user name and password followed by a request to accept a certificate. This is the exact problem we highlighted earlier in 802.1X implementations that may be subject to Evil Twin equivalents. In desktop mode, go to control panel > network and sharing center > setup a new connection > manually connect to a wireless profile:
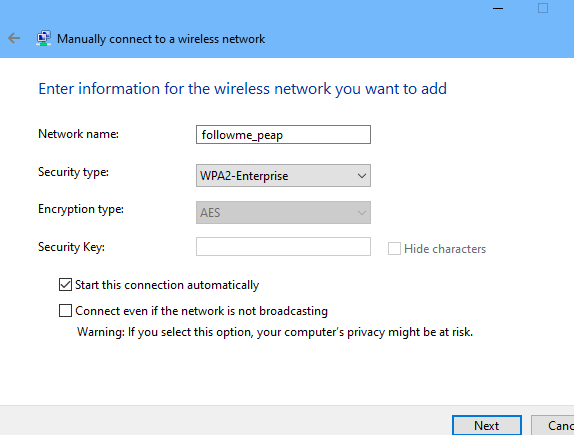
In the next screen mimic what you did in the WLAN network profile for WPA2 Enterprise along with the SSID you decided to use. Start connection automatically if you wish:
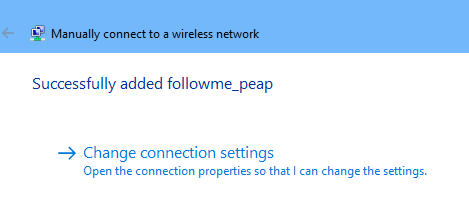
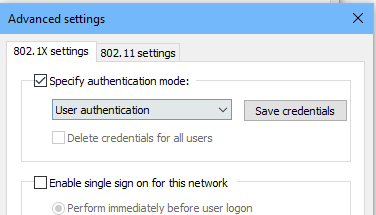
Click on the “Change connection settings” to open the advanced security tabs for authentication. Now click on ‘Advanced’ settings > 802.1X settings and setup your authentication to be ‘user’ authentication. At the time of this writing the UDM-PRO does not have native client certificate generations for you to use computer based authentication.
Next open your protected EAP properties and setup the following:
Ensure that “Verify the server’s identity by validating the certificate” is checked.
Scroll down to the Ubiquiti RADIUS CA element and ensure that it is checked.
Set the “Notifications before connecting:” section to “Don’t ask user to authorize new servers or trusted CA’s”:
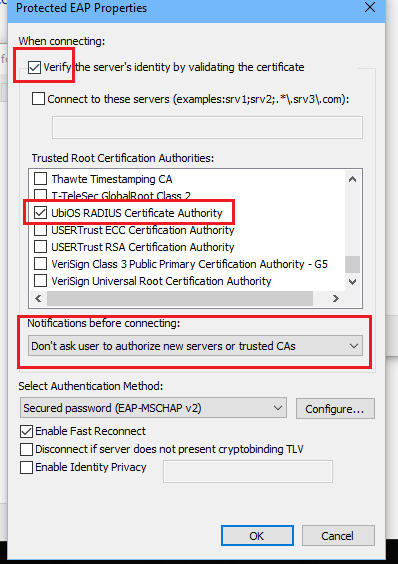
Ensure that the default value “EAP-MSCHAP-v2” with fast reconnect is left intact. *Don’t worry* this setting is ignored when you have the UDM-PRO certificate as a preference. See the diagram below to see the different phases of the Microsoft PEAP implementation of TLS with MS-CHAPv2:

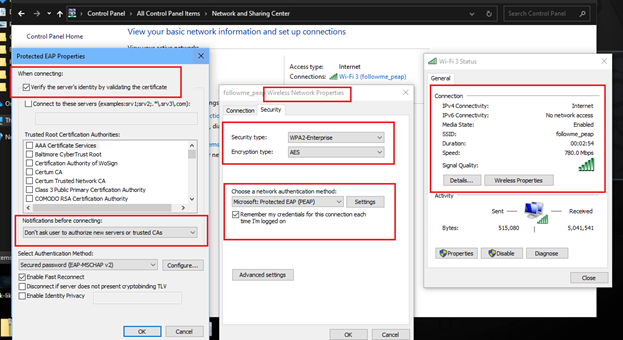
If you successfully connected, you should be returned to your control panel networking screen with the option to edit this wireless profile manually with the same menus. All menus expanded below for your final reference for the supplicant:
Closing
There you have it. In Ubiquiti world; the deployment of 802.1X over PEAP is less than a 15-minute deployment and would require more active man-in-the-middle based attacks to work. This would be mitigated somewhat at layer 2 by ensuring that your WLAN network in the Ubiquiti interface enforces “Isolate Layer 2 Hosts” options in the advanced drill down. I hope you enjoyed my short adventure into 802.1X and how I performed a series of observations and controls to finally lead up to adding the prevention layer to help reduce my risk footprint. As always, if you’re ever in need of cyber security services, you can find me at www.scissecurity.com
Dennis Chow, CISO of SCIS Security


