
AI Toolkit — Give a brain to your NPCs, a header-only C++ library

Second edition of me battling my procrastination. This time, it is a project I made 1 or 2 years ago that I decided to publish. I was planning the AI for my 4X strategy game Warmonger Dynasty in C++, and I wanted a set of tools to help me implement it.
This is how AI Toolkit was born:
It provides 4 modules:
- Finite State Machines: a nice abstraction of state management, useful for animations, or scripted actions
- Behavior Trees: an extension of state machines which allows you to compose a decision tree where each node implement part of the desired complex behavior
- Utility AI: to determine the best action to perform in a specific situation
- Goal Oriented Action Planning: to find a sequence of actions capable of achieving a specific goal from a given situation
The combination of those tools enables the implementation of complex AIs without necessarily needing machine learning.
I generally use FSMs to handle global state management and the UI, to control which menu to display when, and when to pause the game or resume it.
Behavior Trees are great to implement scripted behaviors, like an NPC patrolling the area, and attacking any enemy it sees.
Utility AI can be used to determine which goal is best to pursue. Then, combined with Goal Oriented Action Planning (GOAP from now on), we can determine the sequence of actions to take to achieve that goal. For strategy games, it gives a great flexibility to the AI.
Nothing prevents you from sprinkling some Q-Learning on top of it to make your AI learn, but this is not yet provided by this library.
Ok let’s dive in now 🙂
📦 Installation
Since it is a header-only library, all you need is to add the include folder to your include paths, and a compiler supporting at least C++20, ideally C++23:
$ git clone https://github.com/linkdd/aitoolkit
$ g++ -std=c++23 mygame.c -Iaitoolkit/include
You can copy-paste it in your project (MIT license), use a submodule, or whatever you want.
Finite State Machine
FSMs are the number 1 solution for state management in the game development field. They offer a clear way to handle the various states a game object can be in at any given time. It lays out all the possible states, like walking, jumping, attacking, and defines the rules for transitioning between them based on player inputs or game events.
With FSMs, it is very easy to setup animation controllers. Unity even provides a visual editor for that purpose:

AI Toolkit provide 2 kinds of state machines:
Simple Machine:
- can only be in one state at a time
- has one transition:
set_state - has 3 extra methods:
pause,resume,update
Stack Machine:
- can be in multiple states at the same time, many paused only 1 active
- has 2 transitions:
push_state,pop_state - has 1 extra method:
update
Let’s see some code. First we need to import the header:
#include <aitoolkit/fsm.hpp>

using namespace aitoolkit::fsm;
One common pattern in AI Toolkit is to have objects depend on a “blackboard”, a data structure of your choice that will hold the data manipulated by your AI:
struct blackboard_type {
  // ...
};
NB: If like me you are using EnTT, the blackboard would contain a reference to the world (the container for all the ECS entities and components).
The FSM header provides a base class for your states that you must inherit:
class dummy final : public state<blackboard_type> {
    virtual void enter(blackboard_type& blackboard) override {
      // ...
    }

    virtual void exit(blackboard_type& blackboard) override {
      // ...
    }

    virtual void pause(blackboard_type& blackboard) override {
      // ...
    }

    virtual void resume(blackboard_type& blackboard) override {
      // ..
    }

    virtual void update(blackboard_type& blackboard) override {
      // ...
    }
};
You can then create your machines and manipulate them:
auto simple_bb = blackboard_type{};
auto simple_fsm = simple_machine<blackboard_type>();

simple_fsm.set_state(std::make_shared<dummy>(), simple_bb);
simple_fsm.pause(simple_bb);
simple_fsm.resume(simple_bb);
simple_fsm.update(simple_bb);

auto stack_bb = blackboard_type{};
auto stack_fsm = stack_machine<blackboard_type>{};

stack_fsm.push_state(std::make_shared<dummy>(), stack_bb);
stack_fsm.push_state(std::make_shared<dummy>(), stack_bb);

stack_fsm.update(stack_bb);

stack_fsm.pop_state(stack_bb);
stack_fsm.pop_state(stack_bb);
For Simple machines:
- the
set_statetransition willexitthe current state (if any) andenterthe new one (if any); if the machine is paused, thepausemethod of the new state will be called as well - the machine's
pausemethod will call the current state's (if any)pausemethod - the machine’s
resumemethod will call the current state's (if any)resumemethod - the machine’s
updatemethod will call the current state's (if any)updatemethod, if it is not paused
For Stack machines:
- the
push_statetransition willpausethe current state (if any) andenterthe new one - the
pop_statetransition willexitthe current state andresumethe previous one (if any) - the machine’s
updatemethod will call the current state’s (if any)updatemethod
Simple Machines are really useful for scene management, or player controllers. While Stack Machines are more useful for UI management, for example:
Consider that we are in the state in_game, when we push a new state pause_menu, the in_game::pause() method will be called, stopping the simulation, then the pause_menu::enter() method will be called, initializing the UI. Then on each update, the pause_menu::update() method will display the UI (that is, if you use immediate mode UI, like ImGui).
You can even nest them for more complex behaviors.
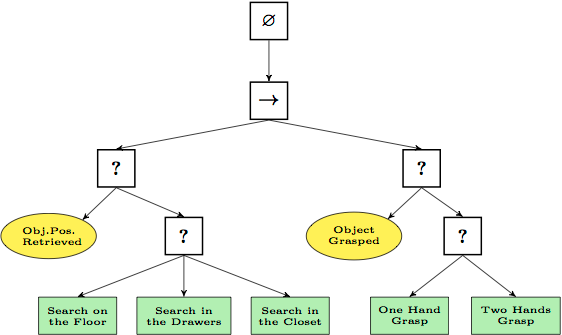
Behavior Trees
Behavior Trees are another powerful tool in game development, especially when it comes to scripting complex AI behaviors like those of a patrolling or attacking NPC. Essentially, a Behavior Tree is a hierarchical structure that combines many tasks and decisions to define the behavior of the AI agent. Compared to FSMs, it allows more flexible behaviors as it is able to model more complex decision-making algorithms.
Just like before, Behavior Trees are in their own header:
#include <aitoolkit/behtree.hpp>

using namespace aitoolkit::behtree;
Just like before, you will need a “blackboard”:
struct blackboard_type {
  // ...
};
The library provides the following nodes:
seq: will execute all children in order until one failssel: will execute all children in order until one succeedsneg: will return the opposite of the child nodecheck: will return success if the callback returns truetask: will execute the callback and return the result
Each node can be in one of those 3 states:
success: the node was successful (for example: “we are in range”)failure: the node failed (for example: “we are too far”)running: the node has not yet completed the related action (for example: “we are still moving towards that point”)
Now, let’s create a tree for a patrolling/attacking NPC:
struct blackboard_type {
  glm::vec2 agent_position;
  glm::vec2 enemy_position;

  float attack_range;
  float sight_range;

  size_t current_waypoint;
  std::vector<glm::vec2> waypoints;
};

auto tree = sel<blackboard_type>::make({
  seq<blackboard_type>::make({
    check<blackboard_type>::make([](const blackboard_type& bb) {
      auto distance = glm::distance(bb.agent_position, bb.enemy_position);
      return distance <= bb.attack_range;
    }),
    task<blackboard_type>::make([](blackboard_type& bb) {
      // Destroy enemy
      return execution_state::success;
    })
  }),
  seq<blackboard_type>::make({
    check<blackboard_type>::make([](const blackboard_type& bb) {
      auto distance = glm::distance(bb.agent_position, bb.enemy_position);
      return distance <= bb.sight_range;
    }),
    task<blackboard_type>::make([](blackboard_type& bb) {
      // Move towards enemy
      // returns execution_state::running if close enough
      return execution_state::success;
    })
  }),
  seq<blackboard_type>::make({
    task<blackboard_type>::make([](blackboard_type& bb) {
      // Move towards waypoint
      // returns execution_state::running if close enough
      return execution_state::success;
    }),
    task<blackboard_type>::make([](blackboard_type& bb) {
      // Select next waypoint
      return execution_state::success;
    })
  })
});
And evaluate it:
auto bb = blackboard_type{
  .agent_position = { 0.0f, 0.0f },
  .enemy_position = { 1.0f, 1.0f },
  .attack_range = 0.5f,
  .sight_range = 1.0f
};

while (true) {
  auto state = tree->evaluate(bb);
  if (state == execution_state::success) {
    break;
  }
}
Utility AI
Unlike FSMs or Behavior Trees that follow predefined paths, Utility AI works by evaluating a set of actions based on their “utility”, basically scoring each potential action based on the current situation and choosing the best one.
This method allows AI agents to make more nuanced decisions, like when to attack, retreat or pursue alternative strategies.

Just like before, the Utility AI is in its own header:
#include <aitoolkit/utility.hpp>

using namespace aitoolkit::utility;
Just like before, you will need a “blackboard”:
struct blackboard_type {
  int food{0};
  int wood{0};
  int stone{0};
  int gold{0};
};
The library provides a base class action that you need to inherit from:
class collect_food final : public action<blackboard_type> {
  public:
    virtual float score(const blackboard_type& blackboard) const override {
      return 50.0f;
    }

    virtual void apply(blackboard_type& blackboard) const override {
      blackboard.food += 1;
    }
};

class collect_wood final : public action<blackboard_type> {
  public:
    virtual float score(const blackboard_type& blackboard) const override {
      return 150.0f;
    }

    virtual void apply(blackboard_type& blackboard) const override {
      blackboard.wood += 1;
    }
};

class collect_stone final : public action<blackboard_type> {
  public:
    virtual float score(const blackboard_type& blackboard) const override {
      return -10.0f;
    }

    virtual void apply(blackboard_type& blackboard) const override {
      blackboard.stone += 1;
    }
};

class collect_gold final : public action<blackboard_type> {
  public:
    virtual float score(const blackboard_type& blackboard) const override {
      return 75.0f;
    }

    virtual void apply(blackboard_type& blackboard) const override {
      blackboard.gold += 1;
    }
};
In this example:
- the
scoremethod is used to evaluate an action, here we used static values, but feel free to implement any evaluation function you want based on the current state of the blackboard - the
applymethod is used to actually mutate the blackboard, and eventually trigger events (for example: a state change in an FSM)
We can then instantiate an evaluator by giving it a list of actions and run it:
auto evaluator = evaluator<blackboard_type>{
std::make_shared<collect_food>(),
std::make_shared<collect_wood>(),
std::make_shared<collect_stone>(),
std::make_shared<collect_gold>()
};
auto blackboard = blackboard_type{};
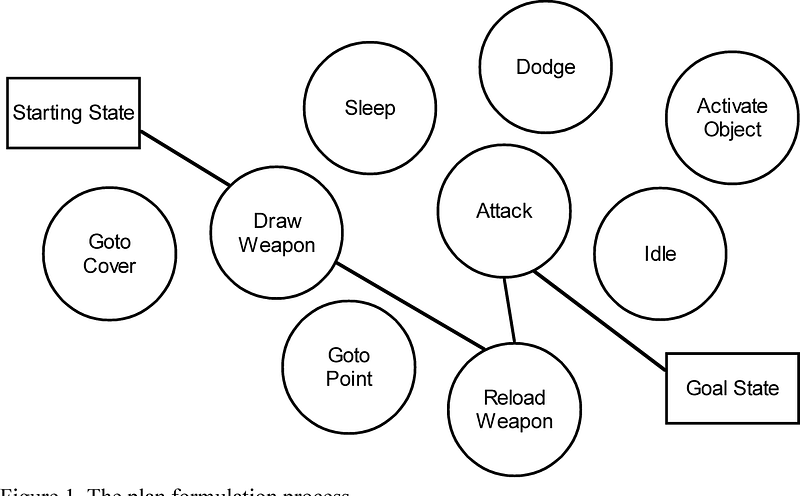
evaluator.run(blackboard); // finds the best action and apply itGoal Oriented Action Planning
GOAP is a more flexible approach in AI design for games, where agents have specific goals and a set of actions to achieve them. Unlike simpler systems, GOAP allows AIs to dynamically plan their actions based on their objectives and the changing game environment. This results in AI that can creatively solve problems and adapt to new situations.
Just like before, the GOAP toolkit is in its own header:
#include <aitoolkit/goap.hpp>

using namespace aitoolkit::goap;
Just like before, we will need a “blackboard”:
struct blackboard_type {
  bool has_axe{false};
  int wood{0};
};
The library provides a base class for your actions:
class get_axe final : public action<blackboard_type> {
  public:
    virtual float cost(const blackboard_type& blackboard) const override {
      return 1.0f;
    }

    virtual bool check_preconditions(const blackboard_type& blackboard) const override {
      return !blackboard.has_axe;
    }

    virtual void apply_effects(blackboard_type& blackboard) const override {
      blackboard.has_axe = true;
    }
};

class chop_tree final : public action<blackboard_type> {
  public:
    virtual float cost(const blackboard_type& blackboard) const override {
      return 1.0f;
    }

    virtual bool check_preconditions(const blackboard_type& blackboard) const override {
      return blackboard.has_axe;
    }

    virtual void apply_effects(blackboard_type& blackboard) const override {
      blackboard.wood += 1;
    }
};- the
costmethod is used as a weight during planning, if 2 actions have a similar outcome, their cost might be different - the
check_preconditionsmethod is used to determine what are the available actions in a given situation during planning - the
apply_effectsmethod is used to mutate the state (and eventually trigger events, like a transition in an FSM)
Then, we use the planner to create a plan:
auto actions = std::vector<action_ptr<blackboard_type>>{
  std::make_shared<get_axe>(),
  std::make_shared<chop_tree>()
};
auto initial = blackboard_type{};
auto goal = blackboard_type{
  .has_axe = true,
  .wood = 3
};

auto p = planner<blackboard_type>(actions, initial, goal);
The plan can then be run until it contains no more actions:
auto blackboard = initial;
while (p) {
  p.run_next(blackboard); // will mutate the blackboard
}
Conclusion
This library provides all you need to create the brain of your NPC.
It is worth mentioning that combining all those techniques is where the fun is at:
- use FSMs to animate your NPCs
- use Behavior Trees to implement scripted behavior
- use Utility AI to determine what the current overall goal should be
- use GOAP to find a sequence of action that can achieve the current overall goal, each action might trigger a transition in the NPC’s FSM, each state might be running a specific Behavior Tree
I never published this in the past 2 years because there was no test suite, and no documentation (thank you procrastination). But thanks to Github Copilot, it read my code and help me generate the test cases and the documentation with a few hit on the TAB key 😉
Feel free to clap for this article to give me more visibility 🙂
You can also join me on Discord:
If you want to read the other devlogs, it’s here → Devlogs Reading List