avatarTimothy Ugbaja

Free AI web copilot to create summaries, insights and extended knowledge, download it at here

20046

Abstract

ccess response</span> <span class="hljs-keyword">return</span> { <span class="hljs-string">'statusCode'</span>: <span class="hljs-number">200</span>, <span class="hljs-string">'body'</span>: json.dumps(<span class="hljs-string">'Video processing started!'</span>), }

<span class="hljs-keyword">except</span> Exception <span class="hljs-keyword">as</span> e:
    <span class="hljs-comment"># Return an error response</span>
    <span class="hljs-keyword">return</span> {
        <span class="hljs-string">'statusCode'</span>: <span class="hljs-number">500</span>,
        <span class="hljs-string">'body'</span>: json.dumps(<span class="hljs-string">f'Error: <span class="hljs-subst">{<span class="hljs-built_in">str</span>(e)}</span>'</span>),
    }</pre></div><p id="c2a0">Make sure to replace <code>&lt;YourS3BucketName&gt;</code>, <code>&lt;YourSNSTopicArn&gt;</code>, and <code>&lt;YourSNSRoleArn&gt;</code> with the actual values corresponding to your S3 bucket, SNS topic, and IAM role for SNS.</p><p id="825c">This code assumes the presence of a video key in the <code>video_data</code> structure, which identifies the video to be processed. Adjust the parameters according to your specific video data structure.</p><p id="21cb">With this code, the Lambda function initiates video processing using Amazon Rekognition, starting content moderation analysis asynchronously. The function provides a success or error response based on the outcome of the Rekognition operation. This is a crucial step in the video stream processing workflow within your hybrid proctoring solution.</p><p id="77b3">3.3 Configure Lambda Triggers:</p><p id="e9a8">Configure triggers for your Lambda functions to specify when they should be invoked. For example, you can set up an API Gateway trigger for the <code>ProcessRegistration</code> Lambda function.</p><div id="9e10"><pre><span class="hljs-comment"># Add API Gateway trigger to the ProcessRegistration Lambda function</span>

aws <span class="hljs-built_in">lambda</span> add-permission --function-name <span class="hljs-title class_">ProcessRegistration</span> --statement-id apigateway-prod-<span class="hljs-number">2</span> --action <span class="hljs-symbol">lambda:</span><span class="hljs-title class_">InvokeFunction</span> --principal apigateway.amazonaws.com --source-arn <span class="hljs-symbol">arn:</span><span class="hljs-symbol">aws:</span>execute-<span class="hljs-symbol">api:</span><<span class="hljs-title class_">YourRegion</span>><span class="hljs-symbol">:<YourAccountId></span><span class="hljs-symbol">:<YourApiId>/prod/POST/register</span></pre></div><p id="a5e9">Replace <code><YourRegion></code>, <code><YourAccountId></code>, and <code><YourApiId></code> with your AWS region, account ID, and API ID, respectively.</p><p id="eea3">Repeat this process for other Lambda functions and triggers as needed.</p><p id="a657">By following these steps, you have implemented AWS Lambda functions that are essential for handling exam registrations and processing video streams in your hybrid proctoring solution. These functions, triggered by various events, contribute to the overall functionality and integrity of the examination system.</p><h2 id="0b5f">Step 4: Set Up Amazon Kinesis Video Streams</h2><p id="8bde">Amazon Kinesis Video Streams enables real-time ingestion and processing of video data, making it an integral part of our hybrid proctoring system. This step involves setting up a Kinesis Video Stream to capture and stream student webcam and screen recordings seamlessly.</p><p id="114c">4.1 Create a Kinesis Video Stream:</p><p id="7ed5">Use the AWS CLI to create a Kinesis Video Stream that will capture and process the video streams generated by students during examinations.</p><div id="c833"><pre># Create <span class="hljs-selector-tag">a</span> Kinesis <span class="hljs-selector-tag">Video</span> Stream aws kinesisvideo create-stream <span class="hljs-attr">--stream-name</span> ExamStream</pre></div><p id="f530">This command will return essential information, including the <code>StreamARN</code>, which you will need for subsequent configurations.</p><p id="3850">4.2 Start Streaming from Student Clients:</p><p id="a474">Student clients, integrated with the Amazon Chime SDK, should start streaming video data to the created Kinesis Video Stream. Ensure that the streaming process includes both webcam and screen recordings.</p><div id="9d95"><pre><span class="hljs-comment"># Example code to start streaming video data using the Amazon Chime SDK</span> <span class="hljs-keyword">import</span> boto3 <span class="hljs-keyword">import</span> amazon_chime_sdk

kinesis_video = boto3.client(<span class="hljs-string">'kinesisvideo'</span>) chime_sdk = amazon_chime_sdk.client(<span class="hljs-string">'chime'</span>)

<span class="hljs-comment"># Create a Kinesis Video Stream</span> stream_arn = kinesis_video.create_stream(StreamName=<span class="hljs-string">'ExamStream'</span>)[<span class="hljs-string">'StreamARN'</span>]

<span class="hljs-comment"># Create a Chime meeting and attendee</span> meeting = chime_sdk.create_meeting() attendee = chime_sdk.create_attendee(MeetingId=meeting[<span class="hljs-string">'Meeting'</span>][<span class="hljs-string">'MeetingId'</span>])

<span class="hljs-comment"># Start streaming from webcam and screen</span> chime_sdk.start_video_stream(AttendeeId=attendee[<span class="hljs-string">'Attendee'</span>][<span class="hljs-string">'AttendeeId'</span>], StreamARN=stream_arn, MediaType=<span class="hljs-string">'video'</span>)</pre></div><p id="68d6">This example code assumes that you have a configured Chime SDK and Amazon Kinesis Video Stream.</p><p id="d392">4.3 Process Video Streams with Lambda:</p><p id="0701">Create an AWS Lambda function to process the video stream data from the Kinesis Video Stream. This function may use Amazon Rekognition for further analysis and detection of prohibited behavior.</p><div id="764c"><pre><span class="hljs-comment"># Create a Lambda function for processing video streams</span> aws lambda create<span class="hljs-operator">-</span><span class="hljs-keyword">function</span> <span class="hljs-operator">-</span><span class="hljs-operator">-</span><span class="hljs-keyword">function</span><span class="hljs-operator">-</span>name ProcessVideoStream <span class="hljs-operator">-</span><span class="hljs-operator">-</span>runtime python3.8 <span class="hljs-operator">-</span><span class="hljs-operator">-</span>role <span class="hljs-operator"><</span>YourLambdaRoleArn<span class="hljs-operator">></span> <span class="hljs-operator">-</span><span class="hljs-operator">-</span>handler index.handler <span class="hljs-operator">-</span><span class="hljs-operator">-</span>code S3Bucket<span class="hljs-operator">=</span><span class="hljs-operator"><</span>YourS3BucketName<span class="hljs-operator">></span><span class="hljs-punctuation">,</span>S3Key<span class="hljs-operator">=</span><span class="hljs-operator"><</span>YourLambdaZipFile<span class="hljs-operator">></span></pre></div><p id="9ac7">Ensure that the Lambda function code includes logic to process video stream data effectively.</p><p id="95cd">4.4 Set Up Lambda Trigger:</p><p id="a578">Configure an event source mapping to trigger the Lambda function when new video stream data is available in the Kinesis Video Stream.</p><div id="a8ba"><pre><span class="hljs-comment"># Create an event source mapping for the Lambda function</span> aws <span class="hljs-built_in">lambda</span> create-event-source-mapping --function-name <span class="hljs-title class_">ProcessVideoStream</span> --event-source <span class="hljs-symbol">arn:</span><span class="hljs-symbol">aws:</span><span class="hljs-symbol">kinesisvideo:</span><<span class="hljs-title class_">YourRegion</span>><span class="hljs-symbol">:<YourAccountId></span><span class="hljs-symbol">:stream/ExamStream</span></pre></div><p id="0978">Replace <code><YourRegion></code>, <code><YourAccountId></code>, and <code>ExamStream</code> with your AWS region, account ID, and the name of your Kinesis Video Stream, respectively.</p><p id="f2f3">By completing these steps, you have successfully set up Amazon Kinesis Video Streams within your hybrid proctoring solution. This enables real-time ingestion and processing of student webcam and screen recordings, laying the foundation for the subsequent detection of prohibited behavior using services like Amazon Rekognition.</p><h2 id="e86d">Step 5: Configure Real-Time Communication with Amazon Chime SDK</h2><p id="9355">In our hybrid proctoring solution, real-time communication is facilitated through the integration of the Amazon Chime SDK. This step involves configuring the SDK to enable seamless audio and video communication between proctors and students during examinations.</p><p id="3f3b">5.1 Set Up Amazon Chime SDK:</p><p id="3b93">Ensure you have the Amazon Chime SDK properly set up in your development environment. Follow the official Amazon Chime SDK documentation for detailed instructions on SDK installation and configuration.</p><p id="ea6f">5.2 Create a Chime Meeting:</p><p id="0917">Use the Chime SDK to create a meeting that serves as the central point for communication between proctors and students.</p><div id="ab52"><pre><span class="hljs-comment"># Example code to create a Chime meeting</span> <span class="hljs-keyword">import</span> boto3 <span class="hljs-keyword">import</span> amazon_chime_sdk

chime_sdk = amazon_chime_sdk.client(<span class="hljs-string">'chime'</span>)

<span class="hljs-comment"># Create a Chime meeting</span> meeting = chime_sdk.create_meeting()</pre></div><p id="3090">Ensure you handle the meeting ID and associated information securely, as it will be crucial for subsequent communication.</p><p id="df1a">5.3 Generate Attendee for Proctor:</p><p id="d450">Create an attendee for the proctor who will be monitoring the examination.</p><div id="024a"><pre><span class="hljs-comment"># Example code to create an attendee for the proctor</span> import amazon_chime_sdk

chime_sdk = amazon_chime_sdk.client('chime')

<span class="hljs-comment"># Provide the meeting ID from the created meeting</span> meeting_id = 'your_meeting_id'

<span class="hljs-comment"># Create an attendee for the proctor</span> proctor_attendee = chime_sdk.create_attendee(MeetingId=meeting_id)</pre></div><p id="fd88">Ensure that you securely manage the proctor attendee information.</p><p id="a551">5.4 Initiate Real-Time Communication:</p><p id="ba92">Proctors and students can initiate real-time communication using the Chime SDK. This can be done through a web interface or a dedicated application, depending on your system’s design.</p><div id="2636"><pre><span class="hljs-comment"># Example code to initiate real-time communication using Chime SDK</span> <span class="hljs-keyword">import</span> boto3 <span class="hljs-keyword">import</span> amazon_chime_sdk

chime_sdk = amazon_chime_sdk.client(<span class="hljs-string">'chime'</span>)

<span class="hljs-comment"># Create a meeting</span> meeting = chime_sdk.create_meeting()

<span class="hljs-comment"># Create an attendee for the proctor</span> proctor_attendee = chime_sdk.create_attendee(MeetingId=meeting[<span class="hljs-string">'Meeting'</span>][<span class="hljs-string">'MeetingId'</span>])

<span class="hljs-comment"># Provide the proctor_attendee['Attendee']['AttendeeId'] to the proctor</span>

<span class="hljs-comment"># Create an attendee for the student</span> student_attendee = chime_sdk.create_attendee(MeetingId=meeting[<span class="hljs-string">'Meeting'</span>][<span class="hljs-string">'MeetingId'</span>])

<span class="hljs-comment"># Provide the student_attendee['Attendee']['AttendeeId'] to the student</span>

<span class="hljs-comment"># Example: Print meeting and attendee details for reference</span> <span class="hljs-built_in">print</span>(<span class="hljs-string">"Meeting ID:"</span>, meeting[<span class="hljs-string">'Meeting'</span>][<span class="hljs-string">'MeetingId'</span>]) <span class="hljs-built_in">print</span>(<span class="hljs-string">"Proctor Attendee ID:"</span>, proctor_attendee[<span class="hljs-string">'Attendee'</span>][<span class="hljs-string">'AttendeeId'</span>]) <span class="hljs-built_in">print</span>(<span class="hljs-string">"Student Attendee ID:"</span>, student_attendee[<span class="hljs-string">'Attendee'</span>][<span class="hljs-string">'AttendeeId'</span>])</pre></div><p id="c37d">This example code initiates real-time communication using the Amazon Chime SDK. It creates a meeting, generates attendees for both the proctor and the student, and prints their respective Attendee IDs for reference. In a real-world scenario, these Attendee IDs would be securely provided to the proctor and the student, enabling them to join the meeting and engage in real-time communication during the examination.</p><p id="3bff">In a real-world scenario, you would securely share the Attendee IDs and set up a communication interface for proctors and students.</p><p id="aec8">5.5 Implement Real-Time Communication Features:</p><p id="1842">Leverage the features provided by the Chime SDK to implement real-time communication features, such as audio and video chat, screen sharing, and messaging. Customize these features to meet the specific requirements of your proctoring system.</p><p id="5850">Refer to the Amazon Chime SDK documentation for detailed information on implementing real-time communication features.</p><p id="0eed">By completing these steps, you have successfully configured real-time communication using the Amazon Chime SDK within your hybrid proctoring solution. This ensures a seamless and secure channel for proctors to monitor students during examinations and address any issues that may arise in real-time.</p><h2 id="0314">Step 6: Configure Amazon S3 for Cloud Storage</h2><p id="ad32">Amazon S3 (Simple Storage Service) is a highly scalable and secure object storage service that plays a crucial role in our hybrid proctoring solution. This step involves setting up Amazon S3 buckets to securely store exam recordings and images captured during the examination process.</p><p id="96a4">6.1 Create S3 Buckets:</p><p id="acbf">Use the AWS CLI to create Amazon S3 buckets to store exam recordings and any other relevant data.</p><div id="30e7"><pre># <span class="hljs-keyword">Create</span> an S3 bucket <span class="hljs-keyword">for</span> exam recordings aws s3api <span class="hljs-keyword">create</span><span class="hljs-operator">-</span>bucket <span class="hljs-comment">--bucket ExamRecordingsBucket</span>

<span class="hljs-keyword">Create</span> an S3 bucket <span class="hljs-keyword">for</span> other data (if needed)

aws s3api <span class="hljs-keyword">create</span><span class="hljs-operator">-</span>bucket <span class="hljs-comment">--bucket OtherDataBucket</span></pre></div><p id="f164">This command will return essential information, including the <code>BucketName</code>, which you will need for subsequent configurations.</p><p id="adfe">6.2 Configure Bucket Policies and Permissions:</p><p id="b93b">Ensure proper access control and security by configuring bucket policies and permissions using Amazon IAM (Identity and Access Management).</p><div id="e7a5"><pre># Example AWS CLI command <span class="hljs-selector-tag">to</span> configure <span class="hljs-selector-tag">a</span> bucket policy aws s3api put-bucket-policy <span class="hljs-attr">--bucket</span> ExamRecordingsBucket <span class="hljs-attr">--policy</span> file://bucket-policy.json</pre></div><p id="0736">Consider creating and attaching IAM policies to control access to the S3 buckets based on roles and users.</p><p id="8b30">6.3 Store Exam Recordings:</p><p id="bca3">During the execution of your hybrid proctoring system, use the AWS SDKs or AWS CLI to store exam recordings securely in the designated S3 bucket.</p><div id="7238"><pre><span class="hljs-comment"># Example AWS CLI command to upload exam recording to S3</span> aws s3 <span class="hljs-built_in">cp</span> /path/to/exam-recording.mp4 s3://ExamRecordingsBucket/</pre></div><p id="6928">Ensure that you replace <code>/path/to/exam-recording.mp4</code> with the actual path to the exam recording file.</p><p id="ffbc">6.4 Implement Versioning and Logging (Optional):</p><p id="b86c">Consider enabling versioning for your S3 buckets to keep track of changes and ensure data integrity.</p><div id="59e6"><pre># Enable <span class="hljs-keyword">versioning</span> <span class="hljs-keyword">for</span> an S3 bucket aws s3api put<span class="hljs-operator">-</span>bucket<span class="hljs-operator">-</span><span class="hljs-keyword">versioning</span> <span class="hljs-comment">--bucket ExamRecordingsBucket --versioning-configuration Status=Enabled</span></pre></div><p id="fe72">Configure logging to capture detailed records of S3 bucket activity using Amazon CloudWatch.</p><div id="4ea7"><pre><span class="hljs-comment"># Example AWS CLI command to enable logging for an S3 bucket</span> aws s3api put-bucket-logging --bucket ExamRecordingsBucket --bucket-logging-status file://logging-config.json</pre></div><p id="8412">Ensure you replace <code>file://logging-config.json</code> with the actual path to your logging configuration file.</p><p id="b0f8">By completing these steps, you have successfully configured Amazon S3 for cloud storage within your hybrid proctoring solution. This ensures secure and scalable storage for exam recordings and other relevant data, with the added option of versioning and logging for enhanced data management and traceability.</p><h2 id="6e17">Step 7: Implement Proctoring Interface</h2><p id="7dd6">The proctoring interface is a critical component of our hybrid proctoring solution, serving as the central hub for proctors to monitor and manage online exams. This step involves developing a web-based proctoring interface that proctors can access through a web browser. The interface should provide real-time access to exam recordings, enable communication with students, and allow proctors to take necessary actions based on the examination context.</p><p id="6a18">7.1 Choose a Web Framework:</p><p id="b1c5">Select a web framework that aligns with your development preferences and requirements. Popular choices include React.js, Angular, or Vue.js for the front end, and Node.js, Django, or Flask for the back end.</p><p id="79cb">7.2 Set Up the Front-End:</p><p id="d41c">Implement the front-end of the proctoring interface to display relevant information and features. This includes:</p><ul><li>Real-time Video Player: Use a video player library (e.g., Video.js) to display the live or recorded video stream from students.</li><li>Communication Interface: Integrate the Amazon Chime SDK to facilitate real-time audio and video communication between proctors and students.</li><li>Alerts and Notifications: Implement a notification system to alert proctors of any flagged behavior or system messages.</li><li>Exam Metadata Display: Show relevant information about the ongoing exams, including exam details, student information, and any additional context.</li></ul><p id="7203">7.3 Set Up the Back-End:</p><p id="9b8d">Develop the back-end of the proctoring interface to handle data processing and communication with other AWS services. This includes:</p><ul><li>API Integration: Connect the proctoring interface to the Amazon API Gateway to fetch and update exam information.</li><li>AWS SDK Integration: Use AWS SDKs (e.g., boto3 for Python) to interact with AWS services such as Amazon S3 for exam recording retrieval.</li><li>Real-time Communication Logic: Implement logic to handle real-time communication between proctors and students using the Amazon Chime SDK.</li><li>Behavior Alert Handling: Develop functionality to respond to alerts generated by the

Options

system, such as prohibited behavior detected by Amazon Rekognition.</li></ul><p id="2cb8">7.4 Implement Security Measures:</p><p id="6351">Prioritize security measures to protect sensitive exam data and maintain the integrity of the proctoring interface. This may include:</p><ul><li>User Authentication: Integrate Amazon Cognito for user authentication to ensure that only authorized proctors access the interface.</li><li>Access Control: Implement fine-grained access control using Amazon IAM to restrict access based on proctor roles and responsibilities.</li><li>Secure Communications: Ensure that communication between the proctoring interface and AWS services is secured using HTTPS and other encryption mechanisms.</li></ul><p id="565e">7.5 User Interface Design:</p><p id="4e9c">Design the proctoring interface with a user-friendly and intuitive layout. Consider features such as:</p><ul><li>Responsive Design: Ensure that the interface is accessible and functional across different devices and screen sizes.</li><li>Intuitive Navigation: Design an interface that allows proctors to easily navigate through exam information, communication features, and alerts.</li><li>Dashboard Overview: Provide a centralized dashboard that offers a quick overview of ongoing exams and any critical alerts.</li></ul><p id="358d">7.6 Testing and Debugging:</p><p id="6584">Thoroughly test the proctoring interface to identify and address any issues. Consider implementing automated testing and debugging tools to streamline the development process.</p><p id="0339">7.7 Deployment:</p><p id="f099">Deploy the proctoring interface to a web server or a cloud-based hosting service. Utilize services such as Amazon CloudFront for content delivery to optimize performance and reduce latency.</p><p id="b56f">By completing these steps, you have successfully implemented a robust and user-friendly proctoring interface for your hybrid proctoring solution. Proctors can now use this interface to monitor exams, communicate with students in real time, and take appropriate actions based on the exam context and any detected irregularities.</p><h2 id="9993">Step 8: Monitor and Log with Amazon CloudWatch</h2><p id="d997">Monitoring and logging are essential components of any scalable and reliable system, providing insights into the performance, health, and behavior of your hybrid proctoring solution. Amazon CloudWatch is a comprehensive monitoring service that allows you to collect and track metrics, collect and monitor log files, and set alarms. This step involves setting up CloudWatch to monitor and log various aspects of your system.</p><p id="09e7">8.1 Create CloudWatch Alarms:</p><p id="b7c6">Set up CloudWatch alarms to monitor key metrics and receive notifications when certain thresholds are breached. For example, you might create alarms for:</p><ul><li>Lambda Function Metrics: Monitor the execution, duration, and error rates of Lambda functions involved in exam registration, video processing, and alerting.</li><li>Amazon Kinesis Video Streams Metrics: Track the incoming data and stream metrics to ensure the stability of video stream processing.</li></ul><div id="8a87"><pre><span class="hljs-comment"># Example AWS CLI command to create a CloudWatch alarm for Lambda function errors</span> aws cloudwatch put-metric-<span class="hljs-keyword">alarm</span> --<span class="hljs-keyword">alarm</span>-name LambdaErrorAlarm --<span class="hljs-keyword">alarm</span>-description <span class="hljs-string">"Lambda function error rate exceeded"</span> --actions-enabled --<span class="hljs-keyword">alarm</span>-actions <YourSnsTopicArn> --metric-name Errors --namespace AWS/Lambda --statistic Sum --period <span class="hljs-number">300</span> --threshold <span class="hljs-number">1</span> --comparison-operator GreaterThanThreshold --evaluation-periods <span class="hljs-number">1</span> --dimensions Name=FunctionName,Value=<YourLambdaFunctionName></pre></div><p id="21b1">Replace <code><YourSnsTopicArn></code> and <code><YourLambdaFunctionName></code> with your actual SNS topic ARN and Lambda function name.</p><p id="84f5">8.2 Enable CloudWatch Logs:</p><p id="4df6">Configure your Lambda functions to send logs to CloudWatch Logs for detailed analysis and troubleshooting.</p><div id="c9eb"><pre><span class="hljs-comment"># Example AWS CLI command to enable logging for a Lambda function</span> aws lambda update-<span class="hljs-function"><span class="hljs-keyword">function</span>-<span class="hljs-title">configuration</span> --<span class="hljs-title">function</span>-<span class="hljs-title">name</span> <<span class="hljs-title">YourLambdaFunctionName</span>> --<span class="hljs-title">log</span>-<span class="hljs-title">config</span> '</span>{<span class="hljs-string">"cloudWatchLogsRoleArn"</span>:<span class="hljs-string">"<YourCloudWatchLogsRoleArn>"</span>, <span class="hljs-string">"cloudWatchLogsEnabled"</span>:<span class="hljs-literal">true</span>}<span class="hljs-string">'</span></pre></div><p id="64d6">Replace <code><YourLambdaFunctionName></code> and <code><YourCloudWatchLogsRoleArn></code> with your actual Lambda function name and CloudWatch Logs role ARN.</p><p id="e519">8.3 Monitor API Gateway Metrics:</p><p id="4221">Keep track of Amazon API Gateway metrics, such as request latency, error rates, and cache performance.</p><div id="38d2"><pre><span class="hljs-comment"># Example AWS CLI command to create a CloudWatch alarm for API Gateway latency</span> aws cloudwatch put-metric-<span class="hljs-keyword">alarm</span> --<span class="hljs-keyword">alarm</span>-name ApiGatewayLatencyAlarm --<span class="hljs-keyword">alarm</span>-description <span class="hljs-string">"API Gateway latency exceeded threshold"</span> --actions-enabled --<span class="hljs-keyword">alarm</span>-actions <YourSnsTopicArn> --metric-name Latency --namespace AWS/ApiGateway --statistic Average --period <span class="hljs-number">300</span> --threshold <span class="hljs-number">500</span> --comparison-operator GreaterThanThreshold --evaluation-periods <span class="hljs-number">1</span> --dimensions Name=ApiName,Value=<YourApiName></pre></div><p id="9a85">Replace <code><YourSnsTopicArn></code> and <code><YourApiName></code> with your actual SNS topic ARN and API name.</p><p id="46f2">8.4 CloudWatch Dashboards:</p><p id="40e1">Create CloudWatch dashboards to visualize and aggregate metrics from different components of your hybrid proctoring solution.</p><div id="f702"><pre># Example AWS CLI command <span class="hljs-selector-tag">to</span> create <span class="hljs-selector-tag">a</span> CloudWatch dashboard aws cloudwatch put-dashboard <span class="hljs-attr">--dashboard-name</span> ProctoringDashboard <span class="hljs-attr">--dashboard-body</span> file://dashboard-definition.json</pre></div><p id="48d5">Ensure you replace <code>file://dashboard-definition.json</code> with the actual path to your dashboard definition file.</p><p id="9d27">8.5 Set Up CloudWatch Alarms for S3:</p><p id="5526">Monitor Amazon S3 metrics, including bucket size, number of objects, and request rates.</p><div id="2616"><pre><span class="hljs-comment"># Example AWS CLI command to create a CloudWatch alarm for S3 bucket size</span> aws cloudwatch put-metric-<span class="hljs-keyword">alarm</span> --<span class="hljs-keyword">alarm</span>-name S3BucketSizeAlarm --<span class="hljs-keyword">alarm</span>-description <span class="hljs-string">"S3 bucket size exceeded threshold"</span> --actions-enabled --<span class="hljs-keyword">alarm</span>-actions <YourSnsTopicArn> --metric-name BucketSizeBytes --namespace AWS/S3 --statistic Average --period <span class="hljs-number">300</span> --threshold <span class="hljs-number">5000000000</span> --comparison-operator GreaterThanThreshold --evaluation-periods <span class="hljs-number">1</span> --dimensions Name=BucketName,Value=<YourBucketName></pre></div><p id="27ab">Replace <code><YourSnsTopicArn></code> and <code><YourBucketName></code> with your actual SNS topic ARN and S3 bucket name.</p><p id="10c2">8.6 Custom Metrics:</p><p id="405c">Implement custom CloudWatch metrics to monitor specific behaviors or performance indicators in your proctoring solution.</p><div id="ccaf"><pre><span class="hljs-comment"># Example code to publish a custom metric to CloudWatch</span> <span class="hljs-keyword">import</span> boto3

cloudwatch = boto3.client(<span class="hljs-string">'cloudwatch'</span>)

cloudwatch.put_metric_data( Namespace=<span class="hljs-string">'ProctoringMetrics'</span>, MetricData=[ { <span class="hljs-string">'MetricName'</span>: <span class="hljs-string">'CustomMetric'</span>, <span class="hljs-string">'Value'</span>: <span class="hljs-number">1</span>, <span class="hljs-string">'Unit'</span>: <span class="hljs-string">'Count'</span> } ] )</pre></div><p id="a8be">Custom metrics can be used to track specific events or behaviors that are critical for monitoring.</p><p id="745f">By implementing these steps, you have effectively set up monitoring and logging using Amazon CloudWatch for your hybrid proctoring solution. This allows you to gain insights into the performance and health of your system, proactively address issues, and ensure the overall reliability of your online examination platform.</p><h2 id="7f04">Step 9: Implement Access Control with Amazon IAM</h2><p id="0530">Access control is crucial for securing your hybrid proctoring solution and ensuring that only authorized users and services can interact with your AWS resources. Amazon IAM (Identity and Access Management) provides robust and fine-grained access control capabilities. This step involves setting up IAM policies and roles to manage permissions and access across various components of your system.</p><p id="dbe6">9.1 Define IAM Policies:</p><p id="4715">IAM policies define the permissions that control access to AWS resources. Create IAM policies tailored to the roles and responsibilities of different entities in your system, such as proctors, students, Lambda functions, and other services.</p><p id="8a3a">Here is an example IAM policy allowing read-only access to an S3 bucket for exam recordings:</p><div id="0b62"><pre><span class="hljs-punctuation">{</span> <span class="hljs-attr">"Version"</span><span class="hljs-punctuation">:</span> <span class="hljs-string">"2012-10-17"</span><span class="hljs-punctuation">,</span> <span class="hljs-attr">"Statement"</span><span class="hljs-punctuation">:</span> <span class="hljs-punctuation">[</span> <span class="hljs-punctuation">{</span> <span class="hljs-attr">"Effect"</span><span class="hljs-punctuation">:</span> <span class="hljs-string">"Allow"</span><span class="hljs-punctuation">,</span> <span class="hljs-attr">"Action"</span><span class="hljs-punctuation">:</span> <span class="hljs-string">"s3:GetObject"</span><span class="hljs-punctuation">,</span> <span class="hljs-attr">"Resource"</span><span class="hljs-punctuation">:</span> <span class="hljs-string">"arn:aws:s3:::ExamRecordingsBucket/*"</span> <span class="hljs-punctuation">}</span> <span class="hljs-punctuation">]</span> <span class="hljs-punctuation">}</span></pre></div><p id="b304">9.2 Create IAM Roles:</p><p id="ee13">IAM roles define a set of permissions that determine what actions can be performed on AWS resources. Create IAM roles for Lambda functions, EC2 instances (if applicable), and other entities.</p><div id="a1dc"><pre><span class="hljs-comment"># Example AWS CLI command to create an IAM role for a Lambda function</span> aws iam create-role --role-name LambdaExecutionRole --assume-role-policy-document file://trust-policy.json</pre></div><p id="15ea">Ensure that you replace <code>file://trust-policy.json</code> with the actual path to your trust policy document.</p><p id="902a">9.3 Attach Policies to Roles:</p><p id="1e74">Once IAM roles are created, attach the appropriate policies to grant the required permissions.</p><div id="a61b"><pre># Example AWS CLI command <span class="hljs-selector-tag">to</span> attach <span class="hljs-selector-tag">a</span> policy <span class="hljs-selector-tag">to</span> an IAM role aws iam attach-role-policy <span class="hljs-attr">--role-name</span> LambdaExecutionRole <span class="hljs-attr">--policy-arn</span> arn:aws:iam::aws:policy/AmazonS3ReadOnlyAccess</pre></div><p id="a3b4">Replace <code>LambdaExecutionRole</code> with your actual role name and use the appropriate policy ARN.</p><p id="4b49">9.4 Implement Least Privilege Principle:</p><p id="b90b">Follow the principle of least privilege, ensuring that each IAM entity (user, role, or Lambda function) has the minimum permissions necessary to perform its tasks. Regularly review and update policies to remove unnecessary permissions.</p><p id="7f1d">9.5 Configure Trust Relationships:</p><p id="ec04">Configure trust relationships for IAM roles to specify which entities are allowed to assume the roles. This is crucial for secure communication between services.</p><div id="d84e"><pre><span class="hljs-comment">// Example trust policy allowing Lambda functions to assume the role</span> <span class="hljs-punctuation">{</span> <span class="hljs-attr">"Version"</span><span class="hljs-punctuation">:</span> <span class="hljs-string">"2012-10-17"</span><span class="hljs-punctuation">,</span> <span class="hljs-attr">"Statement"</span><span class="hljs-punctuation">:</span> <span class="hljs-punctuation">[</span> <span class="hljs-punctuation">{</span> <span class="hljs-attr">"Effect"</span><span class="hljs-punctuation">:</span> <span class="hljs-string">"Allow"</span><span class="hljs-punctuation">,</span> <span class="hljs-attr">"Principal"</span><span class="hljs-punctuation">:</span> <span class="hljs-punctuation">{</span> <span class="hljs-attr">"Service"</span><span class="hljs-punctuation">:</span> <span class="hljs-string">"lambda.amazonaws.com"</span> <span class="hljs-punctuation">}</span><span class="hljs-punctuation">,</span> <span class="hljs-attr">"Action"</span><span class="hljs-punctuation">:</span> <span class="hljs-string">"sts:AssumeRole"</span> <span class="hljs-punctuation">}</span> <span class="hljs-punctuation">]</span> <span class="hljs-punctuation">}</span></pre></div><p id="ba1c">9.6 Implement IAM Users and Groups:</p><p id="f960">Create IAM users and groups for human users, such as proctors and administrators. Assign appropriate policies to these users and groups based on their responsibilities.</p><div id="0c0e"><pre># Example AWS CLI command <span class="hljs-keyword">to</span> <span class="hljs-keyword">create</span> an IAM <span class="hljs-keyword">user</span> aws iam <span class="hljs-keyword">create</span><span class="hljs-operator">-</span><span class="hljs-keyword">user</span> <span class="hljs-comment">--user-name ProctorUser</span>

Example AWS CLI command <span class="hljs-keyword">to</span> <span class="hljs-keyword">add</span> a <span class="hljs-keyword">user</span> <span class="hljs-keyword">to</span> an IAM <span class="hljs-keyword">group</span>

aws iam <span class="hljs-keyword">add</span><span class="hljs-operator">-</span><span class="hljs-keyword">user</span><span class="hljs-operator">-</span><span class="hljs-keyword">to</span><span class="hljs-operator">-</span><span class="hljs-keyword">group</span> <span class="hljs-comment">--user-name ProctorUser --group-name ProctorGroup</span></pre></div><p id="0d7c">9.7 Secure AWS Resources:</p><p id="659a">Implement IAM policies to secure other AWS resources, such as Amazon S3 buckets, Amazon API Gateway, and Amazon Kinesis Video Streams.</p><p id="2593">9.8 Regularly Review and Audit:</p><p id="6d12">Regularly review IAM policies, roles, and user permissions. Perform periodic audits to ensure that access remains aligned with the principle of least privilege and that there are no unauthorized changes.</p><p id="bce4">9.9 Use IAM Roles for EC2 Instances (If Applicable):</p><p id="8383">If your hybrid proctoring solution involves EC2 instances, use IAM roles to grant permissions to instances rather than storing access keys on the instances.</p><div id="a2f0"><pre><span class="hljs-comment"># Example AWS CLI command to create an IAM role for EC2 instances</span> aws iam create-role --role-name EC2InstanceRole --assume-role-policy-document file://ec2-trust-policy.json</pre></div><p id="4469">Replace <code>file://ec2-trust-policy.json</code> with the actual path to your EC2 trust policy document.</p><p id="e53c">By implementing these steps, you have established a robust access control mechanism for your hybrid proctoring solution using Amazon IAM. This ensures that only authorized entities have the necessary permissions to interact with AWS resources, enhancing the overall security and integrity of your online examination platform.</p><h1 id="9d16">Conclusion:</h1><p id="f125">In conclusion, the implementation of a hybrid proctoring solution leveraging AWS services has provided a comprehensive and scalable platform for ensuring exam integrity in online assessments. The integration of artificial intelligence for real-time behavior analysis, coupled with human monitoring through the proctoring interface, creates a powerful synergy that enhances the overall reliability of the examination process.</p><p id="16df">The key components and steps involved in building this solution are designed to provide a seamless and secure experience for both students and proctors. Amazon services such as Kinesis Video Streams, Rekognition, S3, Cognito, API Gateway, Lambda, and Chime SDK have been orchestrated to create a robust architecture that addresses various aspects of exam proctoring.</p><p id="72e1">The implementation covers a wide range of functionalities, including exam registration, video stream processing, real-time communication, and secure cloud storage. Access control measures using IAM policies and roles ensure that only authorized users have the necessary permissions, adhering to the principle of least privilege.</p><p id="66ca">Monitoring and logging with Amazon CloudWatch offer real-time insights into system performance, allowing for proactive issue resolution and continuous improvement. Additionally, the security measures implemented, including SSL for communication, IAM for access control, and encryption for data at rest, contribute to the overall integrity and confidentiality of the system.</p><p id="20c0">As the online education landscape continues to evolve, this hybrid proctoring solution stands as a testament to the capabilities of cloud-based technologies in creating robust, scalable, and secure examination platforms. The flexibility offered by AWS services enables institutions and organizations to adapt and customize the solution to meet their specific requirements, ensuring a reliable and trustworthy environment for conducting online exams.</p><p id="6af2">In summary, the hybrid proctoring solution presented here represents a state-of-the-art approach to online exam integrity, combining the strengths of artificial intelligence and human monitoring within a secure and scalable cloud infrastructure. It provides a foundation for educational institutions and examination bodies to embrace the benefits of online assessments while maintaining the highest standards of integrity and security.</p><div id="ac6c"><pre>Want to connect? https:<span class="hljs-comment">//www.linkedin.com/in/timothy-ugbaja-acfellow-osl-006b111a/</span> https:<span class="hljs-comment">//www.facebook.com/evangtimugbaja</span> https:<span class="hljs-comment">//twitter.com/TimothyUgbaja</span> Contact me <span class="hljs-keyword">if</span> you have any issue <span class="hljs-keyword">for</span> further assistance.</pre></div></article></body>

AI-Powered, Human-Monitored: The Hybrid Proctoring Solution Ensuring Exam Integrity

Unlock access, uphold standards. The future of exam integrity is here.

Introduction

In the ever-evolving landscape of education technology, ensuring the integrity of online exams is a critical concern. One innovative solution to address this challenge is the development of a hybrid proctoring system that combines the power of artificial intelligence (AI) with human monitoring. This tutorial will guide you through the creation of such a system using a range of Amazon Web Services (AWS) tools, ensuring a robust and scalable architecture.

Prerequisites

Before diving into the implementation, make sure you have the following prerequisites in place:

  1. AWS Account: You’ll need an AWS account to access the services used in this tutorial.
  2. AWS CLI: Install the AWS Command Line Interface to interact with AWS services from your terminal.
pip install awscli

3. AWS SDKs: Install AWS SDKs for your preferred programming language (e.g., boto3 for Python) to interact programmatically with AWS services.

4. Amazon Chime SDK: Follow the Amazon Chime SDK documentation to set up the SDK for real-time audio and video communication.

Now, let’s dive into the architecture and implementation.

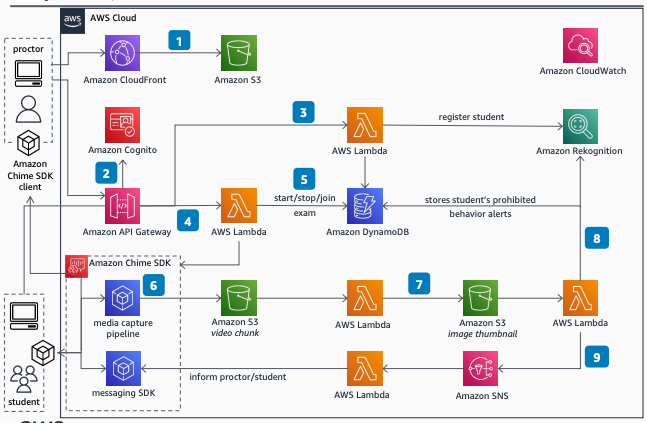
Architecture Overview

The hybrid proctoring solution leverages several AWS services to create a secure and efficient exam environment. Here’s an overview of the key components:

  1. Amazon CloudFront: Used as a Content Delivery Network (CDN) for distributing static content, such as the proctoring interface, to users globally.
  2. Amazon S3: Scalable object storage for storing exam recordings, images, and other data.
  3. Amazon Cognito: Manages user authentication for both students and proctors.
  4. Amazon API Gateway: Creates and manages RESTful APIs for exam registration and other interactions.
  5. AWS Lambda: Serverless compute service for running code without managing servers, used for various functions, including registration, video processing, and messaging.
  6. Amazon DynamoDB: NoSQL database service for storing student registration data and other information.
  7. Amazon Kinesis Video Streams: Fully managed service for real-time video ingestion and processing, used to capture and stream student webcam and screen recordings.
  8. Amazon Rekognition: Image and video analysis service for detecting prohibited behavior in exam recordings.
  9. Amazon SNS: Pub/sub messaging service for sending alerts to proctors and students.
  10. Amazon Chime SDK: Toolkit for building real-time audio and video communication applications, used for communication between proctors and students.
  11. Amazon CloudWatch: Monitors and logs system activities.
  12. Amazon IAM: Manages access control and security.

Implementation Steps

Step 1: Set up Amazon Cognito for Authentication

Amazon Cognito plays a pivotal role in securing our hybrid proctoring solution by managing user authentication for both students and proctors. This step involves creating user pools to accommodate the distinct user groups and configuring them to handle registration and login processes seamlessly.

1.1 Create User Pools:

Use the AWS CLI to create user pools for students and proctors. A user pool represents a group of users who can sign in and use your app.

# Create a user pool for students
aws cognito-idp create-user-pool --pool-name StudentPool

# Create a user pool for proctors
aws cognito-idp create-user-pool --pool-name ProctorPool

This command will return essential information, including the UserPoolId, which you will need for subsequent configurations.

1.2 Create User Pool Clients:

User pool clients represent the different apps that users can sign in to. Create user pool clients for the student and proctor applications.

# Create a user pool client for the student app
aws cognito-idp create-user-pool-client --user-pool-id <YourStudentPoolId> --client-name StudentApp

# Create a user pool client for the proctor app
aws cognito-idp create-user-pool-client --user-pool-id <YourProctorPoolId> --client-name ProctorApp

Make note of the ClientId generated for each client, as they will be used during the authentication setup.

1.3. Configure Triggers and Policies:

Tailor user authentication to your needs by configuring triggers and policies. You can customize actions that occur during user pool operations, such as user sign-up or authentication.

# Example AWS CLI command to configure triggers
aws cognito-idp update-user-pool --user-pool-id <YourUserPoolId> --lambda-config PreSignUp=<YourLambdaFunctionArn>

Additionally, establish password policies and multi-factor authentication (MFA) settings for an added layer of security.

1.4. Configure App Clients:

Define settings for user pool clients, specifying allowed redirect URIs and scopes.

# Example AWS CLI command to configure app client settings
aws cognito-idp update-user-pool-client --user-pool-id <YourUserPoolId> --client-id <YourClientId> --allowed-o-auth-flows "code" --allowed-o-auth-scopes "openid"

Ensure that you replace <YourUserPoolId> and <YourClientId> with your actual values.

1.5. Domain Name Setup (Optional):

If desired, configure a custom domain for your user pool to provide a branded authentication experience.

# Example AWS CLI command to configure a custom domain
aws cognito-idp create-user-pool-domain --domain <YourCustomDomain> --user-pool-id <YourUserPoolId>

Make sure to update <YourCustomDomain> and <YourUserPoolId> accordingly.

By completing these steps, you have successfully set up Amazon Cognito, creating a robust foundation for user authentication within your hybrid proctoring solution. This authentication mechanism ensures the secure and seamless access of both students and proctors to the system.

Step 2: Create an API for Exam Registration

To facilitate seamless exam registration for students, we will utilize Amazon API Gateway to create a RESTful API. This API will serve as the communication bridge between the student interface and the backend system, handling exam registration requests and storing relevant information in Amazon DynamoDB.

2.1 Create an API:

Start by creating a new RESTful API using Amazon API Gateway. This API will define the endpoints necessary for handling exam registration.

# Create a new REST API
aws apigateway create-rest-api --name ExamRegistrationAPI

The command will return essential information about the API, including the id needed for subsequent configurations.

2.2. Define Resources and Methods:

Configure resources and methods within your API to define the structure of the exam registration endpoints. In this example, we’ll create a resource named /register with a POST method.

# Create a resource named "register"
aws apigateway create-resource --rest-api-id <YourApiId> --parent-id <YourParentId> --path-part register

# Create a POST method for the "register" resource
aws apigateway put-method --rest-api-id <YourApiId> --resource-id <YourResourceId> --http-method POST

Make sure to replace <YourApiId>, <YourParentId>, and <YourResourceId> with the actual values obtained from the previous commands.

2.3. Create Integration with AWS Lambda:

Connect your API endpoint to an AWS Lambda function that will handle the exam registration logic. This involves creating an integration between the API Gateway and Lambda.

# Create an integration with AWS Lambda
aws apigateway put-integration --rest-api-id <YourApiId> --resource-id <YourResourceId> --http-method POST --type AWS_PROXY --integration-http-method POST --uri arn:aws:apigateway:<YourRegion>:lambda:path/2015-03-31/functions/<YourLambdaFunctionArn>/invocations

Replace <YourRegion> and <YourLambdaFunctionArn> with your AWS region and Lambda function ARN.

2.4. Create Deployment:

Deploy your API to make it accessible. This step generates a unique invoke URL that students can use to register for exams.

# Deploy the API
aws apigateway create-deployment --rest-api-id <YourApiId> --stage-name prod

The deployment command will return a URL under the invokeUrl field, representing the endpoint for your exam registration API.

Now, you’ve successfully created an API for exam registration using Amazon API Gateway. Students can utilize the provided URL to register for exams, triggering the associated AWS Lambda function for processing and storing registration data in Amazon DynamoDB. This seamless integration streamlines the registration process within your hybrid proctoring solution.

Step 3: Implement AWS Lambda Functions

AWS Lambda functions play a crucial role in the functioning of our hybrid proctoring system. These serverless functions execute various tasks, including processing exam registrations, analyzing video streams, and sending alerts. Below are steps to implement Lambda functions for key functionalities:

3.1 Create Lambda Functions:

Create Lambda functions for processing exam registrations, analyzing video streams, and sending alerts. The examples below cover registration processing and video stream processing.

# Create Lambda function for processing exam registration
aws lambda create-function --function-name ProcessRegistration --runtime python3.8 --role <YourLambdaRoleArn> --handler index.handler --code S3Bucket=<YourS3BucketName>,S3Key=<YourLambdaZipFile>

# Create Lambda function for processing video stream
aws lambda create-function --function-name ProcessVideoStream --runtime python3.8 --role <YourLambdaRoleArn> --handler index.handler --code S3Bucket=<YourS3BucketName>,S3Key=<YourLambdaZipFile>

Replace <YourLambdaRoleArn>, <YourS3BucketName>, and <YourLambdaZipFile> with your Lambda execution role ARN, S3 bucket name, and the location of your Lambda deployment package, respectively.

3.2 Write Lambda Function Code:

Write the Lambda function code in the programming language of your choice (e.g., Python). Below are simplified examples:

ProcessRegistration Lambda Function (Python):

# index.py

import json
import boto3

def handler(event, context):
    # Extract registration data from the request body
    registration_data = json.loads(event['body'])

    # DynamoDB table name
    dynamodb_table = '<YourDynamoDBTableName>'

    # Create a DynamoDB client
    dynamodb = boto3.client('dynamodb')

    try:
        # Store registration data in DynamoDB
        response = dynamodb.put_item(
            TableName=dynamodb_table,
            Item={
                'StudentId': {'S': registration_data['student_id']},
                'ExamId': {'S': registration_data['exam_id']},
                'RegistrationTime': {'S': registration_data['registration_time']}
                # Add additional attributes as needed
            }
        )

        # Return a success response
        return {
            'statusCode': 200,
            'body': json.dumps('Registration successful!'),
        }

    except Exception as e:
        # Return an error response
        return {
            'statusCode': 500,
            'body': json.dumps(f'Error: {str(e)}'),
        }

Remember to replace <YourDynamoDBTableName> with the actual name of your DynamoDB table. Additionally, modify the attributes within the Item dictionary based on the registration data structure.

This code assumes a simple structure for the DynamoDB table, with attributes like StudentId, ExamId, and RegistrationTime. Adjust the structure according to your specific requirements.

With this code, the Lambda function now processes registration data and stores it in DynamoDB. It provides a success or error response based on the outcome of the DynamoDB operation. This is a crucial step in the exam registration process within your hybrid proctoring solution.

ProcessVideoStream Lambda Function (Python):

# index.py

import json
import boto3

def handler(event, context):
    # Extract video stream data from the request body
    video_data = json.loads(event['body'])

    # Amazon Rekognition client
    rekognition = boto3.client('rekognition')

    # Amazon Rekognition parameters
    rekognition_params = {
        'Video': {
            'S3Object': {
                'Bucket': '<YourS3BucketName>',
                'Name': video_data['video_key']  # Assumes video_key is present in video_data
            }
        },
        'NotificationChannel': {
            'SNSTopicArn': '<YourSNSTopicArn>',  # Replace with your SNS topic ARN
            'RoleArn': '<YourSNSRoleArn>'  # Replace with your IAM role ARN for SNS
        }
    }

    try:
        # Start asynchronous video analysis with Amazon Rekognition
        response = rekognition.start_content_moderation(**rekognition_params)

        # Return a success response
        return {
            'statusCode': 200,
            'body': json.dumps('Video processing started!'),
        }

    except Exception as e:
        # Return an error response
        return {
            'statusCode': 500,
            'body': json.dumps(f'Error: {str(e)}'),
        }

Make sure to replace <YourS3BucketName>, <YourSNSTopicArn>, and <YourSNSRoleArn> with the actual values corresponding to your S3 bucket, SNS topic, and IAM role for SNS.

This code assumes the presence of a video key in the video_data structure, which identifies the video to be processed. Adjust the parameters according to your specific video data structure.

With this code, the Lambda function initiates video processing using Amazon Rekognition, starting content moderation analysis asynchronously. The function provides a success or error response based on the outcome of the Rekognition operation. This is a crucial step in the video stream processing workflow within your hybrid proctoring solution.

3.3 Configure Lambda Triggers:

Configure triggers for your Lambda functions to specify when they should be invoked. For example, you can set up an API Gateway trigger for the ProcessRegistration Lambda function.

# Add API Gateway trigger to the ProcessRegistration Lambda function
aws lambda add-permission --function-name ProcessRegistration --statement-id apigateway-prod-2 --action lambda:InvokeFunction --principal apigateway.amazonaws.com --source-arn arn:aws:execute-api:<YourRegion>:<YourAccountId>:<YourApiId>/prod/POST/register

Replace <YourRegion>, <YourAccountId>, and <YourApiId> with your AWS region, account ID, and API ID, respectively.

Repeat this process for other Lambda functions and triggers as needed.

By following these steps, you have implemented AWS Lambda functions that are essential for handling exam registrations and processing video streams in your hybrid proctoring solution. These functions, triggered by various events, contribute to the overall functionality and integrity of the examination system.

Step 4: Set Up Amazon Kinesis Video Streams

Amazon Kinesis Video Streams enables real-time ingestion and processing of video data, making it an integral part of our hybrid proctoring system. This step involves setting up a Kinesis Video Stream to capture and stream student webcam and screen recordings seamlessly.

4.1 Create a Kinesis Video Stream:

Use the AWS CLI to create a Kinesis Video Stream that will capture and process the video streams generated by students during examinations.

# Create a Kinesis Video Stream
aws kinesisvideo create-stream --stream-name ExamStream

This command will return essential information, including the StreamARN, which you will need for subsequent configurations.

4.2 Start Streaming from Student Clients:

Student clients, integrated with the Amazon Chime SDK, should start streaming video data to the created Kinesis Video Stream. Ensure that the streaming process includes both webcam and screen recordings.

# Example code to start streaming video data using the Amazon Chime SDK
import boto3
import amazon_chime_sdk

kinesis_video = boto3.client('kinesisvideo')
chime_sdk = amazon_chime_sdk.client('chime')

# Create a Kinesis Video Stream
stream_arn = kinesis_video.create_stream(StreamName='ExamStream')['StreamARN']

# Create a Chime meeting and attendee
meeting = chime_sdk.create_meeting()
attendee = chime_sdk.create_attendee(MeetingId=meeting['Meeting']['MeetingId'])

# Start streaming from webcam and screen
chime_sdk.start_video_stream(AttendeeId=attendee['Attendee']['AttendeeId'], StreamARN=stream_arn, MediaType='video')

This example code assumes that you have a configured Chime SDK and Amazon Kinesis Video Stream.

4.3 Process Video Streams with Lambda:

Create an AWS Lambda function to process the video stream data from the Kinesis Video Stream. This function may use Amazon Rekognition for further analysis and detection of prohibited behavior.

# Create a Lambda function for processing video streams
aws lambda create-function --function-name ProcessVideoStream --runtime python3.8 --role <YourLambdaRoleArn> --handler index.handler --code S3Bucket=<YourS3BucketName>,S3Key=<YourLambdaZipFile>

Ensure that the Lambda function code includes logic to process video stream data effectively.

4.4 Set Up Lambda Trigger:

Configure an event source mapping to trigger the Lambda function when new video stream data is available in the Kinesis Video Stream.

# Create an event source mapping for the Lambda function
aws lambda create-event-source-mapping --function-name ProcessVideoStream --event-source arn:aws:kinesisvideo:<YourRegion>:<YourAccountId>:stream/ExamStream

Replace <YourRegion>, <YourAccountId>, and ExamStream with your AWS region, account ID, and the name of your Kinesis Video Stream, respectively.

By completing these steps, you have successfully set up Amazon Kinesis Video Streams within your hybrid proctoring solution. This enables real-time ingestion and processing of student webcam and screen recordings, laying the foundation for the subsequent detection of prohibited behavior using services like Amazon Rekognition.

Step 5: Configure Real-Time Communication with Amazon Chime SDK

In our hybrid proctoring solution, real-time communication is facilitated through the integration of the Amazon Chime SDK. This step involves configuring the SDK to enable seamless audio and video communication between proctors and students during examinations.

5.1 Set Up Amazon Chime SDK:

Ensure you have the Amazon Chime SDK properly set up in your development environment. Follow the official Amazon Chime SDK documentation for detailed instructions on SDK installation and configuration.

5.2 Create a Chime Meeting:

Use the Chime SDK to create a meeting that serves as the central point for communication between proctors and students.

# Example code to create a Chime meeting
import boto3
import amazon_chime_sdk

chime_sdk = amazon_chime_sdk.client('chime')

# Create a Chime meeting
meeting = chime_sdk.create_meeting()

Ensure you handle the meeting ID and associated information securely, as it will be crucial for subsequent communication.

5.3 Generate Attendee for Proctor:

Create an attendee for the proctor who will be monitoring the examination.

# Example code to create an attendee for the proctor
import amazon_chime_sdk

chime_sdk = amazon_chime_sdk.client('chime')

# Provide the meeting ID from the created meeting
meeting_id = 'your_meeting_id'

# Create an attendee for the proctor
proctor_attendee = chime_sdk.create_attendee(MeetingId=meeting_id)

Ensure that you securely manage the proctor attendee information.

5.4 Initiate Real-Time Communication:

Proctors and students can initiate real-time communication using the Chime SDK. This can be done through a web interface or a dedicated application, depending on your system’s design.

# Example code to initiate real-time communication using Chime SDK
import boto3
import amazon_chime_sdk

chime_sdk = amazon_chime_sdk.client('chime')

# Create a meeting
meeting = chime_sdk.create_meeting()

# Create an attendee for the proctor
proctor_attendee = chime_sdk.create_attendee(MeetingId=meeting['Meeting']['MeetingId'])

# Provide the proctor_attendee['Attendee']['AttendeeId'] to the proctor

# Create an attendee for the student
student_attendee = chime_sdk.create_attendee(MeetingId=meeting['Meeting']['MeetingId'])

# Provide the student_attendee['Attendee']['AttendeeId'] to the student

# Example: Print meeting and attendee details for reference
print("Meeting ID:", meeting['Meeting']['MeetingId'])
print("Proctor Attendee ID:", proctor_attendee['Attendee']['AttendeeId'])
print("Student Attendee ID:", student_attendee['Attendee']['AttendeeId'])

This example code initiates real-time communication using the Amazon Chime SDK. It creates a meeting, generates attendees for both the proctor and the student, and prints their respective Attendee IDs for reference. In a real-world scenario, these Attendee IDs would be securely provided to the proctor and the student, enabling them to join the meeting and engage in real-time communication during the examination.

In a real-world scenario, you would securely share the Attendee IDs and set up a communication interface for proctors and students.

5.5 Implement Real-Time Communication Features:

Leverage the features provided by the Chime SDK to implement real-time communication features, such as audio and video chat, screen sharing, and messaging. Customize these features to meet the specific requirements of your proctoring system.

Refer to the Amazon Chime SDK documentation for detailed information on implementing real-time communication features.

By completing these steps, you have successfully configured real-time communication using the Amazon Chime SDK within your hybrid proctoring solution. This ensures a seamless and secure channel for proctors to monitor students during examinations and address any issues that may arise in real-time.

Step 6: Configure Amazon S3 for Cloud Storage

Amazon S3 (Simple Storage Service) is a highly scalable and secure object storage service that plays a crucial role in our hybrid proctoring solution. This step involves setting up Amazon S3 buckets to securely store exam recordings and images captured during the examination process.

6.1 Create S3 Buckets:

Use the AWS CLI to create Amazon S3 buckets to store exam recordings and any other relevant data.

# Create an S3 bucket for exam recordings
aws s3api create-bucket --bucket ExamRecordingsBucket

# Create an S3 bucket for other data (if needed)
aws s3api create-bucket --bucket OtherDataBucket

This command will return essential information, including the BucketName, which you will need for subsequent configurations.

6.2 Configure Bucket Policies and Permissions:

Ensure proper access control and security by configuring bucket policies and permissions using Amazon IAM (Identity and Access Management).

# Example AWS CLI command to configure a bucket policy
aws s3api put-bucket-policy --bucket ExamRecordingsBucket --policy file://bucket-policy.json

Consider creating and attaching IAM policies to control access to the S3 buckets based on roles and users.

6.3 Store Exam Recordings:

During the execution of your hybrid proctoring system, use the AWS SDKs or AWS CLI to store exam recordings securely in the designated S3 bucket.

# Example AWS CLI command to upload exam recording to S3
aws s3 cp /path/to/exam-recording.mp4 s3://ExamRecordingsBucket/

Ensure that you replace /path/to/exam-recording.mp4 with the actual path to the exam recording file.

6.4 Implement Versioning and Logging (Optional):

Consider enabling versioning for your S3 buckets to keep track of changes and ensure data integrity.

# Enable versioning for an S3 bucket
aws s3api put-bucket-versioning --bucket ExamRecordingsBucket --versioning-configuration Status=Enabled

Configure logging to capture detailed records of S3 bucket activity using Amazon CloudWatch.

# Example AWS CLI command to enable logging for an S3 bucket
aws s3api put-bucket-logging --bucket ExamRecordingsBucket --bucket-logging-status file://logging-config.json

Ensure you replace file://logging-config.json with the actual path to your logging configuration file.

By completing these steps, you have successfully configured Amazon S3 for cloud storage within your hybrid proctoring solution. This ensures secure and scalable storage for exam recordings and other relevant data, with the added option of versioning and logging for enhanced data management and traceability.

Step 7: Implement Proctoring Interface

The proctoring interface is a critical component of our hybrid proctoring solution, serving as the central hub for proctors to monitor and manage online exams. This step involves developing a web-based proctoring interface that proctors can access through a web browser. The interface should provide real-time access to exam recordings, enable communication with students, and allow proctors to take necessary actions based on the examination context.

7.1 Choose a Web Framework:

Select a web framework that aligns with your development preferences and requirements. Popular choices include React.js, Angular, or Vue.js for the front end, and Node.js, Django, or Flask for the back end.

7.2 Set Up the Front-End:

Implement the front-end of the proctoring interface to display relevant information and features. This includes:

  • Real-time Video Player: Use a video player library (e.g., Video.js) to display the live or recorded video stream from students.
  • Communication Interface: Integrate the Amazon Chime SDK to facilitate real-time audio and video communication between proctors and students.
  • Alerts and Notifications: Implement a notification system to alert proctors of any flagged behavior or system messages.
  • Exam Metadata Display: Show relevant information about the ongoing exams, including exam details, student information, and any additional context.

7.3 Set Up the Back-End:

Develop the back-end of the proctoring interface to handle data processing and communication with other AWS services. This includes:

  • API Integration: Connect the proctoring interface to the Amazon API Gateway to fetch and update exam information.
  • AWS SDK Integration: Use AWS SDKs (e.g., boto3 for Python) to interact with AWS services such as Amazon S3 for exam recording retrieval.
  • Real-time Communication Logic: Implement logic to handle real-time communication between proctors and students using the Amazon Chime SDK.
  • Behavior Alert Handling: Develop functionality to respond to alerts generated by the system, such as prohibited behavior detected by Amazon Rekognition.

7.4 Implement Security Measures:

Prioritize security measures to protect sensitive exam data and maintain the integrity of the proctoring interface. This may include:

  • User Authentication: Integrate Amazon Cognito for user authentication to ensure that only authorized proctors access the interface.
  • Access Control: Implement fine-grained access control using Amazon IAM to restrict access based on proctor roles and responsibilities.
  • Secure Communications: Ensure that communication between the proctoring interface and AWS services is secured using HTTPS and other encryption mechanisms.

7.5 User Interface Design:

Design the proctoring interface with a user-friendly and intuitive layout. Consider features such as:

  • Responsive Design: Ensure that the interface is accessible and functional across different devices and screen sizes.
  • Intuitive Navigation: Design an interface that allows proctors to easily navigate through exam information, communication features, and alerts.
  • Dashboard Overview: Provide a centralized dashboard that offers a quick overview of ongoing exams and any critical alerts.

7.6 Testing and Debugging:

Thoroughly test the proctoring interface to identify and address any issues. Consider implementing automated testing and debugging tools to streamline the development process.

7.7 Deployment:

Deploy the proctoring interface to a web server or a cloud-based hosting service. Utilize services such as Amazon CloudFront for content delivery to optimize performance and reduce latency.

By completing these steps, you have successfully implemented a robust and user-friendly proctoring interface for your hybrid proctoring solution. Proctors can now use this interface to monitor exams, communicate with students in real time, and take appropriate actions based on the exam context and any detected irregularities.

Step 8: Monitor and Log with Amazon CloudWatch

Monitoring and logging are essential components of any scalable and reliable system, providing insights into the performance, health, and behavior of your hybrid proctoring solution. Amazon CloudWatch is a comprehensive monitoring service that allows you to collect and track metrics, collect and monitor log files, and set alarms. This step involves setting up CloudWatch to monitor and log various aspects of your system.

8.1 Create CloudWatch Alarms:

Set up CloudWatch alarms to monitor key metrics and receive notifications when certain thresholds are breached. For example, you might create alarms for:

  • Lambda Function Metrics: Monitor the execution, duration, and error rates of Lambda functions involved in exam registration, video processing, and alerting.
  • Amazon Kinesis Video Streams Metrics: Track the incoming data and stream metrics to ensure the stability of video stream processing.
# Example AWS CLI command to create a CloudWatch alarm for Lambda function errors
aws cloudwatch put-metric-alarm --alarm-name LambdaErrorAlarm --alarm-description "Lambda function error rate exceeded" --actions-enabled --alarm-actions <YourSnsTopicArn> --metric-name Errors --namespace AWS/Lambda --statistic Sum --period 300 --threshold 1 --comparison-operator GreaterThanThreshold --evaluation-periods 1 --dimensions Name=FunctionName,Value=<YourLambdaFunctionName>

Replace <YourSnsTopicArn> and <YourLambdaFunctionName> with your actual SNS topic ARN and Lambda function name.

8.2 Enable CloudWatch Logs:

Configure your Lambda functions to send logs to CloudWatch Logs for detailed analysis and troubleshooting.

# Example AWS CLI command to enable logging for a Lambda function
aws lambda update-function-configuration --function-name <YourLambdaFunctionName> --log-config '{"cloudWatchLogsRoleArn":"<YourCloudWatchLogsRoleArn>", "cloudWatchLogsEnabled":true}'

Replace <YourLambdaFunctionName> and <YourCloudWatchLogsRoleArn> with your actual Lambda function name and CloudWatch Logs role ARN.

8.3 Monitor API Gateway Metrics:

Keep track of Amazon API Gateway metrics, such as request latency, error rates, and cache performance.

# Example AWS CLI command to create a CloudWatch alarm for API Gateway latency
aws cloudwatch put-metric-alarm --alarm-name ApiGatewayLatencyAlarm --alarm-description "API Gateway latency exceeded threshold" --actions-enabled --alarm-actions <YourSnsTopicArn> --metric-name Latency --namespace AWS/ApiGateway --statistic Average --period 300 --threshold 500 --comparison-operator GreaterThanThreshold --evaluation-periods 1 --dimensions Name=ApiName,Value=<YourApiName>

Replace <YourSnsTopicArn> and <YourApiName> with your actual SNS topic ARN and API name.

8.4 CloudWatch Dashboards:

Create CloudWatch dashboards to visualize and aggregate metrics from different components of your hybrid proctoring solution.

# Example AWS CLI command to create a CloudWatch dashboard
aws cloudwatch put-dashboard --dashboard-name ProctoringDashboard --dashboard-body file://dashboard-definition.json

Ensure you replace file://dashboard-definition.json with the actual path to your dashboard definition file.

8.5 Set Up CloudWatch Alarms for S3:

Monitor Amazon S3 metrics, including bucket size, number of objects, and request rates.

# Example AWS CLI command to create a CloudWatch alarm for S3 bucket size
aws cloudwatch put-metric-alarm --alarm-name S3BucketSizeAlarm --alarm-description "S3 bucket size exceeded threshold" --actions-enabled --alarm-actions <YourSnsTopicArn> --metric-name BucketSizeBytes --namespace AWS/S3 --statistic Average --period 300 --threshold 5000000000 --comparison-operator GreaterThanThreshold --evaluation-periods 1 --dimensions Name=BucketName,Value=<YourBucketName>

Replace <YourSnsTopicArn> and <YourBucketName> with your actual SNS topic ARN and S3 bucket name.

8.6 Custom Metrics:

Implement custom CloudWatch metrics to monitor specific behaviors or performance indicators in your proctoring solution.

# Example code to publish a custom metric to CloudWatch
import boto3

cloudwatch = boto3.client('cloudwatch')

cloudwatch.put_metric_data(
    Namespace='ProctoringMetrics',
    MetricData=[
        {
            'MetricName': 'CustomMetric',
            'Value': 1,
            'Unit': 'Count'
        }
    ]
)

Custom metrics can be used to track specific events or behaviors that are critical for monitoring.

By implementing these steps, you have effectively set up monitoring and logging using Amazon CloudWatch for your hybrid proctoring solution. This allows you to gain insights into the performance and health of your system, proactively address issues, and ensure the overall reliability of your online examination platform.

Step 9: Implement Access Control with Amazon IAM

Access control is crucial for securing your hybrid proctoring solution and ensuring that only authorized users and services can interact with your AWS resources. Amazon IAM (Identity and Access Management) provides robust and fine-grained access control capabilities. This step involves setting up IAM policies and roles to manage permissions and access across various components of your system.

9.1 Define IAM Policies:

IAM policies define the permissions that control access to AWS resources. Create IAM policies tailored to the roles and responsibilities of different entities in your system, such as proctors, students, Lambda functions, and other services.

Here is an example IAM policy allowing read-only access to an S3 bucket for exam recordings:

{
    "Version": "2012-10-17",
    "Statement": [
        {
            "Effect": "Allow",
            "Action": "s3:GetObject",
            "Resource": "arn:aws:s3:::ExamRecordingsBucket/*"
        }
    ]
}

9.2 Create IAM Roles:

IAM roles define a set of permissions that determine what actions can be performed on AWS resources. Create IAM roles for Lambda functions, EC2 instances (if applicable), and other entities.

# Example AWS CLI command to create an IAM role for a Lambda function
aws iam create-role --role-name LambdaExecutionRole --assume-role-policy-document file://trust-policy.json

Ensure that you replace file://trust-policy.json with the actual path to your trust policy document.

9.3 Attach Policies to Roles:

Once IAM roles are created, attach the appropriate policies to grant the required permissions.

# Example AWS CLI command to attach a policy to an IAM role
aws iam attach-role-policy --role-name LambdaExecutionRole --policy-arn arn:aws:iam::aws:policy/AmazonS3ReadOnlyAccess

Replace LambdaExecutionRole with your actual role name and use the appropriate policy ARN.

9.4 Implement Least Privilege Principle:

Follow the principle of least privilege, ensuring that each IAM entity (user, role, or Lambda function) has the minimum permissions necessary to perform its tasks. Regularly review and update policies to remove unnecessary permissions.

9.5 Configure Trust Relationships:

Configure trust relationships for IAM roles to specify which entities are allowed to assume the roles. This is crucial for secure communication between services.

// Example trust policy allowing Lambda functions to assume the role
{
  "Version": "2012-10-17",
  "Statement": [
    {
      "Effect": "Allow",
      "Principal": {
        "Service": "lambda.amazonaws.com"
      },
      "Action": "sts:AssumeRole"
    }
  ]
}

9.6 Implement IAM Users and Groups:

Create IAM users and groups for human users, such as proctors and administrators. Assign appropriate policies to these users and groups based on their responsibilities.

# Example AWS CLI command to create an IAM user
aws iam create-user --user-name ProctorUser

# Example AWS CLI command to add a user to an IAM group
aws iam add-user-to-group --user-name ProctorUser --group-name ProctorGroup

9.7 Secure AWS Resources:

Implement IAM policies to secure other AWS resources, such as Amazon S3 buckets, Amazon API Gateway, and Amazon Kinesis Video Streams.

9.8 Regularly Review and Audit:

Regularly review IAM policies, roles, and user permissions. Perform periodic audits to ensure that access remains aligned with the principle of least privilege and that there are no unauthorized changes.

9.9 Use IAM Roles for EC2 Instances (If Applicable):

If your hybrid proctoring solution involves EC2 instances, use IAM roles to grant permissions to instances rather than storing access keys on the instances.

# Example AWS CLI command to create an IAM role for EC2 instances
aws iam create-role --role-name EC2InstanceRole --assume-role-policy-document file://ec2-trust-policy.json

Replace file://ec2-trust-policy.json with the actual path to your EC2 trust policy document.

By implementing these steps, you have established a robust access control mechanism for your hybrid proctoring solution using Amazon IAM. This ensures that only authorized entities have the necessary permissions to interact with AWS resources, enhancing the overall security and integrity of your online examination platform.

Conclusion:

In conclusion, the implementation of a hybrid proctoring solution leveraging AWS services has provided a comprehensive and scalable platform for ensuring exam integrity in online assessments. The integration of artificial intelligence for real-time behavior analysis, coupled with human monitoring through the proctoring interface, creates a powerful synergy that enhances the overall reliability of the examination process.

The key components and steps involved in building this solution are designed to provide a seamless and secure experience for both students and proctors. Amazon services such as Kinesis Video Streams, Rekognition, S3, Cognito, API Gateway, Lambda, and Chime SDK have been orchestrated to create a robust architecture that addresses various aspects of exam proctoring.

The implementation covers a wide range of functionalities, including exam registration, video stream processing, real-time communication, and secure cloud storage. Access control measures using IAM policies and roles ensure that only authorized users have the necessary permissions, adhering to the principle of least privilege.

Monitoring and logging with Amazon CloudWatch offer real-time insights into system performance, allowing for proactive issue resolution and continuous improvement. Additionally, the security measures implemented, including SSL for communication, IAM for access control, and encryption for data at rest, contribute to the overall integrity and confidentiality of the system.

As the online education landscape continues to evolve, this hybrid proctoring solution stands as a testament to the capabilities of cloud-based technologies in creating robust, scalable, and secure examination platforms. The flexibility offered by AWS services enables institutions and organizations to adapt and customize the solution to meet their specific requirements, ensuring a reliable and trustworthy environment for conducting online exams.

In summary, the hybrid proctoring solution presented here represents a state-of-the-art approach to online exam integrity, combining the strengths of artificial intelligence and human monitoring within a secure and scalable cloud infrastructure. It provides a foundation for educational institutions and examination bodies to embrace the benefits of online assessments while maintaining the highest standards of integrity and security.

Want to connect?
https://www.linkedin.com/in/timothy-ugbaja-acfellow-osl-006b111a/
https://www.facebook.com/evangtimugbaja
https://twitter.com/TimothyUgbaja
Contact me if you have any issue for further assistance.
Programming
Technology
Artificial Intelligence
AWS
Software Engineering
Recommended from ReadMedium