
AI Agents Are Here to Automate Boring Tasks: How to Use AutoGen to Fully Automate Summaries.
Scrape, Summarize & Save articles with a simple prompt.

Who doesn’t want to automate boring and repetitive tasks?
I’m so excited about the future of AI Agents because they will do exactly that!
The capabilities of LLMs (Large Language Models) are impressive. But alone, they are not able to automate because they lack 2 crucial components that AI Agents own:
- AI Agents have access to tools. Large Language Models are great at generating text. But they can’t do anything else. AI Agents can run code and various APIs. It gives them practical tools for full automation.
- They work in iterative loops. They can think, act, and reflect on the results. It gives them a significant improvement in the outputs.
Even better! Multiple AI Agents working together improve the results even more. That’s why I’m a huge advocate of AutoGen. It is my favorite framework for creating AI Agent teams.
In this article, I’ll show you an example of full automation with AutoGen!
It will be a basic yet practical example.
I will provide a short prompt and the URL to an article. And my AI Agents will:
- Call an HTTP Request to get the content of the article.
- Scrape the article.
- Summarize it.
- Save it into my second brain application, Obsidian.
I hope you’re excited!
What are the tasks you’d love to automate? Leave a comment! ✍️
Let’s dive into the guide to show you how I did it!
Step-by-Step Guide
In the guide, we’ll go through the following steps:
- Installing necessary packages.
- Generating and saving API keys.
- Configuring AutoGen to use GPT-4.
- Creating our own, custom functions.
- Writing configuration for function calling.
- Configuring the Assistant Agent and User Proxy Agent.
- Initializing the conversation by passing a simple prompt with URL.
Let’s see the details.
Prerequisites
Installing Packages
To run this code, we’ll need to install the following packages:
autogento create AI Agent Assistants.openaito use GPT models.requestsfor HTTP requests.beautifulsoup4for web-scraping.python-dotenvto load environment variables.
To install them, run:
pip install pyautogen openai requests beautifulsoup4 python-dotenv
Then, we’ll need OpenAI and Browserless API keys.
Generate the OpenAI API Key.
Go to OpenAI’s API Key Page to generate a new API key.
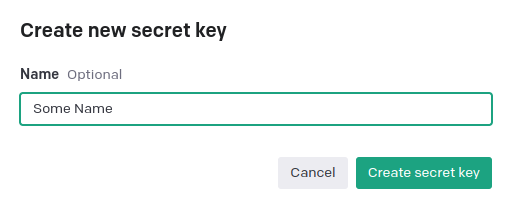
First, click on “+ Create new secret key”.
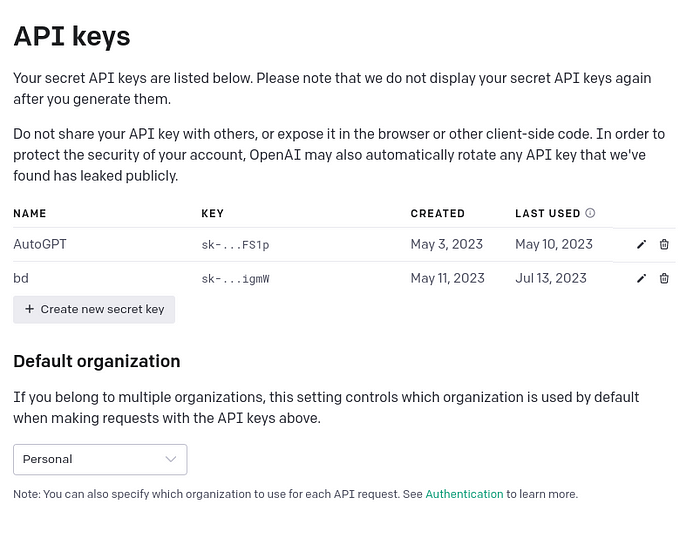
Then, give it a name and press “Create secret key”
Then, copy the generated key, and paste it in the OAI_CONFIG_LIST file that will look like this:
[
  {
    "model": "gpt-4-0613",
    "api_key": "sk-11111111111" <- your actual OpenAI API key here
  },
  {
    "model": "gpt-4",
	"api_key": "sk-11111111111"
  }
]
For the Browserless API key, we’ll use the .env file:
BROWSERLESS_API_KEY=<your Browserless API key here>Note: To create the Browserless API key, go to the Browserless page and create an account. You will find the API key on your profile.
Step 1: Imports & Loading Environment Variables.
First, we need to import the necessary libraries and load environment variables like this:
import os
import requests
from bs4 import BeautifulSoup
import autogen
from autogen import config_list_from_json
from dotenv import load_dotenv

load_dotenv()
BROWSERLESS_API_KEY = os.getenv("BROWSERLESS_API_KEY")
Here are the main parts of the snippet:
bs4for web scraping.requestsfor HTTP calls.autogenfor creating conversational agents.dotenvfor managing environment variables.- we retrieve
BROWSERLESS_API_KEYhere as well.
Time to configure AutoGen.
Step 2: Configuring AutoGen and API Key
To configure AutoGen, we create the config_list as follows:
config_list = config_list_from_json(
    env_or_file="OAI_CONFIG_LIST",
	filter_dict={
		"model": [
			"gpt-4",
			"gpt-4-0613",
		],
	},
)
llm_config = {"config_list": config_list, "seed": 42, "request_timeout": 240}
In this snippet:
- we use
config_list_from_jsonto configure AutoGen with specific models. - we load the
OAI_CONFIG_LISTwith models and keys. - we filter the models with
filter_dict. - we set the
seedto 42 for cashing purposes.
With this configuration, we are ready to use AI Agents with AutoGen.
But in this guide, we specify 2 functions that our AI Agents will use later.
Step 3: Defining the Web Scraping Function
First, we need a function to scrape web content using Browserless:
def scrape(url: str) -> Optional[str]:
	"""
	Scrapes the content of the given URL using the browserless API.

	Args:
	- url (str): The URL to scrape.

	Returns:
	- Optional[str]: The scraped content, or None if an error occurs.
	"""
        print("Using the scrape function...")
        browserless_url = (
          f"https://chrome.browserless.io/content?token={BROWSERLESS_API_KEY}"
        )
        headers = {"Cache-Control": "no-cache", "Content-Type": "application/json"}
        data = {"url": url}

	try:
	    with requests.post(browserless_url, headers=headers, json=data) as response:
	        if response.status_code == 200:
	            soup = BeautifulSoup(response.content, "html.parser")
    	        return soup.get_text()
	        else:
	            print(f"HTTP request failed with status code {response.status_code}")
	except requests.RequestException as e:
	    print(f"Request failed: {e}")
	return None
Let’s break down the crucial parts:
- We use
requeststo fetch webpage content. - We use
BeautifulSoupto parse and extract the text usingget_text(). - We return the extracted text. It will be the base for our summary.
In the next steps, we’ll prompt our AI Assistant to summarize the text we get from this function. But first, we need to implement one more function.
Step 4: Implementing the Summary Saving Function
We create the following function to save summaries:
OBS_DIR = "/path/to/Your/Obsidian/Vault/"
def save_summary(content: str, filename: str) -> None:
  """
  Saves the given content to a file in the OBS_DIR directory.
  Args:
  - content (str): The content to save.
  - filename (str): The name of the file to save the content to.
  """
  file_path = os.path.join(OBS_DIR, filename)
  try:
 with open(file_path, "w") as file:
   file.write(content)
  except IOError as e:
 print(f"File writing error: {e}")
It is a simple function that writes summaries to the specified file. I’m saving the summaries into my Second Brain, Obsidian.
Step 5: Specify Config for the Assistant Agent.
AutoGen supports function calling for OpenAI models. But we need to specify the function using the following snippet:
# function callings for the agent
llm_config_writer = {
"functions": [
	{
		"name": "scrape",
		"description": "Scraping website content based on url",
		"parameters": {
			"type": "object",
			"properties": {
				"url": {
					"type": "string",
					"description": "Website url to scrape",
				}
			},
			"required": ["url"],
		},
	},

	{
		"name": "save_summary",
		"description": "Saving summary content to file",
		"parameters": {
			"type": "object",
			"properties": {
				"content": {
					"type": "string",
					"description": "The summary of the article in MarkDown format",
				},
			"filename": {
				"type": "string",
				"description": "The filename to save the summary",
			},
		},
		"required": ["content", "filename"],
		},
	},
],
"config_list": config_list,
}
In the configuration, we just described the functions we created in steps 3 and 4. We used the format that the GPT-4 model understands.
Note: Function calling is a powerful capability of OpenAI models. I highly encourage you to learn more about them.
Step 6: Configuring the Assistant Agent — Writer.
It’s time to define our Assistant Agent. We do it like this:
writer = autogen.AssistantAgent(
	name="Writer",
	system_message="""
		You are a professional content researcher.\
		You specialize in summarizing the content of the provided article or blog.\
		Your summaries are detailed and well-structured.\
		Use the scrape function to get the content based on URL.\
		Then use the save_summary function to save the generated summary.\
		Add TERMINATE to the end of the message""",
	llm_config=llm_config_writer,
)
Please notice we pass the llm_config_writer we created in the previous step. It'll allow "Writer" to use the scrape and save_summary functions.
But let’s also break down the system_message. Here are the crucial parts:
- we assign a role -> Professional Content Researcher.
- we specify writing style -> “your summaries are detailed and well structured.”
- we mention the usage of the
scrapeandsave_summaryfunctions for specific tasks.
So, our “AI Writer” is now ready to scrape, read, summarize, and save content!
Step 7: Configuring the UserProxy Agent.
User Proxy Agents are the types of AI Agents that work on behalf of the user. Here’s how we set the one for our project:
user_proxy = autogen.UserProxyAgent(
	name="User_proxy",
	is_termination_msg=lambda x: x.get("content", "")
		and x.get("content", "").rstrip().endswith("TERMINATE"),
	human_input_mode="TERMINATE",
	function_map={
		"scrape": scrape,
		"save_summary": save_summary,
	},
)
It is a standard implementation with the addition of the function_map parameter. We use it to bind the function calling configuration with our actual functions.
Note: I’ve described AI Agents in detail in this article:
Step 8: Initiating the Conversation
It’s time to pass our prompt to the agents. We do it through the User Proxy Agent:
user_proxy.initiate_chat(
	writer,
	message="""Summarize the article and highlight key takeaways: https://python.plainenglish.io/python-7-mind-blowing-use-cases-of-the-lambda-function-3bb896f866af""",
)
From now on, our AI Agents will work together to create a full summary in my Obsidian!
Step 9: Checking the Results.
So I wanted the summary of an article about use cases for lambda functions in Python. Here are the results:
The article provides a comprehensive guide to seven unique use cases for Python's lambda function; a small, anonymous function that supports a construct for creating function objects. The key use cases highlighted are:
1. **The Sort Method**: The lambda function can be used with the `sort()` method, which uses a lambda function to define a customized sort mechanism for its elements.
2. **The Max Function**: The `max()` function, which finds the maximum value in a collection of values, can use a lambda function to determine how the maximum value is found.
3. **The Min Function**: Similarly to the max function, the `min()` function can also use a lambda function to customize how the minimum value is selected.
4. **The Filter Class**: Python's `filter()` class filters values from a collection based on a lambda function. All elements that return `True` are retained, and those that return `False` are discarded.
5. **The Map Class**: The `map()` class applies a lambda function to each element in a collection of values, like converting uppercase strings to lowercase or string values to integers.
6. **The Reduce Function**: `reduce()` in the `functions` module uses a lambda function to generate a single aggregate value from a collection of values.
7. **The Sorted Function**: The `sorted()` function, applicable to all collection types, can use a lambda function to change how the elements of the list are sorted.
In conclusion, lambda functions offer a flexible and powerful way to write short, one-time, anonymous function objects in Python. They can be used in a wide range of scenarios - essentially wherever a normal function can be applied. This fundamental concept of Python helps to simplify code and improve readability.
Success! It’s worked!
Conclusion
Isn’t it impressive?
Look, I only provided my AI Agents with the prompt: “Summarize the article and highlight key takeaways: [URL].”
And they did the rest for me. To repeat, the agents:
- Called an HTTP Request.
- Scraped the article.
- Summarized the article.
- Saved the summary in my second brain.
Although it was a simple project, you can expand it in various ways:
- you can ask agents to generate content ideas based on the summary
- you can ask agents to test your knowledge from the article
- you can improve the prompt to get a tailored summary And much more!
I hope you’ll take my code as a starting point and build something amazing!
✍️ Let me know in the comments what you want to automate! ✍️
Happy coding!
If you prefer a video version of this tutorial, check this out:
Useful resources:


