
Adding Interactivity to an Image in Flutter — Take 2
A while ago, I wrote an article on interacting with SVG images in Flutter.
Interacting with SVG Images in Flutter | by Joseph Muller | Medium
Although my steps worked, there were a bunch of limitations and downsides to the overall approach:
- It was complicated
- It was tedious
- Changes were difficult to make without re-writing large pieces of code
- It was designed specifically for images that were made up of disconnected pieces
In this article, I want to revisit the topic and hopefully make things a bit simpler for anyone that wants to create an image like the one shown here. I’ll also be using newer versions of the libraries I used before.
Setup
Dependencies
svg_path_parser | Flutter Package (pub.dev) — Necessary for taking a raw SVG path and parsing it into a Path object from the dart:ui library
touchable | Flutter Package (pub.dev) — Enables shapes drawn on the canvas to respond to user input
xml | Dart Package (pub.dev) — Used to parse XML file from Inkscape so that we don’t have to manually update paths every time we change them
Software
Unlike last time, we only need one extra software tool to get the image data we need: Inkscape. There’s a super simple way to extract the path strings from the XML tree so using a text editor (as I suggested in the previous article) is unnecessary.
Image Prep
Find an Image
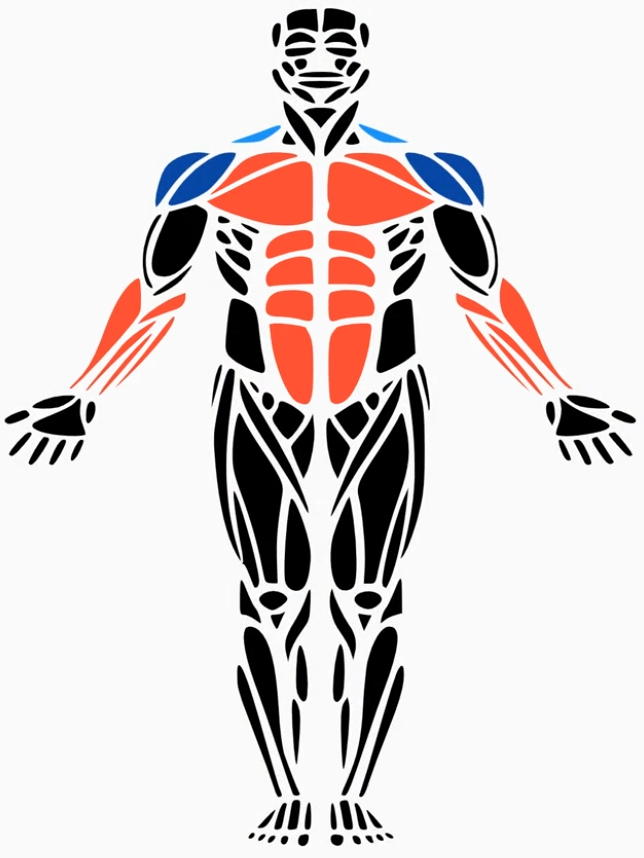
To start, find an image that you want to break apart. The image doesn’t have to consist of individual parts to begin with since we can use Inkscape to manually add in separation lines. The one restriction you should keep in mind is that the object you want to work with should be isolated from it’s background and the edges should be smooth. Below is the image I’ll be working with:

Separate the Image
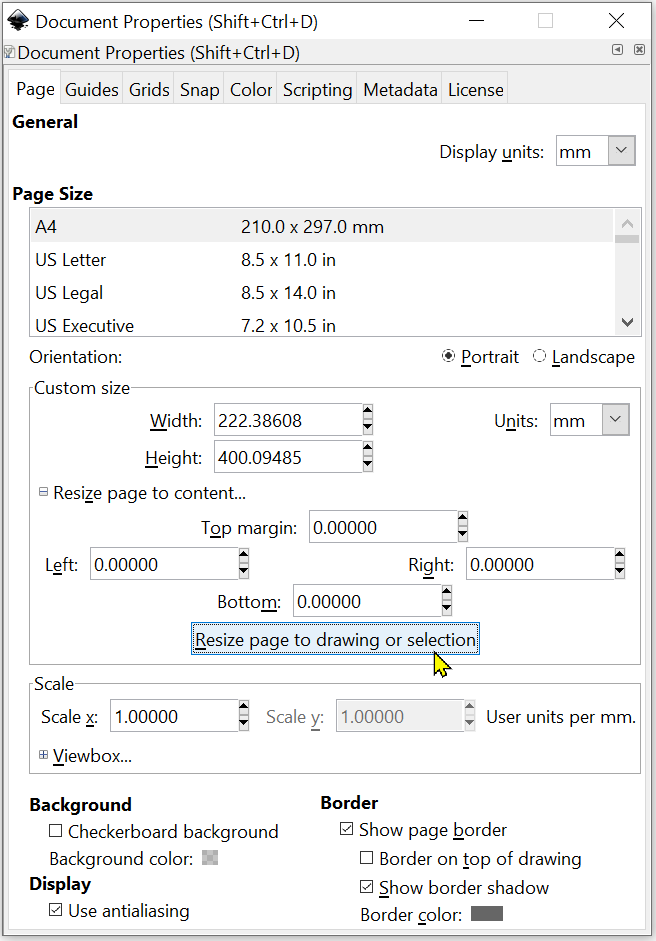
Next, open a new file in Inkscape, select File -> Import, and the select your image. Resize the image as desired and then select File -> Document Properties. In the window that appears, you can select the plus sign next to ‘Resize page to content…’ and then the ‘Resize page to drawing or selection’ button. This will save you time trying to guess or find the dimensions of your drawing.
Now, select your image and click the XML button along the right toolbar. this should open a window where you can see each of your SVG objects.

After clicking on one, you should see a “Transform” value that is larger than (0,0). Delete this. If you leave it, your path data will be offset by some amount and things won’t be centered in Flutter.
Handling transforms in Inkscape can be frustrating. If you can’t delete the transform on an object without moving it, right click on the object and duplicate it.
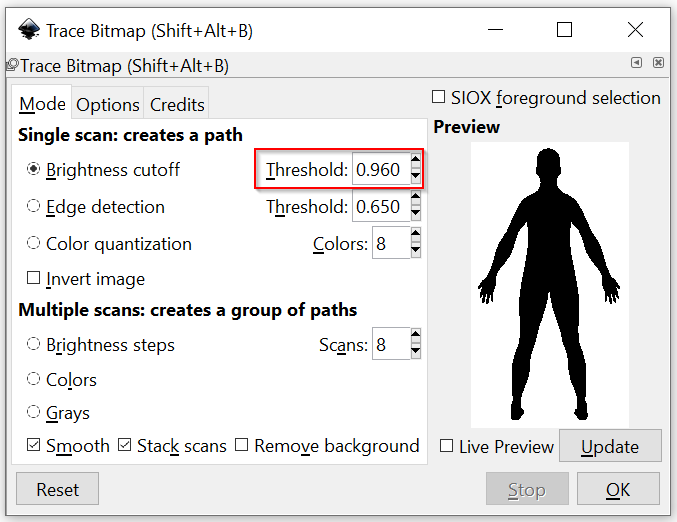
With the object still selected, select Path -> Trace Bitmap. Change the brightness threshold to something big (like .96) and click OK.
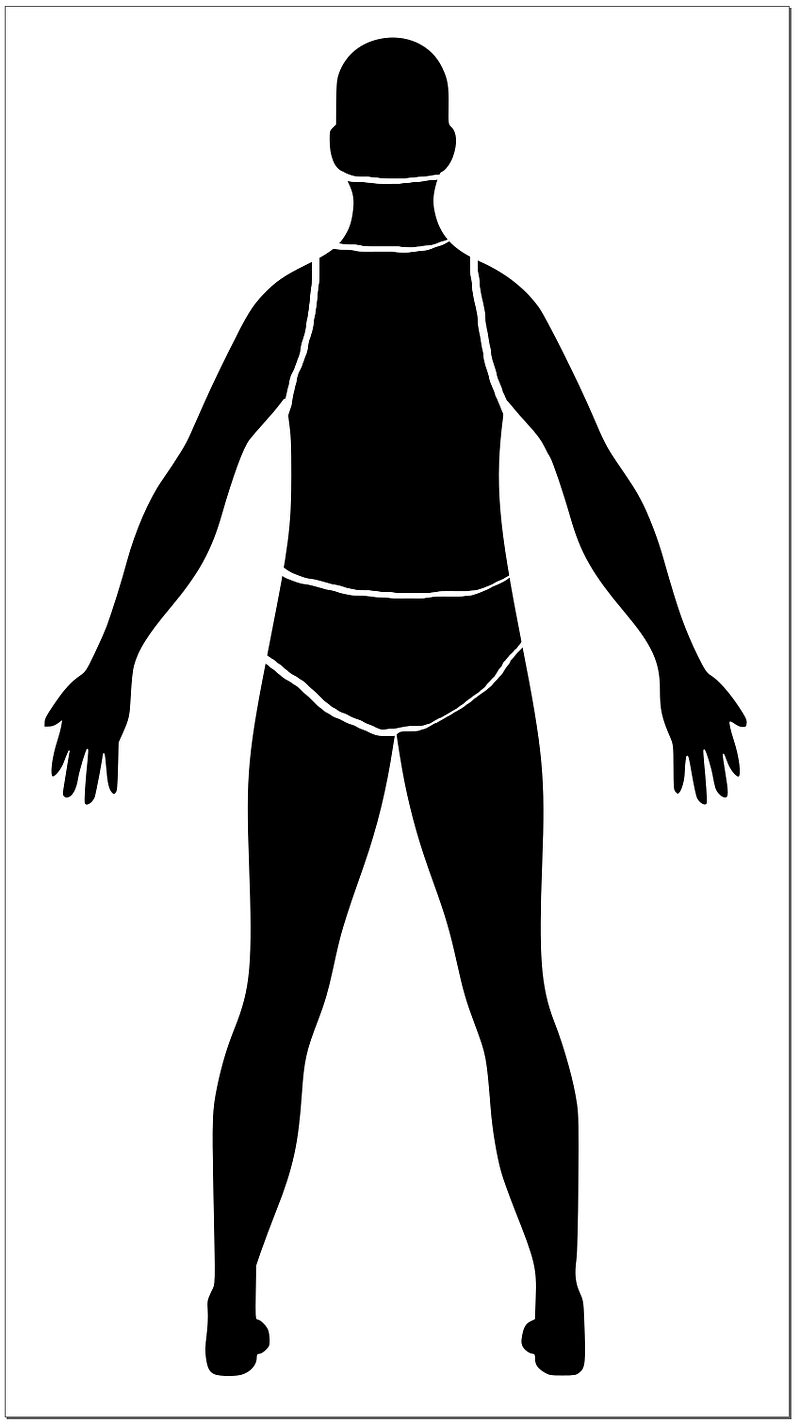
This will generate a solid version of your image that we can “cut apart”. To keep the silhouette and the original image separated, create a new layer in Inkscape by clicking Layer -> Add Layer. Then, right click on the silhouette, select Move to Layer, and move it to Layer 2.
To divide the image into pieces we are going to use the brush from the left toolbar. After selecting it, you can left click on a color along the bottom of the window to set the paint color. Here, we want white. You can also adjust the brush thickness using the Width attribute in the top toolbar (Inkscape has a lot of toolbars).

Using the brush, carefully divide the image into sections.
When you’re ready, follow these steps:
- Screenshot the image
- Paste it
- Delete the old components
- Select the new image and Trace Bitmap again
- Select everything
- Path -> Break Apart
After all of this, you’ll have an SVG image that consists of several smaller parts. If there’s a quicker way to accomplish this, I’d love to know!
Extract the Paths
Now for the fun part. Back in Flutter, create a wrapper class for an image part that will contain a unique identifier (e.g. a name) and the SVG path string. Something as simple as the following will do.
class GeneralBodyPart {
String name;
String path;
GeneralBodyPart({
required this.name,
required this.path,
});
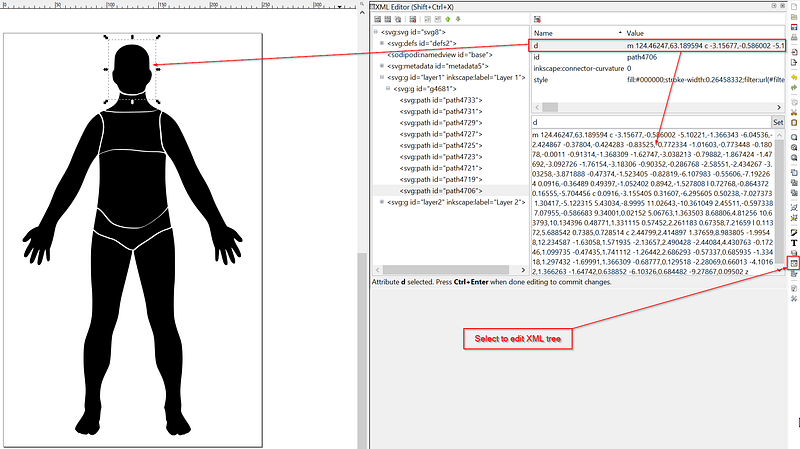
}Now, we’ll find the coordinates for each body part. Click on the corresponding part in the Inkscape diagram and then open the XML editor on the right toolbar. For each SVG part, you should be able to find a “d” attribute in the XML panel. If you click on that, the full path will be shown. Copy that and paste it into the appropriate constructor.

You‘ll need to do this for all parts of the -
JK
This was the general process I followed in version one of this tutorial and it quickly became a long-winded effort, especially since I was using two images with about 50 segments each. Since last year, I’ve come up with a slightly smarter, slightly faster solution.
Extract the Paths from an XML File
When you save an SVG file in Inkscape, you’re saving off a ton of information. Layers, paths, ids. If you open the file in a text editor you’ll see that it’s written in XML and as such, it’s very organized. Each individual section of the image has its own properties including an ID, stroke style, and path. Better yet, all of these properties are customizable.
In this section, I’ll show you how you can use the xml dart package to extract all of your paths from your SVG file. Never again will you have to copy and paste countless Strings from one screen to another.
Name you Parts
Despite how much I’ve hyped this up there is still one step in the process that requires typing. Before you can import the SVG file into your Flutter app and parse it, you’ll need to click through each piece of the image and change it’s “id”. You can find this in the right hand XML pane.
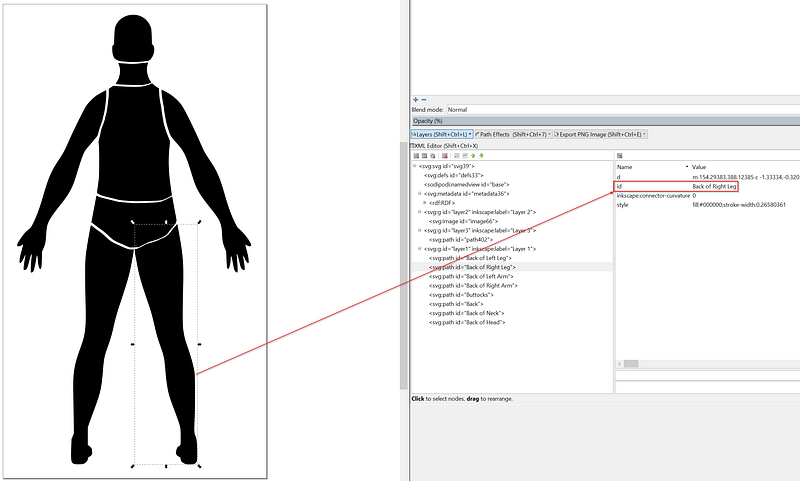
Before you edit it, it will have a value like path345 or path420. That’s nonsense. What you want to do is change each of these IDs to something that you’ll recognize/something you can use in your app. In my example, I named each section according to the part of the body it represents.
When you’re finished, save your changes.
Read the SVG File
Step 2. Add your SVG file to the assets folder of your app (probably in the assets/images/ folder but it’s up to you). From here, reading the SVG file is a two line process.
String generalString = await rootBundle.loadString(svgImage);

XmlDocument document = XmlDocument.parse(generalString);
The xml package is doing the heavy lifting here and that’s the point. Instead of bouncing back and forth between Android Studio and Inkscape an unruly number of times, you read the file once and you’re done…sort of.
Parsing the new XmlDocument to find the paths you ID’d is the penultimate step and you can do that using the findAllElements method. In our case, we want to find all “path” elements since those are the things that users can click on.
Note the difference between XML
and attributes. Elements describe parts of the overall document while attributes provide more details about elements. It’s tough to find hard and fast definitions of these two things since its possible for them to store the same data. Don’t worry about that. Inkscape SVGs define each part of the image as it’s own element. Inside of this element, you can find path and id attributes, among others.
The function below loads the SVG file, finds each path that I ID’d, and constructs a Flutter object from the id and path attributes. I’m filtering out anything I didn’t ID by checking if the ID contains the word “path” (like path 342 or path678). This isn’t super robust and in the next section I’ll show you an alternate way to find the data you care about.
Draw the Paths
With the list of parts ready to go, you can draw them to the screen using a slightly modified CustomPaint widget. Simply wrap your CustomPaint with a CanvasTouchDetector from the touchable package…
…and then use CustomPainter and the svg_path_parser package to render the paths on screen.
This is basically the same code that you’d use on a regular canvas but TouchyCanvas let’s each path respond to gestures. If you want it to look like a piece is being tapped, just store the ID of the path that was tapped and change the color of the paint you’re using.
Going Further
Attributes
We did it. Since each path now has a human-readable ID that our Flutter code uses to extract data, we don’t need to worry about making updates to the image. Hypothetically, you could go back into Inkscape and use the path editor to fine tune the shape of each section.

When you’re done, just save the new SVG to your assets folder and boom. Everything should continue to work normally.
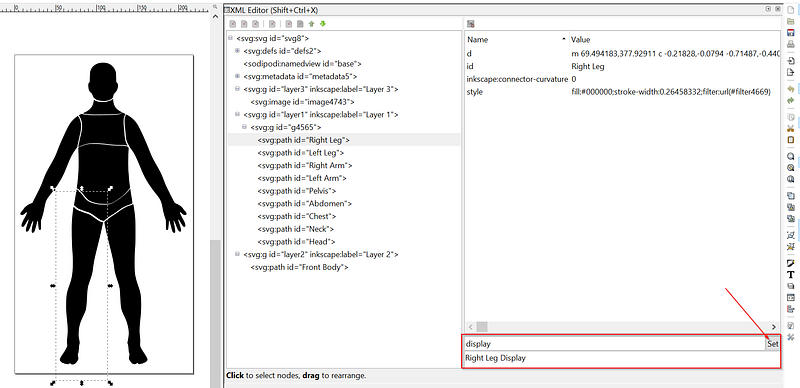
Aside from maintainability, this approach also gives you the option to add new attributes to your image parts. For instance, say I wanted each part to have a computer-friendly ID and a human-friendly display label. To do this
- Go into Inkscape
- Select the part you want to edit
- Open the XML editor
- Type in the name of your new attribute in the top field
- Type in the value of your new attribute in the bottom field
- Tap “Set”
Back in flutter, you can read this new attribute the same way you read the ID and path attributes. Using this approach you could configure display names, colors, routing behaviors, and more without hard coding everything into a dart file. I guess this is still considered hardcoding…but at least in Inkscape you can visualize your changes.
Using TouchyCanvas and InteractiveViewer
In Flutter 1.20, the InteractiveViewer widget was introduced. This widget lets you zoom, pan, and otherwise interact with its child as if you were interacting with a large picture. Unfortunately, this widget doesn’t seem to work with the TouchyCanvas from the touchable package since the canvas intercepts gestures before they reach the InteractiveViewer. This is frustrating because being able to zoom into a picture and tap on very specific sections would be awesome.
Fortunately, we can work around this using the IgnorePointer widget and toggling its “ignoring” parameter on and off. First, create a boolean variable that indicates whether or not the user is in interaction mode (ex. panning or scaling). Wrap your CanvasTouchDetector in an IgnorePointer widget and set ignoring equal to your new variable.
For this to work at all, you’ll need to make sure you toggle the interaction variable in several locations:
- Turn it on when
onInteractionStartis called in theInteractiveViewer - Turn it off when the
onInteractionEndis called in theInteractiveViewer - Turn it off when the user taps on the
InteractiveViewer - Turn it on when
onPanUpdateis called in yourTouchyCanvas - Turn it on when
onPanStartis called in yourTouchyCanvas - Turn it off when
onTapUpis called in yourTouchyCanvas
It’s slightly more involved than I’d like, and it takes tqo gestures to zoom or pan, but until TouchyCanvas and InteractiveViewer play nice together, this should be okay.
Bonus: The Flutter Canvas lets you draw shadows so you can add a bit of dimension to your diagram
myCanvas.drawShadow(
  bodyPath.transform(matrix4.storage),
  Colors.black,
  8,
  false,
);
Conclusion
Depending on what your need is, you may have to create an image that reacts to taps at specific locations. While this is nearly impossible using regular PNG images, SVG images provide you with a surplus of control and, using a tool like Inkscape, you can add a cool looking feature to your app in an hour or two.
For more Flutter related content, follow me on Twitter @Mullr33!


