
Adding a JIRA Issue Collector (feedback tool) to your MadCap Flare Documentation
In this article, I will show you how to add a custom JIRA Issue Collector to your MadCap Flare-based online documentation.
Why JIRA Issue Collector?
Adding a feedback mechanism to your web-based documentation is an excellent way to find areas for improvement. Every documentation site is different, so the requirements will likely vary. I would recommend that you do thorough research and try a few different tools before choosing. In our case, we wanted the following features in the toolset:
- easy to manage and maintain
- collects the URL and browser information, so we know precisely the area in the documentation the user is talking about
- automatically generates a JIRA ticket
We have been using the issue collector for a couple of months and are happy with it.
Why do you need to customize the issue collector?
After creating an issue collector in JIRA, you can add the generated code snippet to your Flare project right away without any additional customization. It will work. There are, however, a few things you may want to customize.
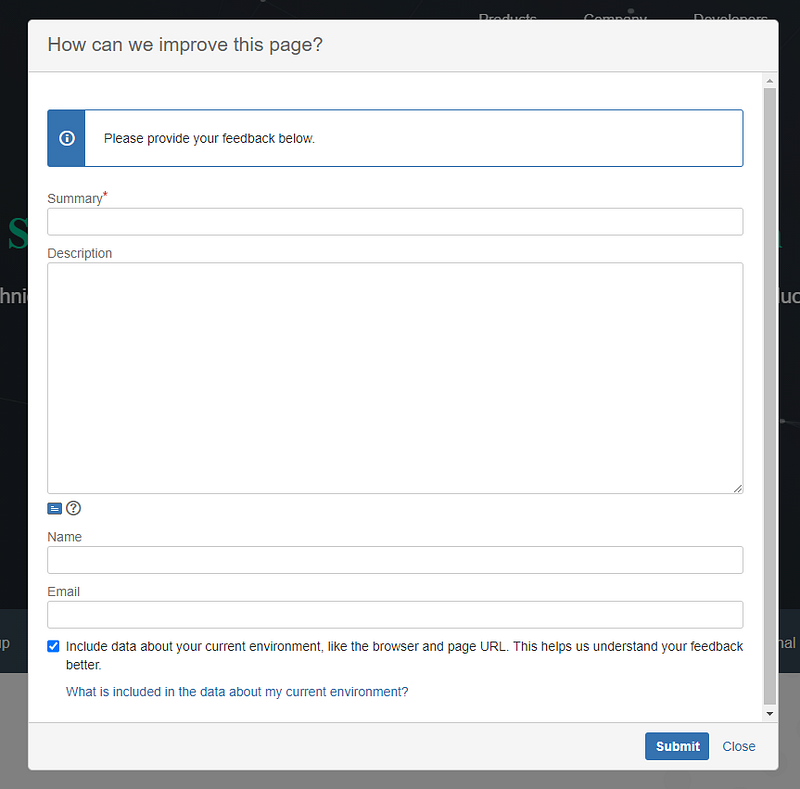
An important feature that we wanted was the ability to automatically collect the source page’s URL. While the issue collector provides an optional checkbox for the users to share their system’s environment information (URL, browser, etc.), it is often left unchecked. Without that data, it is difficult to identify the source page and understand the problem.
To customize the JIRA issue collector, you will need to do a few things:
Step 1: JIRA Account and Permissions
First, you will need is a JIRA account with permission to manage the Project Settings, or at the least permission to configure the issue collector. If you don’t have permission to manage the project settings, ask your JIRA project administrator to add the “Environment” field to your JIRA project. You will need the Environment variable to collect the URL information of the source page.
Step 2: Create and Configure the Issue Collector
The option to create an issue collector will be under Project Settings > Issue Collectors. When you configure your issue collector, make sure to check and customize the following options:
Collector browser info
Make sure the checkbox is selected. This info is required to collect the URL of the source page.

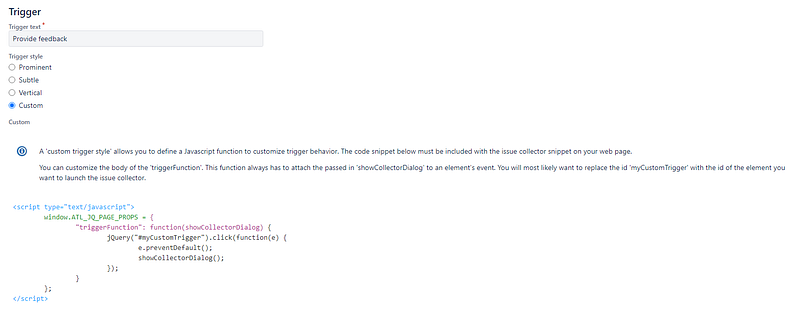
Trigger
Select the Custom radio button. You need to create a custom trigger to add additional fields to the generated code snippet.
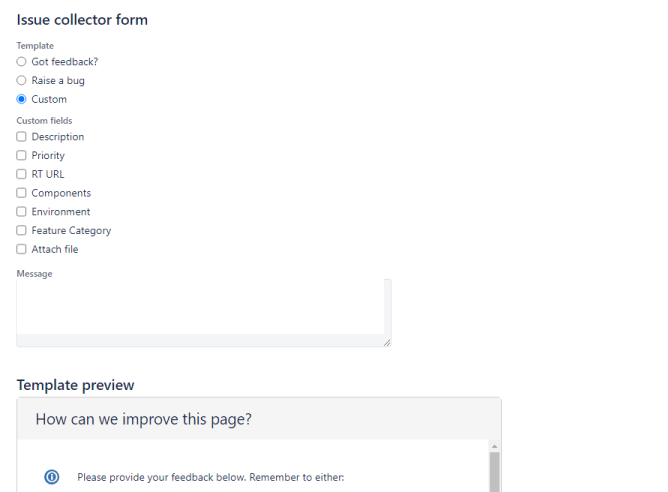
Issue Collector form
Similar to the Trigger, select Custom and ensure that the Environment field is available under Custom fields. You don’t need to select the checkbox. If you don’t see the Environment option, reach out to your JIRA project administrator.
Once you’ve completed your configuration, click Update.
Step 3: Copy the JavaScript code snippet
On the Issue Collector page, select your new issue collector. Then under Embedding this issue collector, select Embed in Javascript.
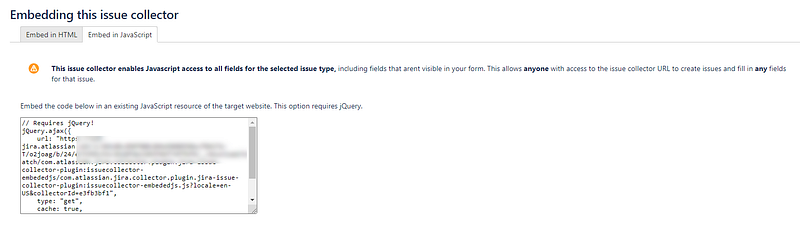
Copy and paste the code snippet in a text editor of your choice, or you can paste it directly on a Masterpage in your Flare project. I prefer using an external text editor such as Sublime or VS Code for any code-related updates. The code snippet will look something like this:
// Requires jQuery!
jQuery.ajax({
url: “https://yourcompany-jira.atlassian.net/s/d41d8cd98f00b204e9800998ecf8427e-T/o2joag/b/24/e73395c53c3b10fde2303f4bf74ffbf6/_/download/batch/com.atlassian.jira.collector.plugin.jira-issue-collector-plugin:issuecollector-embededjs/com.atlassian.jira.collector.plugin.jira-issue-collector-plugin:issuecollector-embededjs.js?locale=en-US&collectorId=12345678",
type: “get”,
cache: true,
dataType: “script”
});window.ATL_JQ_PAGE_PROPS = {
“triggerFunction”: function(showCollectorDialog){
//Requires that jQuery is available!
jQuery(“#myCustomTrigger”).click(function(e) {
e.preventDefault();
showCollectorDialog();
});
}};We will update the code snippet by adding some custom fields in the next step.
Step 4: Customize the code snippet and create a custom trigger
We will add two new custom fields to the issue collector’s JavaScript code snippet and create a custom trigger using HTML and CSS.
In the code snippet, we’ll add the following fieldValues:
fieldValues:{
recordWebInfo: ‘1’, // field Name
recordWebInfoConsent: [‘1’] // field Id
}These field values will ensure that the optional environment checkbox is automatically selected to collect the source page URL.
Updated JavaScript code snippet
// Requires jQuery!jQuery.ajax({
url: “https://yourcompany-jira.atlassian.net/s/d41d8cd98f00b204e9800998ecf8427e-T/o2joag/b/24/e73395c53c3b10fde2303f4bf74ffbf6/_/download/batch/com.atlassian.jira.collector.plugin.jira-issue-collector-plugin:issuecollector-embededjs/com.atlassian.jira.collector.plugin.jira-issue-collector-plugin:issuecollector-embededjs.js?locale=en-US&collectorId=12345678",
type: “get”,
cache: true,
dataType: “script”
});window.ATL_JQ_PAGE_PROPS = {
“triggerFunction”: function(showCollectorDialog) {
//Requires that jQuery is available!
jQuery(“#myCustomTrigger”).click(function(e) {
e.preventDefault();
showCollectorDialog();
});
},
f1ieldValues:{
recordWebInfo: ‘1’, // field Name
recordWebInfoConsent: [‘1’] // field Id
}};Custom trigger
HTML trigger button
<!-- Paste this on the master page.--><a href=”#” id=”myCustomTrigger” class=”issue-collector”>Provide feedback</a>Custom CSS
/* This is the subtle issue collector style. Paste this on the stylesheet, but feel free to change it*/.issue-collector {
position: fixed;
bottom: 0px;
right: 0px;
border: 1px solid #ccc;
border-bottom: none;
border-right: none;
background-color: #f5f5f5;
color: #444 !important;
font-size: 11px;
padding: 6px;
-webkit-box-shadow: -1px -1px 2px rgba(0, 0, 0, 0.5);
box-shadow: -1px -1px 2px rgba(0, 0, 0, 0.5);
border-radius: 2px 0 0 0;
}Step 5: Embed the code snippet in your Flare project
You will need to embed the code snippet on the master pages and add the new CSS styles to the stylesheet. To embed the above codes, do the following:
- Open a master page in your Flare project and embed the JavaScript at the bottom of the page.
- Copy the HTML code for the trigger button and paste it somewhere on the master page.
- Copy the custom CSS style and paste it at the bottom of the stylesheet.
You can now start a build and test the feedback tool. You will notice that the optional environment checkbox is automatically selected, and the URL of the source page is collected in the JIRA issue.