avatarCedric Nicoloso

Free AI web copilot to create summaries, insights and extended knowledge, download it at here

5884

Abstract

slate3d</span>(<span class="hljs-number">0</span>, <span class="hljs-number">0</span>, <span class="hljs-number">0</span>); <span class="hljs-comment">/* Basically, no transform */</span> }

<span class="hljs-comment">/* "leave-to": End result /</span> <span class="hljs-selector-class">.groups-leave-to</span> { <span class="hljs-comment">/ Move 100% of the parent div width to the left /</span> <span class="hljs-attribute">transform</span>: <span class="hljs-built_in">translate3d</span>(-<span class="hljs-number">100%</span>, <span class="hljs-number">0</span>, <span class="hljs-number">0</span>); }</pre></div><p id="c7de">And now making the second <code>div</code> to appear from the right:</p><div id="89f0"><pre><span class="hljs-comment">/ Remember we have "left: 100%;" for this div /</span> <span class="hljs-selector-class">.categories-leave-from</span> { <span class="hljs-attribute">transform</span>: <span class="hljs-built_in">translate3d</span>(<span class="hljs-number">0</span>, <span class="hljs-number">0</span>, <span class="hljs-number">0</span>); <span class="hljs-comment">/ so no transform */</span> }

<span class="hljs-comment">/* 100% - 100% = 0, that's what we want */</span> <span class="hljs-selector-class">.categories-enter-to</span> { <span class="hljs-attribute">transform</span>: <span class="hljs-built_in">translate3d</span>(-<span class="hljs-number">100%</span>, <span class="hljs-number">0</span>, <span class="hljs-number">0</span>); }

<span class="hljs-comment">/* And let's add the same transform to the div itself, to materialize the end result /</span> <span class="hljs-selector-class">.content-categories</span> { <span class="hljs-attribute">left</span>: <span class="hljs-number">100%</span>; <span class="hljs-attribute">transform</span>: <span class="hljs-built_in">translate3d</span>(-<span class="hljs-number">100%</span>, <span class="hljs-number">0</span>, <span class="hljs-number">0</span>); <span class="hljs-comment">/ <-- */</span> }</pre></div><p id="e1b0">Finally, we’ll add the transition function to both active states:</p><div id="ba43"><pre><span class="hljs-selector-class">.groups-leave-active</span>, <span class="hljs-selector-class">.categories-enter-active</span> { <span class="hljs-attribute">transition</span>: transform <span class="hljs-number">0.3s</span> ease-in-out; }</pre></div><p id="fedc">And here we go:</p><figure id="0bcb"><img src="https://cdn-images-1.readmedium.com/v2/resize:fit:800/1*RKjxHqJS2QDFKskVZ2wCOA.gif"><figcaption>GIF created with <a href="https://getkap.co/">Kap</a></figcaption></figure><p id="7dee">I’ll let you go over the code for handling the “Back” button. Spoil: it’s very similar.</p><h1 id="4849">2- Adaptive height</h1><p id="1a51">Notice all the empty white space below the second list? That’s what I wanted to improve and make the white card height adapt to its content.</p><p id="36e4">To access DOM elements within our Vue.js code, we’ll add three <code>ref</code>: <code>parentRef</code>, <code>groupsRef</code> and <code>categoriesRef</code>.</p><div id="2178"><pre><span class="hljs-tag"><<span class="hljs-name">div</span> <span class="hljs-attr">ref</span>=<span class="hljs-string">"parentRef"</span> <span class="hljs-attr">class</span>=<span class="hljs-string">"parent"</span>></span> <span class="hljs-tag"><<span class="hljs-name">Transition</span> <span class="hljs-attr">name</span>=<span class="hljs-string">"groups"</span>></span> <span class="hljs-tag"><<span class="hljs-name">div</span> <span class="hljs-attr">v-if</span>=<span class="hljs-string">"showGroups"</span> <span class="hljs-attr">ref</span>=<span class="hljs-string">"groupsRef"</span> <span class="hljs-attr">class</span>=<span class="hljs-string">"content-groups"</span>></span> ... <span class="hljs-tag"></<span class="hljs-name">div</span>></span> <span class="hljs-tag"></<span class="hljs-name">Transition</span>></span>

<span class="hljs-tag"><<span class="hljs-name">Transition</span> <span class="hljs-attr">name</span>=<span class="hljs-string">"categories"</span>></span> <span class="hljs-tag"><<span class="hljs-name">div</span> <span class="hljs-attr">v-if</span>=<span class="hljs-string">"showCategories"</span> <span class="hljs-attr">ref</span>=<span class="hljs-string">"categoriesRef"</span> <span class="hljs-attr">class</span>=<span class="hljs-string">"content-categories"</span>></span> ... <span class="hljs-tag"></<span class="hljs-name">div</span>></span> <span class="hljs-tag"></<span class="hljs-name">Transition</span>></span> <span class="hljs-tag"></<span class="hljs-name">div</span>></span></pre></div><p id="20e9">On a side-note, if your child components are custom components, I suggest to add an additional wrapping <code>div</code> around each child and set the <code>ref</code> at the wrapping <code>div</code> level. That is to avoid any unexpected issue since components using <code><script setup></code> are private by default (as explained <a href="https://vuejs.org/guide/essentials/template-refs.html#ref-on-component">here</a>).</p><p id="04c7">Our height transition will be triggered from a <code>watch</code>. I’ll refactor a bit and introduce a <code>currentBlock</code> ref to make this watch more simple:</p><div id="eb9a"><pre><span class="hljs-keyword">const</span> currentBlock = ref<<span class="hljs-string">'groups'</span> | <span class="hljs-string">'categories'</span>>(<span class="hljs-string">'groups'</span>)

<span class="hljs-keyword">const</span> showGroups = <span class="hljs-title function_">computed</span>(<span class="hljs-function">() =></span> currentBlock.<span class="hljs-property">value</span> === <span class="hljs-string">'groups'</span>) <span class="hljs-keyword">const</span> sho

Options

wCategories = <span class="hljs-title function_">computed</span>(<span class="hljs-function">() =></span> currentBlock.<span class="hljs-property">value</span> === <span class="hljs-string">'categories'</span>)</pre></div><div id="59f6"><pre><span class="hljs-title function_">watch</span>(currentBlock, <span class="hljs-function">() =></span> { <span class="hljs-built_in">setTimeout</span>(<span class="hljs-function">() =></span> { <span class="hljs-keyword">const</span> currentHeight = parentRef.<span class="hljs-property">value</span>.<span class="hljs-property">offsetHeight</span> <span class="hljs-keyword">const</span> childRef = currentBlock.<span class="hljs-property">value</span> === <span class="hljs-string">'categories'</span> ? categoriesRef : groupsRef <span class="hljs-keyword">const</span> newHeight = childRef.<span class="hljs-property">value</span>.<span class="hljs-property">offsetHeight</span> <span class="hljs-title function_">animateValue</span>({ <span class="hljs-attr">start</span>: currentHeight, <span class="hljs-attr">end</span>: newHeight, <span class="hljs-attr">duration</span>: <span class="hljs-number">350</span> }) }) })</pre></div><p id="c582">So all the interesting logic is hidden behind this <code>animateValue</code> function, let’s have a look.</p><div id="dfcb"><pre><span class="hljs-keyword">function</span> <span class="hljs-title function_">animateValue</span>(<span class="hljs-params">{ start, end, duration }</span>) { <span class="hljs-keyword">let</span> startTimestamp <span class="hljs-keyword">let</span> endTimestamp

<span class="hljs-comment">// Internal "step" function, called as many times as needed</span> <span class="hljs-comment">// (Called ~40 times with Chrome, ~20 times with Safari...)</span> <span class="hljs-keyword">function</span> <span class="hljs-title function_">step</span>(<span class="hljs-params">timestamp</span>) { <span class="hljs-keyword">if</span> (!startTimestamp) { startTimestamp = timestamp endTimestamp = startTimestamp + duration }

<span class="hljs-keyword">const</span> elapsed = timestamp - startTimestamp
<span class="hljs-keyword">const</span> progress = <span class="hljs-title class_">Math</span>.<span class="hljs-title function_">min</span>(elapsed / duration, <span class="hljs-number">1</span>)
<span class="hljs-keyword">const</span> valueNow = <span class="hljs-title function_">easeOutQuart</span>(progress, start, end - start, <span class="hljs-number">1</span>)

<span class="hljs-comment">// -&gt; The important line where the actual height of the div changes</span>
parentRef.<span class="hljs-property">value</span>.<span class="hljs-property">style</span>.<span class="hljs-property">height</span> = <span class="hljs-string">`<span class="hljs-subst">${valueNow}</span>px`</span>

<span class="hljs-comment">// If still not the desired end value, keep animating</span>
<span class="hljs-keyword">if</span> (progress &lt; <span class="hljs-number">1</span>) {
  <span class="hljs-variable language_">window</span>.<span class="hljs-title function_">requestAnimationFrame</span>(step)
}

}

<span class="hljs-comment">// Start animation</span> <span class="hljs-variable language_">window</span>.<span class="hljs-title function_">requestAnimationFrame</span>(step) }

<span class="hljs-comment">// Some "hard-to-read" easing function</span> <span class="hljs-keyword">function</span> <span class="hljs-title function_">easeOutQuart</span>(<span class="hljs-params">t, b, c, d</span>) { <span class="hljs-keyword">return</span> -c * ((t = t / d - <span class="hljs-number">1</span>) * t * t * t - <span class="hljs-number">1</span>) + b }</pre></div><p id="002e">That leverages the window API <code>requestAnimationFrame</code> method. You can read more about this in the <a href="https://developer.mozilla.org/en-US/docs/Web/API/Window/requestAnimationFrame">MDN web docs</a>.</p><p id="4559">And when using such API, a good practice is to check “caniuse”: <a href="https://caniuse.com/mdn-api_window_requestanimationframe">https://caniuse.com/mdn-api_window_requestanimationframe</a></p><p id="3472">I’ve used an <code>easeOutQuart</code> easing function, you can find many other examples here: <a href="https://spicyyoghurt.com/tools/easing-functions"><i>https://spicyyoghurt.com/tools/easing-functions</i></a></p><h1 id="0262">Side notes</h1><h2 id="2c2d">1- “prefers-reduced-motion”</h2><p id="879b">When working with transitions and animations, one should always pay attention to user’s preference regarding that matter. I’m talking about “<a href="https://developer.mozilla.org/en-US/docs/Web/CSS/@media/prefers-reduced-motion">prefers-reduced-motion</a>”. VueUse comes to the rescue: <a href="https://vueuse.org/core/usePreferredReducedMotion/">https://vueuse.org/core/usePreferredReducedMotion/</a></p><h2 id="3fdf">2- Bad performance on height animation</h2><p id="ebf8">⚠️ Note that we animate the CSS <code>height</code> property, which is usually not recommended for a matter of performance. Indeed, it will force the browser to repaint everything… It would be much better to use <code>transform: scaleY(...)</code> to expand the parent white background as needed! More readings <a href="https://www.smashingmagazine.com/2016/12/gpu-animation-doing-it-right/">here</a> or <a href="https://www.freecodecamp.org/news/animating-height-the-right-way/">here</a>.</p><p id="e93a">Well, that’s about it 🙂</p><p id="0797">You can have a look at the whole code here: <a href="https://github.com/cedric25/slide-with-auto-height">https://github.com/cedric25/slide-with-auto-height</a></p><p id="6795">Or play with the final solution: <a href="https://slide-with-auto-height.vercel.app/">https://slide-with-auto-height.vercel.app/</a></p></article></body>

A slide transition with changing height

In this tutorial, I’ll be mostly talking about CSS and some standard JavaScript DOM API. The rest of it is less important for the transition itself but that includes Vue.js 3 with <script setup> and a bit of tailwindcss.

1- The slide transition

The slide part is pretty straightforward. I’ll go over the significant parts:

<div class="parent">
  <div v-if="showGroups" class="content-groups"> ... </div>
  <div v-else-if="showCategories" class="content-categories"> ... </div>
</div>
.parent {
  position: relative;
  height: 506px; /* Bad magic value that we'll remove in the 2nd part */
  overflow-y: hidden;
}

/* First div visible from the start */
.content-groups {
  position: absolute;
  top: 0;
  left: 0;
  width: 100%;
}

.content-categories {
  position: absolute;
  top: 0;
  left: 100%; /* Second div is hidden, pushed to the right */
  width: 100%;
}

Let’s comment out the overflow-y property and both v-if for a second and here we can see our two blocks:

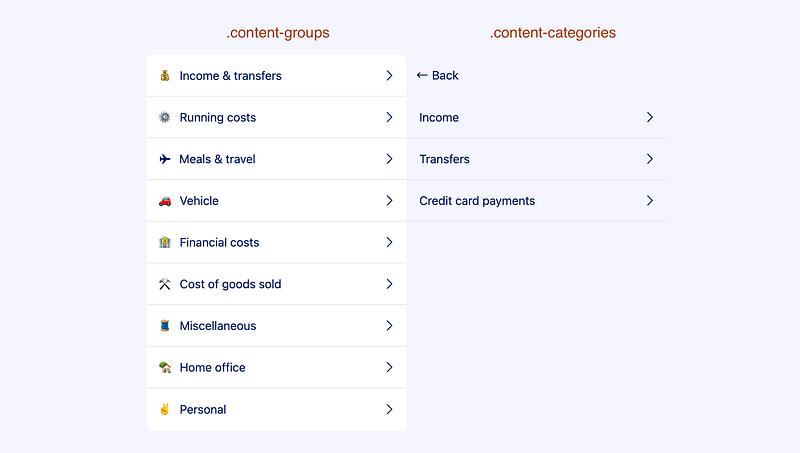
Now comes the slide transition. Let’s wrap our two children div within a <Transition> component.

To learn about the <Transition> component, the Vue.js documentation is a good starting point: https://vuejs.org/guide/built-ins/transition.html

<div class="parent">
  <Transition name="groups">
    <div v-if="showGroups" class="content-groups"> ... </div>
  </Transition>

  <Transition name="categories">
    <div v-if="showCategories" class="content-categories"> ... </div>
  </Transition>
</div>

We have given a name to these transitions. Let’s use that and add some CSS to make the first div disappear to the left:

/* "leave-from": Starting point */
.groups-leave-from {
  transform: translate3d(0, 0, 0); /* Basically, no transform */
}

/* "leave-to": End result */
.groups-leave-to {
  /* Move 100% of the parent div width to the left */
  transform: translate3d(-100%, 0, 0);
}

And now making the second div to appear from the right:

/* Remember we have "left: 100%;" for this div */
.categories-leave-from {
  transform: translate3d(0, 0, 0); /* so no transform */
}

/* 100% - 100% = 0, that's what we want */
.categories-enter-to {
  transform: translate3d(-100%, 0, 0);
}

/* And let's add the same transform to the div itself, to materialize the end result */
.content-categories {
  left: 100%;
  transform: translate3d(-100%, 0, 0); /* <-- */
}

Finally, we’ll add the transition function to both active states:

.groups-leave-active,
.categories-enter-active {
  transition: transform 0.3s ease-in-out;
}

And here we go:

GIF created with Kap

I’ll let you go over the code for handling the “Back” button. Spoil: it’s very similar.

2- Adaptive height

Notice all the empty white space below the second list? That’s what I wanted to improve and make the white card height adapt to its content.

To access DOM elements within our Vue.js code, we’ll add three ref: parentRef, groupsRef and categoriesRef.

<div ref="parentRef" class="parent">
  <Transition name="groups">
    <div v-if="showGroups" ref="groupsRef" class="content-groups"> ... </div>
  </Transition>

  <Transition name="categories">
    <div v-if="showCategories" ref="categoriesRef" class="content-categories"> ... </div>
  </Transition>
</div>

On a side-note, if your child components are custom components, I suggest to add an additional wrapping div around each child and set the ref at the wrapping div level. That is to avoid any unexpected issue since components using <script setup> are private by default (as explained here).

Our height transition will be triggered from a watch. I’ll refactor a bit and introduce a currentBlock ref to make this watch more simple:

const currentBlock = ref<'groups' | 'categories'>('groups')

const showGroups = computed(() => currentBlock.value === 'groups')
const showCategories = computed(() => currentBlock.value === 'categories')
watch(currentBlock, () => {
  setTimeout(() => {
    const currentHeight = parentRef.value.offsetHeight
    const childRef = currentBlock.value === 'categories' ? categoriesRef : groupsRef
    const newHeight = childRef.value.offsetHeight
    animateValue({ start: currentHeight, end: newHeight, duration: 350 })
  })
})

So all the interesting logic is hidden behind this animateValue function, let’s have a look.

function animateValue({ start, end, duration }) {
  let startTimestamp
  let endTimestamp

  // Internal "step" function, called as many times as needed
  // (Called ~40 times with Chrome, ~20 times with Safari...)
  function step(timestamp) {
    if (!startTimestamp) {
      startTimestamp = timestamp
      endTimestamp = startTimestamp + duration
    }

    const elapsed = timestamp - startTimestamp
    const progress = Math.min(elapsed / duration, 1)
    const valueNow = easeOutQuart(progress, start, end - start, 1)

    // -> The important line where the actual height of the div changes
    parentRef.value.style.height = `${valueNow}px`

    // If still not the desired end value, keep animating
    if (progress < 1) {
      window.requestAnimationFrame(step)
    }
  }

  // Start animation
  window.requestAnimationFrame(step)
}

// Some "hard-to-read" easing function
function easeOutQuart(t, b, c, d) {
  return -c * ((t = t / d - 1) * t * t * t - 1) + b
}

That leverages the window API requestAnimationFrame method. You can read more about this in the MDN web docs.

And when using such API, a good practice is to check “caniuse”: https://caniuse.com/mdn-api_window_requestanimationframe

I’ve used an easeOutQuart easing function, you can find many other examples here: https://spicyyoghurt.com/tools/easing-functions

Side notes

1- “prefers-reduced-motion”

When working with transitions and animations, one should always pay attention to user’s preference regarding that matter. I’m talking about “prefers-reduced-motion”. VueUse comes to the rescue: https://vueuse.org/core/usePreferredReducedMotion/

2- Bad performance on height animation

⚠️ Note that we animate the CSS height property, which is usually not recommended for a matter of performance. Indeed, it will force the browser to repaint everything… It would be much better to use transform: scaleY(...) to expand the parent white background as needed! More readings here or here.

Well, that’s about it 🙂

You can have a look at the whole code here: https://github.com/cedric25/slide-with-auto-height

Or play with the final solution: https://slide-with-auto-height.vercel.app/

CSS
Css Animation
Vuejs
Recommended from ReadMedium