
A guide to integrating Klaviyo with Webflow
A comprehensive guide to setting up Klaviyo’s email marketing system with Webflow’s native forms

Email marketing is crucial for any business that wants to successfully connect with their audience and boost sales. The first step in creating any successful marketing campaign is gathering emails from your audience, which usually involves adding an email capture form to your website. Klaviyo is a great option for email marketing due to its robust reporting, cost-effectiveness, and powerful segmentation and automation. It has many form templates to choose from that you can embed in your site to capture these emails, as well as a style editor to customize these forms. However, the editor functionality is limited — in the end, you end up with forms that don’t look like they belong on your site, which is bad for the brand and the user experience. This is the issue I ran into when I was trying to create custom sign up forms on a Webflow site that had to be integrated with Klaviyo. After many hours of trial and error, I finally found the fix. Instead of struggling with Klaviyo’s templated forms, I found a way to build custom forms right within Webflow itself and send the data over to Klaviyo by following a few steps. This comprehensive guide will show you how to do just that!
A little about me
I’m a Webflow Developer for imaware, a patient-facing platform that offers scientifically validated home-based tests that screen and monitor a wide range of health conditions. I’ve been lucky enough to work with a team who constantly pushes me to become better by learning new tricks and discovering new ways to solve the many issues that come with integrating different tools together. I’d like to make a special shoutout to Julieta Rybnik for not only encouraging me to write this article, but for taking time out of her busy schedule to edit. I’m very lucky to have you as a coworker.
⚠️ Before we begin:
- This guide will not show you how to build forms with Webflow. This guide assumes you have experience with Webflow and all of its features. I will show you how to use Webflow forms and send that data to Klaviyo. Thus, previous experience with Webflow is required. If you are new to Webflow, I have written a couple of articles to help you get started.
- You may run into issues that I haven’t come across myself. If you happen to figure out how to solve those issues, I encourage you to leave a comment on this post as a way to help myself and others in the future.
- Too busy or would just rather pass this task onto someone else? I can set this up for you for a flat fee! Send me an email at [email protected] and let’s get started ASAP 😊🚀
Klaviyo Built-In Signup Forms vs. Legacy Signup Forms
There are two main ways to add Klaviyo signup forms to your website. You can either use their built-in signup forms or their legacy forms.
Built-In Signup Forms
Klaviyo’s built-in signup forms are definitely easier to use. You just need to copy and paste a small snippet of code onto an embed element within your Webflow site. However, in terms of styling this form, you can’t do it within Webflow, and you are limited to using Klaviyo’s form editor. This might be enough in some instances, but if you need complete control of your forms, this is probably not the right solution for you. This leads us to your second option and what this guide is all about, legacy signup forms.
Legacy Signup Forms
Klaviyo’s legacy signup forms are your best option if you want to have complete control over your forms. This will allow you to use Webflow’s form element, style it to your needs, and connect it to Klaviyo. Let’s get into the steps on how to achieve this.
The Initial Setup
The first thing you need to do is install Klaviyo by adding the Klaviyo Install Code Snippet script to your site. I’ve written down the steps below, and you can scroll down a bit further to see a GIF showing the steps in action.
- In your Klaviyo dashboard, navigate to the Signup Forms tab.
- Select one for the templates to create a signup form. It doesn’t matter which one you pick, we simply need to create one form in order to have access to the Install Code Snippet.
- Upon selecting a form from the templates and selecting a Subscribe List in the modal (again this doesn’t matter, select any list), click the Create Form button. You will now be presented with the form editor, simply click exit at the top.
- You will be brought back to the Signup Form page and the Install Code Snippet button should now appear in the top right hand side. Copy this code snippet.
- In your Webflow site project settings, click on the “Custom Code” tab.
- Paste your Klaviyo code snippet in the Footer code and publish your site.
- In Klaviyo, verify your installation by entering your site’s URL in the Install Code Snippet modal. Upon successful installation, we can now set up a legacy form.
Creating a Signup Form
Part 1: Laying the groundwork in Webflow
Once you have successfully installed Klaviyo on your site, the next step is to set up your form. I recommend that you create a plain signup form as described here first, with no styling. Then you can reuse this form throughout your site and style it according to your needs for each instance (for example, for a popup form vs. a form within a block) by adding new classes. I’ve broken this process down below.
⚠️ Note: I have created a clonable Webflow template with a form already set up for you to use. However, please read through these steps anyways because edits need to be made for the form to connect to your Klaviyo account.
- Add a Webflow form element onto your page.
- Remove all input fields and labels except the email input field. Later, I will show you how to add other fields, but for now let’s focus on emails.
- Inside of your Form Block element, there is an element called Form. Give it the class klaviyo_gdpr_embed_ListID. - Replace ListID with your own list ID value. This can be found by navigating to your Klaviyo dashboard and clicking on the List & Segments tab on the left. Navigate to your list and click on Settings, where you will find your list ID in bold. - If you don’t yet have a list, create one by clicking the Create List/Segment button in Klaviyo.
- Click on your Form element and on the right hand side of Webflow, click on the settings icons for this element to make the following changes: - Give this form an ID to identify it, for example email_signup - Under Action, paste in the following URL: //manage.kmail-lists.com/subscriptions/subscribe - Add an attribute called data-ajax-submit with the value: //manage.kmail-lists.com/ajax/subscriptions/subscribe - Add another attribute called novalidate with the value novalidate - Add a final attribute called target with the value _blank

Part 2: Adding the required elements and classes
Next, it’s time to set up the structure that the form needs to have for Klaviyo to correctly identify all the different components — including inputs, submit button, and the form success message.
- Add a div inside of the Form element and give it the class klaviyo_field_group. All of your form inputs need to be inside of a div with this class. This does not include your submit button, leave it outside of this div.
<input type=hidden name="g" value="ListID">- Give the email input field the ID k_id_email
- Your form submit button needs to be placed inside of a div with the class klaviyo_form_actions. - This div is a sibling of the div above, thus I suggest placing both of them inside of another div (this one doesn’t need any specific class). This parent div should be inside of the Form element.
- Give your submit button the class klaviyo_submit_button
- Add another div inside of your Form element (not within the same div as the field group and form actions you created above), and give it the class klaviyo_messages.
- Inside of the klaviyo_messages div, add another div and give it the class success_message. Here, add a text block element with the class thank_you. This will be your form’s success message and you can change this text accordingly. - Do not add any styling to thank_you class. - Click back to the success_message div. Give it a second class, this class will have to be unique to each form you create, and set it to display none.
- The two divs that are automatically created by Webflow with the form success message and form error messages will not work for this form and will never display, so you can ignore these. ⚠️ ️Note: I haven’t been able to figure out how to set up error messages with these legacy forms unfortunately. If anyone happens to know how to make this work, please leave a comment below.
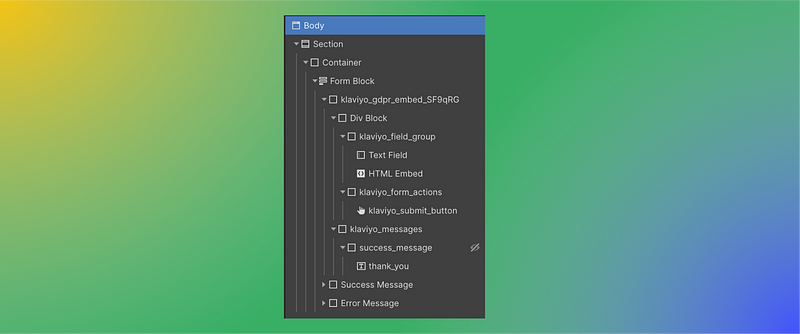
- That’s it! Refer to the image below to see what the final form structure should look like.
Part 3: Adding the script code to your page
Now that our form is set up correctly, all that’s left is add in the script that will run when the user has submitted the form. This is also where we will define any properties we’d like to be stored in Klaviyo along with the form data.
- Click on your page’s settings and paste the following code before the </body>:
<script type="text/javascript" src="//www.klaviyo.com/media/js/public/klaviyo_subscribe.js"></script>
<script type="text/javascript">
 KlaviyoSubscribe.attachToForms('#email_signup', {
 hide_form_on_success: true,
 custom_success_message: true,
 extra_properties: {
 $signup_location: 'Home Page'
 }});
</script>
2. Make sure that the ID (#email_signup) referenced in the script above matches the ID you gave your form in step 4 of Part 1 above.
3. If you want to send the location of the form to klaviyo on each submission, change the $signup_location property to match the location of your form. For example, you may want to know which page a user was on when the form was submitted.
4. You can send other properties to Klaviyo by following the same syntax. For example, you can add a property called $product_name and assign it to the name of the Product page your user is currently on. You can also create a $url property and assign it to the current page’s url.
Part 4: Testing
Before testing, it is important to note that by default, Klaviyo sets all lists to require a Double Opt-In. This setting sends an email to a user after they sign up to confirm their subscription. With this setting on, a user will not be added to the Klaviyo list until they confirm. To make testing easier and quicker, I recommend you change this setting to Single Opt-In instead, so you can immediately see when an email is added to the list with all of its corresponding properties, and confirm that the form worked upon submission.

Extra notes
At this point you should have an email capture form set up! I wanted to add these extra considerations here to cover some potential questions.
- More than one form on a page: If your page has more than one form, you will need to give each form a unique ID. You will also have to duplicate the code in Part 3 for each form and change the values accordingly.
- Form with multiple inputs: If you need to capture more than just email, there’s a couple of steps you need to take. Klaviyo has reserved properties for common data like first name, last name, phone number. Thus, I suggest you take a look at this list before creating your own. The steps for adding other inputs to your form are the following: 1. Add all of your inputs inside of the klaviyo_field_group element you created in Step 2 of Part 2 above 2. Give each of those inputs a unique ID 3. Go back to the HTML embed element you added in Step 2 of Part 2 above 4. Add the following HTML and edit the value property to equal to the IDs of each of your inputs, starting with the $ sign.
<input type="hidden" name="$fields" value="$first_name,$last_name,$phone_number,$organization"/>- Form labels: Unfortunately, I have not been able to figure out how to add form labels to form inputs. When you have form labels for form inputs, these do not become hidden when you submit the form, Klaviyo only hides the form inputs. Again, if anyone has figured this out, please leave a comment below.
Last updated: January 2, 2024
I hope at least one person out there can benefit from this article. If anything needs clarification, you believe I have made a mistake, or if you have a better way to do any of the above, please leave a comment! I welcome all constructive feedback. A huge thank you for taking the time to read this article! ❤️
Still unsure or would rather pass this task onto someone else? I can set this up for you for a flat fee! Send me an email at [email protected] and I’ll be happy to help out 😊
Let’s connect! I am always happy to connect with new people, find me on LinkedIn! And if you are interested in more Webflow and nocode content, follow me on Medium as well.