
A Complete Guide to File Uploading in JavaScript
Single file, multiple files, drag, and paste, everything you need to know

File upload is a common function for a web project. I believe that everyone has encountered related requirements more or less during the development.
In this article, I have summarized some scenarios and solutions, hoping to help you thoroughly grasp questions related to file uploading.
Our Goals
First, let’s clarify the specific functions of file uploading.
According to upload target, there are 3 kind tasks:
- Upload a single file
- Upload multiple files at the same time
- Upload the entire folder
According to the user actions, there are:
- Choose a file the upload
- Drag the file to the box then upload
- Upload from clipboard
From a performance perspective, we may need:
- Upload after compressing a file
- Divide a large file into blocks then uploading
And additionally, sometimes we may not upload files in the client browser, but through the server to upload to another server.
We will discuss these in turn.
Prerequisites
Before the start coding, we still need to understand some background knowledge.
First, when uploading files, we use Axios, the most popular HTTP Library. In actual development, we generally don’t use XMLHttpRequest directly, and using Axios conforms to the real development model.
When we discuss uploading files in the front-end, if we want to fully understand the relevant principles, we must understand the relevant back-end code. Here we use the Koa to implement our server.
Finally, I hope you will have a brief understanding of formdata, we use this data format to upload files.
Upload a single file
The need to upload a file is too common. For example, when you register for Medium, you need to upload an avatar.

The file upload function requires cooperation between the client and the server. In our project, the user selects a file in the client and uploads it to the server; the server saves the file and returns the URL of it.
Here is the project preview:

The above Gif shows the complete process of file uploading:
- User selects a file in the browser
- User click the upload button
- The uploaded files are placed in the
uploadFilesfolder of the server - Then the server returns a URL, which is the address of the uploaded file
- Users can access the resource through this URL
The Code
All the code of this project was held on GitHub:
You can clone it to your computer:
# clone it
$ git clone git@github.com:BytefishMedium/FileUploading.git
# and install npm package
$ cd FileUloading
$ npm installAll the code related to single file uploading was put on 1-SingleFile folder.
client.htmlrelated to client-side code.server.jsrelated to server-side code

To run the server, you can go to the folder and run this command:
$ node server.jsThen you can open client.html on any browser.
The specific operation I have shown in the gif above. You can try it for yourself first, and then read on.
Client-side code
Um, How many steps does it take to put a giraffe into a refrigerator?
Just three steps:
- Open the door
- put the giraffe in
- and close the door.
The same is true for uploading files, we only need three steps:
- Let users choose a file to upload
- Read this file
- Upload the file using Axios

In HTML, we can use the input element. Just set the type of this element to file, then the element can be used to select the file.
<input id="fileInput" type="file"/>
After the user selects a file, the metadata of the file will be stored in the files property of this input element.
const uploadFileEle = document.getElementById("fileInput")console.log(uploadFileEle.files[0]);
Finally, we use Axios’ post method to upload files. But before uploading the file, we also need to package this file into FormData format.
let file = fileElement.files[0];
let formData = new FormData();
formData.set('file', file);axios.post("http://localhost:3001/upload-single-file", formData)
.then(res => {
console.log(res)
})Tips: FormData is a key-value type data format. Here is an example:

Well, these are the knowledge points related to file uploading. The more complete code is as follows:
This code is actually to implement the three steps we said before:

It’s just that we added two additional functions:
- One is the upload button. When the user clicks the upload button, we start executing the upload logic.
- Then we have one more judgment to ensure that the user really selects a file.
Then, when Axios uploads a file, it allows us to monitor the progress of the file uploading.
We know that HTTP is built on top of TCP. If an HTTP packet is relatively large, it may be decomposed into multiple different TCP packets for transmissions in the network.
If you need to write a progress bar to show the user the progress of the uploading, you can use this API.
axios.post("http://localhost:3001/upload-single-file", formData, {
  onUploadProgress: (progressEvent) => {
    const percentCompleted = Math.round(
      (progressEvent.loaded * 100) / progressEvent.total
    );
    console.log(`upload process: ${percentCompleted}%`);
  },
});
progressEvent.loaded means how many bytes have upload success and progressEvent.total means total bytes of the file.

Ok, this is our client-side code.
Server-side code
To start a server, we can use Koa. Here is a tiny server using Koa:
This is the most basic Koa demo. Since this article focuses on file uploading, so I will not explain this in detail. If you don’t familiar with this, you can read the official documentation.
Our client uses the format of FormData to upload files, then our server also needs to parse FormData. And Koa-multer is a middleware that helps us parse FormData data:
About Koa-multer, you can read their official documentation:
The key code is uoload.single('file'), this line of code can help us parse the data of FormData, and then put the corresponding information in the ctx.request.file.
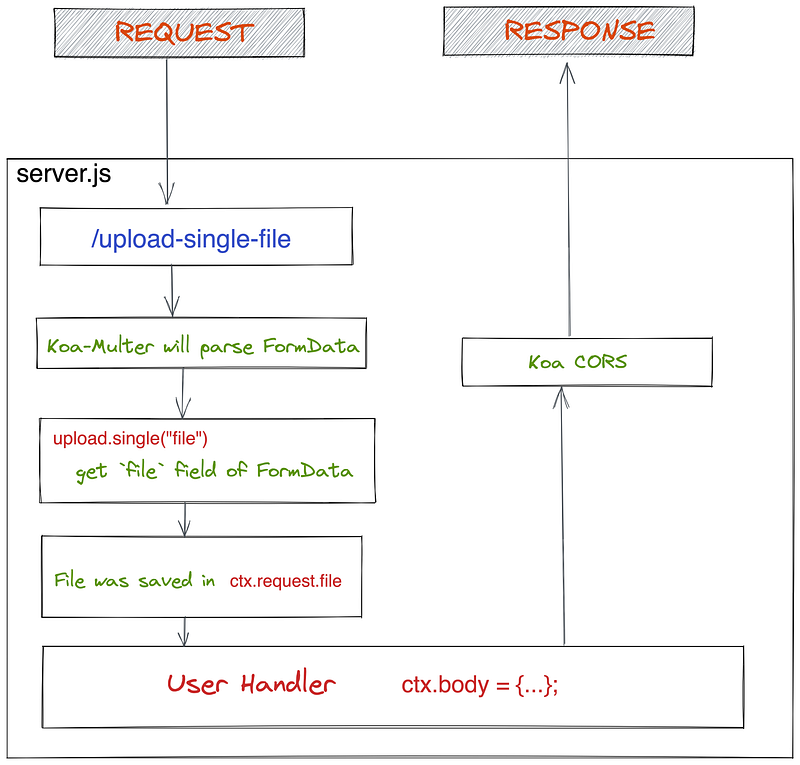
In fact, at this time, our server can already receive the files uploaded by the client, but it does not store them to the disk after receiving the files.
If we want Koa-multer to save the file to disk for us, we can add the following configuration:
const storage = multer.diskStorage({
  destination: function (req, file, cb) {
    cb(null, UPLOAD_DIR);
  },
  filename: function (req, file, cb) {
    cb(null, `${file.originalname}`);
  },
});
const upload = multer({ storage: storage });
The complete code is server.js, and you can read it directly in the code repository.

The current flow chart looks like this:

Anyway, you should try it yourself.
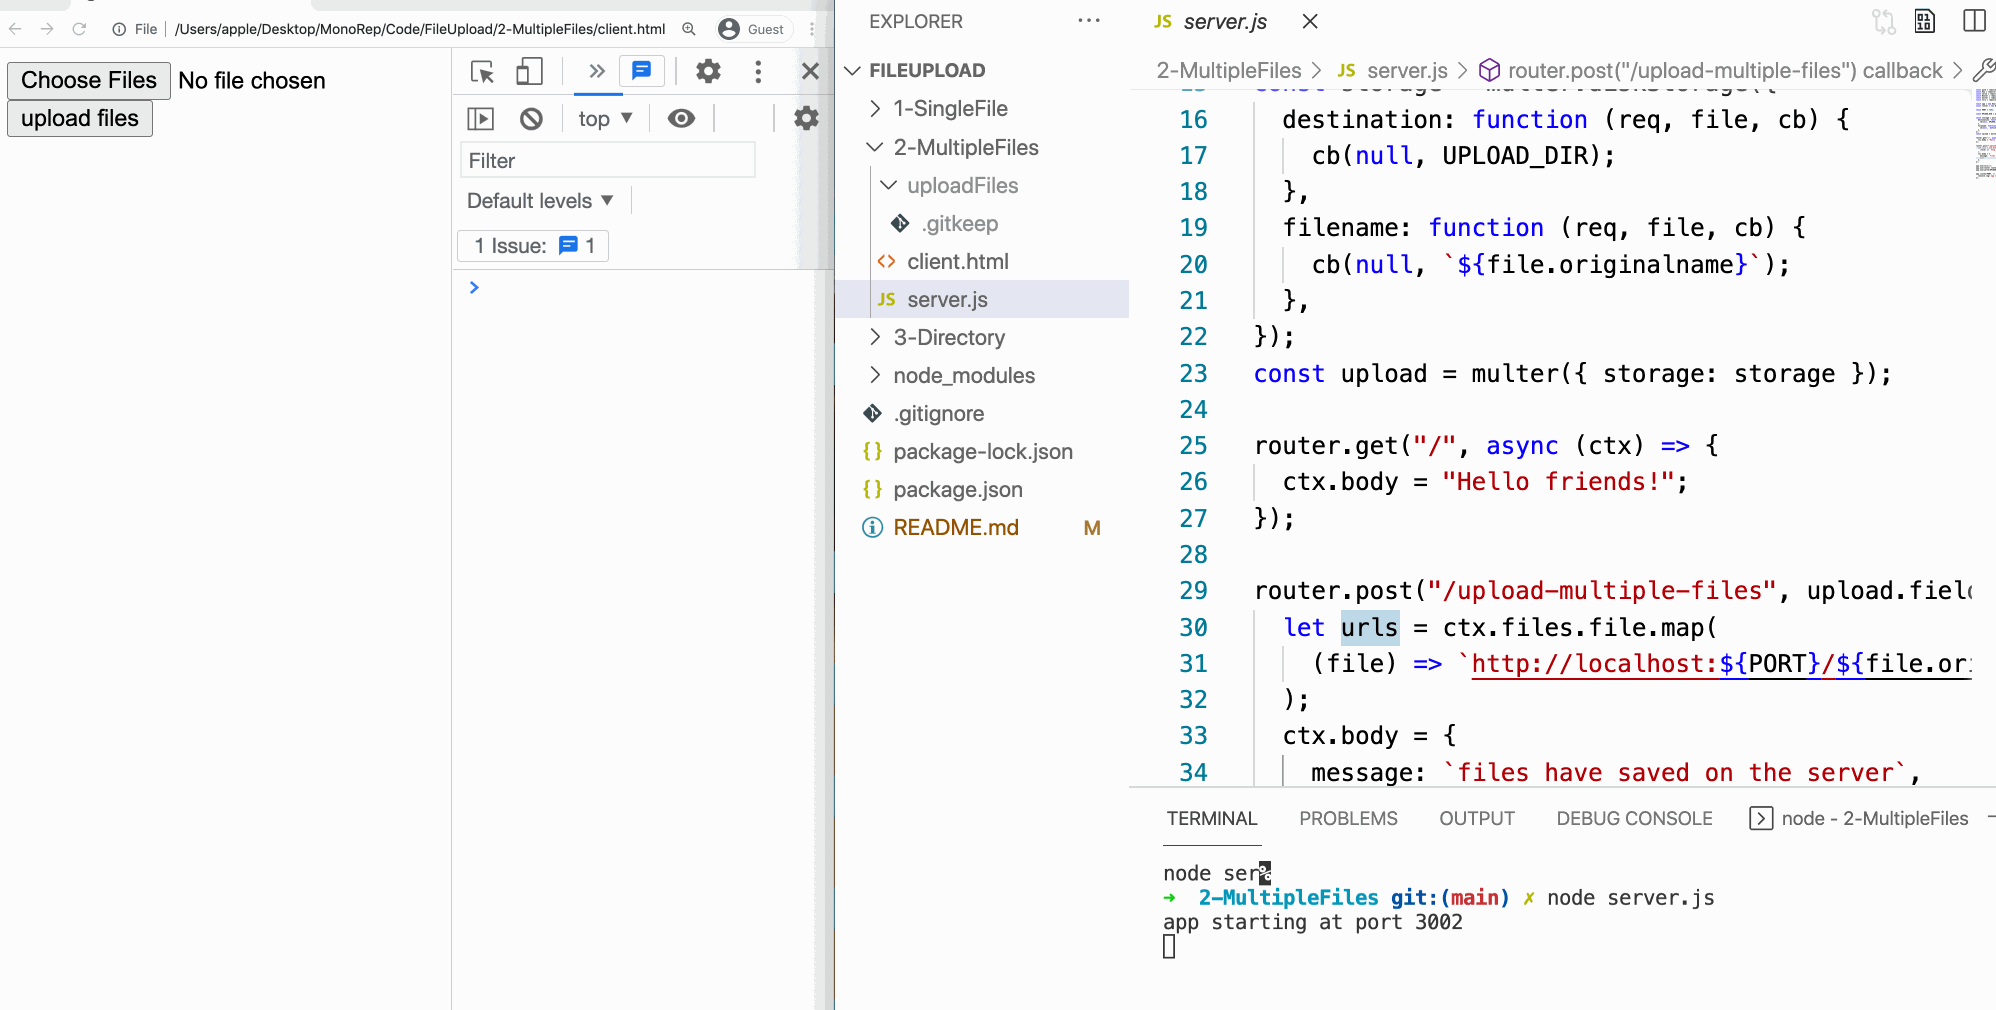
Upload multiple files
With the above foundation, it is much simpler for us to write the code for uploading multiple files.
First, we need to modify the input element and add the multiple attribute to it.
<input type="file" id="fileInput" multiple>This is to tell the browser that now this input element should allow the user to select multiple files at the same time.
Then after the user selects multiple files, the data will be placed in fileElement.files. When we construct formdata, we need to traverse this list and put all files into formdata.
let files = Array.from(fileElement.files);let formData = new FormData();
files.forEach((file) => {
formData.append("file", file);
});Then the code of uploading the file doesn't need modification.
Here is the complete code:

The file is located on 2-MultipleFiles/client.html in the project.
At the same time, we also need to adjust the code on the server-side.
First, we need to add the corresponding route /upload-multiple-files
, and then use the upload.fields([{ name: “file” }]) middleware to handle multiple files. After that, the FormData data in request will be placed in ctx.files.file.

Demo:
Upload directory
Now let’s look at the steps to upload a directory.
Similarly to before, we need to set the attribute of the input element to this:
<input type="file" id="fileInput" webkitdirectory>Then when uploading the directory, the files object of input element will have the webkitRlativePath property, and we will also add them to the formdata

It should be noted here that when the file name contains \, koa-multer may make an error. To fix this, we need to replace \ with @ symbol.
formData.append('file', file, file.webkitRelativePath.replace(/\//g, "@"));
Then we also need to modify the corresponding server code:

Demo:

Conclusion
Well, we have analyzed the process of uploading a single file, multiple files, and directories in turn. It’s actually very simple, just 3 steps:
- Using the
inputelement to let the user select a file - Read the file and construct FormData
- Upload FormData with Axios
All the code is on GitHub, you can try it yourself. If you have any questions, you can leave a comment.
Due to the length of the article, the rest of the file uploading will be included in a later article. If you are interested in this content, you can follow me.
Thanks for reading.


