
A cloud dailies supercomputer workflow: rendering via DaVinci Resolve on an AWS P3dn.24xlarge EC2 instance
The future of cloud dailies has arrived
The COVID-19 pandemic has provided an opportunity to reexamine, rework, and reconfigure post-production workflows. The need for social distancing and working from home has changed the cost-benefit calculations for enterprises to adopt cloud technologies. Before the pandemic, ingesting media to the cloud for processing was relatively costly on two dimensions: time and money. Even under relatively ideal conditions, upload speeds for most Internet endpoints are, at most, just 1 Gbps, which can’t compare to industry-standard on-premises 10-GbE LANs. The ongoing variable costs for storage in the cloud also can’t really compare to the capital expenditure for on-premises NASs, switches, workstations, et cetera — these are mostly fixed costs.
The pandemic has added hefty costs to the on-premises, in-person IT infrastructure: health and safety risks of contracting the virus, and in much of the world, local laws enforcing quarantines that restrict in-person access to facilities.
S3 for data transfers across the Internet
Just about a month or so before the United States started locking down, I started running into undocumented download limits with Google Drive. While Google’s documentation does specify a maximum amount for uploads, at 750 GB per user per day, Google unpredictably throttles the amount of data that can be downloaded. Their own support representatives actually can’t specify what the download limit might be. I don’t think this is just because they’ve just been instructed to be opaque; I think it’s because they actually change it according to network conditions, so they really can’t say.
For an enterprise seeking to transfer large amounts of data across the Internet reliably, this is untenable. Though Google promises an unlimited amount of data storage for G Suite, throttling downloads unpredictably makes operational planning impossible.
I turned to AWS. AWS’s pricing is simply metered, proportional to the amount of data being uploaded, stored, and downloaded. There are certain fixed costs, but my oversimplified way of thinking about the pricing is: if I’m just transferring from one endpoint on the Internet in the United States into an S3 bucket, and then downloading from that S3 bucket to another endpoint on the Internet in the United States, I expect to pay just a bit more than $0.09 per GB of data. There are some storage costs as well, but those comprise just a tiny fraction of the cost to download.
Incidentally, uploading from the Internet to S3 is actually free — it’s the download that costs $0.09 per GB. This has big implications for online-offline workflows across geographic distances. Heavy original camera footage can be uploaded into S3 from one endpoint and loaded up into an EC2 instance, lightweight proxies can be rendered out inside the EC2 HVM, and then those lightweight proxies can distributed out to offline editors in multiple different cities.
So for a typical day of documentary shooting, a few hours of REDCODE might total something like 1 TB. Uploading to S3 via dedicated fiber from wherever production is occurring and then downloading via dedicated fiber to a post-production facility in a different city is comparable in cost to overnighting a hard drive.
AWS powers huge swaths of the Internet, but the tools tend to be designed for developers, not casual users. I found the AWS CLI quite powerful, but I had been warned that the aws s3 sync command suffers from some pretty severe quality of information problems: silent errors falsely showing huge data transfers as having successfully completed.
To ensure rock-solid end-to-end data integrity, I wrote some shell scripts that glue together the AWS CLI and Pomfort’s MHL tool. It works wonderfully — I have indeed caught some silent errors for transfers via aws s3 sync. But for the MHL tool, I wouldn’t have immediately noticed hundreds of GB missing.
There are some nice services that build point-to-point transfers on top of VPCs and/or S3 itself — they have GUIs and are designed for the casual user, but they’re more expensive than the AWS services themselves. I think of these services as “retail,” while the AWS services themselves are “wholesale.” Having a deeper understanding of AWS allows for significant cost savings that are simply inaccessible to casual users.
The sync command for S3 inside the AWS CLI functions very similarly to rsync, but it’s specific to S3. One great feature of the sync command, like rsync, is the ability to resume a transfer. If a transfer is interrupted, no time or money is wasted on items that have already been successfully transferred.
Moving data into and out of a bucket isn’t just a point-to-point transfer, though — the data is actually stored inside an S3 bucket, and this provides an opportunity to call up that data from the S3 bucket into an EC2 instance in the same availability zone, for free.
On-premises dailies workflows vs. cloud dailies workflows
I’ve long been an advocate for online-offline workflows, and using DaVinci Resolve, in particular, as a workflow tool to glue the whole process together.
A typical on-premises dailies workflow might look like this:
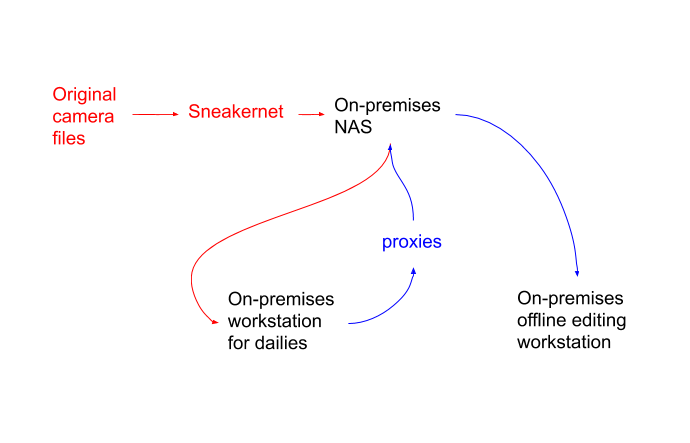
We ship the original camera files to the post-production facility, ingest to the NAS, process from a connected workstation, and make proxies available to other workstations on the NAS, or ship those proxies out to offline editors in different cities via external hard drives.
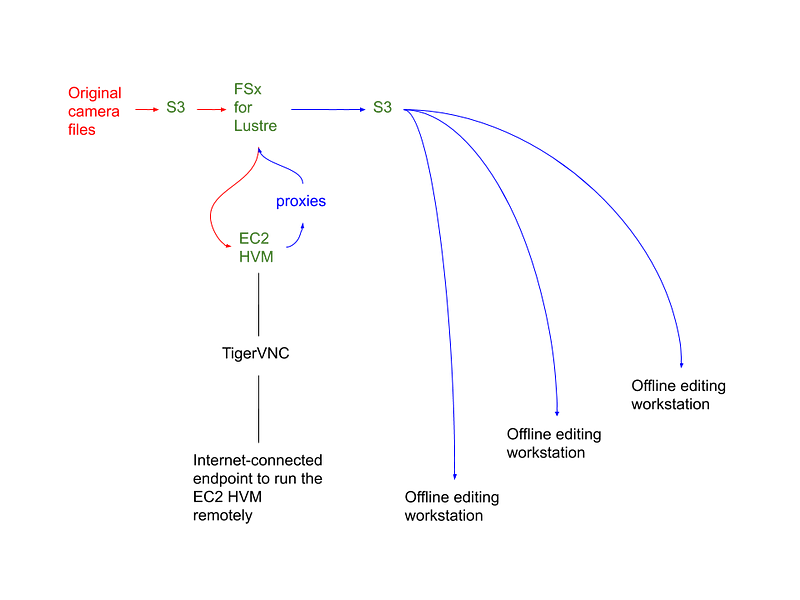
If we’re already uploading the data into an S3 bucket in an availability zone with powerful P3 GPU instances, then we can import that data into an FSx for Lustre filesystem and mount it to a P3 instance, render the dailies from DaVinci Resolve to the same filesystem, and then export those proxies back out to an S3 bucket:
One of the amazing things about this workflow is just how scalable it is. I’ve found that the aws s3 sync command from a us-east-1 bucket can easily saturate typical residential coaxial connections in the continental United States, up to 300 or 400 Mbps. For endpoints further around the world, S3 Transfer Acceleration provides astounding download speeds.
It’s no effort at all for multiple editors in different cities to just download the proxies. Instead of expending time and labor on loading up and shipping shuttle drives to each editor, and then having those editors ingest from each shuttle drive to their local editing RAIDs, editors can just download the proxies to their editing RAIDs directly from S3. It costs $0.09 per GB to download data from an S3 bucket to the Internet, or even less if all users on the AWS account are cumulatively downloading more than 50 TB for the month.
DaVinci Resolve on CentOS Linux
Because I’m a big believer in running DaVinci Resolve on Linux, because license keys can be used without physical dongles, and because Linux dominates the cloud market share, it only made sense to run DaVinci Resolve on CentOS on the EC2 instance.
AWS does indeed provide Windows HVMs, but due to licensing costs, they’re more expensive.
Preparing the project locally to render in the cloud
Figure 2 above isn’t quite complete.
Although:
- Amazon has instructions for adding a MATE GUI to an Amazon Linux 2 AMI and accessing via TigerVNC; and
- Amazon Linux 2 has an AMI with Tesla NVIDIA drivers preinstalled;
DaVinci Resolve is only developed and tested on GNOME, on RHEL/CentOS. Although early versions of Amazon Linux were based on RHEL, it’s a fairly different distribution. Amazon Linux 2 still has the yum package manager, yet Amazon employees insist that it’s not downstream of any one particular distribution.
I didn’t want to go on a wild goose chase tracking down packages in Amazon Linux 2 that might be required for DaVinci Resolve, so I just used the official CentOS AMI.
The instructions for accessing MATE via TigerVNC on Amazon Linux 2 can actually be adapted for GNOME on CentOS, but there’s a big hitch for the digital dailies process in DaVinci Resolve: TigerVNC can’t transmit sound.
So my workflow more closely resembles Figure 3:

In addition to the EC2 instance running DaVinci Resolve, I have two more VPSs:
- An Ubuntu instance serving up a Wireguard VPN
- A CentOS instance running as a PostgreSQL 9.5 server
Algo is a wonderful set of Ansible scripts that automates the setup of a VPS as a VPN server. For my cloud VPN, I deployed Wireguard, which Linus Torvalds loves and recently merged into the mainline Linux kernel — not that this matters much for CentOS 7, since RHEL/CentOS kernels and packages are deliberately ancient and only backported with security fixes.
Because TigerVNC can’t transmit sound, it’s necessary to download a copy of the original camera files and work with that media on a local workstation. Ensuring that a production sound mixer’s dual-system audio was jam synced correctly and/or manually syncing any dual-system audio with incorrect or missing timecode would be impossible without hearing sound. Perhaps there are better VNC solutions out there that can transmit sound perfectly in sync, but that’s an issue to work out for another day.
It’s not just TigerVNC’s lack of sound that necessitates downloading the original camera files — as far as I know there’s no good way to send the output of a DeckLink through the Internet to another endpoint. Using DaVinci Resolve’s viewer in its GUI isn’t sufficient for truly accurate and precise color correction for dailies. A DeckLink must be used to bypass any color management that the OS might be doing, and the DeckLink’s output must be fed out to a calibrated monitor.
Aside from the lack of sound and lack of a DeckLink, there are a couple of other weird hiccups with operating DaVinci Resolve in the cloud:
- Even if the project frame rate, timeline frame rate and all media are set to 23.976p, I noticed that media plays on the Media page, Edit page, and Color page, up at much higher frame rates, around 120 fps. It weirdly speeds up the footage, and given how powerful the instance is, it doesn’t choke — but it’s definitely incorrect to play the frames faster than the rate at which they’re supposed to play.
- I noticed that the Viewer across the different pages just displays a blank, black screen a lot. The renders out are fine, but getting the Viewer to show a frame properly often means dragging the CTI back and forth across a clip a few times. It’s pretty weird.
Now, it would technically work to prepare a project in a local DaVinci Resolve database, either disk or PostgreSQL, export a .drp file, upload the .drp file to the EC2 instance via scp, and then import it into the disk or PostgreSQL database that’s “local” to the EC2 instance, but .drps don’t retain jobs in a Render Queue, so all timelines would need to be queued up in the EC2 instance. With on-demand pricing for a powerful GPU instance, that’s valuable time on the clock, so there’s a more elegant, cost-effective way.
Rather than wasting time queuing up the timelines on the Deliver page with the EC2 instance running, I:
- Put another VPS running PostgreSQL 9.5 into the VPN;
- Put the local workstation into the VPN;
- Put the EC2 instance into the VPN;
- Connected the local workstation in the VPN to the PostgreSQL server; and
- Connected the EC2 instance into the same PostgreSQL database.
With the project data in the PostgreSQL server, I queued up all the timelines in the Deliver page on the local workstation, closed the project, then opened up the same project in the EC2 instance, making sure the paths to the media were mapped between the local workstation and the mounted FSx for Lustre filesystem, and then rendered out the proxies.
In theory, one might think that with both the local workstation and the EC2 instance connected to the same PostgreSQL server inside the Wireguard VPN, it’d be possible to access collaborative workflow features or just use the EC2 instance as a remote render node. In practice, the DaVinci Resolve developers seem to know that users might try this, and for reasons that only they know, it just won’t work. I tried to play around with collaborative workflow and remote rendering, but when I tried to use either, I instantly saw an error message:
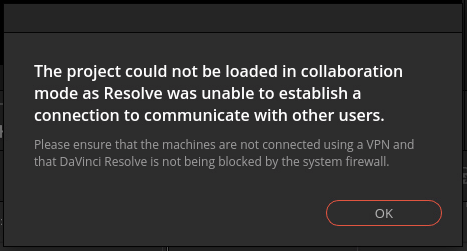
Still, the jobs in the Render Queue can be saved in the PostgreSQL database, so the workflow that saves time with the EC2 instance running is just to queue up the jobs on the local machine, save and close the project, and then pop open the same project from the database from within the EC2 instance.
Tesla drivers are not GeForce drivers
At first, I configured my CentOS HVM pretty much identically to how I configure CentOS on bare metal.
The last hardware selection and configuration guide for DaVinci Resolve is from the 15 Public Beta, and recommends some consumer-grade GeForce cards or workstation-grade Quadro cards, but makes no mention of data center Tesla cards.
I didn’t realize what I was doing at first, and installed the GeForce drivers from ELRepo. Amazingly, even though the P3 HVM was running Tesla V100s, the GeForce drivers from ELRepo did allow Resolve to launch and run, albeit with some issues. I found that in DaVinci Resolve Studio 16.2.1, trying to deBayer and decode R3D files with just those GeForce drivers on the V100s didn’t really work — something in the GPU pipeline would show about 50% of all the source media frames as gibberish purple and green GPU noise instead of the actual image — this was in both the Viewer and in the rendered media. With just those GeForce drivers installed, I could still opt to decode the R3D files on the CPU, which would show the frames OK, but the render speeds were only about half as fast as when decoding via the GPUs. The point of a P3 instance is to take advantage of all its GPU power, so this didn’t seem right.
Then I realized that the GeForce driver doesn’t list the V100 as a supported product, and that the V100 actually has a different driver.
ELRepo doesn’t package that Tesla driver, but it’s not too difficult to get the driver installed for CentOS. NVIDIA’s documentation was written for RHEL, with references to some RHEL-specific repositories that don’t exist on CentOS, so those must be ignored. The NVIDIA documentation also has some weird typos, like $ sudo yum sudo yum clean expire-cache.
Anyway, it turns out that Resolve can run fine on the V100s with the correct Tesla drivers, which isn’t that surprising, since it’s the same version of CUDA, 10.2, and the data center V100 card has the same GV100 chip as in the workstation Quadro GV100, which is recommended in the hardware selection and configuration guide. There’s a small snag with this Tesla driver though: Resolve needs the libOpenCL.so.1 library, but looks for it in /usr/lib64. The GeForce drivers from ELRepo seem to put that into the right spot, but this Tesla driver directly from NVIDIA installs that library into /usr/local/cuda-10.2/targets/x86_64-linux/lib. Actually, it’s a symlink to libOpenCL.so.1.1, which I guess is backwards-compatible.
Anyway, Resolve just needs that symlink to /usr/lib64, which is as simple as running:
$ sudo ln -s /usr/local/cuda-10.2/targets/x86_64-linux/lib/libOpenCL.so.1 /usr/lib64/libOpenCL.so.1Performance
So, with the correct Tesla drivers installed to a P3dn.24xlarge instance, and with DaVinci Resolve Studio 16.2.1 set to deBayer and decode R3D on those eight Tesla V100s, I rendered out some 5K R3D files to 5K DNxHR LB MXF OP1a proxies at sustained speeds hovering between 140–160 fps. I realize that encoding to DNxHR LB doesn’t take advantage of the GPUs, but the P3dn.24xlarge instance has 96 vCPUs of AWS-custom Intel® Xeon® Scalable (Skylake) processors running at 3.1 GHz sustained all-core Turbo, all built atop the AWS Nitro System, so even encoding on the CPUs is pretty stunning.
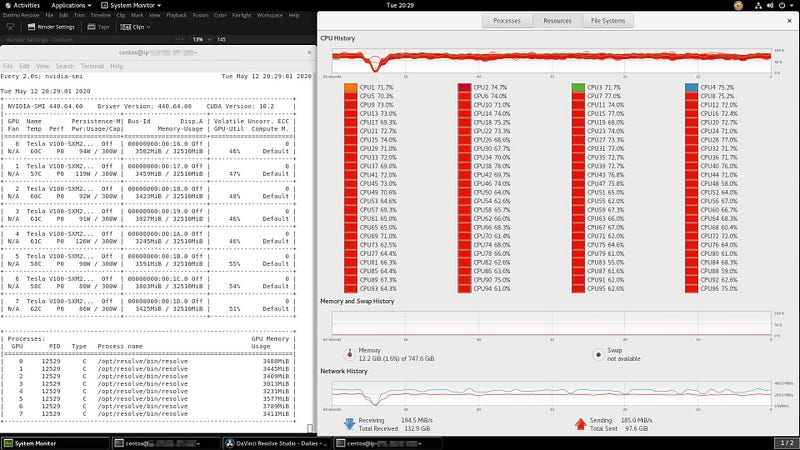
Using NVENC to render to 1080p 4 Mbps HEVC gave me speeds around 180 fps.
Compared to a reference on-premises HP Z workstation with an Intel® Xeon® Gold 6136 and a GeForce GTX 1080 Ti, this is more than six times as fast!
It does seem like performance scales with the number of GPUs, though Resolve doesn’t take advantage of all the VRAM — at least not with just a simple transform from IPP2 RedWideGamutRGB/Log3G10 to Rec. 709/2.4. Perhaps it’d be interesting to see how this instance would perform with heavy noise reduction nodes or elaborate Fusion comps.
The next few times that this dailies workflow is appropriate for my projects, I might try p3.16xlarge and p3.8xlarge instances, just to try to get a sense of whether DaVinci Resolve might be just as fast with fewer GPUs and fewer vCPUs. Where are the diminishing returns? How much performance is DaVinci Resolve really squeezing out of a P3dn.24xlarge?
In-depth workflow
So all of this sounds great, Seth. Tell me how to do it!
IAM user with permissions
First, make sure that the IAM user has permission to access:
- S3
- EC2
- FSx
Create an EC2 instance
For harnessing all the GPU power that AWS has to offer, you can use a P3dn.24xlarge. Before you really understand the process in-depth though, you may want to practice this entire workflow with a lesser powered instance like a p3.2xlarge, with just one V100, so that you’re not on the clock with the P3dn.24xlarge’s expensive per-hour pricing. If you have a relatively new AWS account, but you want to try a P3dn.24xlarge, you might need to put in a support ticket so that AWS can check in with you and make sure that you really understand what you’re doing, so that you don’t accidentally spend a lot of money.
From the AWS Marketplace, search for the official CentOS 7 HVM image.
Install the SSH key with proper permissions
For a macOS or Linux client, take the .pem file, chmod it to 400, and mv it to ~/.ssh. The default name of the key on a macOS client would be id_rsa.
The default username for the CentOS image is centos, so you should be able to ssh in with:
$ ssh centos@publicIPv4addressUpdate to the latest version of CentOS 7
Update to the latest version of CentOS 7 and reboot:
$ sudo yum update
$ sudo reboot
Install GNOME
Amazon’s instructions for installing MATE to Amazon Linux 2 and accessing via TigerVNC can be adapted for GNOME on CentOS 7.
First, install GNOME:
$ sudo yum groupinstall "GNOME Desktop"Then, reboot:
$ sudo rebootInstall TigerVNC:
$ sudo yum install tigervnc-serverConfigure a VNC-specific password containing 6 to 8 characters for this user. When asked if you want to enter a view-only password, press n:
$ vncpasswdStart the VNC Server on display number 1:
$ vncserver :1To always start the VNC Server at boot, create a new systemd unit
$ sudo cp /lib/systemd/system/[email protected] /etc/systemd/system/[email protected]vim into /etc/systemd/system/[email protected] and replace all occurrences of <USER> with the actual username of centos, and then write and close the file.
Reload the systemd manager configuration:
$ sudo systemctl daemon-reloadEnable the service:
sudo systemctl enable vncserver@:1Start the service:
sudo systemctl start vncserver@:1Download and install TigerVNC on the local machine.
For Linux or macOS, SSH to connect to your instance while creating a tunnel to forward all traffic on local port 5901 to the instance’s VNC server:
$ ssh -L 5901:localhost:5901 -i ~/.ssh/id_rsa centos@IPv4addressI noticed in the transition from CentOS 7.7 to 7.8 that GNOME Classic, which is enabled by default in CentOS 7, had a few weird bugs. On a local workstation, you’d be able to select GNOME instead of GNOME Classic on the login screen, but you can’t access a login screen via TigerVNC, so instead, you need to adjust a setting for TigerVNC to select GNOME upon connecting.
On the instance, vim into ~/.vnc/xstartup. Then comment out the line /etc/X11/xinit/xinitrc with # so that it reads:
#/etc/X11/xinit/xinitrcRight underneath that line, add in a new line that reads:
/usr/bin/gnome-sessionWrite and close the file, reboot the instance, and then reconnect.
Install the kernel development headers
$ sudo yum install "kernel-devel-uname-r == $(uname -r)"Install EPEL
$ sudo yum install https://dl.fedoraproject.org/pub/epel/epel-release-latest-7.noarch.rpmInstall DKMS
$ sudo yum install dkmsInstall the Tesla driver for the V100(s):
Install the CUDA repository public GPG key.
$ distribution=$(. /etc/os-release;echo $ID`rpm -E “%{?rhel}%{?fedora}”`)Setup the CUDA network repository:
$ ARCH=$( /bin/arch )
$ sudo yum-config-manager --add-repo http://developer.download.nvidia.com/compute/cuda/repos/rhel7/${ARCH}/cuda-rhel7.repo
Update the repository cache and install the driver using the nvidia-driver-latest-dkms meta-package.
$ sudo yum clean expire-cache
$ sudo yum install -y nvidia-driver-latest-dkms
Reboot the instance:
$ sudo rebootVerify that the Tesla driver is correctly installed by checking:
$ nvidia-smiInstall libOpenCL.so library and create symlink
For the version of CUDA you’ve installed, which you can see by running $ nvidia-smi, go find out which libOpenCL.so library matches your CUDA version, by running:
$ yum provides '*/libOpenCL.so'Then use yum to install the libOpenCL.so package that matches your installed version of CUDA.
Create a symlink for the libOpenCL.so.1 library:
$ sudo ln -s /usr/local/cuda-10.2/targets/x86_64-linux/lib/libOpenCL.so.1 /usr/lib64/libOpenCL.so.1Create a user password
$ sudo passwd centosAfter setting the password, reboot:
$ sudo rebootInstall libGLU.so.1 library
$ sudo yum install mesa-libGLUReboot:
$ sudo rebootInstall and register DaVinci Resolve
Download and extract DaVinci Resolve Studio from the Blackmagic Design website. Double-click the .run file to use the GUI installer. Run DaVinci Resolve Studio, and enter a valid license key.
Ingest data from an Internet-connected endpoint to an S3 bucket
For data integrity, I recommend my shell script, S3 xxHash Transfer, to ingest original digital files into an S3 bucket.
Import the footage from S3 to FSx for Lustre, and mount the FSx for Lustre filesystem to the EC2 instance
Create a Scratch 2 filesystem with plenty of capacity for however much data you need to import from S3, and specify which bucket you want to import your data.
Make sure to add the same VPC security group as the EC2 HVM running DaVinci Resolve Studio.
Install the Lustre client on the EC2 instance.
Install the Amazon FSx rpm public key:
$ sudo wget https://fsx-lustre-client-repo-public-keys.s3.amazonaws.com/fsx-rpm-public-key.asc -O /tmp/fsx-rpm-public-key.ascImport the key:
$ sudo rpm --import /tmp/fsx-rpm-public-key.ascAdd the repository and update the package manager:
$ sudo wget https://fsx-lustre-client-repo.s3.amazonaws.com/el/7/fsx-lustre-client.repo -O /etc/yum.repos.d/aws-fsx.repoSet up VPC rules for FSx.
Mount the Lustre filesystem.
Preload the entire directory for the data that had been imported from the S3 bucket:
$ nohup find local/directory -type f -print0 | xargs -0 -n 1 sudo lfs hsm_restore &Set up a Wireguard VPN with Algo
Algo from Trail of Bits is a great set of Ansible scripts that makes it easy to set up a Wireguard VPN in the cloud.
It’s beyond the scope of this article to explain in-depth how to use Algo, but I have a few tips.
Use an Ubuntu 18.04 LTS instance in Lightsail with its own static IP, and run Algo “locally” to the instance, using the same static IP, instead of having it create a second instance for the VPN server. If you find that you’re spending too much time up in the burstable zone, you can snapshot the instance, and use the snapshot to clone the instance into a larger instance. Lightsail instances are just rebranded T2 EC2 instances, but how burstable credits are accrued and spent is notoriously confusing. If you see performance tank, and you notice that you’ve spent a lot of time in the burstable zone, consider creating a snapshot, cloning to a beefier instance, and then moving the same static IP address over to the new instance.
Set up a PostgreSQL server on another Lightsail instance running CentOS 7
Again, it’s beyond the scope of this article to explain how to set up a PostgreSQL server from scratch, but you can adapt my guide for how I do it on bare metal.
Poke a hole through the Wireguard interfaces on the different VPSs to allow SSH traffic through Port 22
For both the CentOS EC2 instance running DaVinci Resolve Studio and the other CentOS Lightsail instance running the PostgreSQL server, it’s necessary to allow traffic through Port 22 on each Wireguard interface. Before running wg-quick up to activate wg0 for each instance, you’ll have to tweak /etc/iproute2/rt_tables, sysctl.conf, and each wg0.conf file in /etc/wireguard.
After you allow SSH traffic through Port 22, you’ll be able to use TigerVNC to access the EC2 instance running DaVinci Resolve Studio, and put it into the Wireguard VPN. You can also put the PostgreSQL server into the Wireguard VPN, and still retain SSH access to to perform management tasks, patch as necessary, etc.
Send keepalive packets for PostgreSQL traffic
One other thing you have to do for the EC2 instance to be able to consistently access the PostgreSQL server through the Wireguard interface is to send keepalive packets persistently, given that the EC2 instance uses NAT. So in the [peer] section of the wg0.conf file, you should add the line:
PersistentKeepalive = 25Add a local workstation into the Wireguard VPN
Install another .conf file generated from the Algo VPN server to a local workstation running DaVinci Resolve Studio to bring it into the Wireguard VPN.
Connect the local workstation and the DaVinci Resolve Studio EC2 instance to the PostgreSQL server in the VPN.
Download the original digital files to the local workstation
Use S3 xxHash Transfer to download the original digital files to the local workstation.
Organize media, sync audio, color correct, queue sequences
Use the local workstation to organize the original digital files, sync external audio, color correct, and queue jobs into the Render Queue.
Organize the media on the FSx for Lustre filesystem so that all the directories and file paths match the storage on the local workstation. The top-level directories might have different names, so those media paths should be mapped in DaVinci Resolve on the EC2 instance and on DaVinci Resolve on the local machine.
Inside the PostgreSQL database in the VPN, queue up the jobs into the Render Queue on the Deliver page. Close the project on the local workstation and open the project on the EC2 instance.
Render the proxies
If you have a powerful P3 instance, be sure to configure all of the available GPUs, and, depending on your media, if you have BRAW or R3D, configure the GPUs to decode and deBayer on the GPUs.
Export from FSx for Lustre back to S3
After the proxies are done rendering, but before exporting the proxies back out to S3, it may be wise to seal the directory of proxies with the MHL tool. Then, use the FSx interface in the AWS Management Console to export the particular directory of proxies out to S3.
Download the proxies from endpoints on the Internet
Download the proxies from endpoints on the Internet with the S3 xxHash Transfer scripts.
So as not to waste money, stop the EC2 instance and delete the FSx for Lustre filesystem. Optionally, create an AMI from the stopped EC2 instance, saving all the time of of installing and configuring the NVIDIA drivers, DaVinci Resolve Studio, the Lustre client, MHL tool, etc.
Voilà! You’ve ingested footage from anywhere in the world, processed those dailies at astounding speeds, and easily transferred offline editing proxies to collaborators anywhere in the world!
Why did I use Lightsail?
Admittedly, I only started with the Algo-generated VPN server and the PostgreSQL server on Lightsail because I wasn’t yet quite familiar with EC2, which for a newbie, can be a bit overwhelming. Later, I might switch the Wireguard server and the PostgreSQL server over to EC2, which will allow for more fine-tuned control and configuration.
Why did I use TigerVNC?
I only used TigerVNC because I was adapting the AWS instructions for MATE on Amazon Linux 2. The big limitation is that TigerVNC can’t transmit sound.
In the future, with budgets permitting, I may try to use Teradici PCoIP, which can indeed send stereo sound, but it requires additional licensing costs.
What about using GCP?
I realize that I could probably accomplish most or all of what I’ve described here with GCP instead of AWS, but I haven’t yet looked into it. Of course I’m interested in checking out the offerings of a competitor to see if it might be easier, faster, more powerful, or more cost-effective. I fully intend to play around with GCP soon.
The future is here
While this workflow definitely takes a fair amount of technical knowledge, time, and the patience to glue everything together, it’s a great proof of concept for the very near future. Bandwidth to Internet endpoints is only going to increase, especially with 5G rapidly being deployed. Look for more out-of-the-box solutions from companies like BeBop Technology, and others. We’re coming full circle, back to dumb terminals, with the cloud as our mainframe.
Edited on May 31st, 2020 to add a tip about persistent keepalive packets for accessing PostgreSQL traffic through the Wireguard interface on the EC2 instance.
Edited on June 12, 2020 to fix the URL of NVIDIA’s Tesla repository.
Edited on June 14, 2020 to eliminate redundant steps for installing the kernel development headers, and to add instructions for installing libOpenCL.so.


