
Use Chrome Extension To Develop Frontend Applications — Vite App and Create React App
A step by step guide from Hello World Extension to extensions that serve UI code from a local build
Introduction
Software development is complicated. Before writing any code, it may take some time and effort to set up working environment for enterprise applications that are deployed on virtual machines, containers, etc. Also, there are Single Sign On (SSO), Backend For Frontend (BFF) API service, and many things to be taken care of.
Is there a way to simplify the process?
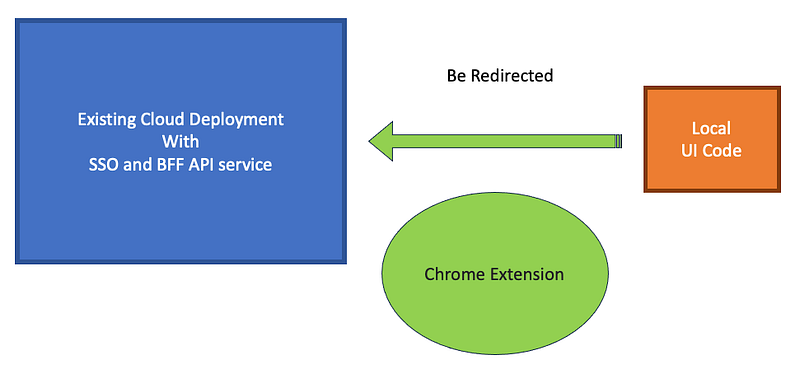
Yes, a Chrome extension may help. It can take advantage of an existing cloud deployment, while serving the UI code from a local build. This approach is illustrated by the graph above, where we can develop/debug the UI code in a “fake” cloud deployment. It works efficiently for both Vite App and Create React App.
In this article, we will take a look at five Chrome extensions:
Hello World Extension: It illustrates how a Chrome extension works.Block Extension: It illustrateschrome.declarativeNetRequest’s capability to block certain types of network requests.Redirect Extension: It illustrateschrome.declarativeNetRequest’s capability to redirect certain types of network requests.vite-dev-tool: It serves the Vite App code from the local build in a “fake” cloud deployment.cra-dev-tool: It serves the Create React App code from the local build in a “fake” cloud deployment.
Hello World Extension
Chrome extensions are software programs built on web technologies to customize the Chrome browsing experience. Typically, HTML, CSS, and JavaScript are used to develop Chrome extensions.
Chrome extensions can improve productivity, enrich webpage content, and aggregate information. Chrome Web Store has listed various types of extensions.
Hello World Extension is a simple extension that illustrates how a Chrome extension works.
Although there is no restriction on file locations, they are usually grouped in a directory. Among all files, only manifest.json is required. It must be placed in the root directory.
Hello World Extension is structured as follows:
hello-world
├── hello.png
├── hello.html
└── manifest.json
Load the extension
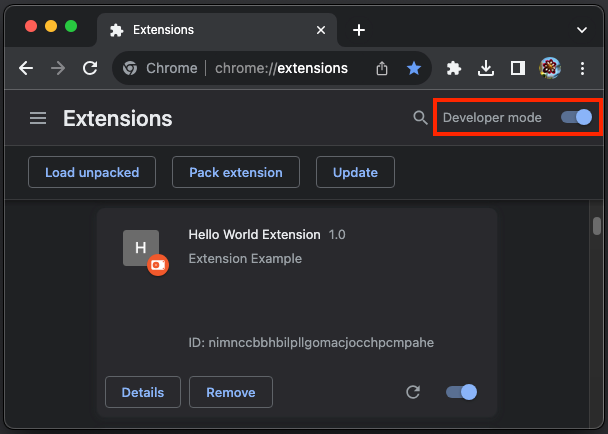
Go to the URL chrome://extensions/, and turn on the switch Developer mode:
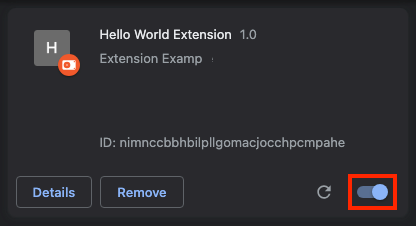
Click the button Load unpacked, and select the directory hello-world to load the extension. After it is loaded, the extension can be enabled or disabled by the switch in the lower-right corner.
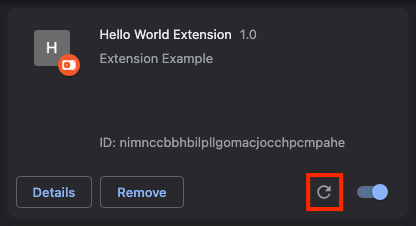
The loaded extension can be updated by clicking the reload button:
Extension files
Hello World Extension includes three files, hello.png, hello.html, and manifest.json:
hello.png: It is an icon that can be positioned at extension bar.

This is how it looks like on the actual bar:
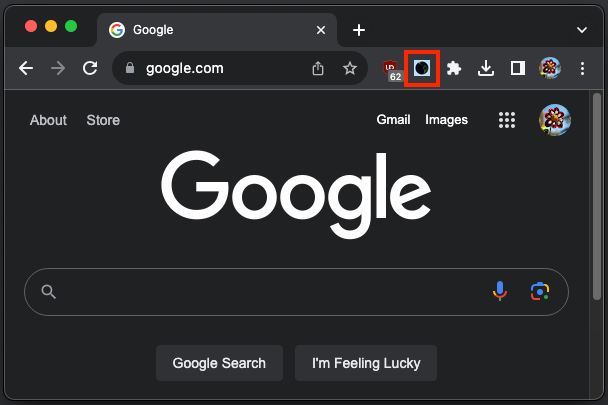
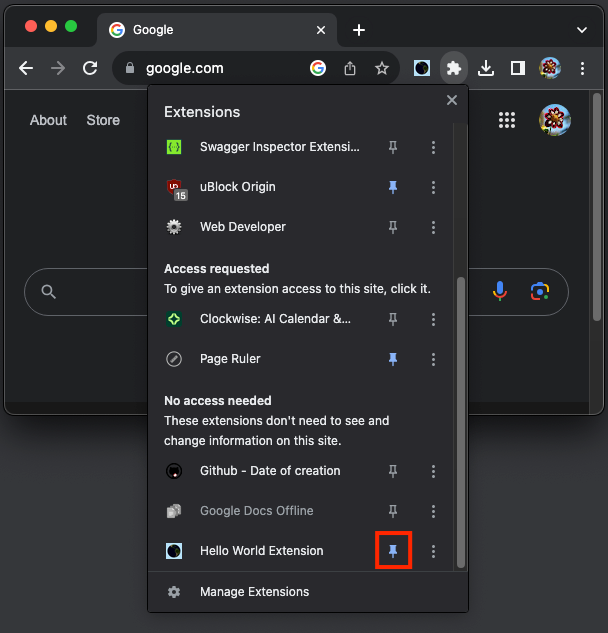
In order for the icon to show up, the extension needs to be pinned:
hello.html: It is the HTML file to be rendered when the icon is clicked.
<html>
  <body style="width: 150px; height: 30px">
    <h1>Hello World!</h1>
  </body>
</html>manifest.json: It is the JSON object that describes the extension’s capability and configuration.
{
  "name": "Hello World Extension",
  "description": "Extension Example",
  "version": "1.0",
  "manifest_version": 3,
  "action": {
    "default_popup": "hello.html",
    "default_icon": "hello.png"
  }
}
manifest.json provides the extension’s name, description, and version. It follows Manifest V3 (MV 3) to define a popup action that invokes hello.html, and the extension is identified by the icon hello.png.
MV3 has improved security, privacy, and performance, which is defined as follows:
{
  // Required
  "manifest_version": 3,
  "name": "My Extension",
  "version": "1.0.1",

  // Recommended
  "action": {...},
  "default_locale": "en",
  "description": "A plain text description",
  "icons": {...},

  // Optional
  "author": "[email protected]",
  "background": {...},
  "chrome_settings_overrides": {...},
  "chrome_url_overrides": {...},
  "commands": {...},
  "content_scripts": [{...}],
  "content_security_policy": {...},
  "cross_origin_embedder_policy": {...},
  "cross_origin_opener_policy": {...},
  "declarative_net_request": {...},
  "devtools_page": "devtools.html",
  "event_rules": [{...}],
  "export": {...},
  "externally_connectable": {...},
  "file_browser_handlers": [...],
  "file_system_provider_capabilities": {...},
  "homepage_url": "https://path/to/homepage",
  "host_permissions": [...],
  "import": [{...}],
  "incognito": "spanning, split, or not_allowed",
  "input_components": [{...}],
  "key": "publicKey",
  "minimum_chrome_version": "107",
  "oauth2": {...},
  "omnibox": {...},
  "optional_host_permissions": ["..."],
  "optional_permissions": ["..."],
  "options_page": "options.html",
  "options_ui": {...},
  "permissions": ["..."],
  "requirements": {...},
  "sandbox": {...},
  "short_name": "Short Name",
  "side_panel": {...},
  "storage": {...},
  "tts_engine": {...},
  "update_url": "https://path/to/updateInfo.xml",
  "version_name": "1.0 beta",
  "web_accessible_resources": [...]
}
Use the extension
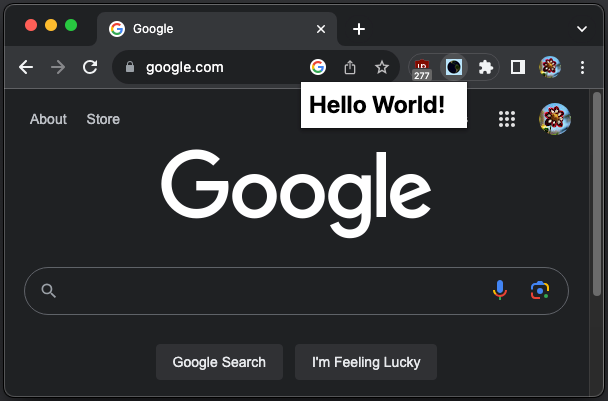
When the extension is enabled, clicking on the icon will display the content of hello.html: Hello World!
Block Extension
We build Block Extension to illustrate chrome.declarativeNetRequest’s capability to block certain types of network requests.
chrome.declarativeNetRequest API can be used to block or modify network requests by specifying declarative rules. The API allows an extension to modify network requests without intercepting them and viewing their content, thus providing more privacy.
Here is the file structure of Block Extension:
block-tool
├── background.js
└── manifest.jsonmanifest.json: It invokes a service worker,background.js, to listen to and handle browser events.
{
  "name": "Block Tool",
  "version": "1.0",
  "description": "Block certain types of network requests",
  "permissions": [
    "declarativeNetRequest"
  ],
  "background": {
    "service_worker": "background.js"
  },
  "manifest_version": 3
}
The extension needs to grant the permissions to use chrome.declarativeNetRequest API inside the service worker.
background.js: It blocks on all scripts from the domainreact.dev:
chrome.runtime.onInstalled.addListener(() => {
chrome.declarativeNetRequest.updateDynamicRules(
{
removeRuleIds: [1],
addRules: [
{
"id" : 1,
"priority": 1,
"action" : { "type" : "block" },
"condition" : {
"initiatorDomains" : ["react.dev"],
"resourceTypes" : ["script"]
}
}
],
},
);
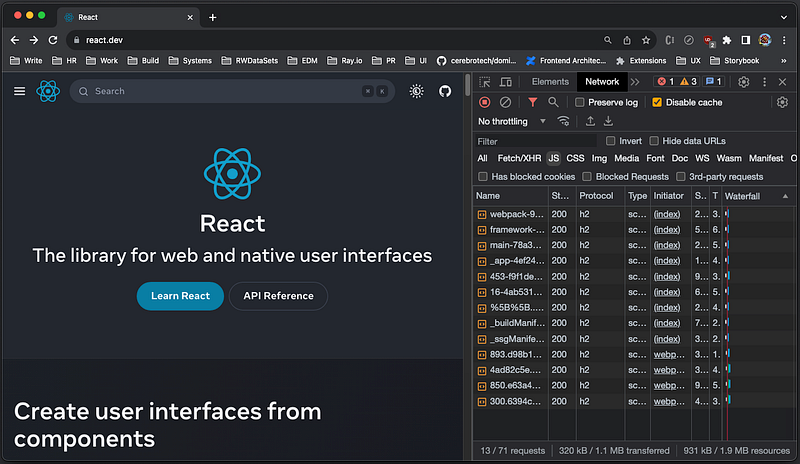
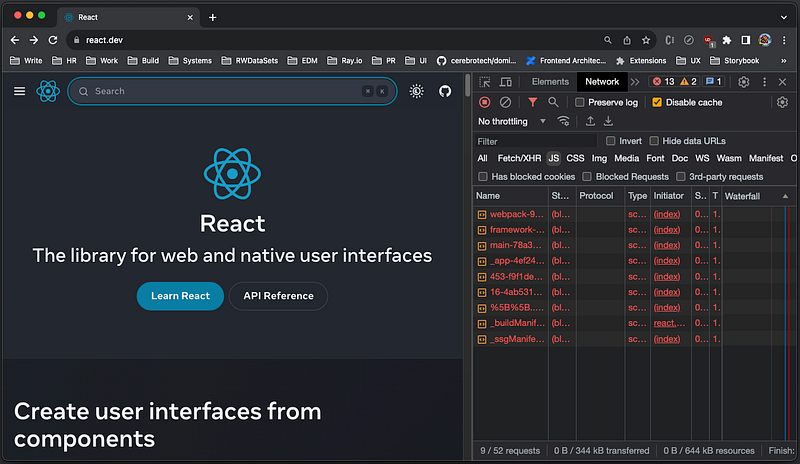
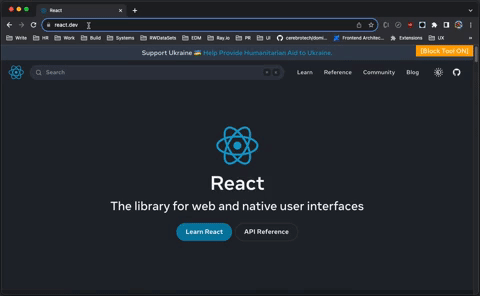
});Before scripts are blocked, the webpage react.dev displays properly.
After enabling the extension, all JavaScript files are blocked and the Search bar no longer works.
Change background.js to block all stylesheets from the domain react.dev:
chrome.runtime.onInstalled.addListener(() => {
chrome.declarativeNetRequest.updateDynamicRules(
{
removeRuleIds: [1],
addRules: [
{
"id" : 1,
"priority": 1,
"action" : { "type" : "block" },
"condition" : {
"initiatorDomains" : ["react.dev"],
"resourceTypes" : ["stylesheet"]
}
}
],
},
);
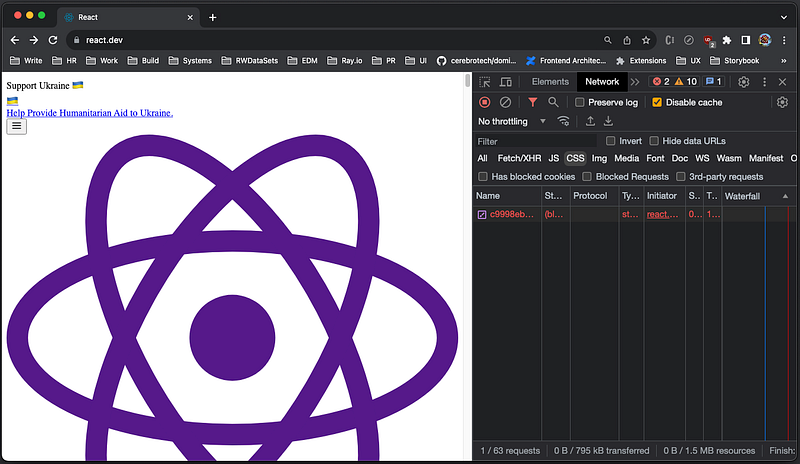
});After reloading the extension, all stylesheets are blocked and the website becomes styleless.
Further, change background.js to block main_frame, a document that is loaded for the top-level frame:
chrome.runtime.onInstalled.addListener(() => {
chrome.declarativeNetRequest.updateDynamicRules(
{
removeRuleIds: [1],
addRules: [
{
"id" : 1,
"priority": 1,
"action" : { "type" : "block" },
"condition" : {
"initiatorDomains" : ["react.dev"],
"resourceTypes" : ["main_frame"]
}
}
],
},
);
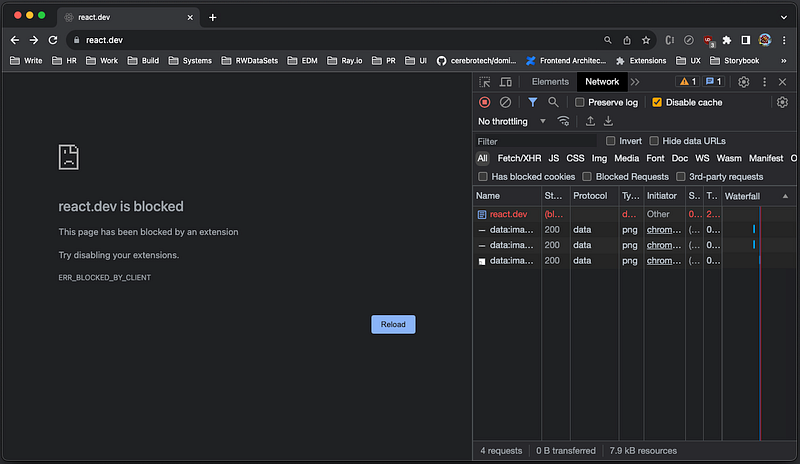
});After reloading the extension and reloading the page, the whole website is blocked.
Besides script, stylesheet, and main_frame, these are additional resource types: sub_frame(a document that is loaded for an embedded frame), image, font, object, xmlhttprequest, ping, csp_report, media, websocket, webtransport, webbundle, and other.
Block Extension is powerful to block a page, partially or fully. However, it could be nicer to have some visual indication that the page has been blocked. Add the content script content.js to achieve this goal. Generally speaking, a content script executes Javascript in the context of a webpage. It can also read and modify the DOM of the page that it is injected into.
Here is the updated file structure of Block Extension:
block-tool
├── icons
|   └── logo.png
├── background.js
├── content.js
├── popup.html
└── manifest.jsonmanifest.json: The configure file is added with two sections:content_scriptsandaction.
{
"name": "Block Tool",
"version": "1.0",
"description": "Block certain types of network requests",
"permissions": [
"declarativeNetRequest",
],
"background": {
"service_worker": "background.js"
},
"content_scripts": [
{
"matches": [
"*://*.react.dev/**"
],
"js": [
"content.js"
]
}
],
"action": {
"default_popup": "popup.html",
"default_icon": "icons/logo.png"
},
"manifest_version": 3
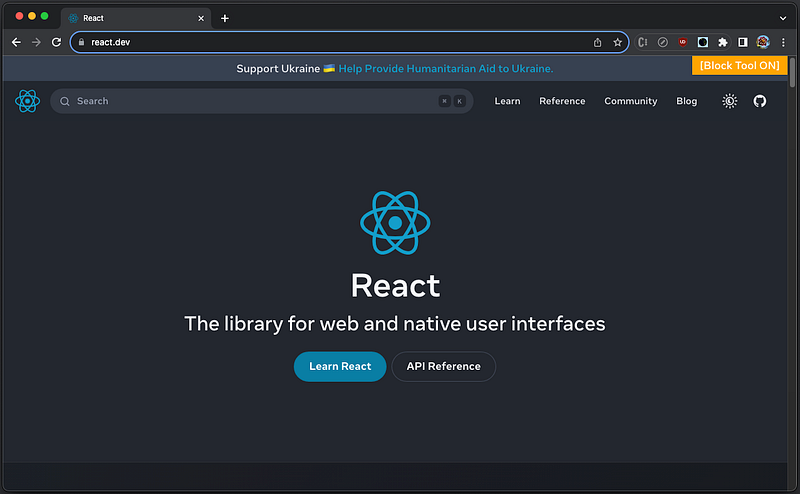
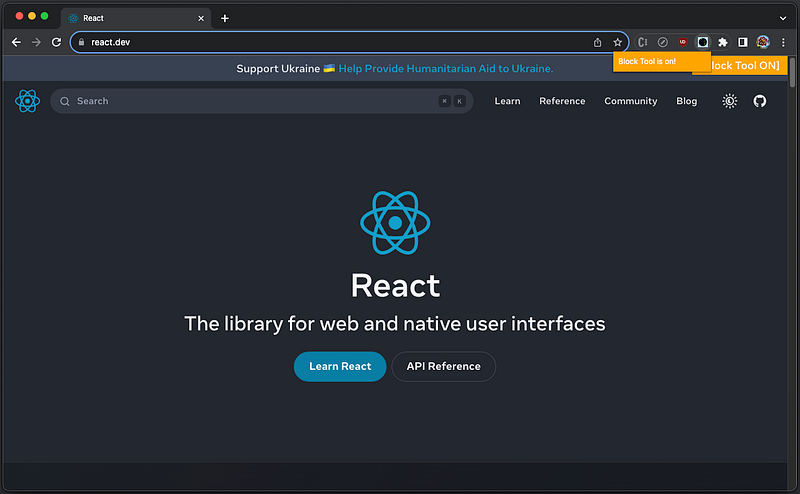
}content.js: It displays an orange label in the top-right corner.
const tooltip = '*** Something is blocked on this page ***';
const label = document.createElement('div');
label.style.cssText = 'position:fixed;top:0;right:0;background:orange;color:white;padding:0 12px;z-index:1000';
label.innerHTML = '[Block Tool On]';
label.setAttribute('title', tooltip);
document.body.appendChild(label);
Here is the screenshot:
popup.html: It is the document to be rendered, when the extension button is clicked.
<html>
  <body style="width:140px;height:16px;background:orange;color:white;">
    <p>Block Tool is on!</p>
  </body>
</html>
Here is the screenshot:
Redirect Extension
Besides blocking, chrome.declarativeNetRequest API can be used to redirect network requests by specifying declarative rules.
Here is the file structure of Redirect Extension:
redirect-tool
├── icons
|   └── logo.png
├── background.js
├── content.js
├── popup.html
└── manifest.jsonmanifest.json: The configure file is added with the sectionhost_permissions.
{
  "name": "Redirect Tool",
  "version": "1.0",
  "description": "Examples to redirect network requests",
  "permissions": [
    "declarativeNetRequest"
  ],
  "host_permissions": [
    "*://*.google.com/**",
    "*://react.dev/**"
  ],
  "background": {
    "service_worker": "background.js"
  },
  "content_scripts": [
    {
      "matches": [
        "*://*.google.com/**",
        "*://react.dev/**"
      ],
      "js": [
        "content.js"
      ]
    }
  ],
  "action": {
    "default_popup": "popup.html",
    "default_icon": "icons/logo.png"
  },
  "manifest_version": 3
}
chrome.declarativeNetRequest allows extensions to block and upgrade requests without any host permissions. However, host permissions are required if the extension wants to redirect requests or modify headers on requests or when chrome.declarativeNetRequestWithHostAccess is used instead of chrome.declarativeNetRequest.
According to MDN, host permissions in manifest.json are required for the request URL. For all requests, except for navigation requests (i.e., resource type main_frame and sub_frame), host permissions are also required for the request's initiators. The initiator of a request is usually the document or worker that has triggered the request. After trying on Chrome, we have found out that redirect needs both host permissions, even for main_frame and sub_frame. As an exception, localhost or 127.0. 0.1 does not require host permissions.
content.js: Text is updated for redirect.
const tooltip = '*** Something has been redirected on this page ***';
const label = document.createElement('div');
label.style.cssText = 'position:fixed;top:0;right:0;background:orange;color:white;padding:0 12px;z-index:1000';
label.innerHTML = '[Redirect Tool On]';
label.setAttribute('title', tooltip);
document.body.appendChild(label);popup.html: Text is updated for redirect.
<html>
  <body style="width:140px;height:16px;background:orange;color:white;">
    <p>Redirect Tool is on!</p>
  </body>
</html>backgound.js: The rules are updated for redirect.
chrome.runtime.onInstalled.addListener(() => {
  chrome.declarativeNetRequest.updateDynamicRules(
    {
      removeRuleIds: [1],
      addRules: [
        {
          "id" : 1,
          "priority": 1,
          "action" : {
            "type" : "redirect",
            redirect: {
              url: "https://www.google.com",
            },
          },
          "condition" : {
            "initiatorDomains" : ["react.dev"],
            "resourceTypes" : ["main_frame"]
          }
        }
      ],
    },
  );
});
When reloading https://react.dev/, it automatically redirects to https://www.google.com:
vite-dev-tool
It has been a long way from learning Hello World Extension to explore the capability of chrome.declarativeNetRequest API to block or redirect network requests.
Let’s build vite-dev-tool, a Chrome extension that serves the UI of Vite App from your local machine.
Here is the file structure, and the extension is located in this repository.
vite-dev-tool
├── icons
|   └── logo.png
├── background.js
├── content.js
├── popup.html
├── manifest.json
├── LICENSE
└── README.mdmanifest.json: It permits the service worker to callchrome.declarativeNetRequestAPI, and allows accessing the domaingithub.io.
{
  "name": "Vite Dev Tool",
  "version": "1.0",
  "description": "A Chrome browser extension tool for your Vite app",
  "permissions": [
    "declarativeNetRequest"
  ],
  "host_permissions": [
    "*://*.github.io/**"
  ],
  "background": {
    "service_worker": "background.js"
  },
  "content_scripts": [
    {
      "matches": [
        "*://*.github.io/**"
      ],
      "js": [
        "content.js"
      ]
    }
  ],
  "action": {
    "default_popup": "popup.html",
    "default_icon": "icons/logo.png"
  },
  "manifest_version": 3
}background.js: It includes the rules to redirect calls from the permitted hostgithub.iotohttp://127.0.0.1:5173, when loading scripts and stylesheets.
const RULES = [
  {
    "id" : 1,
    "action" : {
      "type" : "redirect",
      "redirect": {
        "url": "http://127.0.0.1:5173/dist/assets/index.js",
      },
    },
    "condition" : {
      "urlFilter": 'index-*.js',
      "resourceTypes" : ["script"]
    }
  },
  {
    "id" : 2,
    "action" : {
      "type" : "redirect",
      "redirect": {
        "url": "http://127.0.0.1:5173/dist/assets/index.css",
      },
    },
    "condition" : {
      "urlFilter": 'index-*.css',
      "resourceTypes" : ["stylesheet"]
    }
  }
];

chrome.runtime.onInstalled.addListener(() => {
  chrome.declarativeNetRequest.updateDynamicRules(
    {
      "removeRuleIds": RULES.map(r => r.id),
      "addRules": RULES,
    },
  );
});
Clone the repository vite-react-router described in this article.
% git clone https://github.com/JenniferFuBook/vite-react-router.gitIn src/main.tsx, import the stylesheet file ./index.css:
import React from 'react';
import ReactDOM from 'react-dom/client';
import App from './App.tsx';
import './index.css';

ReactDOM.createRoot(document.getElementById('root')!).render(
  <React.StrictMode>
    <App />
  </React.StrictMode>
);
src/index.css is set to the following:
button {
  background-color: yellow;
}
Execute vite build to make the production build, and it generates the following files:
dist
└── assets
    ├── index-04490b11.css
    └── index-85113db5.js
index-[hash].css and index-[hash].js are generated bundles. To make redirect easier, we use rollup options to format file names without the hash. They are simply named index.js, index.css, and chunk.js (for code splitting). sourcemap is also set to true to map from the transformed source to the original source, enabling debugging.
Here is the modified vite.config.ts:
import { defineConfig } from 'vite';
import react from '@vitejs/plugin-react';

// https://vitejs.dev/config/
export default defineConfig({
  plugins: [react()],
  build: {
    sourcemap: true,
    emptyOutDir: true,
    rollupOptions: {
      output: {
        dir: 'dist/assets/',
        entryFileNames: 'index.js',
        assetFileNames: 'index.css',
        chunkFileNames: 'chunk.js',
        manualChunks: undefined,
      },
    },
  },
});
Execute yarn build again, and the generated bundle names no longer include hash.
dist
└── assets
    ├── index.css
    ├── index.js
    └── index.js.map
Execute yarn dev, and vite-react-router runs at http://127.0.0.1:4173/.
We can also execute yarn build -- --watch to update dist/assets/* dynamically.
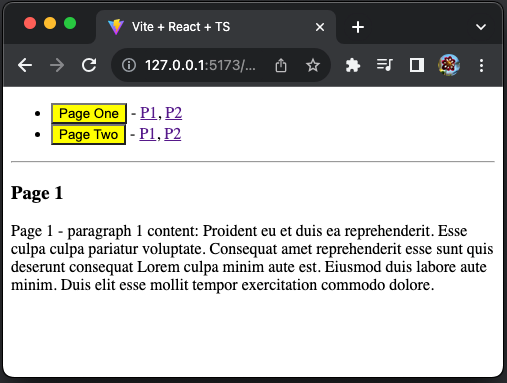
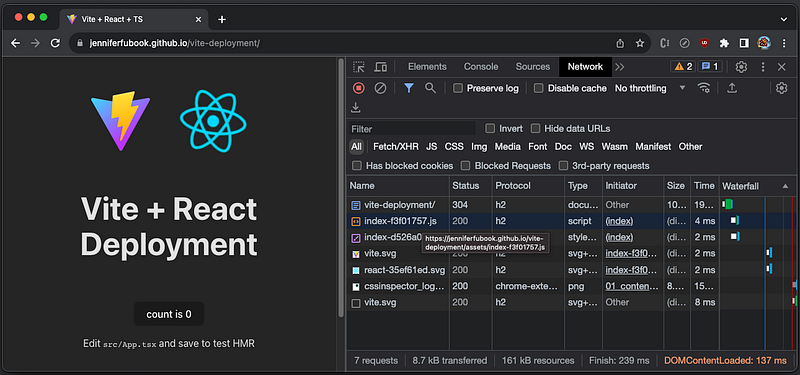
Go to a cloud deployment, such as https://jenniferfubook.github.io/vite-deployment/, where index-f3f01757.js is loaded from https://jenniferfubook.github.io/vite-deployment/assets/index-f3f01757.js.
Enable the extension that redirects calls from the permitted host github.io to http://127.0.0.1:5173, and reload the page. We can see the local code of vite-react-router is loaded, although the URL is still https://jenniferfubook.github.io/vite-deployment/.
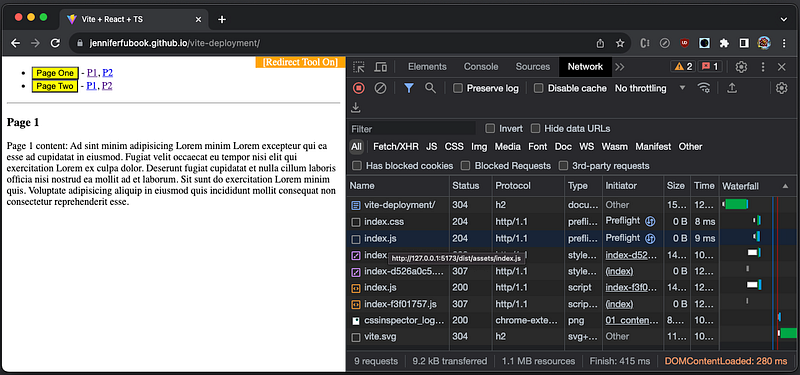
The inspect window also reveals that index.js is loaded from http://127.0.0.1:5173/dist/assets/index.js, via a HTTP 307 temporary redirect.
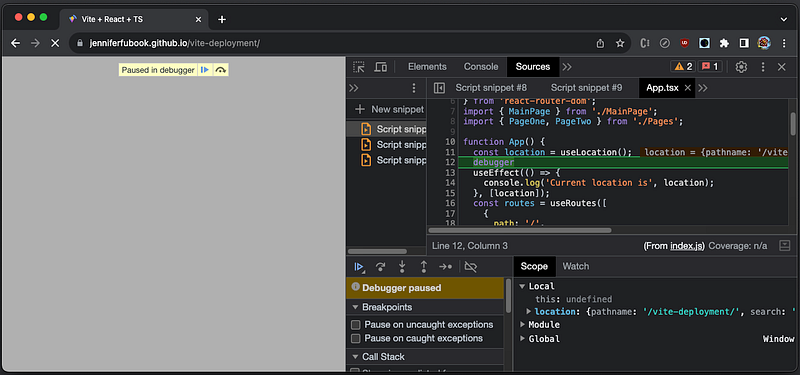
In addition, the source map works for debugging. We can use debugger to stop the execution of JavaScript, or directly set breakpoints at the source code App.tsx.
Isn’t this a convenient way to develop code at local?
It allows us to take advantage of the existing service on the cloud deployment, such as SSO, BFF API service, and many things come with it.
cra-dev-tool
We have shown how vite-dev-tool works. Why do we need another Chrome dev tool cra-dev-tool for Create React Applications?
Vite Applications use ES Modules (ESM), while Create React Applications use CommonJS (CJM) by default. They are not compatible unless changing Create React App’s index.html to use <script type="module" />, and something more.
The original CRA Chrome dev tool was created by Ayon Ghosh. It has been used for a number of years developing enterprise software. This approach has saved a lot of time and effort for professional UI developers.
Ayon’s dev tool was written with Manifest V2 (MV 2), which has been deprecated. The support for MV 2 will be removed in 2023.
We have enhanced cra-dev-tool using MV 3 in this repository, with the following file structure:
cra-dev-tool
├── icons
|   └── logo.png
├── background.js
├── content.js
├── popup.html
├── manifest.json
├── LICENSE
└── README.md
Here is manifest.json:
{
  "name": "CRA Dev Tool",
  "version": "1.0",
  "description": "A Chrome browser extension tool for your Create React App",
  "permissions": [
    "declarativeNetRequest"
  ],
  "host_permissions": [
    "*://*.myDomain.com/**"
  ],
  "background": {
    "service_worker": "background.js"
  },
  "content_scripts": [
    {
      "matches": [
        "*://*.myDomain.com/**"
      ],
      "js": [
        "content.js"
      ]
    }
  ],
  "action": {
    "default_popup": "popup.html",
    "default_icon": "icons/logo.png"
  },
  "manifest_version": 3
}
Obviously, you need to update myDomain.com with a real domain.
Here is background.js:
const localFEServer = 'http://localhost:8080';
const localWPServer = 'http://localhost:3000';

const RULES = [
  {
    id: 1,
    action: {
      type: 'redirect',
      redirect: {
        url: `${localFEServer}/static/js/bundle.js`,
      },
    },
    condition: {
      urlFilter: '/static/js/main.*.js',
      resourceTypes: ['script'],
    },
  },
  {
    id: 2,
    action: {
      type: 'block',
    },
    condition: {
      urlFilter: '/static/js/main.*.css',
      resourceTypes: ['stylesheet'],
    },
  },
  {
    id: 3,
    action: {
      type: 'redirect',
      redirect: {
        regexSubstitution: `${localFEServer}/static/js/\\2.chunk.js`
      },
    },
    condition: {
      regexFilter: "^(.*).myDomain.com\\/static\\/js\\/(.*).chunk\\.js",
      resourceTypes: ['script'],
    },
  },
  {
    id: 4,
    action: {
      type: 'redirect',
      redirect: {
        regexSubstitution: `${localWPServer}/assets/react/js/chunk.\\2.js`
      },
    },
    condition: {
      regexFilter: "^(.*).myDomain.com\\/assets\\/react\\/js\\/chunk.(.*)\\.js",
      resourceTypes: ['script'],
    },
  },
  {
    id: 5,
    action: {
      type: 'redirect',
      redirect: {
        url: `${localWPServer}/assets/react/js/ReactComponents.js`,
      },
    },
    condition: {
      urlFilter: '*.ReactComponents.js',
      resourceTypes: ['script'],
    },
  },
  {
    id: 6,
    action: {
      type: 'redirect',
      redirect: {
        url: `${localWPServer}/assets/react/css/ReactComponents.css`,
      },
    },
    condition: {
      urlFilter: '*.ReactComponents.css',
      resourceTypes: ['stylesheet'],
    },
  },
];

chrome.runtime.onInstalled.addListener(() => {
  chrome.declarativeNetRequest.updateDynamicRules({
    removeRuleIds: RULES.map((r) => r.id),
    addRules: RULES,
  });
});
This extension is for a CRA-based application with many rules that serves the code from two local servers: localFEServer and localWPServer. These rules need to be adapted for your application.
Similar to the Vite project, Create React App’s default build folder contains files whose name includes [hash].
% ls -lR build/static
total 0
drwxr-xr-x  4 jenniferfu  staff  128 Aug 16 21:18 css
drwxr-xr-x  7 jenniferfu  staff  224 Aug 16 21:18 js
drwxr-xr-x  3 jenniferfu  staff   96 Aug 16 21:18 media

build/static/css:
total 56
-rw-r--r--  1 jenniferfu  staff  10241 Aug 16 21:18 main.87c566e0.css
-rw-r--r--  1 jenniferfu  staff  15827 Aug 16 21:18 main.87c566e0.css.map

build/static/js:
total 4640
-rw-r--r--  1 jenniferfu  staff     4601 Aug 16 21:18 787.c2501704.chunk.js
-rw-r--r--  1 jenniferfu  staff    10597 Aug 16 21:18 787.c2501704.chunk.js.map
-rw-r--r--  1 jenniferfu  staff   571863 Aug 16 21:18 main.768f9e8a.js
-rw-r--r--  1 jenniferfu  staff     1917 Aug 16 21:18 main.768f9e8a.js.LICENSE.txt
-rw-r--r--  1 jenniferfu  staff  1776879 Aug 16 21:18 main.768f9e8a.js.map

build/static/media:
total 2312
-rw-r--r--  1 jenniferfu  staff  1183299 Aug 16 21:18 pdf.worker.min.a253bf00459936b55a4f.js
In order to make redirect work, we need to generate filenames without hash. This webpack doc explains on how to configure output filenames.
Also, optimization.chunkIds needs to be set to 'deterministic' — short numeric ids which will not be changing between compilation. It is good for long term caching, and enabled by default for production mode.
cra-dev-tool MV 3 functions as well as MV2. In addition, new rules are safer and have improved overall browser experience.
Conclusion
This is a step by step guide from Hello World Extension to extensions that illustrate chrome.declarativeNetRequest’s capability, to some real dev extensions that serve UI code from a local build.
It allows us to take advantage of the existing service on the cloud deployment, such as SSO, BFF API service, and many things come with it.
This approach has been used for a number of years developing enterprise software. It has saved a lot of time and effort for professional UI developers.
Thanks for reading!
Thanks, S Sreeram and team, for working with me on Domino products.
Want to Connect?

If you are interested, check out my directory of web development articles.
In Plain English
Thank you for being a part of our community! Before you go:
- Be sure to clap and follow the writer! 👏
- You can find even more content at PlainEnglish.io 🚀
- Sign up for our free weekly newsletter. 🗞️
- Follow us on Twitter, LinkedIn, YouTube, and Discord.


