
8 minutes to cover 99% of your Git needs
A simpler path to Git and understanding main concepts
If you like to experience Medium yourself, consider supporting me and thousands of other writers by signing up for a membership. It only costs $5 per month, it supports us, writers, greatly, and you get to access all the amazing stories on Medium.

“What are all these commands?” “How many hours will it take me to learn them all?” “In what order should I use them?”
If those questions sound familiar, you’ve come to the right place.
Git can be very frustrating and difficult to grasp, and the amount of information available on the Internet makes it even more overwhelming.
We all went through this pain of dealing with Git and being plunged into a black hole from which we can’t escape, and we feel that nobody can save us from the mess we created. We are here not to teach you how to get back on your feet in every difficult Git situation (it could take way more than 8 minutes), but rather to give you the right way to do Git and avoid all the pitfalls that could lead you to failure at the first place. Prevention is always better than cure.
In this tutorial, we’ll walk through the standard project path with the issues that arise and give you the solution to the efficient push of your work on GitHub/GitLab.
Synchronizing Local & Remote
First of all, we need to synchronize our local computer with a remote Git project.
In most companies, you will work on an already built Git project, either because a team created for you the company-certified Git template, or you are assigned to improve an existing project. We also assume that you have an established SSH connection between your computer and GitHub/GitLab.
If that is not the case, I suggest you create the repository with the Graphical User Interface of GitHub/GitLab and create and associate Git SSH keys, or you could also on your machine, write git init to initiate the repository locally. You can directly go to the branch section if that is the case.
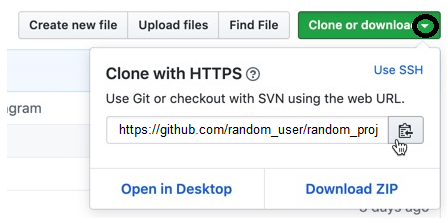
To synchronize with a Git project (that is already available on a remote Git), the easiest way is to copy-paste the HTTPS link by clicking on the clipboard after clicking on the downward pointing arrow on “Clone or Download” on Github (it is just “Clone” on GitLab). Then click on the clipboard to have the link to the repository copied.
Now open a bash command, go to a folder where you want to download the repository, and enter (by writing git clone and pasting the copied link):
git clone https://github.com/random_user/random_projectCongratulations you are now synchronized with the random_user/random_project remote repository!
You could also be in the case where you have already the project locally, therefore git pull is what you need to be synced with the latest update of the remote repository.
Create your branch
Suppose now that you want to add some developments, either on existing script/modules or a completely fresh development.
The best practice is to create a branch, always.
A branch is like a new space you create to make your developments, to not disturb the main road which is also called the master branch in GitLab and the main branch in GitHub.
Think about the master branch as the place where everyone agreed that the work is of enough quality to be shared and cloned. And yours is not even written.
To create a branch, the best practice is to type:
git checkout -b "arli/first_development"This command actually does 2 things:
- It creates the branch arli/first_development
- It sends you to the branch arli/first_development
However, you could also write successively the 2 subcommands that are replaced by the command above.
git branch “arli/first_development” if you just want to create the branch without switching to the branch
git checkout “arli/first_development” if you want to switch to the branch
A message writing: Switched to a new branch ‘arli/first_development’ should appear.
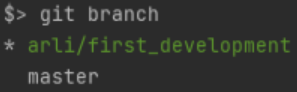
you could always check if you are in the good branch by writing git branch, a star should appear at the left indicating in which branch you are standing:
Start your developments
Great, now it is your time to work!
… 3 hours later …
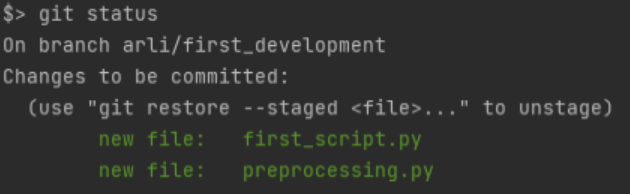
Let’s say you worked hard on a new script called ‘first_script.py’ and you also improved ‘preprocessing.py’.
You can check that you made some progress and therefore changed some local files by entering:
git status
Here you will see:

because you added code to an existing preprocessing.py:

and you will also have:

from the new ‘first_script.py’ you wrote.
You will have to add those changes with the commands (depending on your IDE the first_script.py could have been automatically added the moment you created, but the commands below would not hurt anyway):
git add preprocessing.py
git add first_script.py
by typing git status you should see:
Commit your work
You improved codes in your local files, that’s great but now you need to push that on the remote repository so everyone can see your insane work.
But before pushing, you need to commit your work, and you have to commit often! A rule of thumb (which is difficult to respect I agree) is that: each commit should correspond to a unique point of development you address.
To commit your work, you also need to assign a commit message which is telling what your commit is about.
Let’s say here we developed our first iteration of development 1:
git commit -m "first iteration development 1"It should tell you that you modified 2 files, with the number of inserted and deleted rows compared to the previous state. You can commit every time you modified files (don’t forget to git add).
Great, now let’s push the commit(s)!
Push your work
A push is just a delivery of your local work to the remote repository, either with one or several commits.
Just write:
git push
You should face this usual “fatal” error (not fatal at all actually):

It tells you to write git push — set-upstream origin arli/first_development instead of just git push.
You will need to write this every time you create a new branch and push it.
I will give you a hack to not write anymore this command. The trick is to modify an internal git file that will automatically create and synchronize your local branch on the remote repository, by writing (depending if you have a git version ≥ 2.37, but whatever, executing both commands does not hurt):
git config --global push.default current
git config --global --add --bool push.autoSetupRemote true
Now, execute git push and you are good for the next step!
Merge/Pull Request
In GitLab it is called “merge request”, in GitHub it is called “pull request”. I will stay with the GitLab terminology.
The easiest way to do a merge request is to go to the GitLab/GitHub GUI.
Usually, you will find a banner message telling you that you pushed in a branch and it proposes you, to open a merge request.
You can either click on it and proceed to submit a merge request: give a title, write some descriptions about your development, assign some reviewers you are working with and click on the big green Submit merge request.

If you don’t find the banner, just go the standard route, and go to the Merge Requests folder, you will have to specify your development branch (arli/first_development) and the target branch (should be master), and then click on Compare branches and continue by completing the information on the screenshot above.
Congratulations, your merge request is submitted. Now, someone needs to merge it (either yourself or some reviewers can).
Merge the Merge Request: Rebase or No Rebase
Two scenarios could happen here:
The Merge button is green, and you (or a reviewer) can click on it, good job your work is now merged with the master branch (and no rebase needed)!

You are done with this tutorial if you succeeded here, Congratulations!
However, when you are working with different people on the same project, you will face sooner or later the terrible and frustrating grey Merge button:

Ok, stay with me, take a deep breath, and we will solve that issue.
The problem arises because between now and the last time you synchronized your local repository with the master branch, someone made a change on the same file as you and already merged a modified version that you have not seen, and Git by a precautionary approach, will not attempt to merge your code with his. That’s why Git asks you to do a rebase.
Follow the steps below one by one. You need to be in your branch arli/first_development and your master branch (GitLab) could be named main (GitHub) so swap master for main if needed on the code below.
First, get the last version of the code that your coworker merged:
git pull --rebase origin master
It might happen that you get an error because you have uncommitted files. Either commit them with git add and git commit, or restore them to their previous state with git restore.
If no errors, write git status to know which file(s) is in conflict.
Open the file(s) and search for the marker <<<<<<< HEAD and the marker =======. Inside those 2 markers, you have your coworker work on the same code as you.
Between ======= and >>>>>>> you will find your changes on the file. Resolve the conflict by choosing your version or his version and remove the markers and the not selected version of the code.
Repeat the process for each file that has a conflict. When you don’t have markers left on any of the files, you are good to add those resolved files:
git add random_name_of_the_file_I_resolved.py
git add second_file_I_resolved.py
Commit your changes:
git commit -m "Fix conflict with coworker work on A"And finish the rebase with:
git rebase --continueForce (with lease) push the rebase:
git push --force-with-lease
The reason we use the option — force-with-lease instead of — force is that if someone else updated your branch while you were doing the rebase, Git, by the precautionary principle, will tell you that something is wrong.
If you face this very rare case, you will have to restart all the steps of the rebase BUT you will need to pull from your branch, the remote branch (this case does not happen if you are working alone in your branch).
Now if you go to the page of the Merge/Pull Request you submitted, you will find, the end of your struggle, the holy green Merge button:
Congratulations, you have succeeded in pushing your work and merging it with the Master/Main branch.
Learn more about Git with this pocketbook:
With no extra costs, you can subscribe to Medium via my referral link.
Or you can get all my posts in your inbox. Do that here!