
Learning the basics of input actions (Godot 4/C#)
Let’s see how to make simple but powerful inputs for our Godot games!
Video games are a unique form of art because, among other things, they are an interactive medium. This means that a core feature of any game is handling user inputs, and reacting to the press of keys and buttons to trigger various actions in the game.
And, to do this, a very common technique is to use what we call input actions.
So, in this article, we’ll see why input actions are an interesting tool, how to create custom ones in a Godot project and how to use them in your C# code to trigger some specific actions on-screen.
Also, note that in this tutorial, I’ll be re-using the scene and player setup that we discussed in this previous episode of the series, with a little 2D avatar that can move horizontally or jump:
So be sure to check it out first if you haven’t seen it yet!
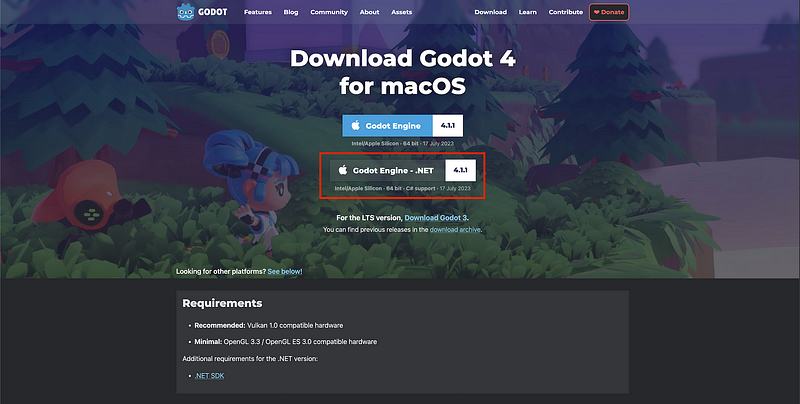
As usual, since we’ll be coding our logic in C#, make sure that you have a version of Godot with .NET enabled.
And of course, don’t forget that you can get the demo scene and all the assets from this demo on my Github 🚀 with all my other Godot tutorials.
The tutorial is also available as a video — text version is below:
But now, with all that said, let’s dive in and discover the basics of using input actions in Godot and C#!
So… why use input actions?
Before talking about the how, let’s first quickly discuss the why.
In short, input actions are a layer of abstraction between the actual keys and buttons on your input device and the in-game actions. So, instead of saying that we want our avatar to jump when we press the Spacebar, for example, we’ll say that we want it to jump when the “jump” action is triggered, and then connect this “jump” action to the press of the Spacebar.
I know, for now, it might look like it’s the same thing, only with an additional step in the middle. But that’s where input actions really shine!
Cause now that we have this bridge, this mapping between the actual input device and the final game action, we can super easily change the input key, or even associate several ones to support cross-platform schemes, without having to change anything in our code. Plus, the code itself is more readable since, usually, the name of the action is quite self-explanatory.
And yes, we could even expose those bindings in some Settings panel inside the game, to let players set their own controls and adapt the inputs to their liking!
So, input actions make games more flexible and user-friendly, as players can adapt the controls to fit their preferences and the hardware they’re using. It’s an essential concept in modern game development that enhances gameplay and accessibility.
And the best thing is that, actually, all of this flexibility is really simple to implement for us, game creators…
Creating input actions in a Godot project
When you want to define custom actions for a Godot game, you need to hop in the Project Settings panel — because this is, quite logically, a project-wide configuration.
Once in the Project Settings popup, we can switch to the Input Map tab, and there we get the editor where we can list, add and remove input actions for the project:
And if we toggle on this option to show the built-in actions, we see a list of some pre-made input actions that Godot automatically adds in any new project:
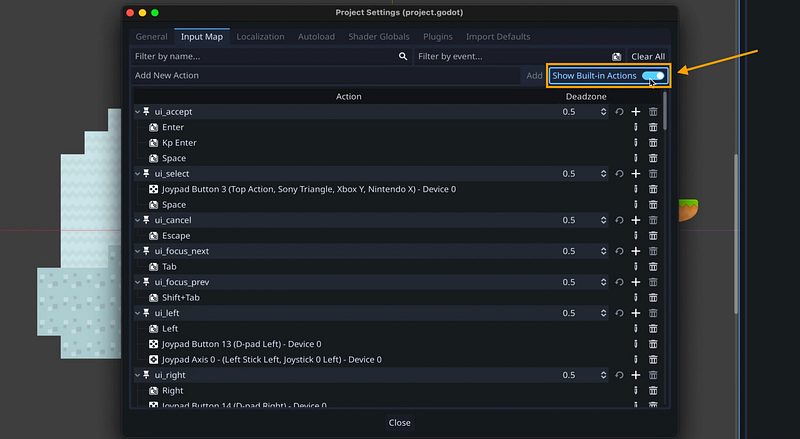
Of course, these are just some basic actions that Godot assumes you might need in many games, and you see that they’re mostly focused on navigating UI. For example, entering some menu, selecting something else, going through a page, and a lot more…
Still, right now, we can already see that the really cool thing with input actions is that they can group a lot of different types of keys, buttons or even input combos under a single item; typically, we have some actions that are triggered by a keyboard input, others by a joystick move, and others by some combination of inputs.
But those actions are a bit too specific for us, and they’re not very related to our code; so let’s rather see how to create our own actions :)
First, we’ll toggle the built-ins back off to get a clean list. Then, we’ll go to the Add New Action input field, and enter the name of our first action. For example, here, we want our avatar to be able to move left, so we’ll just make a new action called “move_left”. Pretty straight-forward!
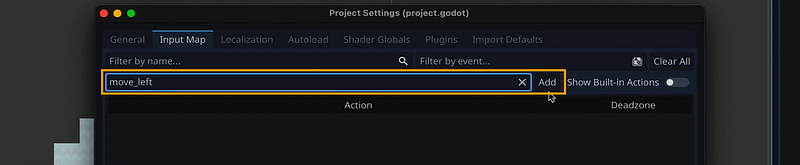
And once we click on the Add button, or we press the Enter key on our keyboard, you see it gets added to the list.
Then, if we wanted to rename an action, we could also re-click on it in the list — or to remove it, we could just click on the little bin icon on the right :)
Ok now, to actually add a binding to this action (meaning associate a real hardware input to this action mapping), we just need to click on the “+” icon on the right of this line, and select an input in the new popup:
Although we can of course navigate through the various types of devices and look for specific keys or buttons, Godot also has a neat feature that is common to a lot of input action systems, called “listening for an input”. So basically, we can also just press on an input and Godot will auto-select it in the list. For example, by pressing a key on your keyboard, you’ll directly select this input as the binding to add:
Note: By the way, you’ll notice that for key inputs, there are actually 3 possible modes, depending on whether you want to use the exact position on the keyboard or the character that is mapped on it. This can be really cool to avoid the famous QWERTY versus AZERTY issue of American and French keyboards ;)
But anyway — once you’ve selected the input you want to associate to the binding, you simply need to click on the Ok button, and you see the input gets added to the list of keys and buttons that trigger this specific action.
(For example, here, I’m saying that pressing the left arrow key on a keyboard will trigger the “move_left” action.)
Of course, what’s cool is that I can then do the same operation to also have the A/Q key move our character to the left, or have the left joystick of a gamepad trigger this same action if we push it to the left:
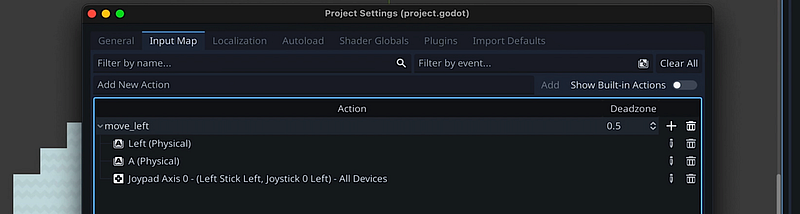
And then, we simply need to do something similar for a “move_right” action, and for a “jump” action:

And here we are! At this point, we have all the actions we need to refactor our player movement script, and have our character move like it did before, but using input actions…
Using input actions in C# scripts
Alright — to finish this tutorial, let’s see how to use Godot input actions in C# code.
Now, as we said before, here, we’re going to start from the code we implemented in this previous episode for our player’s movement. And, as you can see, for now, our _PhysicsProcess() function contains some if- conditions where we check for specific keys:
public override void _PhysicsProcess(double delta) {
  Vector2 velocity = Velocity;

  // apply gravity if in the air
  if (!IsOnFloor()) {
    velocity.Y += gravity * (float)delta;
  }

  // handle jump (if grounded)
  if (Input.IsKeyPressed(Key.Space) && IsOnFloor())
    velocity.Y = -jumpVelocity;

  // handle horizontal movement (keyboard arrow keys)
  velocity.X = 0;
  if (Input.IsKeyPressed(Key.Left))
    velocity.X = -moveSpeed;
  else if (Input.IsKeyPressed(Key.Right))
    velocity.X =  moveSpeed;

  _UpdateSpriteRenderer(velocity.X);

  Velocity = velocity;
  MoveAndSlide();
}
So our goal here is to replace those direct key checks with action checks. To do this, we simply need to use Input.IsActionPressed() (instead of Input.IsKeyPressed()), and then pass in the name of the action to check to the function:
public override void _PhysicsProcess(double delta) {
  Vector2 velocity = Velocity;

  // apply gravity if in the air
  if (!IsOnFloor()) {
    velocity.Y += gravity * (float)delta;
  }

  // handle jump (if grounded)
  if (Input.IsActionPressed("jump") && IsOnFloor())
    velocity.Y = -jumpVelocity;

  // handle horizontal movement (keyboard arrow keys)
  velocity.X = 0;
  if (Input.IsActionPressed("move_left"))
    velocity.X = -moveSpeed;
  else if (Input.IsActionPressed("move_right"))
    velocity.X =  moveSpeed;

  _UpdateSpriteRenderer(velocity.X);

  Velocity = velocity;
  MoveAndSlide();
}
However, for the horizontal movement, we could actually take advantage of another Godot utility for input actions, which is Input.GetAxis().
Basically, by giving it the two actions on each side of a single direction axis (such as our horizontal movement, here), you can directly get a float between -1 and +1 (or 0 if we’re not pressing anything).
And even better: if we were using an analog input like a joystick, then our movement could be between -1 and +1, meaning it would be proportional to how much the input is moved, which is pretty cool ;)
In our case, we can use it by giving it the “move_left” and “move_right” actions, to find out the current value of the horizontal axis input:
Input.GetAxis("move_left", "move_right"); // horizontal input (-1, +1 or 0)Then, just by multiplying it by our moveSpeed value, we’d get back our actual horizontal movement, if any:
public override void _PhysicsProcess(double delta) {
  Vector2 velocity = Velocity;

  // apply gravity if in the air
  if (!IsOnFloor()) {
    velocity.Y += gravity * (float)delta;
  }

  // handle jump (if grounded)
  if (Input.IsActionPressed("jump") && IsOnFloor())
    velocity.Y = -jumpVelocity;

  // handle horizontal movement
  velocity.X = Input.GetAxis("move_left", "move_right") * moveSpeed;

  _UpdateSpriteRenderer(velocity.X);

  Velocity = velocity;
  MoveAndSlide();
}
So here we are! You see we’ve made the code shorter, easier to read and slightly more powerful.
Note: There’s of course a lot more to do with input actions in Godot, like creating or removing actions at runtime using the InputMap API, or getting more info from controllers and joysticks. But I’ll let you have a look at the official docs to learn more about this, cause it really depends on your specific use case.
Anyway, for our little 2D scene… that’s basically it!
If we restart our game with all the rest perfectly identical, we see that our avatar still moves horizontally and jumps, so we’ve properly reproduced our previous behaviour, except we’re relying on input actions :)
Which means that we could actually connect a gamepad to move our avatar, or change our input bindings in the Project Settings panel — and we wouldn’t need to change anything in our code.
Though there’s a little thing we could fix, and that’s the way our jumping currently works. Because, for now, if you keep the “jump” input action pressed, you see that the player character jumps endlessly, as soon as it gets back on the ground! So you can’t really control the jumps…
Usually, in most games, you rather trigger a jump just on the first input, and then you ignore all the following ones.
To do this, we just have to come back to our C# script and, where we check for the jump action, and replace our call to Input.IsActionPressed() with one to Input.IsActionJustPressed():
public override void _PhysicsProcess(double delta) {
  Vector2 velocity = Velocity;

  // apply gravity if in the air
  if (!IsOnFloor()) {
    velocity.Y += gravity * (float)delta;
  }

  // handle jump (if grounded)
  if (Input.IsActionJustPressed("jump") && IsOnFloor())
    velocity.Y = -jumpVelocity;

  // handle horizontal movement
  velocity.X = Input.GetAxis("move_left", "move_right") * moveSpeed;

  _UpdateSpriteRenderer(velocity.X);

  Velocity = velocity;
  MoveAndSlide();
}
And this fixes our issue! Now, if we run the game again, we see that when we press the jump action key the first time, our avatar indeed jumps but then it ignores our key pressing until we release, and re-press completely again :)
Conclusion
So here you go: you now know how to setup custom input actions in a Godot project, and how to use them in a C# script to react to those triggers and run specific in-game actions!
If you enjoyed the tutorial, feel free to clap for the article and follow me to not miss the next ones — and of course, don’t hesitate to drop a comment with ideas of Godot tricks that you’d like to learn!
As always, thanks a lot for reading, and take care :)
To read more of my content, and articles from many other great writers from Medium, consider becoming a member! Your membership fee directly supports the writers you read.


