
30 Microsoft Teams Tips and Tricks
A complete guide to becoming a Microsoft Teams power user

Microsoft Teams is a communication platform much like Slack that combines one on one & team chat, video meetings, and file storage. Teams also has a number of application integrations that can be used to expand your Teams experience. The service integrates with the Microsoft 365 subscription office suite and can integrate with non-Microsoft products. Microsoft Teams is a competitor to Slack and is the upgrade path from Skype.
Teams allows you to communicate and share just about anything in one specified location. Chat with your team, share documents, link Planner boards, and host meetings all from one place.
You can quickly ask a question to an entire team and get a fast response from the first available colleague, share a file with your team and keep it in a secure location where new team members can access the file, the possibilities are endless.
Teams and Channels
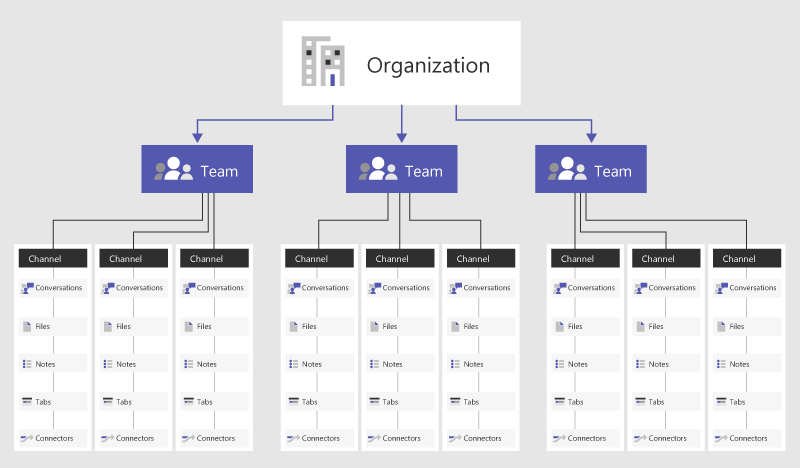
A “team” is a group of people that will communicate, share content, and access apps based on different projects within your organization. Teams can be private so only invited users can see the team. Public teams are those that anyone in your organization can join.
A team can be created for project-based work or based on the departments in your organization. Another option is to create a team based on office locations. Once a team is formed conversations, files, and other apps shared with the team are only accessible to the team members.
Every team is broken into “channels.” Channels are where you can chat, share files with the team, and more. When you create a team, a General channel will automatically be created.
1. Use Teams in Your Browser, Windows, Mac, and Mobile Phone App
How often does this happen: You’re collaborating with someone chatting it up then, boom, it’s time for you to go somewhere else. Teams is perfect because you can move from your desktop app to the smartphone app seamlessly, allowing you to keep the conversation going while you’re on the go.
Access Teams via a web browser
The web app is available online. Simply go to the website and login with your Office 365 account.
Access Teams via Windows desktop app
Teams desktop app can be downloaded by going to the website and clicking “Download for desktop.”
Access Teams via Android or iPhone
The Microsoft Teams app can also be found from the Google Play Store or Apple App Store.
Access Teams via Mac
- From the Teams download page, click Download located under Mac.
- Double click the PKG file to begin the installation.
- Follow the wizard to complete the installation.
- Teams will be installed in the /Applications folder as a machine-wide installation.
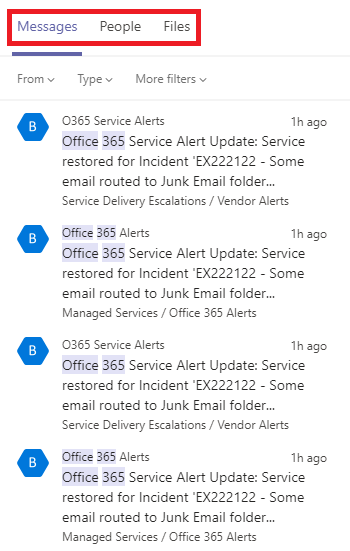
2. Search Across All Your Conversations
The more you use Teams the more content you’ll store. It will become your go-to place for everything. The structure of Teams has unlimited options. If you’re human, you’ll forget where you read that important conversation! Fortunately, Microsoft has built in a fantastic search.
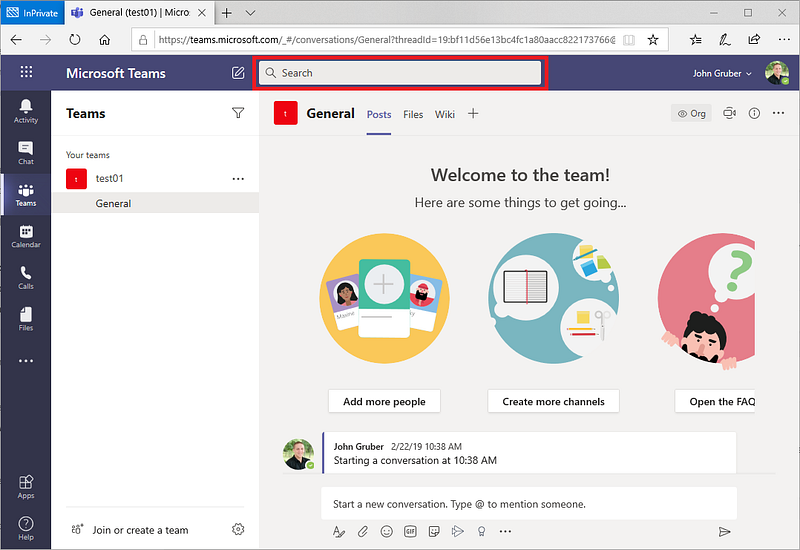
Type your search in the search box in the top and press Enter. The search results will appear in the left pane. Jump to People or Files by using the tabs at the top.
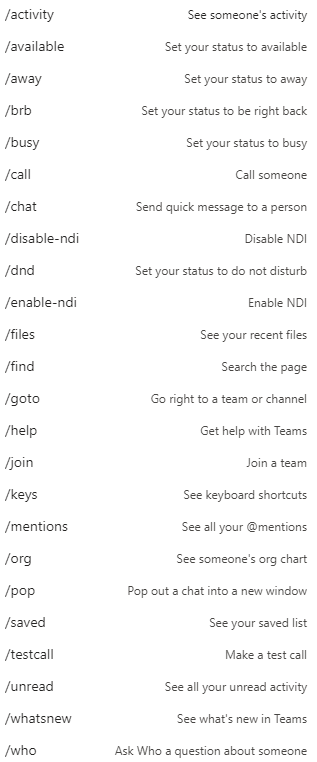
For more advanced searches in messages, you can use the built-in Keyword Query Language (KQL). Below are the keywords that Teams supports. Note: there’s no space between the colon and the search terms.
- “From:Then” enter the person’s name
- “In:Then” enter the channel or group chat name
- “Subject:The” keyword from a message or a subject line
- “Sent:The” date the message was sent
The search feature isn’t just a simple find in Teams. It’s been overloaded with commands. To view the list of available commands type “/” into the search bar.
3. Reach People or Groups with @mentions
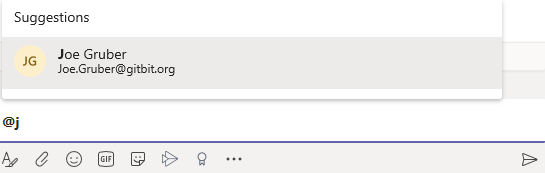
Typically, work involves waiting for approvals or for someone else to complete a part of the project before you can move forward. When you want to notify a person or group, tags let you quickly @mention a person or specific group of people. When a person or group is tagged in Teams, they’ll receive a notification.
Everyone in your organization will automatically have a tag. Simply type “@” then start typing the person or group’s name and select the person from the drop-down that appears. They will then get a notification.
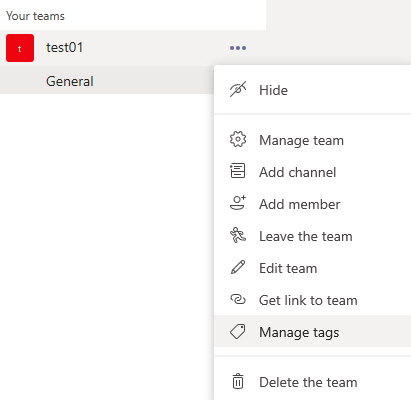
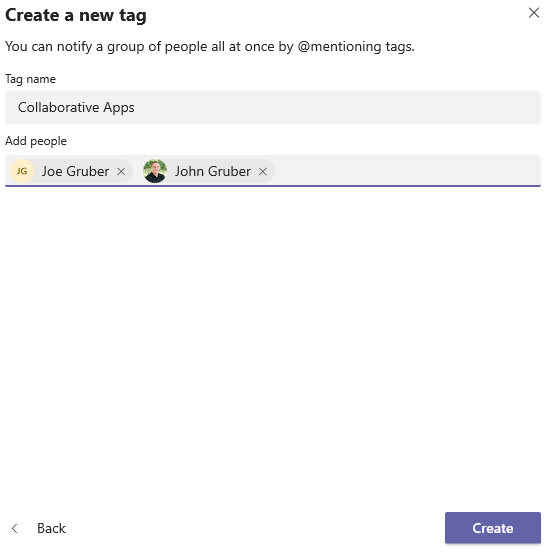
Create a tag within a team
1. Right-click a team name, then select Manage tags to create your first tag.
2. Click Create tag.
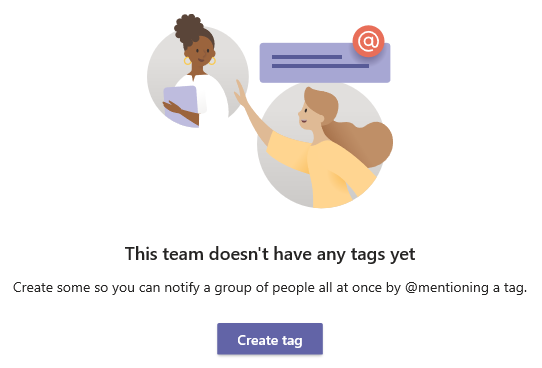
3. Enter your tag name, select the people that will be notified when the tag is used then click Create.
4. Say More With Less Using Emojis and Gifs
Emojis and Gifs are a fun and easy way to communicate with Teams conversations. They’re fun and serious at the same time. You can respond to a message using an emoji or gif by hovering over the message then click one of the emojis.

You can also respond with emojis by starting a reply then clicking the smiley face under the textbox.

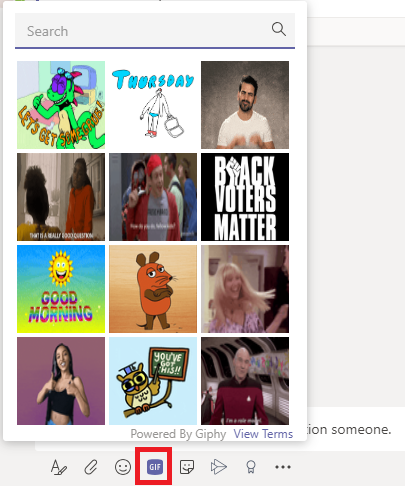
You can also use Gifs by clicking the GIF button next to the emoji button in replies and new conversations.
5. Disable Notifications
Keep notifications to a minimum to avoid distractions. Only get notified on the channels and messages you want to get notified.
To update Channel notifications
- Hover over the channel you want to update.
- Click the ellipsis (…) next to the channel.
- Click Channel notifications.
- Click the All activity, Off, or Custom option to update your notification settings.

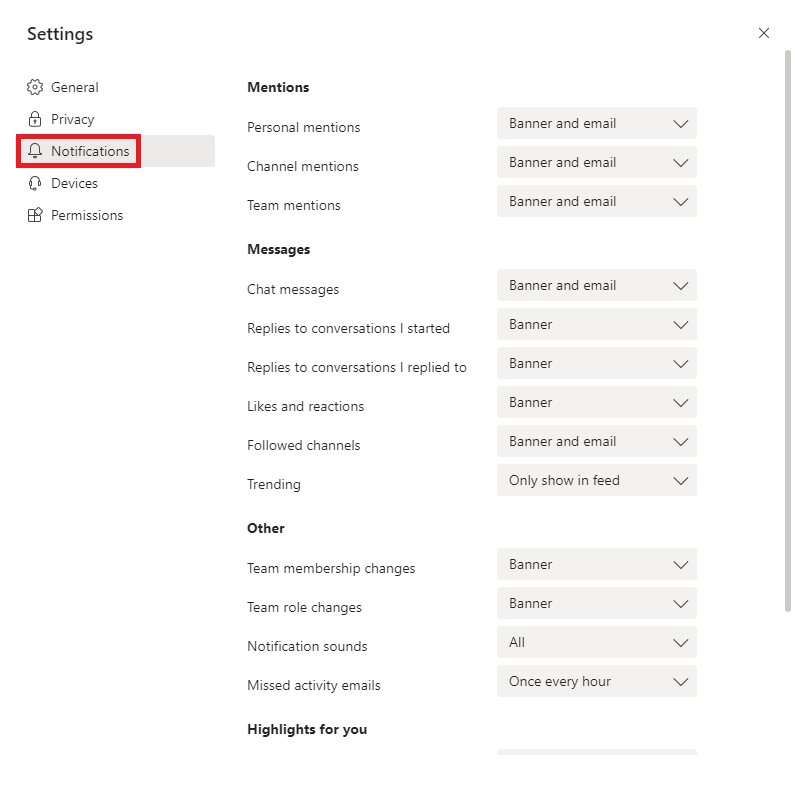
Settings
Keep notifications in the app by selecting Only show in feed. All notifications will be sent to your activity feed. The activity feed can be found in the top left corner of Teams. The app will still show notifications inside your desktop taskbar, but won’t show the pop-up.
By selecting Banner and feed you’ll receive notifications as an alert in your activity feed, as well as, a desktop notification. On Windows, the notifications will show in the bottom right corner of your screen. On macOS, they will show up in the top right corner.
To update your global notifications
Microsoft has also made you global notifications configurable.
1. Click your profile image in the top right corner.
2. Click Settings.
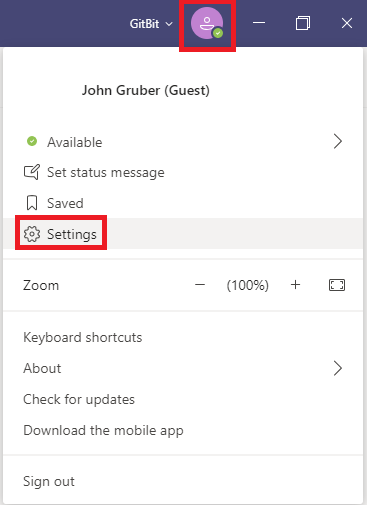
3. Click Notifications.
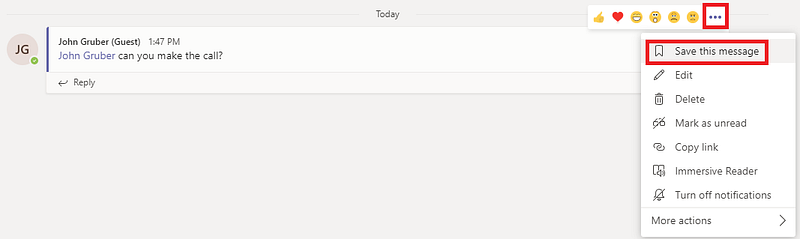
6. Remember to Follow Up by Saving the Message
With instant communication sometimes you get bogged down. You need to save things and come back to them later. Meet “Save this message.” Saved messages will show up in your saved list.
How to save a message for later
- Hover the message and then click the ellipsis (…).
- Click Save this message.
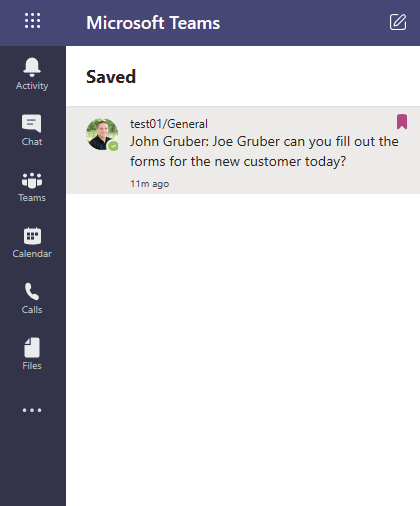
How to view saved messages
- Type /Saved in the search box at the top of Teams and press Enter.

You’ll be able to see your saved searches in the left pane.
How to remove a message from the saved messages
- In the Saved column in the left pane click the banner in the top right of the message you want to remove from the saved messages.

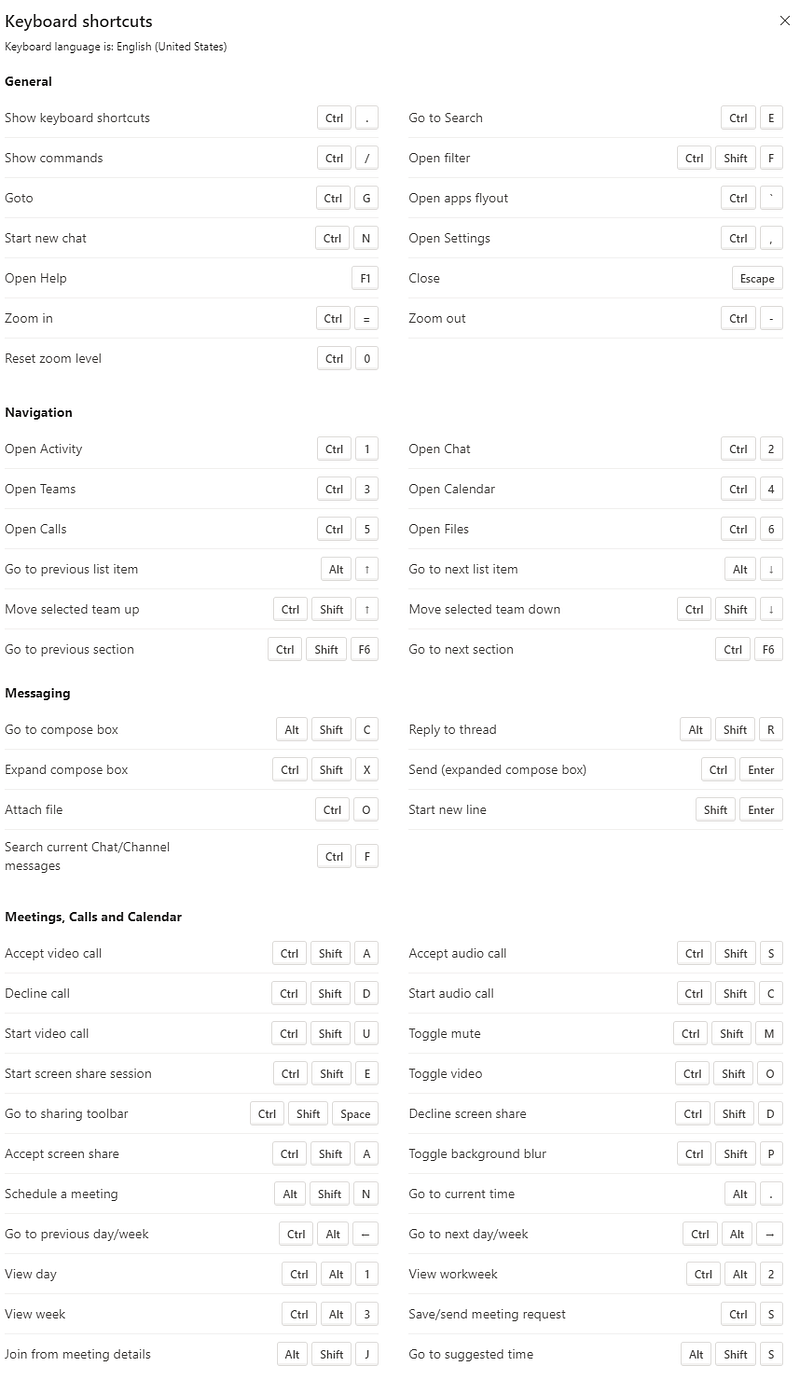
7. Keyboard Shortcuts
When you start to live in an app like Microsoft Teams keyboard shortcuts become a priority. Below is the list of keyboard shortcuts for Microsoft Teams on your Windows computer.
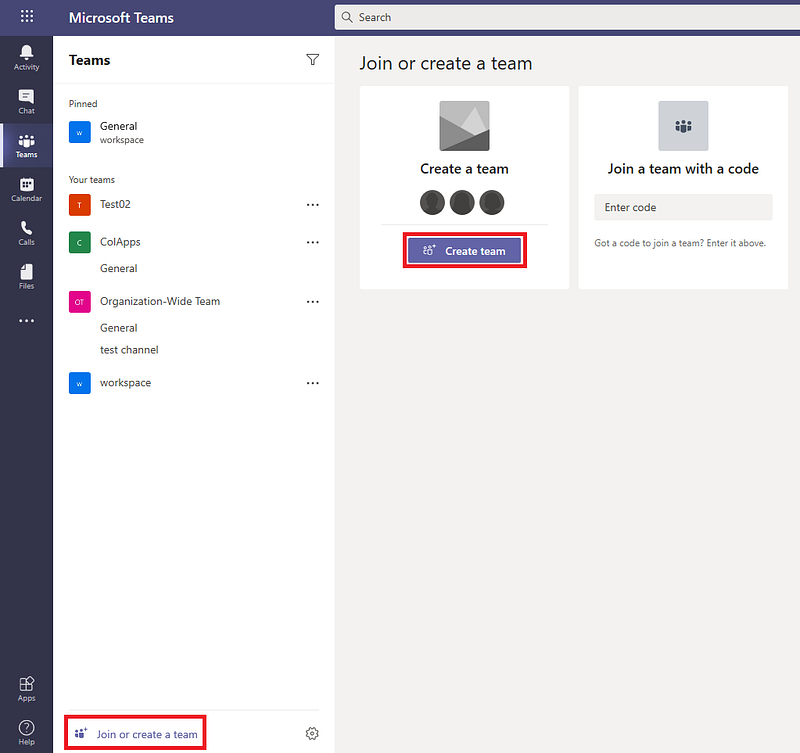
8. Create an Organization-Wide Team
Sometimes you need to communicate with the entire organization. Teams is a great place to have an organization-wide communication channel. With an organization-wide team, the team will automatically be updated when you add or remove users to your Office 365 tenant.
How to create an organization-wide team
1. Go to your Teams list.
2. Click Join or create a team in the bottom left corner of Microsoft Teams.
3. Click Create a team.
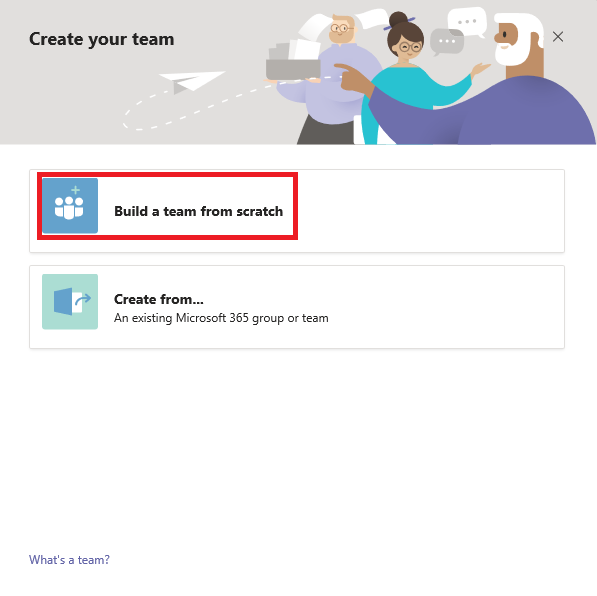
4. Click Build a team from scratch.
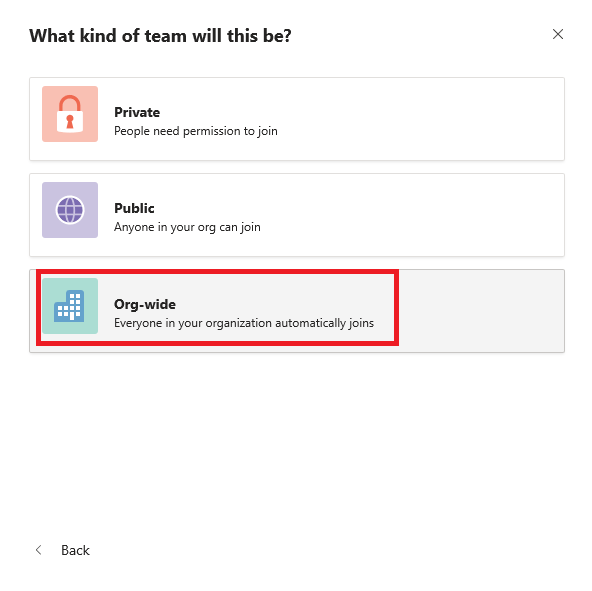
5. Click Org-wide.
6. Enter your team name then click Create.
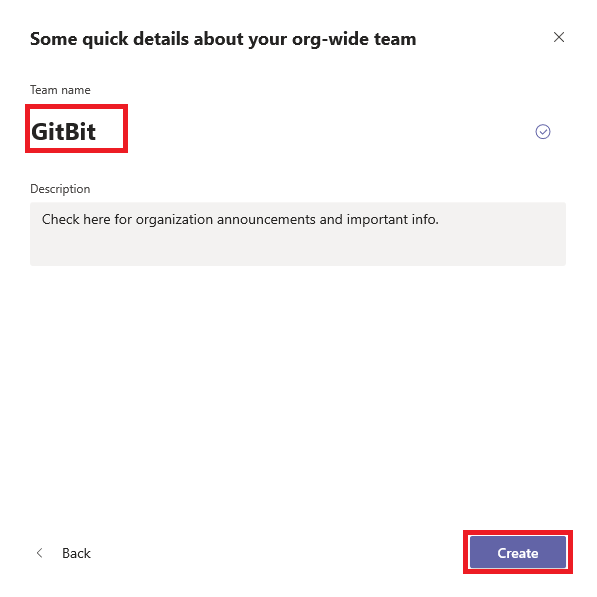
You now have a team that includes all your users (except guest users)!
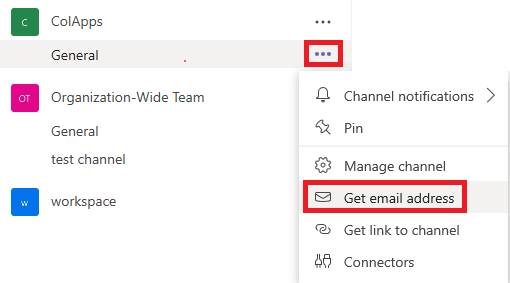
9. Email to a Team Channel
Have you ever wanted to email a team? Now you can! By getting the email address of the team you can add it to the To, CC, or BCC line of an email and email the team directly from Outlook.
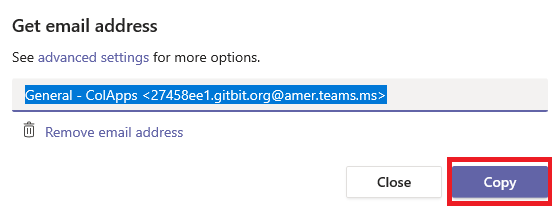
How to get the email address of a channel
- Hover the channel then click the ellipsis (…) next to the channel. Click Get email address.
2. Click the Copy button. Open Outlook and paste the email address.
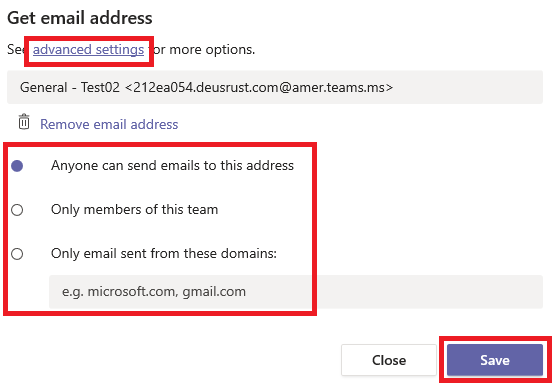
From the advanced setting, you can limit who can email the Teams channel.
3. Click advanced settings. Select who you want to be able to email the channel. Click Save.
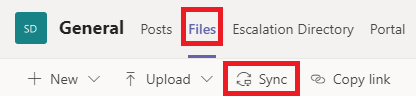
10. Share and Sync Files to Your Desktop
Files can be shared directly with your team in the channel. Once shared everyone with current access or future access to the channel will be able to access the files.
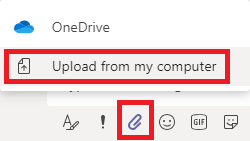
How to upload files to a channel
To upload a file to a channel simply drag and drop the file to the conversation. As an alternate, you can click the attachment icon under the textbox and then click Upload from my computer.
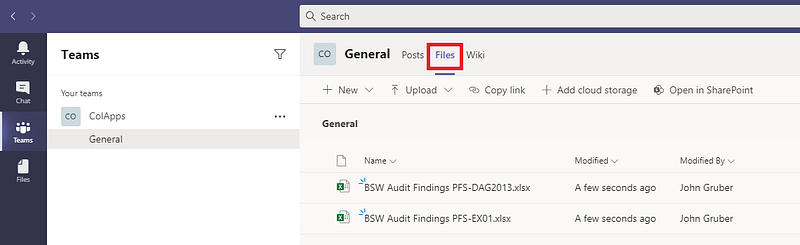
How to access files

You can access the files directly in the conversation. If you need to access the files in the future you can go to the Files tab.
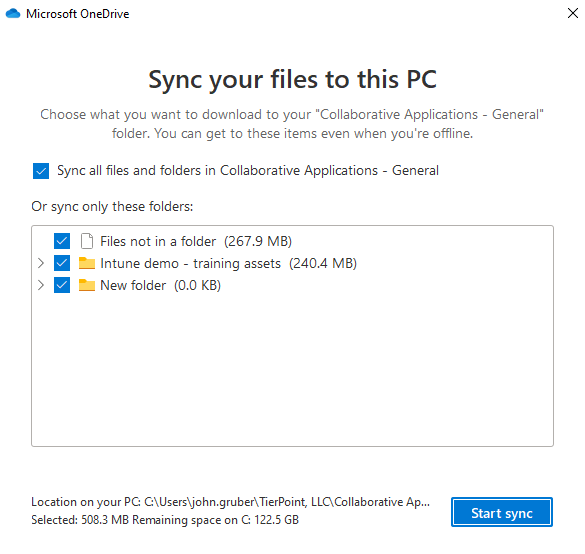
Once you have files being shared with your team you can sync them using OneDrive!
How to sync the files from a Microsoft Teams Teams to your computer
- From the channel click Files at the top then click Sync.
2. When prompted click Start sync.
11. Host a Teams Meeting
Sometimes text messaging back and forth isn’t enough. Sometimes we simply need a voice and video call. But wait, there’s more! You can also share your screen, an application, or a free-hand drawing whiteboard.
Scheduling a meeting can be done in Teams or Outlook.
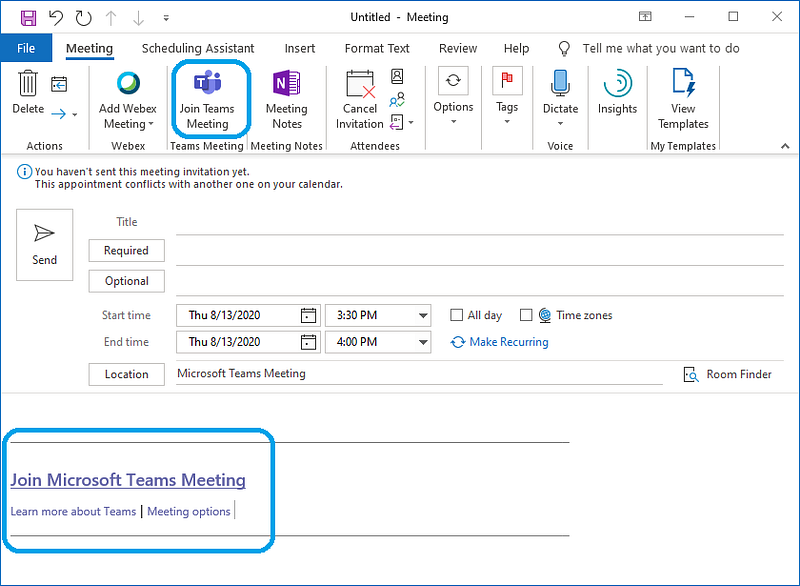
To schedule a meeting through Outlook
- Open a calendar appointment
- Click Teams Meeting in the Meeting ribbon.
- View the details that were added to the meeting.
Schedule a meeting from Teams
1. From Teams click Calendar.
2. Click New meeting.
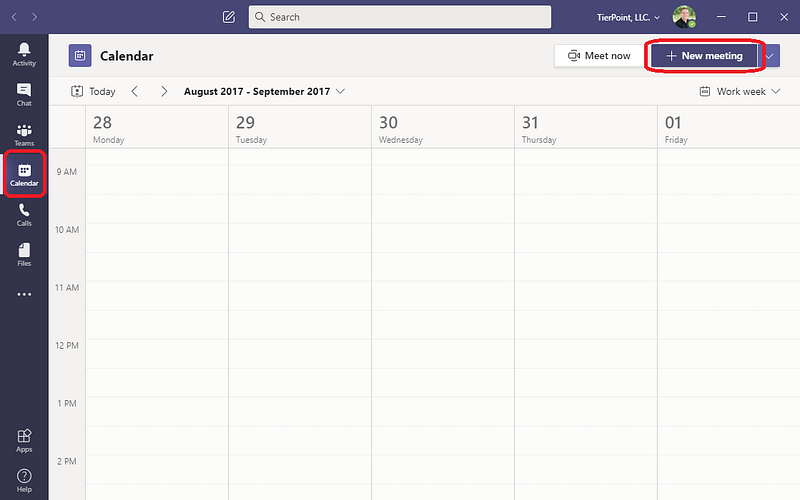
3. Fill out the form.
4. Click Send.

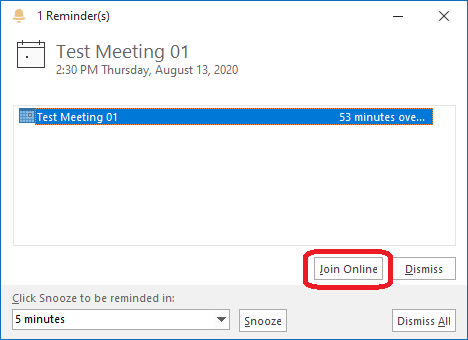
Join Meeting
When the time comes to meet you can join the meeting right from Outlook!
- In the appointment reminder, click Join Online.
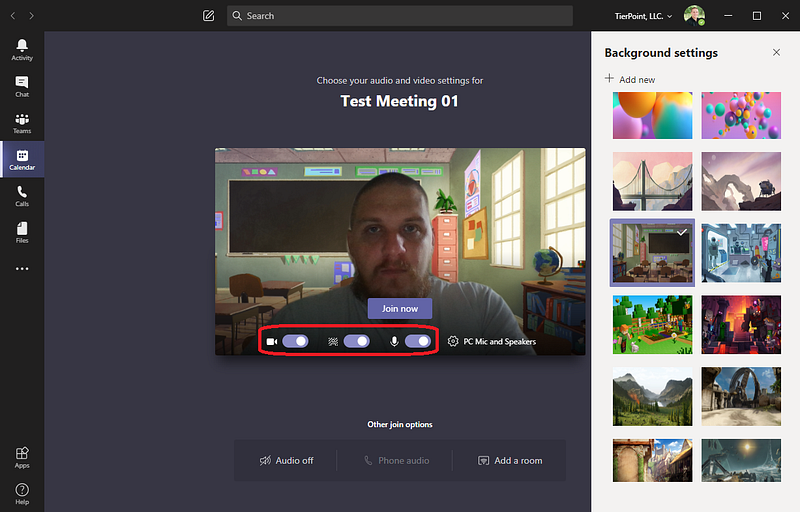
When joining the meeting you can enable video, background effects, and mute your mic. Then click Join now and you’ll be in the meeting.
Controls inside a meeting
Once inside the meeting, you can manage your sharing and options from the meetings toolbar.


Sharing

By clicking the toggle sharing bar button you’ll open the sharing bar. From the sharing bar, you can share your screen, an application, or a free drawing whiteboard.

Whiteboard
By sharing a whiteboard you can take notes, draw or create sticky notes all during the meeting while sharing your whiteboard with everyone in the meeting. The whiteboard is a great way to run productive, engaging remote meetings with your team.
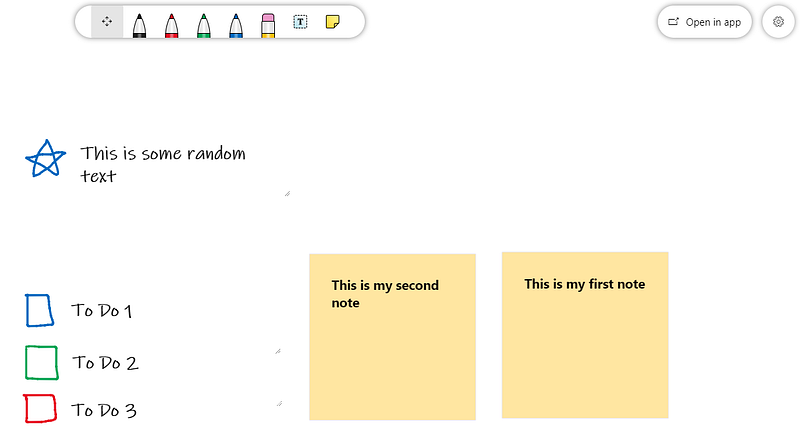
Simply use the controls at the top left to draw on the whiteboard or use the textbox / sticky notes buttons to write text or create a sticky note where you can write text.
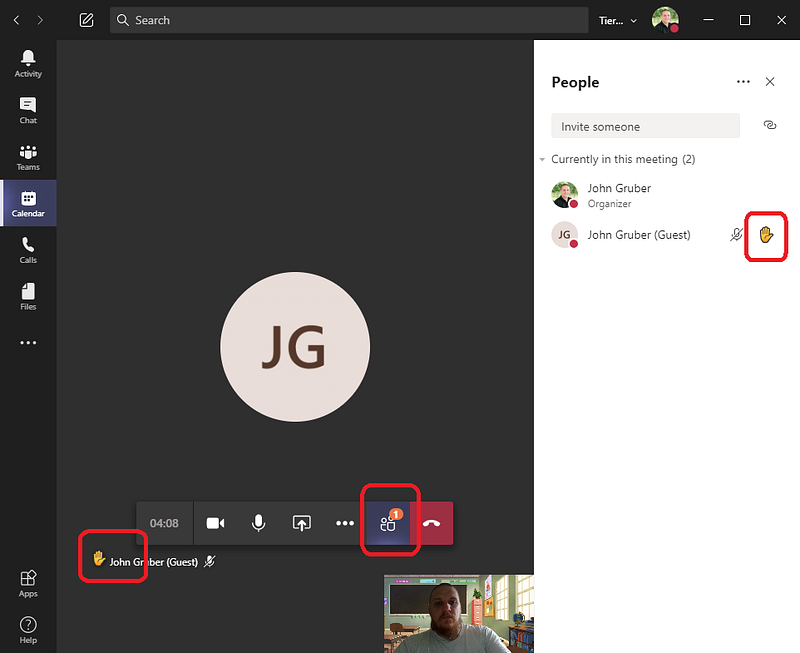
Raise Hand
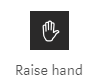
During a Microsoft Teams meeting, you or someone else in the meeting can use the Raise hand button to get the speaker’s attention. That way a participant can get the presenter’s attention without interrupting the meeting. Once participants have been acknowledged, they can use the raise hand button to lower their hand or the meeting host can lower a participant’s hand on their behalf.
12. Rich Text Conversations
By default, starting conversations and replying to conversations appears to only handle plain text. But it doesn’t have to be. The button to the furthest left below the textbox is the format button.
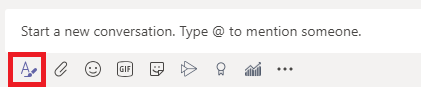
By clicking the format button, you can expand the textbox to be the rich text editor.
From there you can use the formatting buttons to format your text, add a subject line, or edit who can reply to the conversation and more.
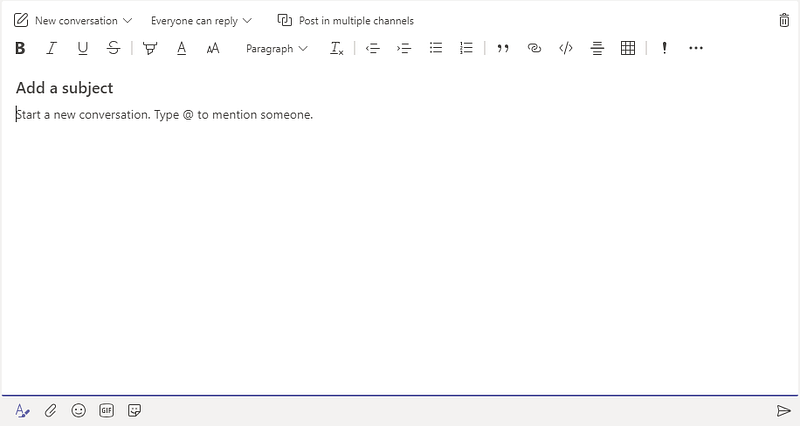
13. Add Tabs to Channels
Tabs are a great way to add quick links to important information and connect your team to it easily. You can add a SharePoint library, Excel or Word document, OneNote, Planner, and many third-party applications.
How to add a tab to a channel

- Select “+” at the top of the channel.
- Choose a tab and follow the steps to add it.
Once added the tab will show at the top of the channel.
Note: To turn an office file into a tab, you must upload it to the team's Files tab or you can attach it to a message in the chat which will upload the file automatically. Once you pick your app (for example, Excel) you’ll be shown files for you to select.
14. Add an App to Your Teams App
Apps are a bit different than tabs. Tabs are shared with your team/channel. While apps are only for you individually.
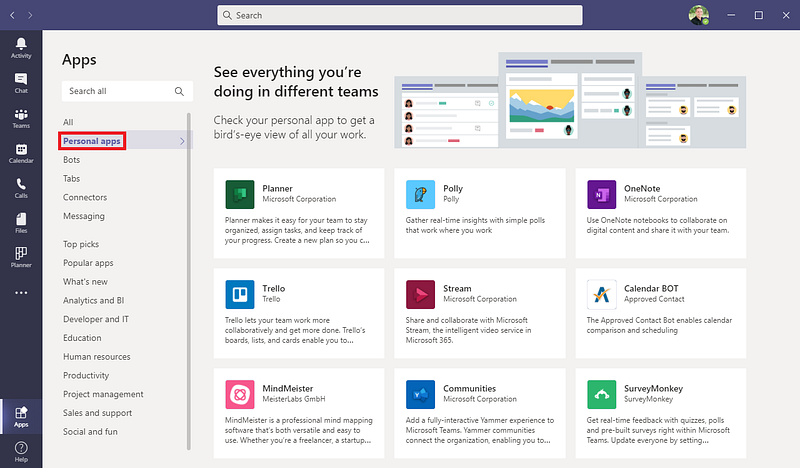
You can view your apps in the left-most pane. To see additional apps, click the ellipsis.

To see what other apps are available to download click More apps > in the bottom right corner of the more apps window.
In the Apps menu, click Personal apps in the left pane.
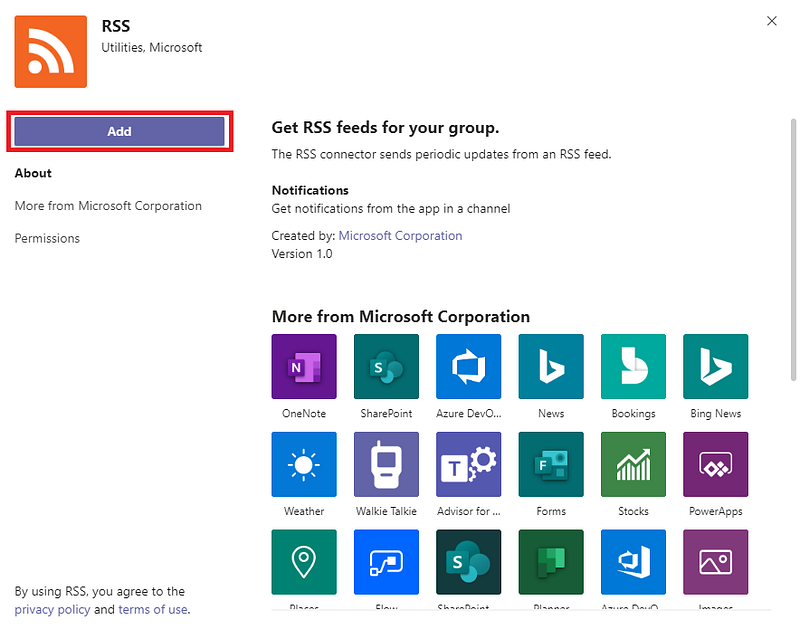
15. Add Connectors for Channel Notifications
Get automatic updates from your favorite services like Bing News, RSS feeds, Twitter, and more, sent directly to the channel of your choice by using Connectors.
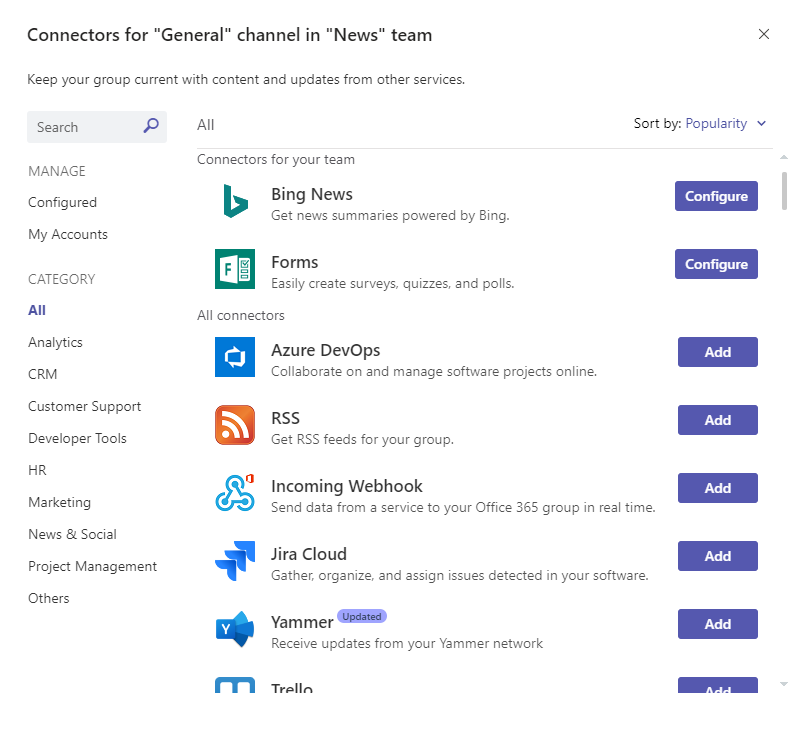
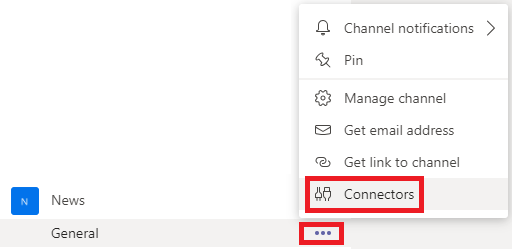
Add Connector to a Channel
- Click the ellipsis next to the channel.
- Click Connectors.
3. Click the Add button next to the connector you want to add.
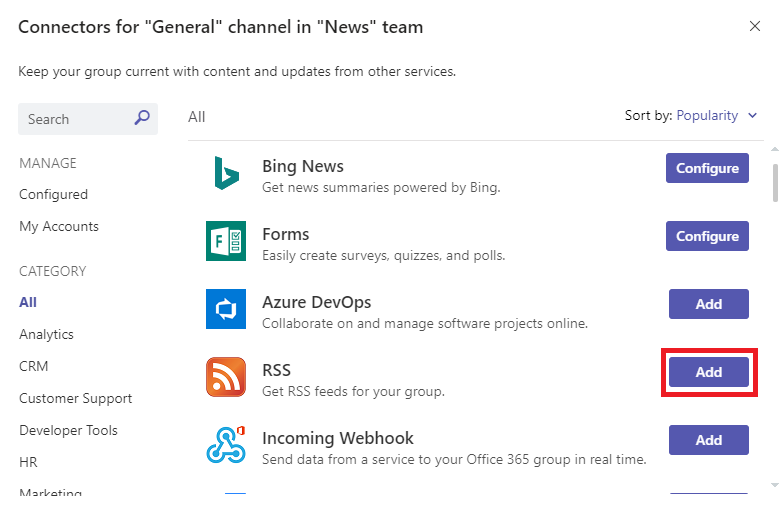
4. Review the description highlighted yellow below. Once you’re sure this is the connector you want, click Add.
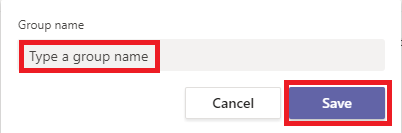
16. Name a Group Chat
Your recent chats can get overwhelmed quickly especially if your team uses them to chat with multiple people at a time. When you’re in a chat with multiple people you can name the chat to make it more easily found in the chat list.
How to name a chat
- Click the group chat to view the messages.
- Click the pencil in the top of the group chat

3. Type the name of the chat and click save.
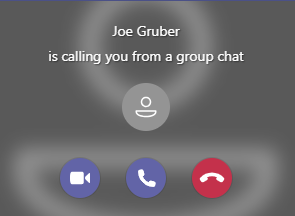
17. Turn Chats into Calls
When text isn’t doing it, you can easily turn your chats into audio/video calls. Once you start a call everyone in the chat will have an audio notification until they join the call.
- Click the chat to view the messages
- Click the video or call button in the top right of the chat.

The people you are calling will receive the ring, as well as, a pop-up notification informing them you are calling.
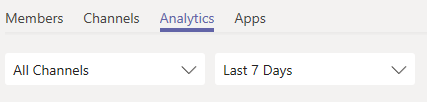
18. View Team and Channel Analytics

Team & channel metrics are now available. Now users can see metrics like the total number of posts and replies for each team and channel for the last 90 days
How to access team analytics
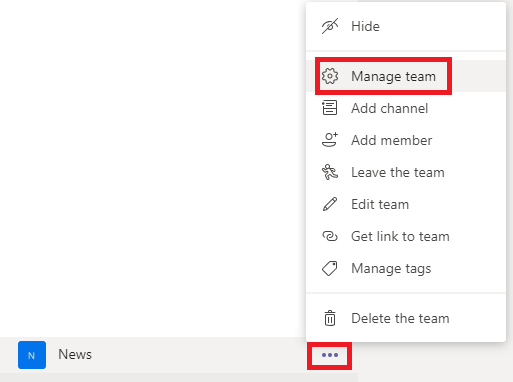
- From your teams’ list, click the ellipsis (…) then select Manage team.
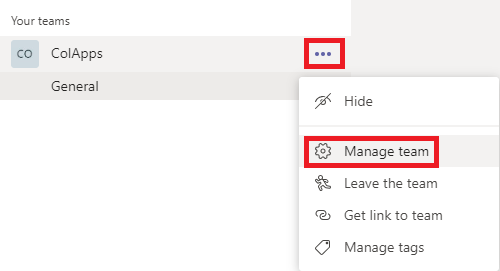
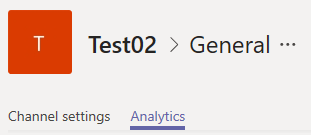
2. Click the Analytics tab at the top of the management window.
How to access channel analytics
- From your teams’ list, click the ellipsis (…) next to a channel then select Manage channel.
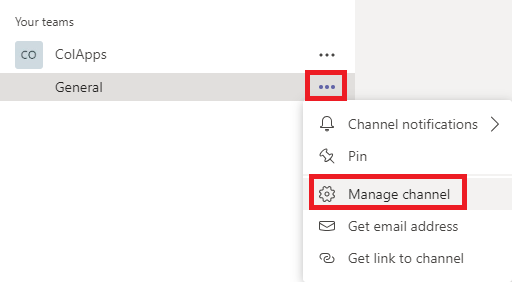
2. Click the Analytics tab at the top of the management window.
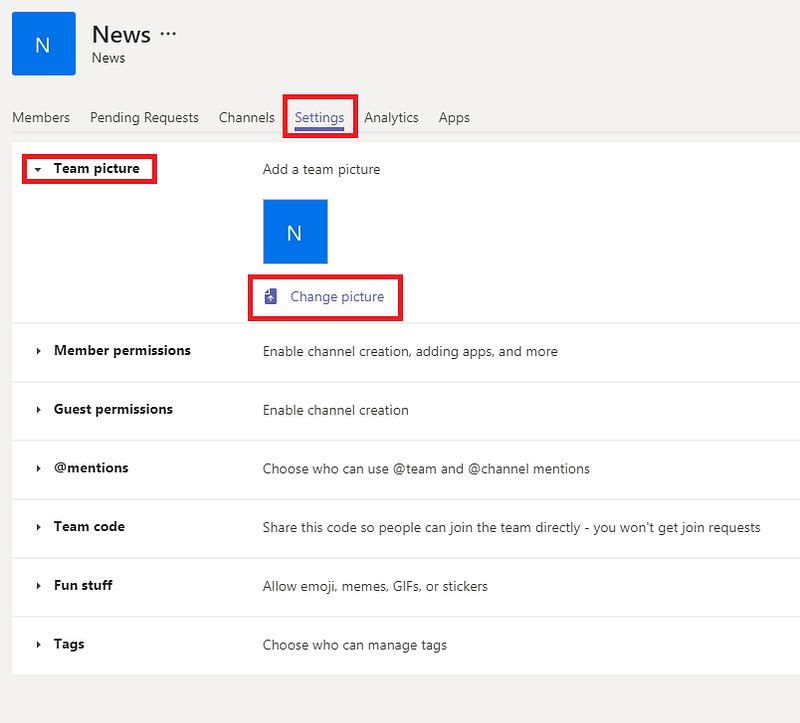
19. Update the Team Icon
The colored background with a letter isn’t very descriptive. Fortunately, we can give our teams a unique icon. It helps users identify the team easier while navigating their countless teams.
How to add an image to a team icon
- Click the ellipsis (…) next to the team you want to update and click Manage team.
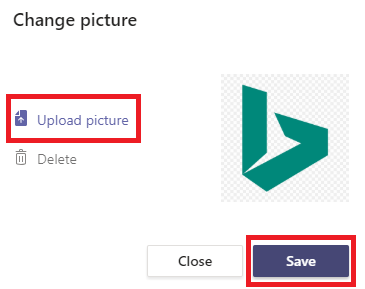
2. Go to the Settings tab. Expand Team picture. Click Change Picture.
3. Click Upload picture. Select the image on your computer that you want to use for the team. Select Save and close the menu.
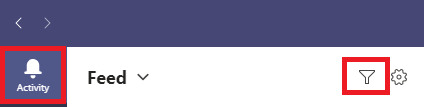
20. Filter the Activity Feed to Get What’s Most Important
The activity feed is specific for you and keeps you up to date on the latest communication. Filtering by unread, @mentions, or seven other options lets you separate your @mentions from the group mass messages and focus on the key conversations.
How to Filter the activity feed
- Click activity in the top left corner.
- Click the filter button at the top of the navigation pane.
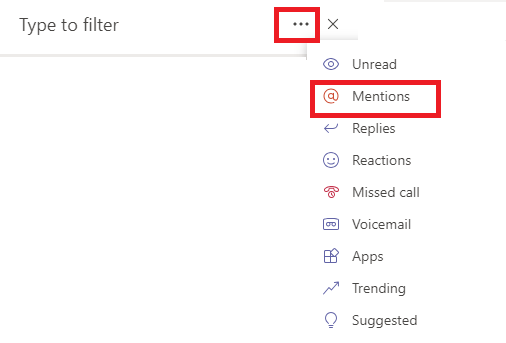
3. Click the ellipsis (…) next to the filter textbox.
4. Click the type of filter you want to use, for example, @mentions.
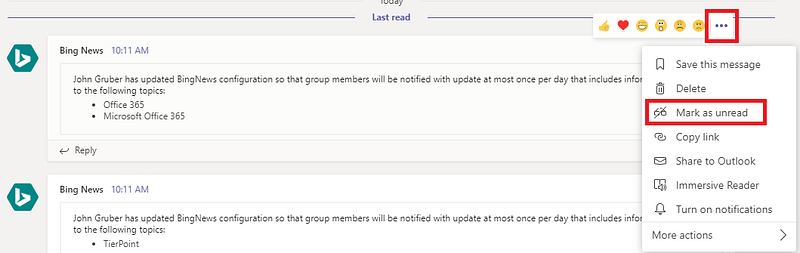
21. Mark Messages as Unread to Come Back \Later
Sometimes you read a message, then want the message to be marked unread to remind you to come back later. In Microsoft Teams It’s easy.
How to mark a message as unread
- With the mouse, hover over the message you want to mark as unread.
- Click the ellipsis (…) in the top right corner.
- Click Mark as unread.
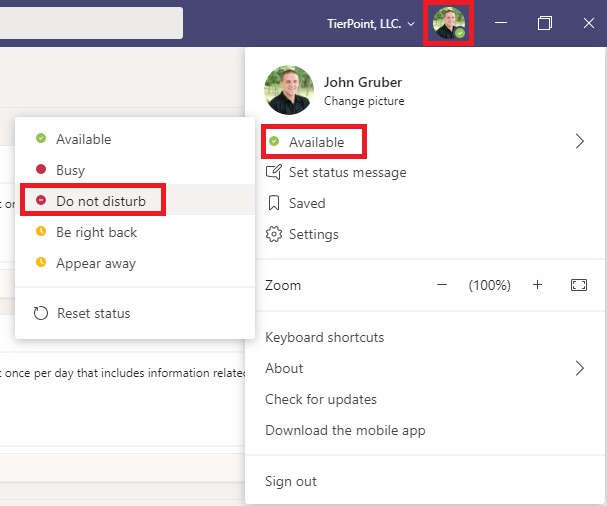
22. Hide Messages by Setting Yourself to Do Not Disturb
Need to stop the noise and stay focused? Just set your status to Do not disturb and prevent distractions so you can get work done.
How to set do not disturb
- Click your icon in the top right corner.
- Click Available in the dropdown.
- Click Do not disturb.
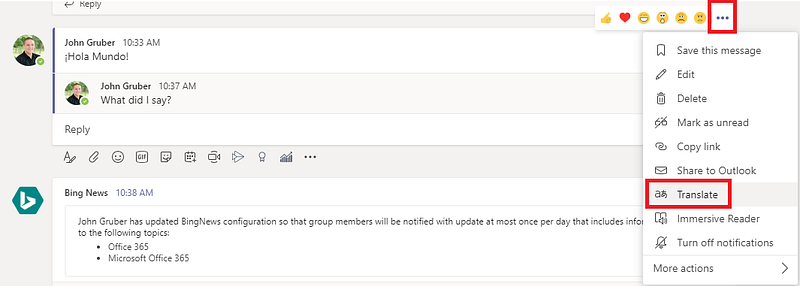
23. Work Across Languages by Translating a Message
Working with a team that speaks a different language? It isn’t a problem when you’re using Teams. You can easily translate a message in Microsoft Teams.
How to translate a message in Teams
- Hover the mouse over the message you want to translate.
- Click the ellipsis (…)
- Click Translate.
24. Follow up on a Message
Sometimes someone may ask you to do something but you’re in the middle of something else. You’ll need a reminder for the message.
That’s where Microsoft Power Automate comes into play. With a specialized flow, you can set and receive reminders for a message.
How to set up the follow-up flow
- Go to the website.
- Login to Office 365 if required.
- Click Continue.
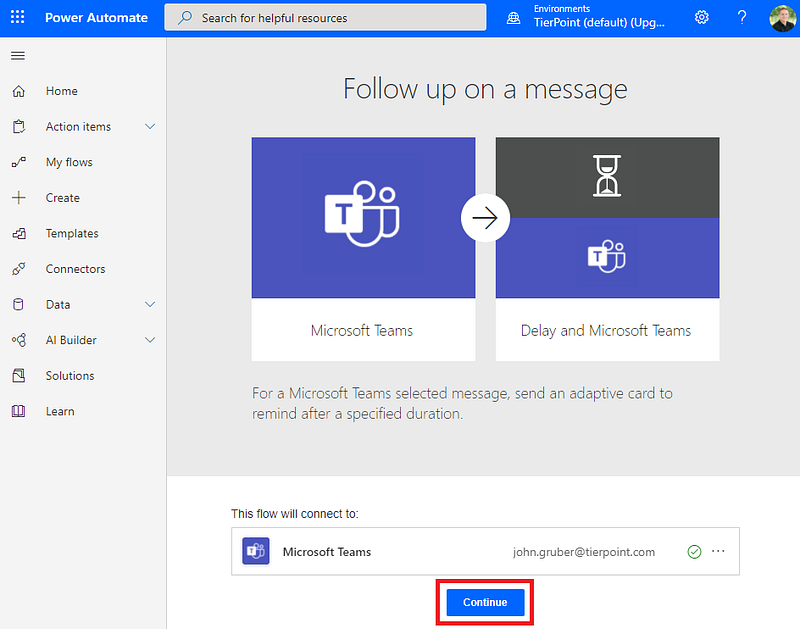
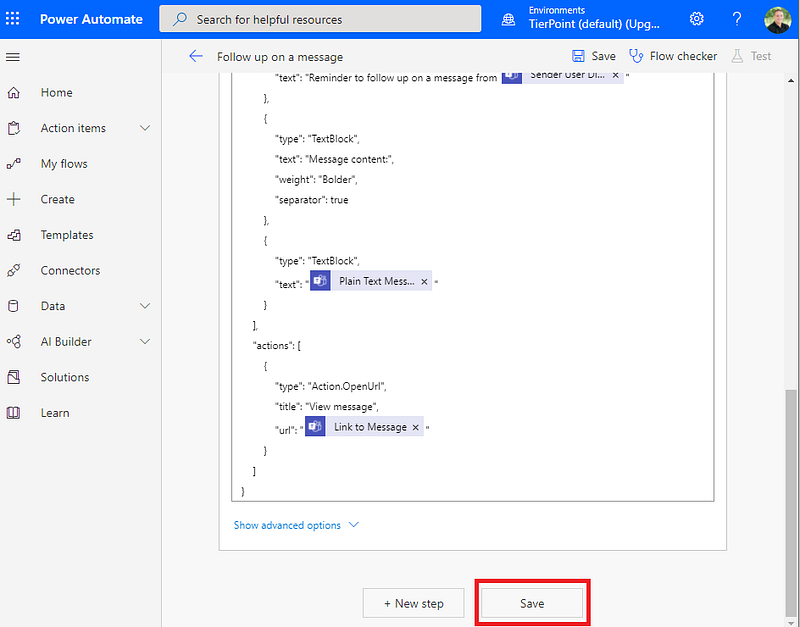
4. Scroll to the bottom of the page and click Save.
How to use flow
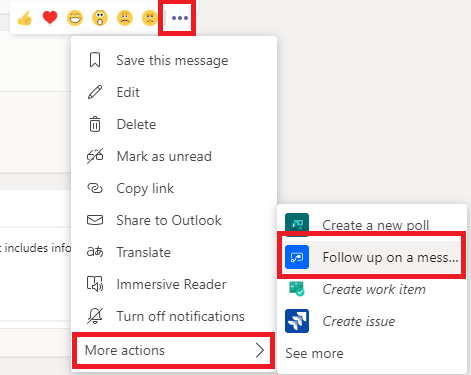
- Hover your mouse over the message you want to be reminded of.
- Click the ellipsis (…) in the top right corner.
- Click More actions.
- Click Follow up on a message.
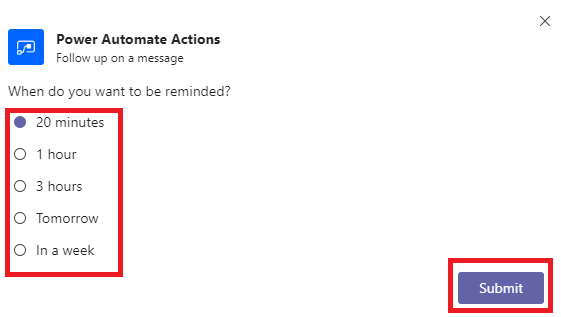
5. Select a time you want to be reminded in.
6. Click Submit.
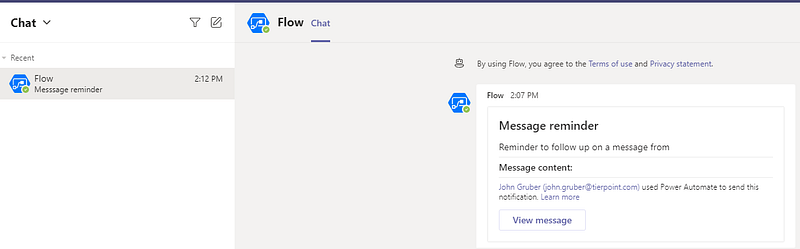
When the reminder goes off, you’ll receive a chat message from the flow with a link to the message.
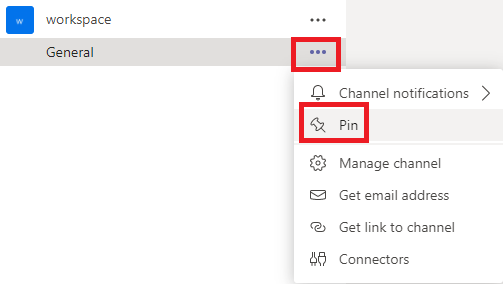
25. Organize Your Teams and Channels
All your teams and channels aren’t equal. Some of them will become your go-to almost every time you open Teams. To make it easier to find the teams you want you can simply drag and drop the teams to the order you want them in. Once complete, every time you open Teams, they’ll be in the order you set them in.

To give you more control of your teams’ list, channels can be pinned to the top of the list.
How to pin a channel to the top of the teams’ list
- Hover your mouse over the channel you want to pin.
- Click the ellipsis (…) next to the channel.
- Click Pin.
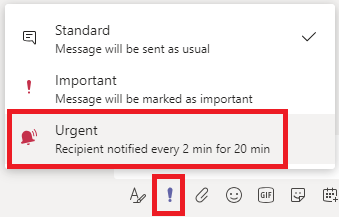
26. Get Noticed Immediately with Urgent Chat Messages
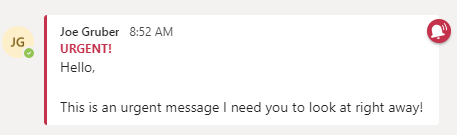
Sometimes, you need to send an urgent message to someone. The type of message that gets someone’s attention. The type of message that continues to alert someone until they acknowledge the message. Introducing urgent messages. An urgent message will notify the recipient every two minutes for 20 minutes. It’s a great (albeit annoying) way to send a critical message to someone so use it sparingly.
How to send an urgent message
- Open the chat with the person you want to send an urgent message.
- Click the exclamation mark under the chat.
- Click Urgent.
- Type your message and click send.
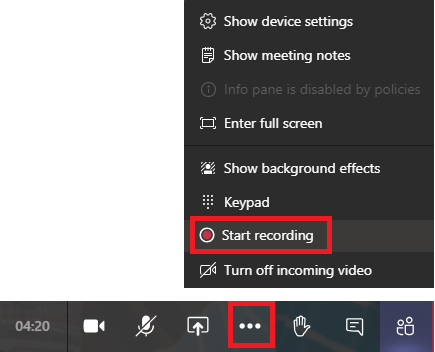
27. Record and Transcribe a Meeting
While in a meeting it’s easy to record but did you know Microsoft Stream can also transcribe the meeting for you? It’s simple.
How to record a meeting
- Once in the meeting click the ellipsis (…) in the bottom navigation pane.
- Click Start recording.
How to transcribe the meeting recording
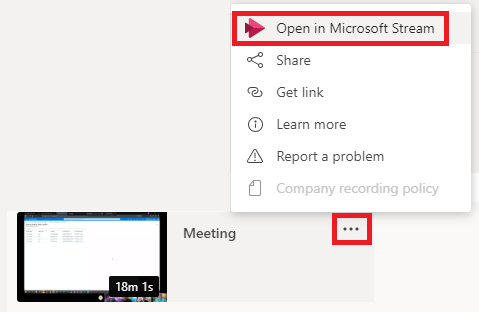
- Once the meeting is over the recording will automatically upload to Microsoft Stream. (it may take a few minutes)
- Click the ellipsis (…) next to the meeting.
- Click Open in Microsoft Stream.
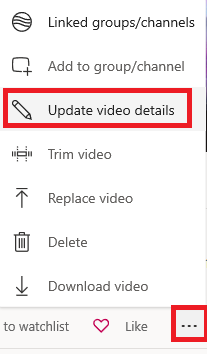
4. Click the ellipsis (…) in the details section.
5. Click Update video details.
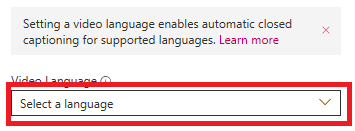
6. Under Video Language click Select a language.
7. Select your language.
8. Verify autogenerate captions is checked.
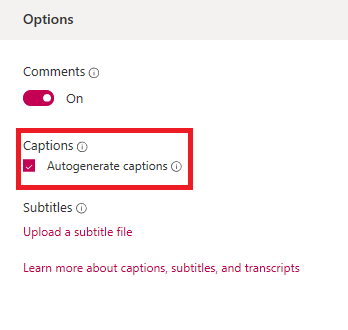
9. Click Apply.
10. Wait for the transcripts to complete.
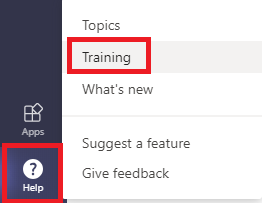
28. Access Teams Help
Teams has a great built-in help system. Designed to keep you up to date on changes and teach you how to get the most of Teams. It’s simple to access too.
How to access Microsoft Teams built-in help
- Click Help in the bottom left corner of Microsoft Teams.
- Click Training.
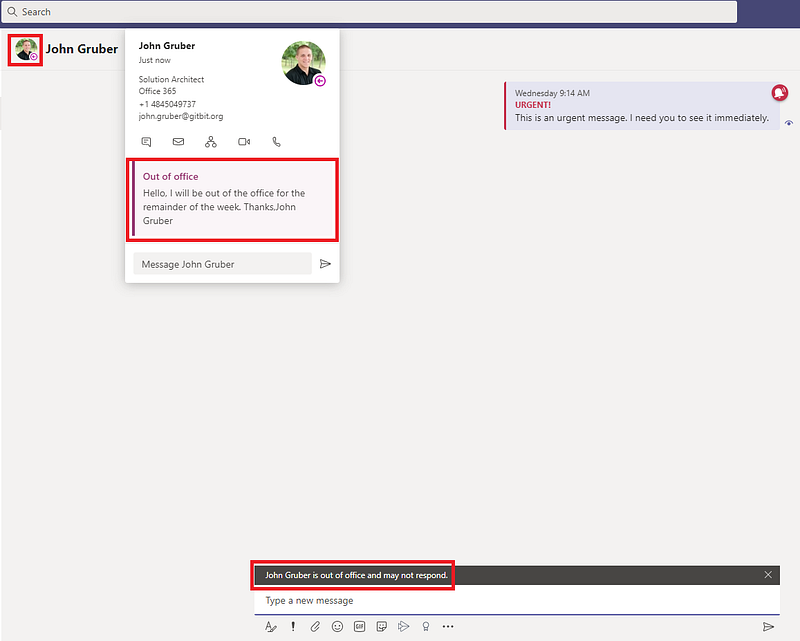
29. Set Out of Office for Coworkers to See in Teams
Unable to respond during normal business hours? Your out of office status will show up in Microsoft Teams. Your teammates will also get a reminder that you’re out of office when they send you a private chat or @mention you.
How to view someone’s out of office message in Teams
- In chat, hover over their name or image.
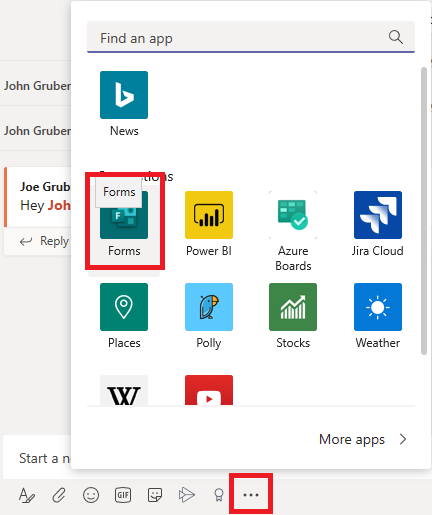
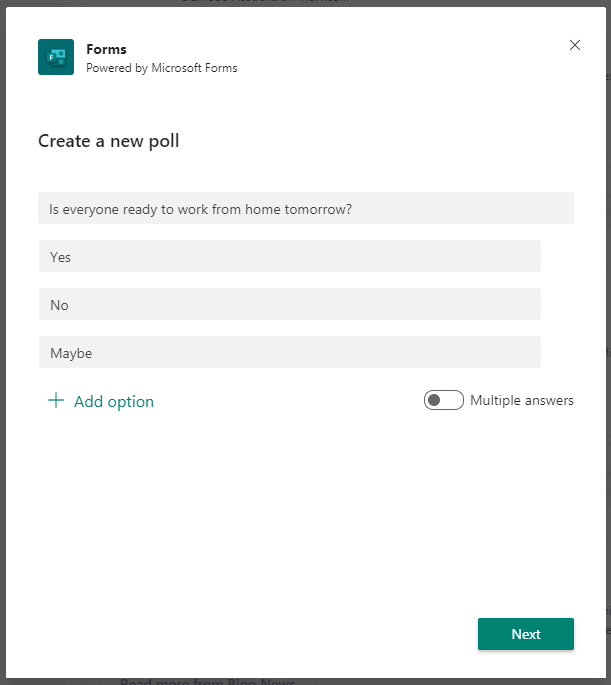
30. Poll Your Team
Creating a form is quick and easy in Teams. It’s a simple way to get everyone to answer a question and get the information in a pretty little form. To create a form and share it with a team is easy!
How to create and share a form in Microsoft Teams
- Within the team click the ellipsis (…) in the new conversation. Click Forms.
2. Enter your question, the optional answers, and click Next.
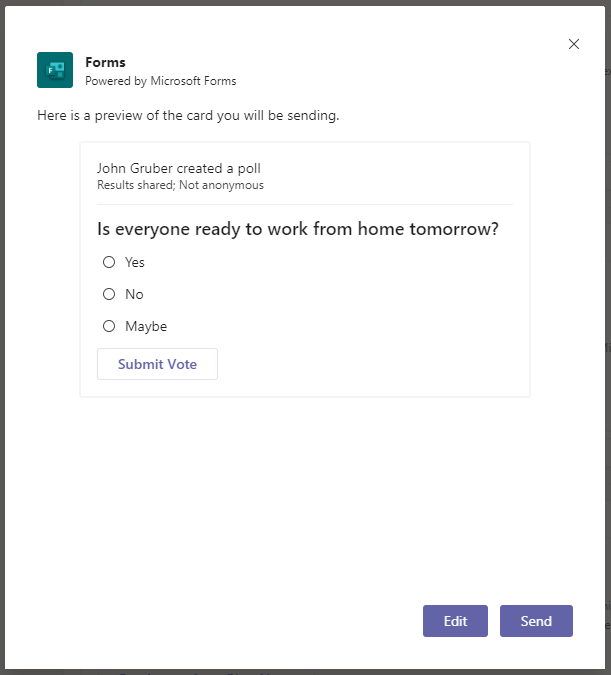
3. Review your form and click Send.
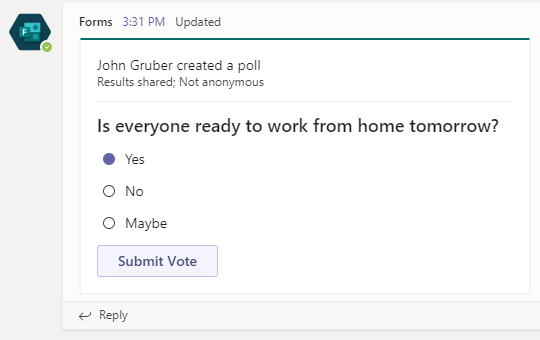
How to respond to a form in Teams
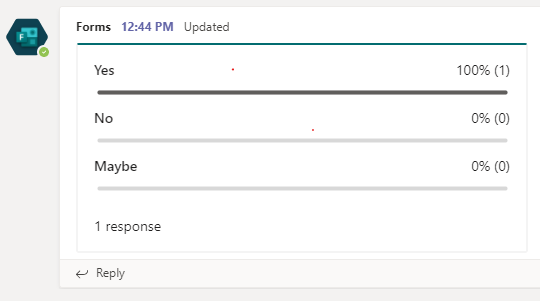
- Once published the form will automatically create two new conversations. One with the form; the second with the results.
- In the first conversation posted by the published form click the answer you want. Click Submit Vote.
How to view additional information in the form
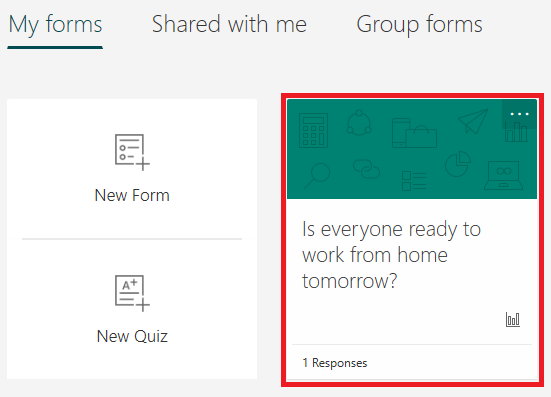
- Go to Microsoft Forms and login with your Teams’ credentials.
- Click the form you created in Microsoft Teams.
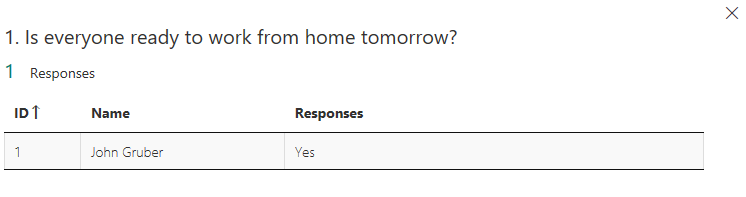
3. Click the Responses tab. Click More Details.
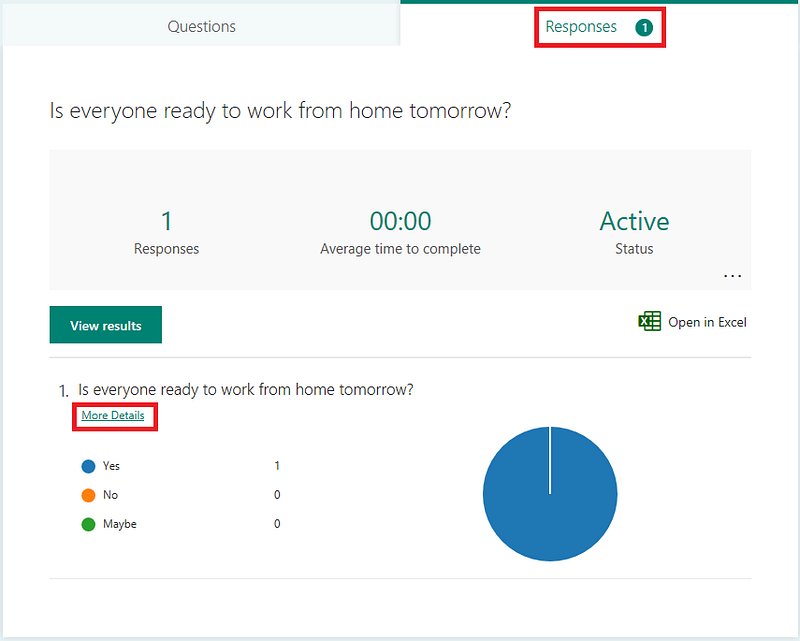
4. View the responses by each individual.
👉The Better Humans publication is a part of a network of personal development tools. For daily inspiration and insight, subscribe to our newsletter, and for your most important goals, find a personal coach.👈