
3 Ways To Install and Manage Multiple Python Versions
Works For any Operating System

This article is a result of one of my previous articles: Read This Before You Install Python3.12 On Linux.
In the mentioned article I explained how I “broke” my Ubuntu Operating System (OS) while trying to install and make Python3.12 my default Python version.
I’m glad that the article reached many people and I received so much great feedback that I could honestly take a lot from them.
I decided to write this one because I feel that there’s still to say about installing Python or managing Python versions on whatever OS you’re working on.
But before I continue, I would like to take a moment to publicly say a thank you to Tony Csoka for telling me about Pyenv.
Thank you to Tom Harrison and H. Habighorst for taking the time to share valuable advice and personal insights with us in the comment section.
And everyone else who shared their point of view. It is always nice to learn and grow with people who want to genuinely share.
Without further ado, let’s get into what matters the most.
Installing Python Using Anaconda
I’m starting with this because this was my first choice when I was considering installing Python3.12.
What is Anaconda? Anaconda is a distribution of Python aimed mostly at Data Scientists.
It comes with its package management tool called conda. With conda, you can install packages, and manage a virtual environment similar to the way we do with pip:
conda install <package>
Creating a virtual environment with conda is very easy to do, you just run the following command:
conda create -n <env_name>
Running a command like this will create a conda environment using the system's Python version.
If you want to install and use a specific version, that can be easily done as follows:
conda create -n <env_name> python=3.12 # the version you want to install— So why didn’t I stick with this?
To explain my decision we would need to cover the difference between pip and conda on how they manage a virtual environment and everything.
Pip uses PyPi as a repository to download a library when you want to install some on your machine.
Conda uses a repository named conda-forge which is owned by Anaconda.
From my experience, you might find libraries that are not in the most recent versions in conda-forge, unlike pip.
The way dependencies are managed in conda is different from the way it’s managed in pip, which is the default used in my team.
In my team we have a set of tasks we perform before deploying a project, and using different tools — conda —, could have confused when trying to deploy.
So one tool to develop and deploy. This way I reduce the probability of having surprises later on.
Using pyenv
If you are familiar with Node Js you probably know Node Version Manager (nvm) that allows you to install and switch between Node Js versions easily.
It happens that Python also has its own version manager — pyenv.
Pyenv allows us to switch between Python versions easily on our machine. It does not install Python globally on your computer but inside a folder — versions — located inside the pyenv installation on your machine.

To install pyenv go to this link and choose the preferable method according to your OS. In my case is MacOS, so the commands I used are the following:
— Install pyenv
brew install pyenv
— Setup pyenv and enable shims
Pyenv uses the shim design pattern under the hood. What this means is that when we execute any Python command on our computer, it intercepts it and directs us to the selected Python version we set with it.
To set pyenv and enable shim on MacOS (if your OS is zsh and not bash), run the following commands:
echo 'export PYENV_ROOT="$HOME/.pyenv"' >> ~/.zshrc
echo '[[ -d $PYENV_ROOT/bin ]] && export PATH="$PYENV_ROOT/bin:$PATH"' >> ~/.zshrc
echo 'eval "$(pyenv init -)"' >> ~/.zshrc
After running all these commands, reload the .zshrc file.
. ~/.zprofile
— Installing a specific Python version
Now that you’re all set, you can go ahead and install any available Python version you want. To see all versions available run the following command:
pyenv install -l
You should see a long list of available versions like this one:
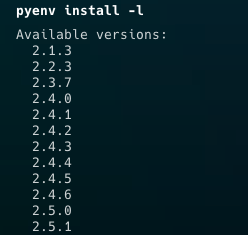
We can install the desired version as follows:
pyenv install <version> # 3.12.2This will install Python 3.12.2 inside our versions folder as I explained earlier:

Now we can set Python 3.12 as default using pyenv:
pyenv global 3.12.2
Now your default Python is 3.12.2:
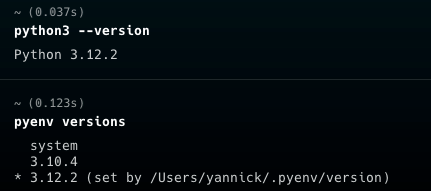
There are lots of things I would like to cover about pyenv, but this has to be in another article entirely dedicated to it.
Things like managing a virtual environment with pyenv, using pip, using local pyenv instead of global (like we did here), and so on.
Using asdf
Unlike pyenv, asdf is a multi-language tool for version management. It can be used with Node Js, Python, Ruby, etc.
Each programming language is considered to be a plugin that you can add to asdf and manage its version.
Like pyenv, it is based on shims design pattern. Each plugin (programming language) will have its shim to ‘intercept’ and handle executions.
To install it, go ahead and choose the proper installation instructions according to your OS. If you’re using MacOS, you can download and install it by running the following commands:
# first install dependencies if not installed already
brew install coreutils curl git
You have two installation options.
— Official download
This is the recommended method of installation. It clones the repository inside a folder named .asdf in your root directory:
git clone https://github.com/asdf-vm/asdf.git ~/.asdf --branch v0.14.0— Community Supported Downloads
In my case, I installed it using this command.
brew install asdf
If you downloaded asdf using Git, finish it by running the following command you find the website according to your Shell and OS.
— Using asdf with Python
As I said earlier, each programming language and other tools in asdf is a plugin. A plugin can be added as follows:
asdf plugin add <plugin_name>If you wish to see the available plugins you can install and use, run the the following command:
asdf plugin list allThis will list all available plugins:
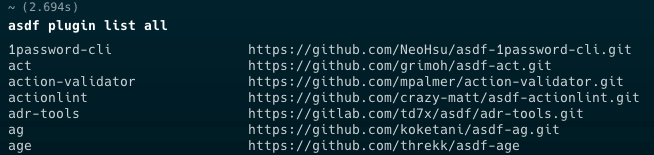
Adding a Python plugin can be easily done by running the following command:
asdf plugin add python
After adding a new plugin, you can now install any version of that plugin that you want. Installing a version using asdf is similar to the way we install using pyenv:
asdf install python 3.12.2 # install version 3.12.2 for Python pluginSetting a preferable version using asdf is also very similar to the way we do using pyenv:
asdf global python 3.12.2Conclusion
I guess I had multiple choices I could’ve made and avoid breaking my computer as I explained in my previous article.
The problem is that I was so obsessed with making Python 3.12 my default system’s Python that I ignored all these solutions. I made a mistake that led me to learn lots of things I didn’t know.
Mistakes are part of life. We learn and grow from our mistakes. I have no problem to admit that I made them every day.
These are the lessons that I took from this particular mistake:
- You don’t mess with the System’s Python. Especially if you’re on Linux.
- There are multiple ways of managing Python versions (like asdf, which is a new tool I learned)
- I did not know about the shim design pattern.
- And many more
There are still other ways for you to install and manage Python versions, but I find these to be better, and currently, I’m favoring pyenv and using asdf for other Programming Languages like Node Js.
Hi! Thank you for your time reading my article. If you enjoyed this article and would like to receive similar content directly to your inbox
In Plain English 🚀
Thank you for being a part of the In Plain English community! Before you go:
- Be sure to clap and follow the writer ️👏️️
- Follow us: X | LinkedIn | YouTube | Discord | Newsletter
- Visit our other platforms: Stackademic | CoFeed | Venture | Cubed
- More content at PlainEnglish.io


