
3 Ways to Implement the Singleton Pattern in TypeScript With Node.js
Choose which way works best for your needs

The singleton pattern is one of the most straightforward creational design patterns to implement. Aside from being easy to understand, it doesn’t require that many lines of code to write.
Throughout my career, I’ve come across code that uses different singleton implementation variations. I thought it would be great to compile these types of implementations in one article so that readers can use it as a reference in their future projects.
Singleton Review
Let’s start with a quick review of what problem a singleton pattern is trying to solve. A singleton pattern is used to maintain a single instance of an object without creating a new one — even if the instance is used in different parts of our application.

This approach applies to object instantiations that you do not want to repeat. Some examples of implementations are logging, caching, and database connection.
We will use logging as an example in this article.
The Problem — Logging Example
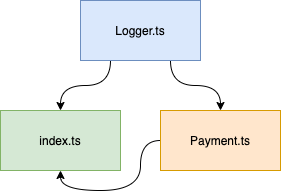
Here’s an example problem: I have a Node.js app for payment processing that uses a Logger class. We want to keep a single logger instance in this example and ensure the Logger state is shared across the Payment app. To keep things simple, let’s say that we need to ensure that the logger needs to keep track of the total number of logged messages within the app. Ensuring that the counter is tracked globally within the app means that we will need a singleton class to achieve this.
Let’s go through each of the classes that we will be using.
Logger class: Logger.ts
A basic logger class that allows its clients to log a message with a timestamp. It also allows the client to retrieve the total number of logged messages.
Payment class: Payment.ts
The Payment processing class processes the payment. It logs the payment instantiation and payment processing:
The entry point of the app: index.ts
The entry point creates an instance of the Logger class and processes the payment. It also processes the payment through the Payment class:
If we run the code above, we will get the following output:
# Run the app
tsc && node dist/creational/singleton/problem/index.js
Notice that the log count stays at 1 despite showing 3 logged messages. The count remains at 1 because a new instance of Logger is created in index.ts and Payment.ts separately. The log count here only represents what’s logged in index.ts. However, we also want to include the number of logged messages in the Payment class.
Here are different ways to solve this problem by using a singleton design pattern.
GitHub Repository (Optional)
If you want to follow along with the TyepScript code examples below, the code I’m using is available in the following GitHub repository:
Clone a local copy or run it directly in Gitpod.
Solution #1: Add a Separate Singleton Class
We can add a Singleton class to the Logger.ts file. The solution here is your standard “taken from the books” singleton implementation in its own Singleton class.
The ever-familiar getInstance() method ensures that there is always one instance. You will also appreciate that TypeScript allows us to declare private constructors, guaranteeing no other way to instantiate the Singleton class. Using the Logger class directly instead of using the Singleton class can bypass the singleton that getInstance() provides. We can resolve this later in Solution #2.
The Logger.ts file will now look like below. Notice the Singleton class added to the file:
Singleton.getInstance() instantiates the Logger class and ensures that there is always a single instance:
The code below shows how the Payment class uses the Singleton class:
If we run index.ts, we will get the result we want by using a singleton design pattern:
# Run the app
tsc && node dist/creational/singleton/separateClass/index.js
The final log count is 3, which means our Singleton class is working as expected.
This approach is straightforward and handy. However, creating a new class may not always be the best solution. Sometimes, the fewer classes we have to deal with, the better (as Solution #2 will demonstrate).
I’ve seen this used quite often if there is already an existing class that needs to be converted to a singleton. Instead of modifying the Logger class itself, it’s simpler to create a separate Singleton class to invoke an existing class.
Solution #2: Modify the Class That You Want to Use as a Singleton
The approach here is to modify the Logger class such that it implements singleton by itself without having to write another class. The benefit is that there is no way to bypass the instantiation of the class as a singleton (unlike in Solution #1).
Let’s modify the Logger class so that the singleton instantiation happens within the class:
Here are a couple of changes that we made from Solution #1:
- We have moved the
getInstancemethod into theLoggerclass. - We have converted the
Loggerclass’s constructor to private, making the instantiation of the class available within the class only.
Let’s update the Payment class to use the singleton Logger class’s getInstance method:
Let’s update the entry point to use the singleton Logger class’s getInstance method:
Running the app will output our expected results, where the final log count is 3:
# Run the app
tsc && node dist/creational/singleton/sameClass/index.js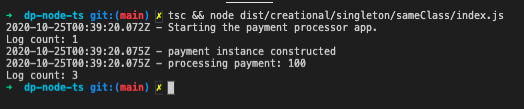
Use this approach when you are sure from the get-go that the class you are writing will be a singleton.
Solution #3: The Most Straightforward Way — Module Singletons
For this approach, we are going to take advantage of how Node modules behave like singletons.
We will do the following in our Logger.ts file:
- Remove the
getInstancemethod in theLoggerclass. - Make the constructor public in the
Loggerclass. - Export a new instance of the
Loggerclass.
Notice how we made this shortcut out of our previous solutions. We will then import this singleton class from our Logger class and index.ts file.
Import the Logger singleton class from the Payment class:
Import the Logger singleton class from the entry point:
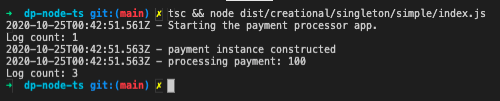
The code above should have the same results as the previous solutions, proving that it is a singleton. After running the following command:
# Run the app
tsc && node dist/creational/singleton/simple/index.js
We should see the following output:
Note: There are caveats that you need to be aware of when using Node.js modules where ensuring singleton is not always guaranteed.
Conclusion
Solution #1 is usually applicable if you have an existing class that you’d like to convert to singleton without modifying that existing class. Solution #2 works if you are writing a new class that you know up front will be a singleton. I would recommend Solution #3 as long as you know the caveats that don't guarantee singleton.
Solutions #1 and #2 require us to write more code. However, both solutions guarantee singleton.


