
3 Easy Ways to Deploy your Streamlit Web App Online
At no cost, and no docker containers required
Web apps are becoming an increasingly popular way to share your data science projects with other users. This is due to the emergence of easy-to-use Python libraries such as Streamlit, and the increased convenience of deploying web apps to the cloud at no cost.

What is Streamlit?
Streamlit a free, open-source Python framework which you can use to easily build and share your interactive dashboards and machine learning web apps. If you are familiar with Python, you should be able to learn and build Streamlit apps within hours, if not minutes. Do check out the gallery for some app inspirations! https://streamlit.io/gallery
Cloud Deployment Process
Not too long ago, deploying even a simple web app to the cloud requires extensive app containerization knowledge and tools, and of course money. These days, the process has become as easy as uploading a couple of files to the web and running a few command lines. In this article, I will go through how to deploy your Streamlit app to 3 public cloud platforms that are easy and free to use.
This is how the end product looks in each platform:
Hugging Face Spaces
https://huggingface.co/spaces/bohmian/simple_streamlit_app
Streamlit Cloud
https://share.streamlit.io/damianboh/simple_streamlit_app/main/app.py
Heroku App Platform
https://simple-streamlit-app-bohmian.herokuapp.com/

One app, 3 cloud platforms. Let’s get started!
1. Build a Simple Streamlit Web App
Let’s first create a simple web app with Streamlit, before learning how to deploy it to the three cloud platforms.
1.1. Installation and Setting Up
First, install the Python Streamlit package using the pip tool: pip install streamlit .
Then we create a folder simple_streamlit_app to store the files required for the app.
1.2. Web App Script
Inside the folder, we create a simple script and name it app.py. Here we code a simple app which demonstrates the usage of text input and slider widgets, as well as how DataFrames can be displayed.
import streamlit as st
import pandas as pdst.title(“A Simple Streamlit Web App”)name = st.text_input(“Enter your name”, ‘’)st.write(f”Hello {name}!”)x = st.slider(“Select an integer x”, 0, 10, 1)
y = st.slider(“Select an integer y”, 0, 10, 1)df = pd.DataFrame({“x”: [x], “y”: [y] , “x + y”: [x + y]}, index = [“addition row”])
st.write(df)The code above is pretty much self-explanatory. The app takes in a user text input and stores it as a name variable, before printing out a greeting text.
It also takes in two slider inputs of integers ranging from 0 to 10, storing them as x and y variables. It then prints out the variables and their sums in a DataFrame df.
1.3. Run the App Locally
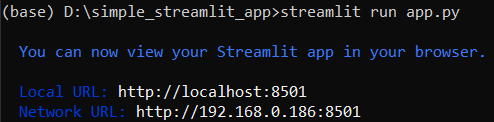
That’s all you need for the app. To start the app locally, simply run the following command in the terminal, in the same folder as your app.py file.
streamlit run app.pyIf you are successful, the following should appear:
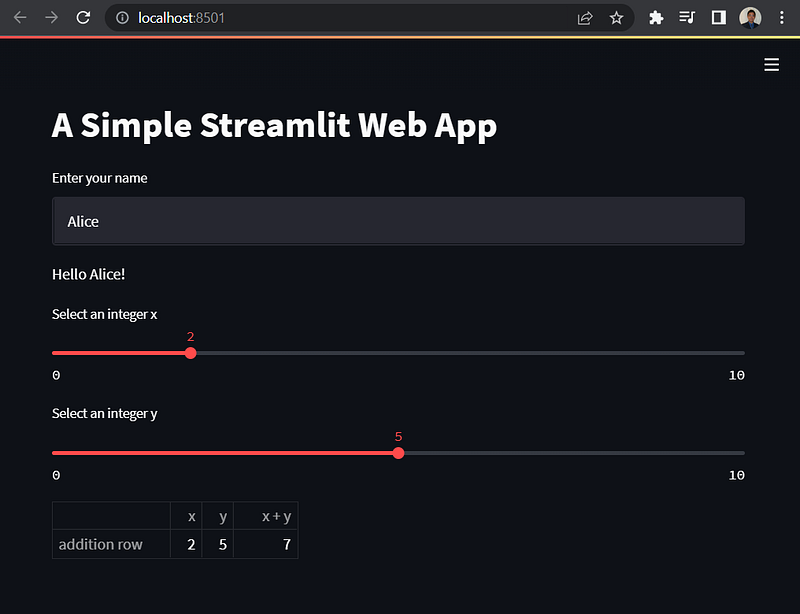
Your browser should also pop up with the above Local URL keyed in, and you will see something like this. Here I have entered a few inputs to show how the app responds.
2. Before Deploying to the Cloud…
We are now ready to deploy your app publicly on the cloud. You need to do two more things before deploying to any of the cloud platforms.
2.1. Install git
Install the git command line tool from this link. This allows you to run git commands on the terminal to upload your app files to the web.
2.2. Add a ‘requirements.text’ file
All the cloud platforms below need to know what Python packages to install before they can start your app. We specify this in a requirements.txt file.
streamlit
pandas
3. First Platform: Deploy your App to Hugging Face Spaces
3.1. Set up a Hugging Face Account
Create a Hugging Face account here: https://huggingface.co/
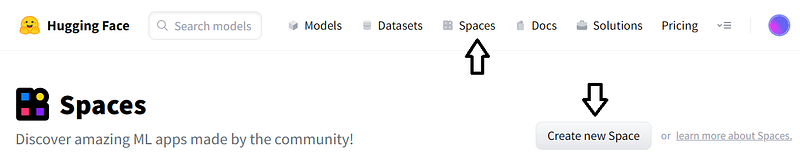
3.2. Create a New Space
Click on Spaces at the top navigation bar. Then click on the ‘Create new Space’ button.
Fill in the form which appears:
- Enter your desired ‘Space name’ (e.g. ‘simple_streamlit_app’)
- Select the Space SDK by clicking on ‘Streamlit’
- Hit the ‘Create space’ button.
3.3. Upload App Files to your New Hugging Face Space
You will now be taken to a page with this command line displayed. (Your’s will be different from mine because you are using a different space.)

- Copy the command above and run it into your terminal. (Remember your command is different.)
- A folder with the
name of your new spacewill be created locally on your computer. - Copy your
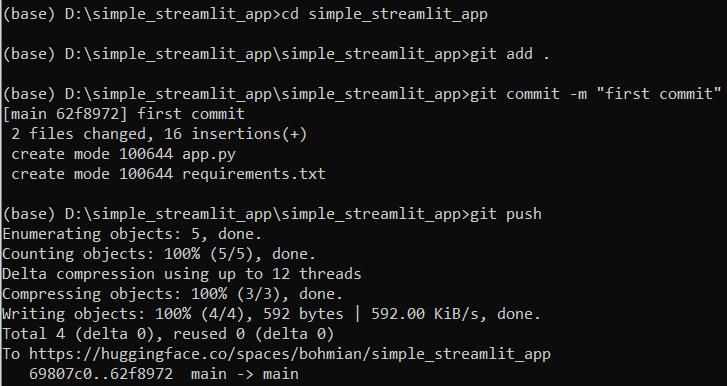
app.pyandrequirements.txtfile into this new folder. - On the terminal, run the following commands, replacing the folder name. These commands tell git to take into account the 2 new files you have added in the previous step, commit them and push them to your new Hugging Face Spaces.
cd name_of_your_new_folder
git add .
git commit -m "first commit"
git push
If successful, you should see the following output.
3.4. Your Public App is Now Live Hugging Face Spaces!
Go back to the browser where your Hugging Face Space page is displayed. After waiting for a couple of minutes, refresh the page and you should see your app running! Anyone can access this app using the link to this page. Here’s mine: https://huggingface.co/spaces/bohmian/simple_streamlit_app
Congratulations, you have published your Streamlit app! Now let’s explore the second cloud platform.
4. Second Platform: Deploy your App to Streamlit Cloud
Streamlit offers its own cloud platform too.
4.1. Set up a GitHub Account
Create a GitHub account here: https://github.com/
4.2. Create a New GitHub Repository
- In the upper-right corner of any page, use the drop-down + menu, and select ‘New repository’.
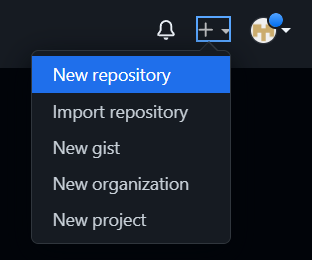
- Fill in your desired ‘repository name’, then scroll down and click on ‘Create repository’. Do not change any other parameters.
4.3. Upload Files to your GitHub Repository
- Now click on ‘uploading an existing file’.
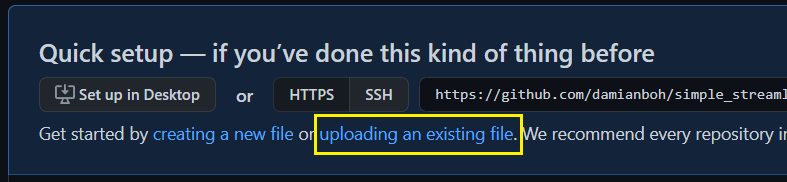
- Drag and drop your
app.pyandrequirements.txtfiles inside the following page.
4.1. Set up a Streamlit Cloud Account
Create a Streamlit cloud account here: https://streamlit.io/cloud
4.2. Create a New App and Link your GitHub Account
- Once you are logged in, there should be a very obvious (you’ll see why) ‘New app’ button for you to click on.
- You will then see a prompt to ‘Connect to GitHub’. Log in to the GitHub account that you created earlier.
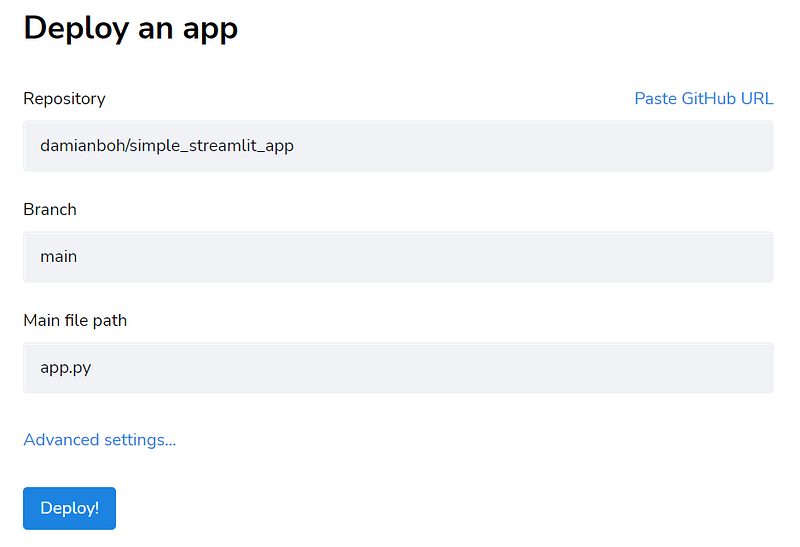
4.3. Deploy your App
- In the next screen, search for your GitHub repository that you created earlier by typing its name under ‘Repository’.
- Change the ‘Main file path’ to ‘app.py’.
- Click on Deploy!
4.4. Your Public App is Now Live on Streamlit Cloud!
After waiting for some time, your app will appear. Congrats! Here’s mine: https://share.streamlit.io/damianboh/simple_streamlit_app/main/app.py
Last but not least. Let’s look at our third cloud platform.
5. Third Platform: Deploy your App to Heroku App Cloud
A couple more files are required here, as Heroku App is a general web app cloud platform which does not have the default Streamlit configurations.
5.1. Add a ‘setup.sh’ File
This is a shell file, and you need to add the following shell command inside the file. It basically tells Heroku what to configure and set up while running the Streamlit app.
mkdir -p ~/.streamlit/
echo “\
[server]\n\
headless = true\n\
port = $PORT\n\
enableCORS = false\n\
\n\
“ > ~/.streamlit/config.toml
5.2. Add a ‘Procfile’ File
There is no file extension for this file. This file specifies the commands for Heroku to run when the app is deployed. We specify that this is a web app with the shell file as the configuration, and call Streamlit to run app.py.
web: sh setup.sh && streamlit run app.py5.3. Create a New Folder for all Files
In our previous folder containing our files, recall that a local git repository has been set up which links to Hugging Face Spaces. We do not want to make any changes to this folder. Hence we create a new one and copy into it our app.py, requirements.txt, setup.sh and Procfile files.
5.4. Set up a Heroku App Cloud Account
Create a Herokuapp account here: https://herokuapp.com/
5.5. Create a Local Git Repository
Run the following commands in the terminal in your folder. This initializes a local git repository, adds all the files and commits all changes to it.
git init
git add .
git commit -m “first commit”
5.6. Create a New Heroku App and Push to its Repository
Next, run the following commands (change the ‘name of your app’) which will perform the following in sequence:
- Log in to your Heroku account (your browser will open for you to perform the log in)
- Create your Heroku app with any name you want
- Push the repository to Heroku
heroku login
heroku create name_of_your_app (change this)
git push heroku master
5.7. Your Public App is Now Live on Heroku App Cloud!
The whole deployment process will be displayed in the terminal. Once it is done, your app should be live on <name_of_your_app>.herokuapp.com. Congrats!
Here’s mine: https://simple-streamlit-app-bohmian.herokuapp.com/
Final Words (Pros and Cons)
You have now learnt to deploy your Streamlit app to three different cloud platforms. You can choose to deploy to any of the clouds depending on your preference. Here are a few points for consideration.
Hugging Face Spaces
Hugging Face Spaces does not deploy your app onto a full browser page, rather it is embedded in a frame with all its navigation bars and tools at the top. If you would rather a full page app, you may choose the other two platforms (I really love the cute Hugging Face logo at the top though).
Streamlit Cloud
Streamlit Cloud is the fastest to load the app when you access it. However both Hugging Face Spaces and Streamlit Cloud allows the users to view the source code of public apps. I leave it as an exercise for the reader to find out how. If you want to keep the source code secret, you may consider Heroku App instead.
Heroku App
Some people may not like the hassle of creating additional files for Heroku App, it also starts the app quite slowly after the app has not been used for a long time. However, you might have already deployed apps with other frameworks (such as Flask and Django) on Heroku before. In this case you may prefer to manage all your apps on Heroku, including the Streamlit app. Note that a free Heroku account only allows up to 5 apps.
I hope that you have found this article useful. Have fun with Streamlit. Happy building and deploying!
If you have enjoyed this article, feel free to follow me or check out my other articles below! :)
If you enjoy articles like these and wish to support writers like me, do consider signing up to become a Medium member. At $5 a month, you will get unlimited access to any article on Medium. If you sign up using my link, I’ll earn a small commission at no extra cost to you.


