
Learn the Fundamentals of Kubernetes for Software Developers
Let’s get started with the mysterious k8s
Kubernetes is an open-source container orchestration system that automates the deployment, scaling, and management of containerized applications. Kubernetes is commonly referred to as k8s for simplicity since there are 8 characters between k and s. Kubernetes is widely used in the modern software development practice and is available in all major cloud providers such as Google Cloud Platform (GCP) and Amazon Web Service (AWS).

Compared to traditional monolithic and virtualized deployment practices, Kubernetes brings revolutionary changes, including self-healing, automated rollouts and rollbacks, automatic resource management, secret and configuration management, service discovery and load balancing, and storage orchestration, etc. If you want to learn more about the introduction of Kubernetes, you can check the official document of Kubernetes. In this post, I will give hands-on examples of Kubernetes and explain the most important concepts for software developers such as Pod, Deployment, Namespace, etc. Command-line examples and YAML configuration files will also be explained with easy-to-understand terms. Besides, there are two bonuses for using Kubernetes in this post which can be very helpful for you as a software developer, don’t miss them :-).
As a software developer, you normally don’t need to install a Kubernetes cluster in your institution by yourself. This should be done by your system administrator or provided by your cloud provider. However, for learning purposes, it’s better not to mess with the production cluster. Luckily, there is a very convenient tool called minikube which can spin up a local Kubernetes cluster on your laptop/desktop quickly. Minikube is perfect for learning, development, or testing purposes.
On Linux, the commands to install minikube are:
Then you can start up your cluster by:
$ minikube startTo interact with Kubernetes, you need to install kubectl. On Linux, the commands are:
To verify that kubectl is installed properly and is connected to your cluster (which should be done automatically) run:
$ kubectl versionWe shall see the client and server versions displayed on the screen, which means everything is set up and we can start our journey with Kubernetes.
Pods
Pods are the smallest deployable units that you can create and manage in Kubernetes. A Pod is a group of one or more containers designed to be scheduled and run together. The containers are normally Docker containers which are standard units of software that package up code and all the dependencies. These containers share the same storage and network resources and act as if they are on the same “localhost”. Usually, you don’t need to create Pods directly but would create them indirectly with workload resources such as Deployment. However, as a beginner, it is helpful to know how a Pod is created so you can better understand what a Deployment is, one of the most important concepts in Kubernetes.
To create a Pod, we need to specify the configuration manifest in a YAML file, which has the following content:
Explanations for each field:
- apiVersion — which version of the Kubernetes API to be used to create the Pod object. kubectl interacts with the Kubernetes cluster through kube-apiserver. Under the hood, all actions are done by REST API calls. Therefore, you need to specify the
apiVersionfield for all the Kubernetes resources. A list ofapiVersioncan be found in this link. - kind — what type of object to create. Here we will create a Pod object, later we see other types of objects.
- metadata — the metadata for the object which helps uniquely identify the object, including the
nameandlabels. The labels are commonly used to select objects in Kubernetes and have thekey:valueformat. An object can have multiple labels. - spec — the desired state for the object. The format for
specis different for each Kubernetes object and can contain nestedspecfields. The most common scenario is that thespecof a Deployment contains aspecfor the Pods contained in it. - spec.containers — the containers to run in the Pod. The value for this field is a list which means there can be multiple containers running in the same Pod. We need to specify the
name,image, andportsfor each container.
To create a Pod from the configuration YAML file, run:
$ kubectl apply -f pod.yaml
pod/nginx-pod created
The Pod is created asynchronously. If you check the Pod with the get command immediately after it’s created, you will probably see that it’s being created:
$ kubectl get pods
nginx-pod             0/1     ContainerCreating   0               4s
You can use the describe command to check the details of the Pod, which include all the statuses and events for the Pod.
$ kubectl describe pod ngins-podTo delete a Pod, run:
$ kubectl delete pod nginx-podReplicaSet
As mentioned above, we rarely create Pods directly but would do so with some workload resources. ReplicaSet is one of the workload resources. It is a definition of how many replicas of a Pod should be run at the same time. When a Pod replica fails, a new one will be created by the ReplicaSet to main the same number of replicas for the Pod all the time.
This is the YAML file for creating a ReplicaSet for the Pod demonstrated above:
Note for important fields:
apiVersionandkindneed to be updated accordingly for the ReplicaSet.metadata.labels— these are the labels for the ReplicaSet, don’t get them confused with the labels for the Pod below.spec.replicas— how many replicas of the Pod to maintain.spec.selector— the selector selects which Pod to be used in the ReplicaSet. It usesmatchLabelsto match the labels of Pods and select the matched one to be used in this ReplicaSet. You can select a Pod not defined in the current ReplicaSet, but it’s highly discouraged because it will introduce confusion or even error for the Kubernetes cluster. Check the documentation for labels and selectors for more details.spec.template— specify the template for the Pod. As you can see, the template field is the same as the Pod definition above, without theapiVersionandkindfields which are handled by the ReplicaSet. Importantly, the Podlabelsdefined inspec.template.metada.labelsare used byspec.selector.matchLabelsabove. The nestedspecis thespecfor the Pod, which defines desired state for the Pod.
Let’s create a ReplicaSet with this YAML file:
$ kubectl apply -f replicaset.yaml
replicaset.apps/nginx-replicaset created
As with Pods, the ReplicaSet can also be checked with the get command:
$ kubectl get replicasets.appNAME DESIRED CURRENT READY AGE
nginx-replicaset 3 3 3 8sWe can verify that there are three replicas for the same Pod running at the same time, each has a unique identifier:
$ kubectl get podsNAME READY STATUS RESTARTS AGE
nginx-replicaset-bzd2q 1/1 Running 0 12s
nginx-replicaset-kk2l9 1/1 Running 0 12s
nginx-replicaset-lv5hc 1/1 Running 0 12sLet’s now delete a Pod to see what will happen:
$ kubectl delete pod nginx-replicaset-bzd2q
pod "nginx-replicaset-bzd2q" deleted
$ kubectl get pods
NAME READY STATUS RESTARTS AGE
nginx-replicaset-kk2l9 1/1 Running 0 4m34s
nginx-replicaset-lv5hc 1/1 Running 0 4m34s
nginx-replicaset-nkmjk 1/1 Running 0 3sWe see that a new Pod is created which keeps the total number of replicas as 3.
However, if you change the image for the Pod, the replicas won’t be recreated. Try it yourself if you don’t believe it. For example, try to change nginx:1.19.10-alpine to nginx:1.20.0-alpine. Here is where Deployment shines.
Let’s remove the ReplicaSet before proceeding:
$ kubectl delete replicasets.apps nginx-replicaset
replicaset.apps "nginx-replicaset" deleted
Deployment
A Deployment is a workload resource in Kubernetes which provides declarative management for Pods and ReplicaSets. Creating a Deployment in Kubernetes automatically creates a ReplicaSet, which then creates the Pod replicas defined by the template. Therefore, we should normally not manage ReplicaSets or Pods directly, as the Deployment will manage them for us automatically. Besides the self-healing feature of ReplicaSet, Deployment also has the benefit of automated rollouts and rollbacks. Rollout means that if the Pod template is updated, for example, the image for a container is updated, a new ReplicaSet will be created by gradually starting new Pods and deleting old ones and thus keeping the total number of running Pods constant. On the other hand, rollback means we can roll back to a previous Deployment if we are unhappy about the current one. The number of Pods will also be kept constant during the rollback process and maintain the stability of the system with no downtime.
This is the YAML file for creating a Deployment based on the ReplicaSet and Pod definitions introduced previously:
You see everything is the same as the YAML file for ReplicaSet except the kind field which defines the resource type. It should be Deployment here since we are creating a Deployment rather than a ReplicaSet.
Let’s create a Deployment based on this YAML file:
$ kubectl apply -f deployment.yaml
deployment.apps/nginx-deployment created
Now let’s check the Deployment, ReplicaSet and Pods created:
$ kubectl get deployments.apps
NAME               READY   UP-TO-DATE   AVAILABLE   AGE
nginx-deployment   3/3     3            3           5s
$ kubectl get replicasets.apps
NAME DESIRED CURRENT READY AGE
nginx-deployment-7484cf4875 3 3 3 8s$ kubectl get pods
NAME READY STATUS RESTARTS AGE
nginx-deployment-7484cf4875-dmrkj 1/1 Running 0 11s
nginx-deployment-7484cf4875-qh9bb 1/1 Running 0 11s
nginx-deployment-7484cf4875-zjplx 1/1 Running 0 11sPay close attention to the names of the Deployment, ReplicaSet, and Pods. There is an obvious pattern that the Deployment comprises the ReplicaSet which then comprises the Pod replicas. The name of the ReplicaSet is in the format of [DEPLOYMENT]-[RANDOM-STRING]. The random string 7484cf4875 is generated using the hash of the Pod template as the seed, which means that when the Pod template is changed, the ReplicaSet will be changed. Let’s see it in practice.
Let’s change the image from nginx:1.19.10-alpine to nginx:1.20.0-alpine.
# deployment.yaml...
containers:
- name: nginx
image: nginx:1.20.0-alpine
ports:
- containerPort: 80
...We already know that nothing will happen when we manage the ReplicaSet directly. Let’s see what will happen with the Deployment:
# kubectl apply -f deployment.yaml
deployment.apps/nginx-deployment configured
$ kubectl get deployments.apps
NAME READY UP-TO-DATE AVAILABLE AGE
nginx-deployment 3/3 3 3 24m$ kubectl get replicasets.apps
NAME DESIRED CURRENT READY AGE
nginx-deployment-7484cf4875 0 0 0 25m
nginx-deployment-95d596f7b 3 3 3 6m29s$ kubectl get pods
NAME READY STATUS RESTARTS AGE
nginx-deployment-95d596f7b-c5xhf 1/1 Running 0 105s
nginx-deployment-95d596f7b-gzhjm 1/1 Running 0 3m
nginx-deployment-95d596f7b-kkg69 1/1 Running 0 106sIf you run the commands quickly enough, you will be able to see the transition states of the ReplicaSet and Pods, where the new ReplicaSet and Pods are created and the old ones are still in function, as indicated by the READY, UP-TODATE, AVAILABLE, DESIRED, CURRENT, READY, etc, fields.
The results above show that a new ReplicaSet with a new random string 95d596f7b is created, and a new set of Pod replicas are created for that ReplicaSet. The new random string is generated using the hash of the new Pod template as the feed.
To let you have a better understanding of the random string of the ReplicaSet, let’s change the image back to nginx:1.19.10-alpine. This time let’s change it on the command line:
$ kubectl set image deployment/nginx-deployment nginx=nginx:1.19.10-alpine
deployment.apps/nginx-deployment image updated
$ kubectl get deployments.apps
NAME READY UP-TO-DATE AVAILABLE AGE
nginx-deployment 3/3 3 3 33m$ kubectl get replicasets.apps
NAME DESIRED CURRENT READY AGE
nginx-deployment-7484cf4875 3 3 3 33m
nginx-deployment-95d596f7b 0 0 0 15m$ kubectl get pods
NAME READY STATUS RESTARTS AGE
nginx-deployment-7484cf4875-26msj 1/1 Running 0 11s
nginx-deployment-7484cf4875-snk2t 1/1 Running 0 14s
nginx-deployment-7484cf4875-zmxxj 1/1 Running 0 12sInterestingly, the old ReplicaSet with string 7484cf4875 is running now, so are the Pod replicas. This proves that the random string for the ReplicaSet is generated using the Pod template as the feed. When the Pod template is the same, the random string will be the same, which in turn results in the same ReplicaSet.
We can check the rollout status of the deployment by:
$ kubectl rollout status deployment nginx-deployment
deployment "nginx-deployment" successfully rolled out
It shows that the deployment has been successfully rolled out. As we are using a minimal alpine image for demonstration purposes, the rollout is very fast. If you are using a larger image, or have a slower cluster, or just check quickly enough, you can see the intermediate state:
Waiting for rollout to finish: 2 out of 3 new replicas have been updated...We can check the rollout history of the Deployment by:
$ kubectl rollout history deployment nginx-deployment
deployment.apps/nginx-deployment
REVISION  CHANGE-CAUSE
2         <none>
3         <none>
There is not much information for each rollout. We can check the details of each rollout version by:
$ kubectl rollout history deployment nginx-deployment --revision=2Let’s add an annotation to the latest revision with the kubernetes.io/change-cause key. Note that the annotation can only be added to the latest version of the deployment. It will be added to the CHANGE-CAUSE field above and make the revisions easier to be identified:
$ kubectl annotate deployment nginx-deployment kubernetes.io/change-cause="with image nginx:1.19.10-alpine"$ kubectl rollout history deployment nginx-deployment
deployment.apps/nginx-deployment
REVISION CHANGE-CAUSE
2 <none>
3 with image nginx:1.19.10-alpineIf we are unhappy with the current version for some reason, we can rollback to the previous version:
$ kubectl rollout undo deployment nginx-deployment
deployment.apps/nginx-deployment rolled back
We can describe the Deployment to see the details and check which image of the container is used:
$ kubectl describe deployments.apps nginx-deploymentNamespace
Namespaces are virtual clusters existing in the same physical cluster. Namespaces provide a scope for resource names, which must be unique within a namespace, but not across namespaces. We can use namespaces to subdivide our cluster according to different purposes, for example for production vs staging environments.
Up to now, we haven’t specified any namespace in our commands. However, this doesn’t mean that we are not using a namespace. Actually we have been using the default namespace implicitly. We can check the current namespaces by:
$ kubectl get namespaces
NAME              STATUS   AGE
default           Active   7d17h
kube-node-lease   Active   7d17h
kube-public       Active   7d17h
kube-system       Active   7d17h
default is the default namespace we have been using. The other namespaces with the kube- prefix are systematic namespaces used by Kubernetes. We should avoid using them in our work.
We can explicitly specify the namespace when we access some resource, for example:
$ kubectl get deployments.apps
NAME               READY   UP-TO-DATE   AVAILABLE   AGE
nginx-deployment   3/3     3            3           7h44m
$ kubectl get deployments.apps --namespace default
NAME READY UP-TO-DATE AVAILABLE AGE
nginx-deployment 3/3 3 3 7h44mLet’s create a new namespace for the production environment:
$ kubectl create namespace productionWe can also create namespaces with a YAML file, which can be better for version control of the code:
Then the Namespace resource can be created like any other resource:
$ kubectl apply -f namespace.yaml$ kubectl get namespaces
NAME STATUS AGE
default Active 7d17h
kube-node-lease Active 7d17h
kube-public Active 7d17h
kube-system Active 7d17h
production Active 3m5s
staging Active 4sLet’s now create a Deployment in the production and staging namespaces, respectively. For simplicity, we will use the command line and specify different names for them:
$ kubectl create deployment production-deployment --image=nginx:1.21.3-alpine --replicas=3 --namespace=production
deployment.apps/production-deployment created
$ kubectl create deployment staging-deployment --image=nginx:1.21.3-alpine --replicas=3 --namespace=staging
deployment.apps/staging-deployment createdThen we can check the Deployments in each namespace:
$ kubectl get deployments.apps --namespace=default
NAME               READY   UP-TO-DATE   AVAILABLE   AGE
nginx-deployment   3/3     3            3           7h58m
$ kubectl get deployments.apps --namespace=production
NAME READY UP-TO-DATE AVAILABLE AGE
production-deployment 3/3 3 3 104s$ kubectl get deployments.apps --namespace=staging
NAME READY UP-TO-DATE AVAILABLE AGE
staging-deployment 3/3 3 3 57sWe can see that the Deployment created in each namespace can only be found in the respective namespaces.
As we have seen, namespaces provide logical separation for the resources. But hey can do much more than that. We can specify different Resource Quotas and Limit Ranges in each namespace which define how much resource in total can be used and how much for each resource in the namespace. However, this is quite advanced usage and is out of the scope of this post. Luckily, as a developer, you normally don’t have to do it yourself and can just use the namespaces assigned by your system administrators.
Bonus — Autocompletion
As you may have already noticed, it’s quite cumbersome to type the commands for kubectl. You have to remember the resource types and options and it’s very easy to have typos. Luckily, kubectl has an autocompletion feature that can save you a lot of typing. To enable autocompletion in Bash, you need to run the following commands:
Now you should have autocompletion enabled for kubectl. Try to press TAB when you enter the following commands, you will have the fancy autocompletion for the resources and options now:
$ kubectl get deployments.apps --namespace=productionBonus — k9s
There is a very fancy tool for monitoring the objects in a Kubernetes cluster called k9s. With k9s, we can monitor the different types of objects created as well the system resources like CPU and memory in a user-friendly console. We can even ssh to the Pods in k9s and run some commands in them directly.
You can install k9s on your computer according to the instructions specified here. For Linux, you can install k9s with snap, or from the source code. From the source code, you will install the latest version of k9s, but normally an older but stable version with snap.
With snap:
$ sudo snap install k9sFrom the source code:
# Get the go repo
$ git clone https://github.com/derailed/k9s.git
$ cd k9s
$ make build
$ sudo cp ./execs/k9s /usr/local/bin/By default, k9s uses the same credentials as kubectl. In our example here, we can use k9s to access our cluster directly because there is no special authentication for it. To open the console for k9s, run:
# To check a specific namespace.
$ k9s --namespace=production
# To check all the namespecs.
$ k9s --all-namespacesYou will see the charming interface of k9s opened (assuming you have specified --all-namespaces):
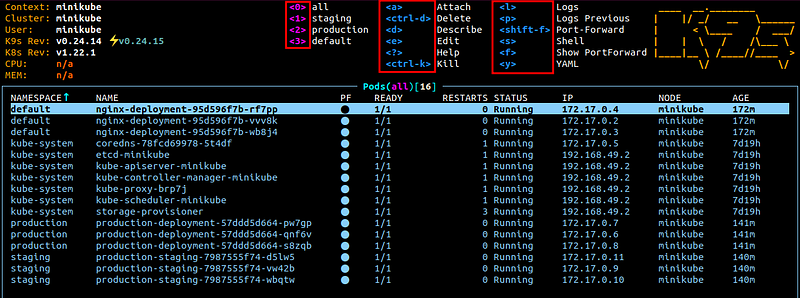
You can press the shortcuts in the red boxes indicated in the picture above. For detailed explanations for each key binding, please check this link. If you need to check your Kubernetes resources in your work, do try out k9s, which is really cool and convenient.
We have covered the fundamentals of Kubernetes for software developers in this post. Now you should have a better understanding of Kubernetes and can start to create deployments in your project. However, this is just an introductory post and didn’t touch on the more advanced topics such as Service, Volume, ConfigMap, Secret, etc. There will be dedicated posts for each of these topics. There will also be a practical post for deploying and configuring Airflow on a Kubernetes cluster, which can be used to schedule and run our Python jobs on the cluster.
Related article:


