
14 Lesser-Known but Incredibly Useful Web APIs You Should Know About

The internet is like a magic show, full of surprises and cool tricks. But have you ever wondered who sets up the stage for all these amazing acts? Well, it’s all thanks to the browser — our main stage — and its toolbox of special powers called Web APIs. These powers decide what a website can show and do, and they keep getting cooler and better with time.
Lately, I’ve been diving back into the world of Web APIs, and wow, there are so many cool new changes! I’ve put together a list of 14 Web APIs that I think are super handy. Some are fully ready to use, while others are still getting their final touches. Let’s explore these interesting Web APIs together!
1. Screen Wake Lock API
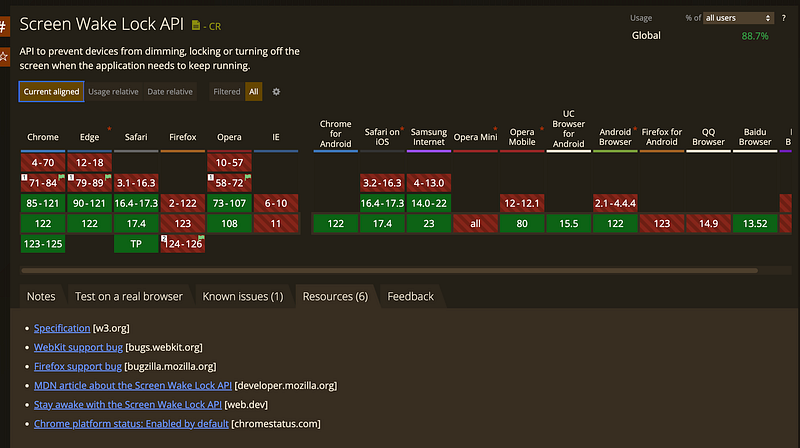
The Screen Wake Lock API offers a way to keep the device from dimming or locking the screen automatically when an app needs to keep running.
It’s really handy for things like video calls, presentations, live games, and online learning, where you can’t have the screen turning off. With this API, developers can make sure the screen stays on, even when there’s no user touch.
here’s a simple example of how to use the Screen Wake Lock API in JavaScript:
<!DOCTYPE html>
<html lang="en">
  <head>
    <meta charset="UTF-8" />
    <title>Wake Lock Demo</title>
    <style>
      #status {
        width: 50vw;
        min-width: 500px;
        margin-top: 20px;
      }
      #status h2 {
        margin-top: 0px;
      }
      #status p {
        padding-left: 20px;
      }
      [data-status='off'] ~ #status {
        border: 2px solid red;
      }
      [data-status='on'] ~ #status {
        border: 2px solid green;
      }
    </style>
  </head>
  <body>
    <header>
      <h1>Wake Lock Demo</h1>
    </header>

    <p>The button below changes depending on whether wake lock is active or not.</p>

    <button data-status="off">Turn Wake Lock ON</button>

    <section id="status">
      <h2>Wake Lock Status</h2>
      <p></p>
    </section>

    <p>Wake lock will automatically release if if the tab becomes inactive.</p>
    <p>
      To re-activate the wake lock automatically when the tab becomes active again, check this box:
      <input
        type="checkbox"
        id="reaquire"
      />
    </p>
  </body>
  <script>
    // status paragraph
    const statusElem = document.querySelector('#status p');
    // toggle button
    const wakeButton = document.querySelector('[data-status]');
    // checkbox
    const reaquireCheck = document.querySelector('#reaquire');

    // change button and status if wakelock becomes aquired or is released
    const changeUI = (status = 'acquired') => {
      const acquired = status === 'acquired' ? true : false;
      wakeButton.dataset.status = acquired ? 'on' : 'off';
      wakeButton.textContent = `Turn Wake Lock ${acquired ? 'OFF' : 'ON'}`;
      statusElem.textContent = `Wake Lock ${acquired ? 'is active!' : 'has been released.'}`;
    };
    // test support
    let isSupported = false;

    if ('wakeLock' in navigator) {
      isSupported = true;
      statusElem.textContent = 'Screen Wake Lock API supported 🎉';
    } else {
      wakeButton.disabled = true;
      statusElem.textContent = 'Wake lock is not supported by this browser.';
    }

    if (isSupported) {
      // create a reference for the wake lock
      let wakeLock = null;

      // create an async function to request a wake lock
      const requestWakeLock = async () => {
        try {
          wakeLock = await navigator.wakeLock.request('screen');

          // change up our interface to reflect wake lock active
          changeUI();

          // listen for our release event
          wakeLock.onrelease = function (ev) {
            console.log(ev);
          };
          wakeLock.addEventListener('release', () => {
            // if wake lock is released alter the button accordingly
            changeUI('released');
          });
        } catch (err) {
          // if wake lock request fails - usually system related, such as battery
          wakeButton.dataset.status = 'off';
          wakeButton.textContent = 'Turn Wake Lock ON';
          statusElem.textContent = `${err.name}, ${err.message}`;
        }
      }; // requestWakeLock()

      // if we click our button
      wakeButton.addEventListener('click', () => {
        // if wakelock is off request it
        if (wakeButton.dataset.status === 'off') {
          requestWakeLock();
        } else {
          // if it's on release it
          wakeLock.release().then(() => {
            wakeLock = null;
          });
        }
      });

      const handleVisibilityChange = () => {
        if (wakeLock !== null && document.visibilityState === 'visible') {
          requestWakeLock();
        }
      };

      reaquireCheck.addEventListener('change', () => {
        if (reaquireCheck.checked) {
          document.addEventListener('visibilitychange', handleVisibilityChange);
        } else {
          document.removeEventListener('visibilitychange', handleVisibilityChange);
        }
      });
    } // isSupported
  </script>
</html>
2. Cookie Store API
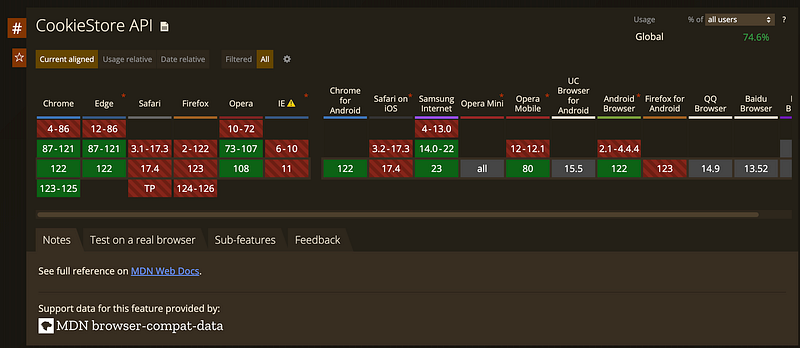
In the past, developers used document.cookie to get cookie information. But it has its limits, like not showing the domain, path, or expiration details.

However, developers could use dev tools for more details. Now, the Cookie Store API gives access to those detailed cookie attributes, just like dev tools. But it can’t reach cookies with the HttpOnly attribute.
This feature is available only in secure contexts (HTTPS), in some or all supporting browsers.
This feature is available in Web Workers
The API also has functions to manage cookies:
cookieStore.delete: to delete a cookie,cookieStore.get: to get info on a single cookie,cookieStore.set: to set a single cookie's info.
It’s a neat upgrade for handling cookies in web development!
3. Compression Stream API
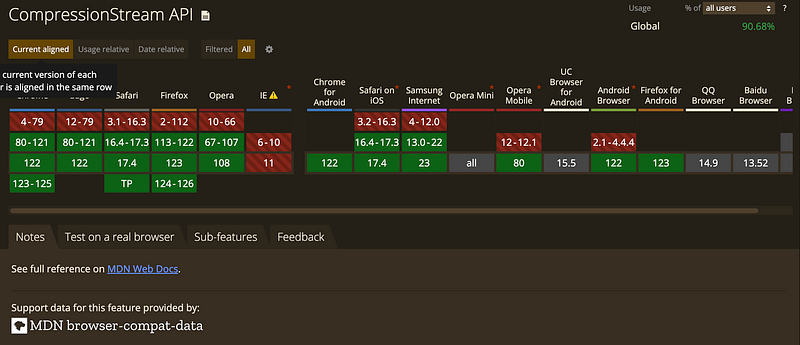
The Compression Stream API is a JavaScript API that lets you compress and decompress data streams. It uses gzip or a default format. With a built-in compression library, JavaScript apps don’t need extra libraries for this. This makes the app download smaller. It’s a great tool for making web pages load faster and use less data.
Here’s an example of how to use the Compression Stream API in JavaScript to compress and decompress data using gzip.
// To compress data
async function compressData(input) {
  // Create a compression stream in gzip format
  const compressionStream = new CompressionStream('gzip');
  // Create a stream from the input data
  const inputStream = new ReadableStream({
    start(controller) {
      // Put the input data into the stream
      controller.enqueue(new TextEncoder().encode(input));
      // Close the stream
      controller.close();
    },
  });

  // Pipe the input stream through the compression stream
  const compressedStream = inputStream.pipeThrough(compressionStream);

  // Gather the compressed data chunks
  const chunks = [];
  const reader = compressedStream.getReader();
  while (true) {
    const { done, value } = await reader.read();
    if (done) break;
    chunks.push(value);
  }

  // Combine the chunks into a single Uint8Array
  const compressedData = new Uint8Array(chunks.reduce((acc, val) => [...acc, ...val], []));
  return compressedData;
}

// To decompress data
async function decompressData(compressedData) {
  // Create a decompression stream in gzip format
  const decompressionStream = new DecompressionStream('gzip');
  // Create a stream from the compressed data
  const inputStream = new ReadableStream({
    start(controller) {
      // Put the compressed data into the stream
      controller.enqueue(compressedData);
      // Close the stream
      controller.close();
    },
  });

  // Pipe the input stream through the decompression stream
  const decompressedStream = inputStream.pipeThrough(decompressionStream);

  // Gather the decompressed data chunks
  const chunks = [];
  const reader = decompressedStream.getReader();
  while (true) {
    const { done, value } = await reader.read();
    if (done) break;
    chunks.push(value);
  }

  // Combine the chunks into a single string
  const decompressedData = new TextDecoder().decode(concatenateUint8Arrays(chunks));
  return decompressedData;
}

// Helper function to concatenate Uint8Arrays
function concatenateUint8Arrays(arrays) {
  let totalLength = arrays.reduce((acc, val) => acc + val.length, 0);
  let result = new Uint8Array(totalLength);
  let length = 0;
  for (let array of arrays) {
    result.set(array, length);
    length += array.length;
  }
  return result;
}

// Example usage
const originalData = 'This is the data to compress';
compressData(originalData).then(compressedData => {
  console.log('Compressed Data:', compressedData);
  decompressData(compressedData).then(decompressedData => {
    console.log('Decompressed Data:', decompressedData);
  });
});
4. CSS Custom Highlight API
The CSS Custom Highlight API lets you style any text range in a document. You create ranges with JavaScript and style them with CSS. Readers who are curious can try out the examples on MDN online.
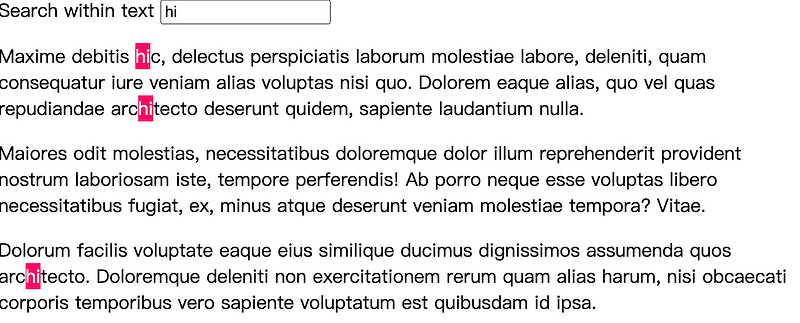
The logic is to find all text nodes and collect Ranges that match the content. Then, you build a Highlight object with those Ranges as arguments. It’s important to note that this doesn’t create new nodes. It’s a neat way to highlight text without altering the DOM structure.
Here’s the core logic code:
const query = document.getElementById("query");
const article = document.querySelector("article");

// Find all text nodes in the article. We'll search within
// these text nodes.
const treeWalker = document.createTreeWalker(article, NodeFilter.SHOW_TEXT);
const allTextNodes = [];
let currentNode = treeWalker.nextNode();
while (currentNode) {
  allTextNodes.push(currentNode);
  currentNode = treeWalker.nextNode();
}

// Listen to the input event to run the search.
query.addEventListener("input", () => {
  // If the CSS Custom Highlight API is not supported,
  // display a message and bail-out.
  if (!CSS.highlights) {
    article.textContent = "CSS Custom Highlight API not supported.";
    return;
  }

  // Clear the HighlightRegistry to remove the
  // previous search results.
  CSS.highlights.clear();

  // Clean-up the search query and bail-out if
  // if it's empty.
  const str = query.value.trim().toLowerCase();
  if (!str) {
    return;
  }

  // Iterate over all text nodes and find matches.
  const ranges = allTextNodes
    .map((el) => {
      return { el, text: el.textContent.toLowerCase() };
    })
    .map(({ text, el }) => {
      const indices = [];
      let startPos = 0;
      while (startPos < text.length) {
        const index = text.indexOf(str, startPos);
        if (index === -1) break;
        indices.push(index);
        startPos = index + str.length;
      }

      // Create a range object for each instance of
      // str we found in the text node.
      return indices.map((index) => {
        const range = new Range();
        range.setStart(el, index);
        range.setEnd(el, index + str.length);
        return range;
      });
    });

  // Create a Highlight object for the ranges.
  const searchResultsHighlight = new Highlight(...ranges.flat());

  // Register the Highlight object in the registry.
  CSS.highlights.set("search-results", searchResultsHighlight);
});
5. EyeDropper
EyeDropper lets you pick colors from the screen.
Remember, it picks colors from the screen. The screenshot below shows it picking the color from the desktop background. It’s really cool.
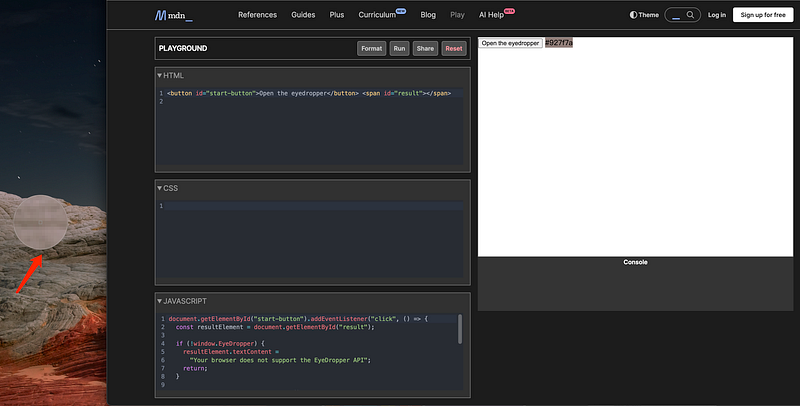
Making a color picker plugin with this should be super quick, right?
This example shows that the eyedropper mode can also be aborted before the user has selected a color or pressed Escape.
<!DOCTYPE html>
<html lang="en">
  <head>
    <meta charset="UTF-8" />
    <title>Eyedropper Demo</title>
  </head>
  <body>
    <button id="start-button">Open the eyedropper</button> <span id="result"></span>
  </body>
  <script>
    document.getElementById('start-button').addEventListener('click', () => {
      const resultElement = document.getElementById('result');

      if (!window.EyeDropper) {
        resultElement.textContent = 'Your browser does not support the EyeDropper API';
        return;
      }

      const eyeDropper = new EyeDropper();
      const abortController = new AbortController();

      eyeDropper
        .open({ signal: abortController.signal })
        .then((result) => {
          resultElement.textContent = result.sRGBHex;
          resultElement.style.backgroundColor = result.sRGBHex;
        })
        .catch((e) => {
          resultElement.textContent = e;
        });

      setTimeout(() => {
        abortController.abort();
      }, 2000);
    });
  </script>
</html>
6. Prioritized Task Scheduling API
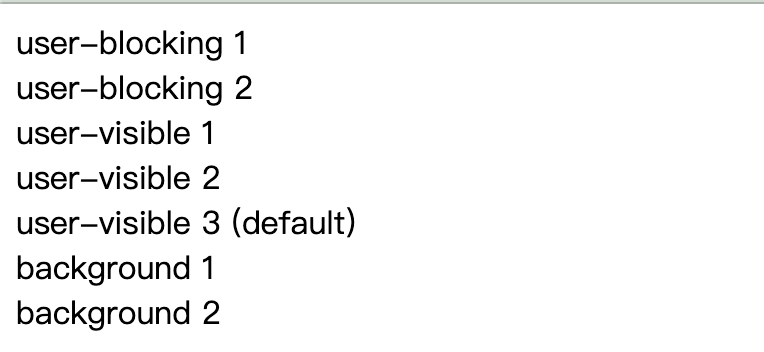
The Prioritized Task Scheduling API provides a standardized way to prioritize all tasks belonging to an application. The priority task scheduling API lets developers assign priorities to asynchronous tasks. These tasks are executed in the following order of priority:
- user-blocking: These tasks have the highest priority as they directly affect the user’s interaction experience. They mainly include rendering the page to an interactive state and immediate response to user input. For example, rendering core content on initial page load, processing button click events, etc.
- user-visible: These tasks are visible in the user interface but don’t prevent the user from doing other things. They include rendering non-critical parts of the page, like loading non-core images, rendering non-essential animations, etc. This is the default priority level.
- background: These are the lowest priority tasks. They are not time-sensitive and can be executed later without affecting the user experience. Tasks like log processing, non-essential third-party library initialization, and other work that does not affect immediate page presentation fall into this category. They are usually performed when the main thread is idle to avoid blocking high-priority tasks related to user visibility or interaction.
Wow, this really gives advanced users a lot to think about. In one word, it’s just awesome.
Here’s an example to see how the priorities work out. As you can see, it’s just as you wished:
<!DOCTYPE html>
<html lang="en">
  <head>
    <meta charset="UTF-8" />
    <title>Prioritized Task Scheduling API Demo</title>
  </head>
  <body>
    <div id="log"></div>
  </body>
  <script>
     let log = document.getElementById("log");
        function mylog(text) {
            log.innerHTML += `${text}<br/>`;
        }

        // three tasks, in reverse order of priority
        scheduler.postTask(() => mylog("background 1"), { priority: "background" });
        scheduler.postTask(() => mylog("user-visible 1"), { priority: "user-visible" });
        scheduler.postTask(() => mylog("user-blocking 1"), { priority: "user-blocking" });

        // three more tasks, in reverse order of priority
        scheduler.postTask(() => mylog("background 2"), { priority: "background" });
        scheduler.postTask(() => mylog("user-visible 2"), { priority: "user-visible" });
        scheduler.postTask(() => mylog("user-blocking 2"), { priority: "user-blocking" });

        // Task with default priority: user-visible
        scheduler.postTask(() => mylog("user-visible 3 (default)"));
  </script>
</html>
7. Trusted Types API
The Trusted Types API gives web developers a way to lock down unsafe parts of the DOM API. It aims to prevent client-side cross-site scripting (XSS) attacks. In the example below, a policy is created using the TrustedTypePolicyFactory.createPolicy() method. A safe HTML string is created using the TrustedTypePolicy.createHTML method and inserted into the document. There's a lot of flexibility since the policy is something you can define yourself.
In the below example we create a policy that will create TrustedHTML objects using TrustedTypePolicyFactory.createPolicy(). We can then use TrustedTypePolicy.createHTML to create a sanitized HTML string to be inserted into the document.
The sanitized value can then be used with Element.innerHTML to ensure that no new HTML elements can be injected.
<!DOCTYPE html>
<html lang="en">
  <head>
    <meta charset="UTF-8" />
    <title>Trusted Types API Demo</title>
  </head>
  <body>
    <div id="myDiv"></div>
  </body>
  <script>
    const escapeHTMLPolicy = trustedTypes.createPolicy('myEscapePolicy', {
      createHTML: (string) => string.replace(/>/g, '<'),
    });

    let el = document.getElementById('myDiv');
    const escaped = escapeHTMLPolicy.createHTML('<img src=x onerror=alert(1)>');
    console.log(escaped instanceof TrustedHTML); // true
    el.innerHTML = escaped;
  </script>
</html>
8. CSS Font Loading API
The CSS Font Loading API provides you with events and interfaces for dynamically loading font resources.
Before, fonts were mainly introduced through CSS. Dynamic font loading can also be achieved by dynamically adding link nodes.
@font-face {
  font-family: 'MyCustomFont';
  src: url('fonts/mycustomfont.woff2') format('woff2'),
       url('fonts/mycustomfont.woff') format('woff');
  font-weight: normal;
  font-style: normal;
}
Now, with the built-in native API, you can dynamically load fonts. Plus, you can control the timing and status of the loading process.
// Define a FontFace
const font = new FontFace("myfont", "url(myfont.woff)");

// Add to the document.fonts (FontFaceSet)
document.fonts.add(font);

// Load the font
font.load();

// Wait until the fonts are all loaded
document.fonts.ready.then(() => {
  // Use the font to render text (for example, in a canvas)
});
9. Popover API
The Popover API gives developers a standard, consistent, and flexible mechanism to display pop-up content over other page contents. This pop-up can be controlled declaratively through HTML attributes or programmatically via JavaScript.
The example below is a pop-up implemented with 0 lines of JavaScript.
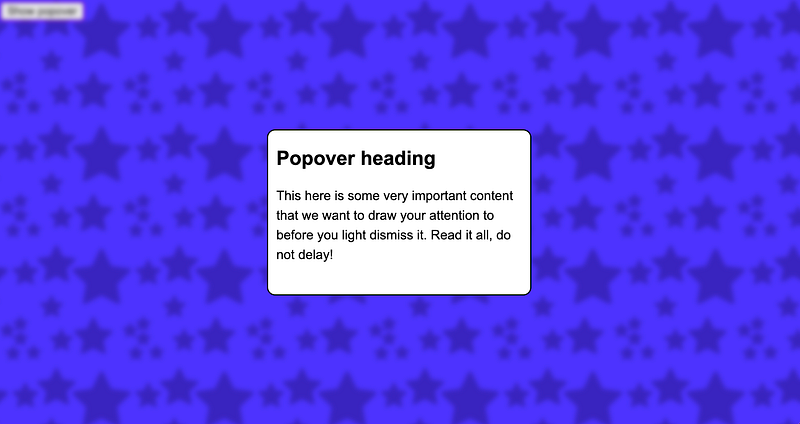
You can check out the source code and try it out at “Using the Popover API#Result”. Also, you can see more examples at “MDN Popover API examples”.
10. URL Pattern API
Experimental: This is an experimental technology Check the Browser compatibility table carefully before using this in production.
The URL Pattern API defines a syntax used to create URL pattern matchers. These patterns can match a full URL or parts of a URL. It’s inspired by the syntax of the path-to-regexp library.
You might not know the path-to-regexp library, but you’ve likely used it. It’s the foundation for routing in libraries like Express and koa-router.
The URL Pattern API’s pattern syntax includes:
- Literal strings: These are text strings that will match exactly, like “/home” or “/contact”.
- Wildcards: The asterisk () in “/posts/” matches any sequence of characters until the next slash (/).
- Named groups: Like “:id” in “/books/:id”, this extracts the value from the corresponding part of the matched URL as a separate data item.
- Non-capturing groups: Like “/books{/old}?”, where the curly braces {…}? indicate that this part of the pattern is optional, matching 0 or 1 times, and is not extracted as a separate data item.
- Regular expression groups: Like “(\d+)” in “/books/(\d+)”, this follows the rules of JavaScript regular expressions for complex matching, although there are certain limitations within the URL Pattern API. For instance, this regular expression matches one or more numeric characters and extracts them as a separate data item.
// A pattern matching with a named group
const pattern = new URLPattern({ pathname: "/books/:id" });
console.log(pattern.test("https://example.com/books/123")); // true
console.log(pattern.exec("https://example.com/books/123").pathname.groups); // { id: '123' }
11. Audio Output Devices API
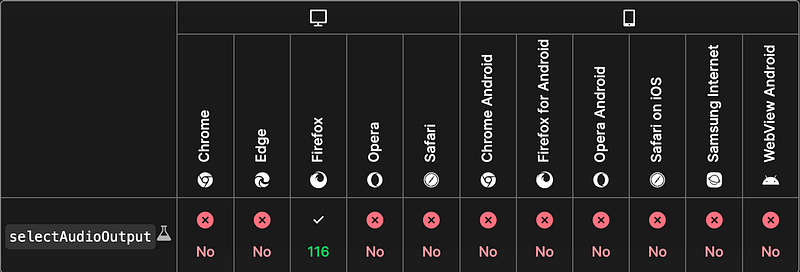
The Audio Output Devices API gives web applications the ability to ask users which audio output device they want to use for sound playback.
Wow, choosing an audio output device is quite interesting. Unfortunately, most browsers don’t support it yet.
document.querySelector("#myButton").addEventListener("click", async () => {
  if (!navigator.mediaDevices.selectAudioOutput) {
    console.log("selectAudioOutput() not supported or not in secure context.");
    return;
  }

  // Display prompt to select device
  const audioDevice = await navigator.mediaDevices.selectAudioOutput();

  // Create an audio element and start playing audio on the default device
  const audio = document.createElement("audio");
  audio.src = "https://example.com/audio.mp3";
  audio.play();

  // Change the sink to the selected audio output device.
  audio.setSinkId(audioDevice.deviceId);
});
12. Device Memory API
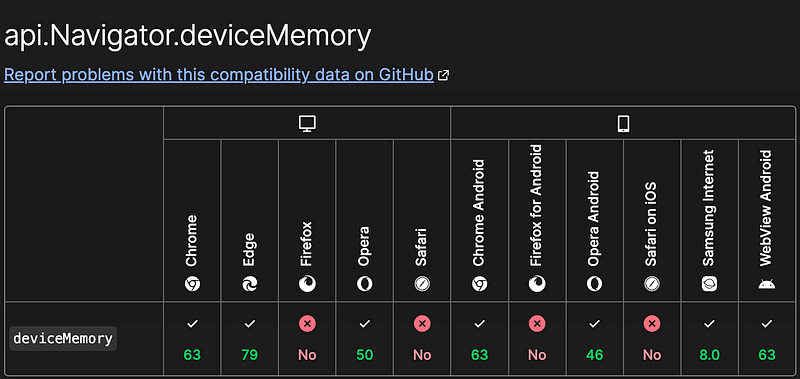
Traditionally, developers assessing client device performance often had to rely on rules of thumb or device benchmark tests. They also guessed device capabilities based on the device manufacturer or the User Agent string, as they couldn’t directly access the device’s RAM size information. But now, there are two ways to determine the approximate amount of device RAM, directly or indirectly:
Device Memory JavaScript API: This API provides developers with a way to understand the device’s memory (RAM) capacity directly. Using the navigator.deviceMemory property, you can get a rough idea of the device's memory level. For example, 0.5 means less than 1GB of RAM, 1 means 1-2GB, and so on.
Accepting Client Hints: Client Hints is an extension of the HTTP protocol that allows browsers to proactively send information about device capabilities in HTTP requests. The Device-Memory HTTP request header contains information about the device's memory category. While it's not obtained directly in JavaScript, the server can dynamically adjust the response content based on this header information. This helps developers optimize the user experience based on the device's RAM size.
const RAM = navigator.deviceMemory; // 8The value is one of 0.25, 0.5, 1, 2, 4, or 8. So, a machine with 16GB of memory will also show 8.
13. Barcode Detection API
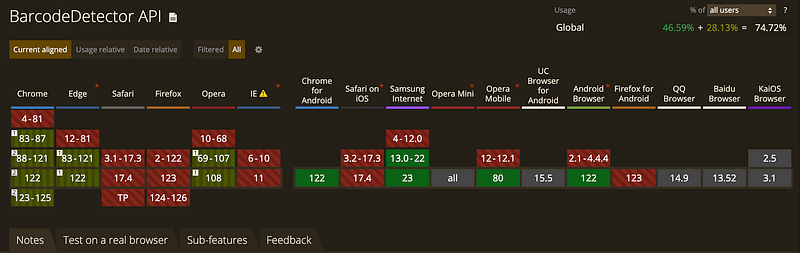
It’s used for detecting barcodes and QR codes in images.
Wow, that’s interesting. Pairing it with navigator.mediaDevices.getUserMedia to activate the camera and taking periodic screenshots for analysis, isn't that a web version of scanning capability?
// check compatibility
if (!("BarcodeDetector" in globalThis)) {
  console.log("Barcode Detector is not supported by this browser.");
} else {
  console.log("Barcode Detector supported!");

  // create new detector
  const barcodeDetector = new BarcodeDetector({
    formats: ["code_39", "codabar", "ean_13"],
  });

  //Detect Barcodes
  barcodeDetector
    .detect(imageEl)
    .then((barcodes) => {
      barcodes.forEach((barcode) => console.log(barcode.rawValue));
    })
    .catch((err) => {
      console.log(err);
    });
}
14. CSS Typed Object Model API
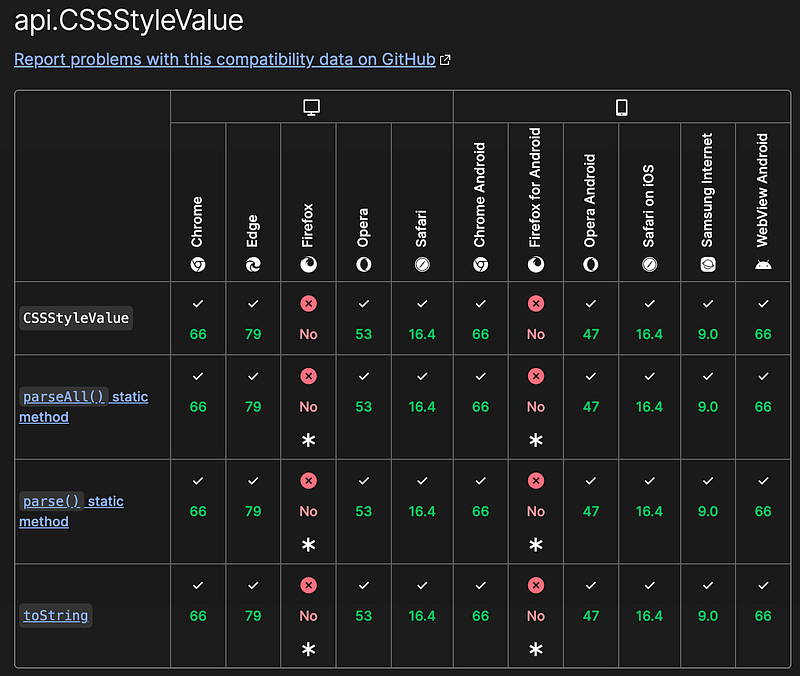
The CSS Typed Object Model (CSSOM) API fundamentally changes how developers handle CSS properties in JavaScript. It introduces type safety and efficiency optimizations.
Generally, CSS values can be read and written in JavaScript as strings, which can be slow and cumbersome. CSS Typed Object Model API provides interfaces to interact with underlying values, by representing them with specialized JS objects that can be manipulated and understood more easily and more reliably than string parsing and concatenation. This is easier for authors (for example, numeric values are reflected with actual JS numbers, and have unit-aware mathematical operations defined for them). It is also generally faster, as values can be directly manipulated and then cheaply translated back into underlying values without having to both build and parse strings of CSS.
CSS Typed OM both allows for the performant manipulation of values assigned to CSS properties while enabling maintainable code that is both more understandable and easier to write.
Just like magicians learn new tricks, the web keeps getting stronger with new APIs. It’s like our browser’s toolbox gets bigger and better over time. So, keep your eyes open for these changes, because they’ll make building websites even more awesome. The future of web development is bright, and with these 14 cool Web APIs, we’re all set to create some internet magic of our own! Let’s get excited for what’s coming next in the wonderful world of web development!
In Plain English 🚀
Thank you for being a part of the In Plain English community! Before you go:
- Be sure to clap and follow the writer ️👏️️
- Follow us: X | LinkedIn | YouTube | Discord | Newsletter
- Visit our other platforms: Stackademic | CoFeed | Venture | Cubed
- More content at PlainEnglish.io


