
12 Jupyter Notebook Extensions That Will Make Your Life Easier
Essential extensions that will boost your productivity in Jupyter Notebook.

Jupyter Notebook is the data scientists’ computational notebook of choice where you can create documents containing not only live code but also equations, visualizations, and text. However, by default, Jupyter Notebook lacks several useful features such as autocompletion, table of content, code folding, etc.
This is why I decided to make a list of useful Jupyter Notebook extensions that will make your life easier and increase your productivity when writing code. Below you can find all the extensions listed in this article.
Table of Contents
1. How to Install Extensions
2. Move selected cell
3. Enable autocompletion (Hinterland)
4. Shortcuts to run multiple cells (Runtools)
5. Search files inside Jupyter Notebook (Tree filter)
6. Hide input (Hide input + Hide input all)
7. Snippet Menu
8. Add a Table of Content (Table of Content 2)
9. Scrathpad
10. Codefolding
11. Variable inspector
12. Translate text inside Jupyter Notebook (nbTranslate)
13. Bonus: Change Themes
How to Install Extensions
To install extensions, run the following code in the command prompt or terminal
pip install jupyter_contrib_nbextensionsThen run the code below to add the nbextensions files into the Jupyter server’s search directory.
jupyter contrib nbextension installNow open Jupyter Notebooks. There should be a new tab called “Nbextensions.” Click on it and you’ll see a bunch of extensions you can use to increase your productivity on Jupyter Notebooks.

The following are the extensions I find the most useful.
Move selected cell
This is an extremely useful extension that will allow you to move selected cell(s) using keyboard shortcuts Alt-up and Alt-down. Just check the “Move selected cell” box inside Nbextensions. Then, refresh the notebook and you will be able to move cells via simple keystrokes.
Enable autocompletion (Hinterland)
This is an extremely useful extension for those who struggle writing code on Jupyter Notebooks because there’s no autocompletion. By checking the ‘Hinterland’ box, you’ll enable autocompletion on Jupyter Notebooks and would be able to write code like in your favorite editor.

Shortcuts to run multiple cells (Runtools)
Runtools provide a number of additional functions for working with code cells in the IPython notebook. Some of them are run cells above (⌥A), run cells below (⌥B), and run all cells (⌥X). To enable it, check the “Runtools” box inside Nbextensions (there you can also find the complete list of shortcuts). Once it’s activated, you’ll see the following icon in the toolbar.
Click on it to turn on a floating toolbar with these code execution buttons.

Search files inside Jupyter Notebook (Tree filter)
This extension will allow you to filter by filename in the Jupyter notebook file tree page.

Hide input (Hide input + Hide input all)
You can hide all cells’ inputs or specific cell’s input by checking the “Hide input all” and “Hide input” respectively. After that, the following icons will show up in the toolbar. The one on the left will help you hide all code cells’ code, while the second only specific cells.

Snippet menu
For those of you who love cheatsheets, “snippet menu” is an extension you must include in Jupyter Notebooks. After you enable it, you’ll see a new menu item called “Snippet” that will let you insert code and markdown snippets. For example, there are available many snippets for the Pandas library that will help you remember useful Pandas methods.

Add a Table of Content (Table of Content 2)
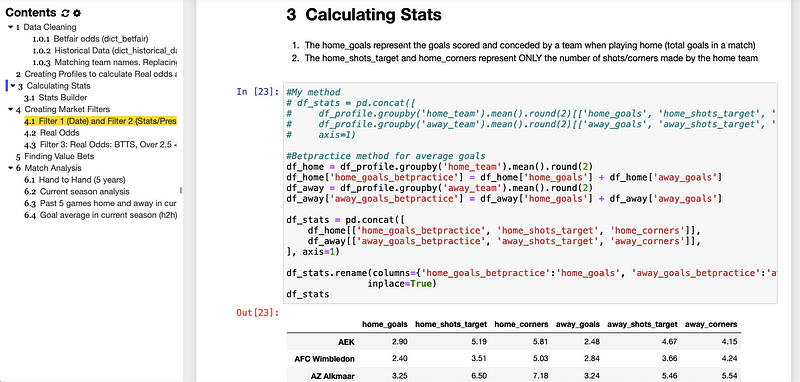
After writing many lines of code, navigating through your notebook will become difficult. This is why you should add a table of content that makes navigation easier by collecting all the headers you included in the notebook and displaying them in the sidebar.
To enable a table of content in your Jupyter Notebook, check the box “Table of Contents (2)” inside Nbextensions. After that, refresh the notebook and you’ll see the following icon in the toolbar.

Click on it to display the table of contents like the picture (you need to have at least one markdown h1, h2, or h3 to see them in the content section)
Scratchpad
Have you ever wanted to test new lines of code without modifying the notebook document? You can do this with the “scratchpad” extension. Just enable it and you’ll be able to execute code against the current kernel without modifying the notebook document. After you enable it, the following icon will appear in the bottom-right corner.

Click on it or use the shortcut Ctrl-B to open a scratchpad. There you can execute code by using Shift-Enter or any other shortcut applied to the notebook document.

Codefolding
This extension allows code folding in code cells. Just enable the “Codefolding” extension listed in the nbextension tab and then you’ll see a triangle in the left margin of the code cell.

Click on it or use the shortcut Alt+F to fold the code. There are three different folding modes supported: indent folding, bracket folding, and magics folding.
Variable inspector
If you ever wanted to keep track of all the variables you used in a notebook, you should enable the “Variable Inspector” extension. This will help you see all the variable names defined, type, size, and shape
After you enable it, the following icon should appear in the toolbar.
Click on it to display a floating window that collects all defined variables. The window draggable, resizable, and collapsable.
Note: I found a couple of glitches after turning on “variable inspector”. If you find them too, just turning “variable inspector” off.
Translate text inside Jupyter Notebook (nbTranslate)
This last extension will be very useful whenever you have to read a notebook written in a foreign language. Just enable the “nbTranslate” extension and then you’ll see two new icons in the toolbar.
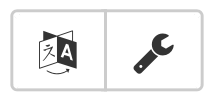
The icon on the right helps you configure the primary and secondary language. Once this is set up, click the icon on the left whenever you want to translate a markdown cell to your native language.
Bonus: Change Themes
There are a good number of themes available on Jupyter Notebooks. First, you need to install jupyterthemes. Open a terminal and write
pip install jupyterthemesAfter this, to see the list of themes available write jt -l
For this example, I’ll choose the “onedork” theme. To change the theme, write the following code.
jt -t onedork -T -Nwhere -T is toolbar visible and -N is name & logo visible (you can even display the kernel logo by adding -kl to the code above)
Note: You can also do all of this inside a notebook, just add the ! symbol in front of a command (e.g., !jt -l )

That’s it! Hope you found the extensions listed in this article useful.
Below you can find a couple of projects that you can start working on Jupyter Notebooks.


