
MidJourney V6 Deep-Dive Series
👱🏻♂️👩🏻 Create Consistent *Multiple* Characters on MidJourney — Use This Simple Hack! ✨
Unveiling the Powerful Hack I Discovered While Experimenting with MidJourney’s New “Character Reference” Feature
If later you find any value in this article, throw me some Medium love! 🥰 To support my work: Clap up to 50 times, leave a message to share your thoughts & Be sure to follow for more future content like this one! 💌
Hello, and a warm welcome to all my fellow creatives! 😊
If you’ve been following my updates, you might already be having fun testing out MidJourney’s latest release — the “Character Reference” feature. This powerful new feature allows you to use a character’s image as a reference, enabling MidJourney to replicate the character in your new creations and achieve character consistency across your images.
However, there’s a problem… 😣
While the “Character Reference” feature excels with single-character images, it isn’t designed for creating images with multiple characters — a real challenge for those of you who wish to maintain character consistency across such images. 🧑🤝👩🏻 → 🖼️
Guess what, though? I have just discovered a simple hack with the “Character Reference” feature during my experiments that effectively solves this problem!
It’s very simple and works incredibly well in achieving consistent multi-characters in your MidJourney images — and I’m eager to share this discovery with you! 😄❤️

If you’re new to MidJourney’s “Character Reference” feature, don’t worry! I suggest checking out this guide — complete with compelling visual examples — to help you get started and become familiar with this incredible feature before you move on to my hack to achieve consistency with multiple characters:

Introducing My Hack to Create Consistent *Multiple* Characters on MidJourney
The “Character Reference” feature is currently limited to replicating a single character. If you want to replicate multiple characters within one image, it’s impossible using only the “Character Reference” feature itself.
However… the tables would turn if you implement another very powerful MidJourney inpainting feature — “Vary (Region)”!
If you’re not familiar with “Vary (Region)”, it’s a very useful feature that allows you to make changes within your MidJourney generation:
So, how do you use “Vary (Region)” together with “Character Reference” to achieve consistency with multiple characters? Let me walk you through the steps!
Step-by-Step to Creating Consistent Multiple Characters on MidJourney with My Hack
Step 1 — Create Images of Individual Characters
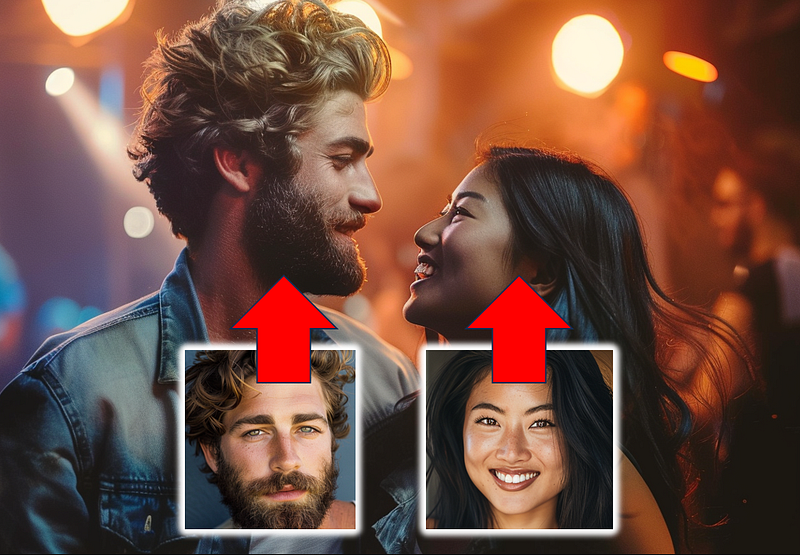
In this step-by-step tutorial, we will work with two characters: an Asian woman and a Caucasian man. First, we need to create an image for each character to serve as a reference for the “Character Reference” feature, which we will need later.
I created these two portraits using MidJourney:
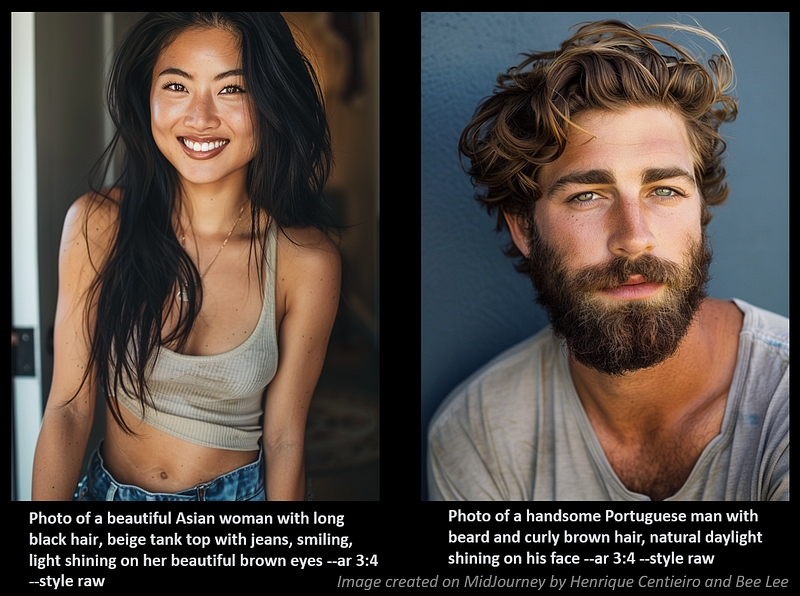
Now that we have our reference images of the two characters ready, obtain their individual image URLs by right-clicking on the image and selecting “Copy Image Address” to copy the URL.
💁🏻♀️My Pro Tips: Note that it’s important to create images that clearly show the facial features of your characters with good lighting. Describing your preferred facial features in detail and including terms like ‘light shining on his/her face’ in your prompts can help achieve this.
Let’s move on to the next step!

Step 2 — Create an Image of Your Preferred Scene
In this step, we’ll temporarily set aside the “Character Reference” feature.
Instead, we’ll focus on creating a scene for our two characters by describing what we want them to be doing in the image. How about we place them in a coffee shop setting? 👨🏼🤝👩🏻☕️ → 🖼️
Here’s the prompt I used:
Photo of a man and a woman with long black hair chatting at an outdoor coffee shop, happy and relaxed atmosphere --ar 4:3 --style rawThis is the image created:
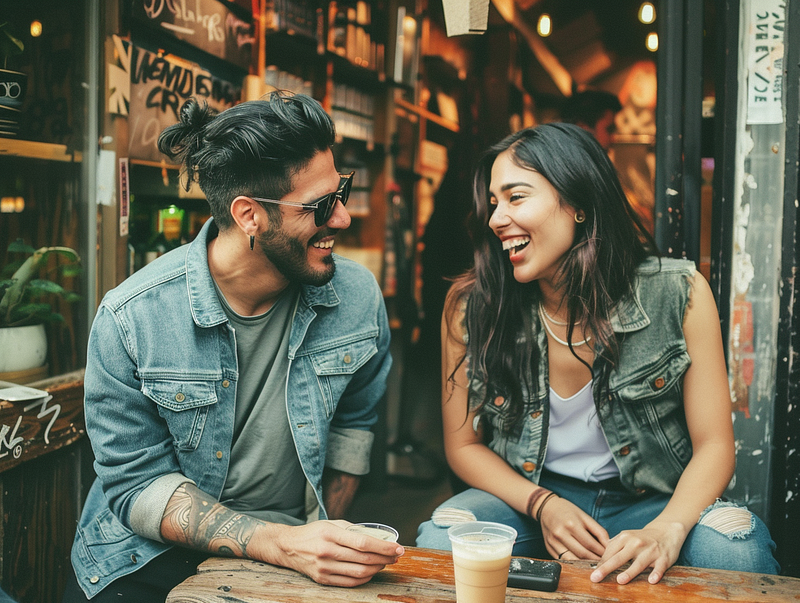
💁🏻♀️My Pro Tips: Notice the way I phrase my prompt? I simply mention “one man” and “one woman” to describe our two characters. Including additional details, like “long black hair,” isn’t essential, but it can help minimize the adjustments needed in the next step.
With our ideal scene set for our two characters, it’s time to introduce the magic of “Vary (Region)”!
Step 3 — Harness the Power of “Vary (Region)”
Okay, now it’s time to combine the power of “Character Reference” and “Vary (Region)”!
- Click on the “Vary (Region)” tab located beneath the upscaled image:

- After clicking the tab, an editor box will appear. Let’s start with our lady, shall we?
- First, select the face area in the image. (Now, I don’t need to select the hair because I prompted “long blacked hair” before, remember? 😉)
- Then, in the prompt box, use the “Character Reference” command followed by
--crefand paste the image URL of the beautiful lady we created earlier. - Take note that I also included “Asian woman smiling” as the new prompt description and set the character weight with
--cwto 100:
Asian woman smiling --cref https://s.mj.run/vgKJxvJnOJ8 --cw 100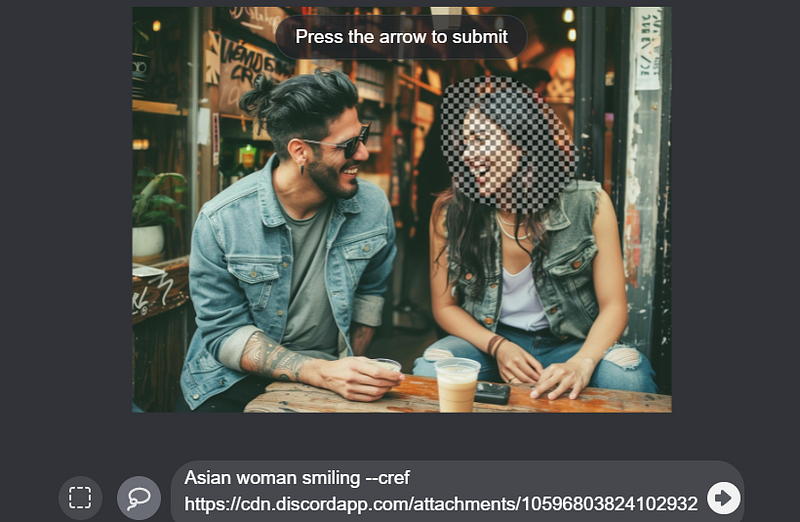
After you hit ‘Submit,’ let’s see what we’ve got:
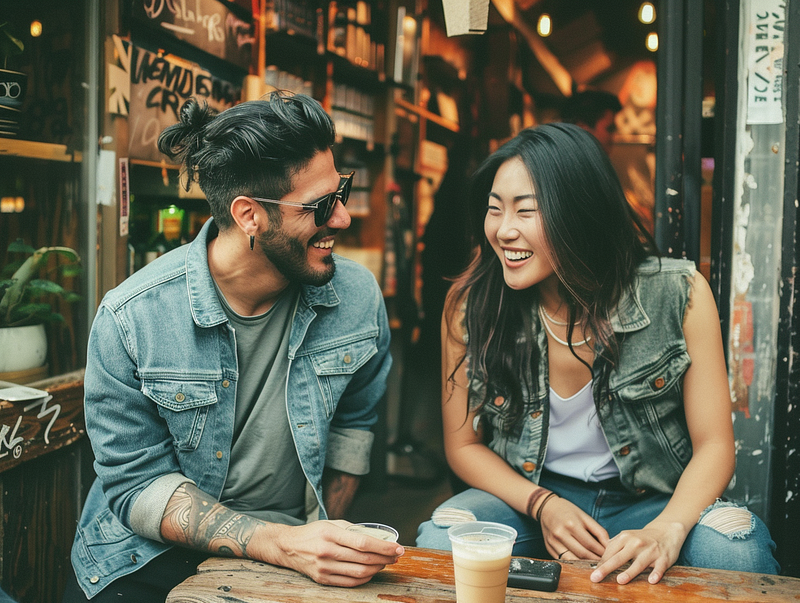
🥳 Voilà! We have successfully ‘transferred’ our female character into the scene. Now it’s time to focus on the guy!
Let’s repeat the same steps as above:
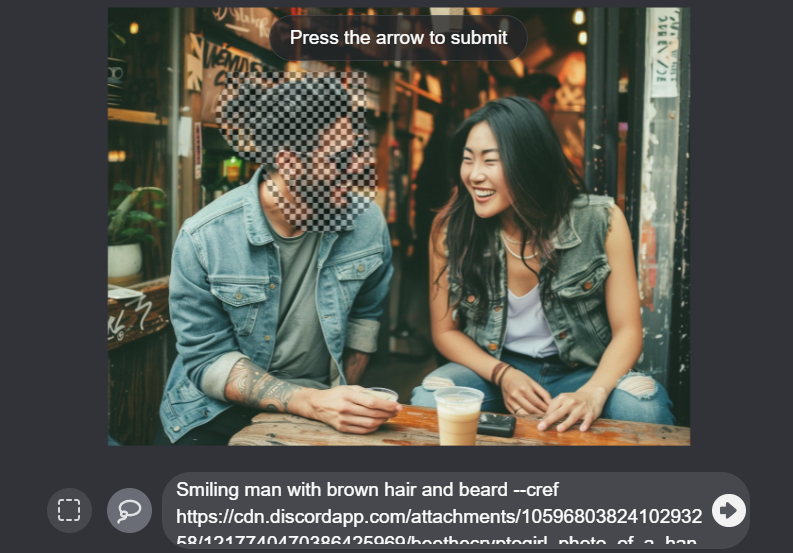
- Note that I included “Smiling man with brown hair and beard” to provide more detailed information to MidJourney, in addition to the character reference image.
- I also removed the tattoo on the man’s arm to ensure consistency in future images.
Let’s take a look at the final result we’ve achieved: 😍
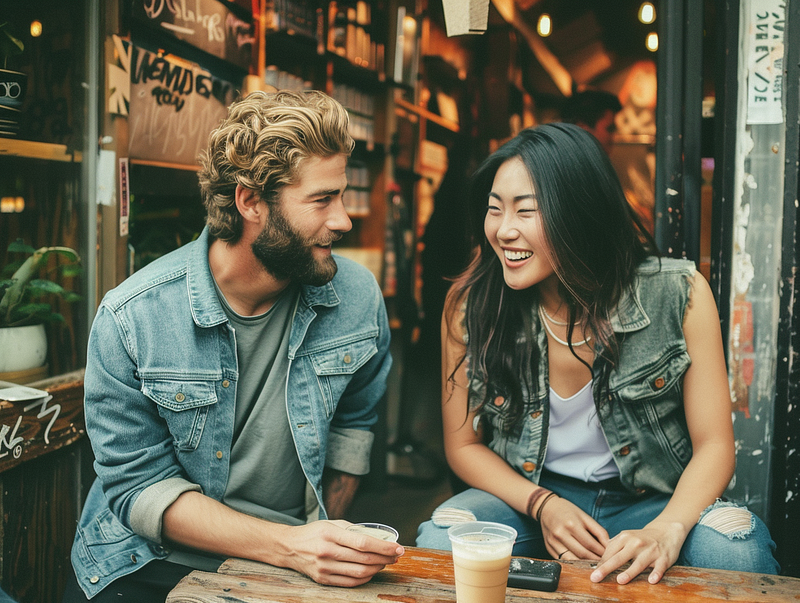
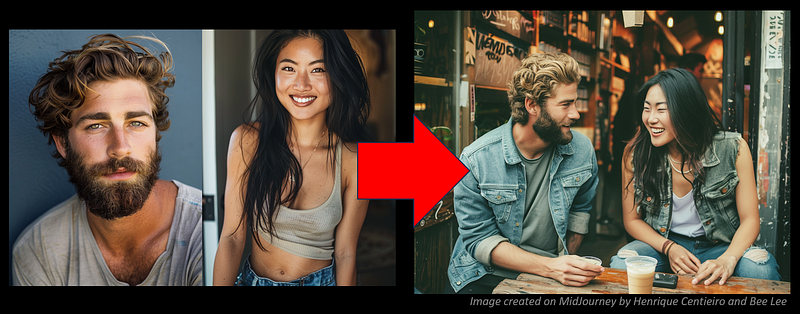
Let me compile everything together for you so you can have a better overview:
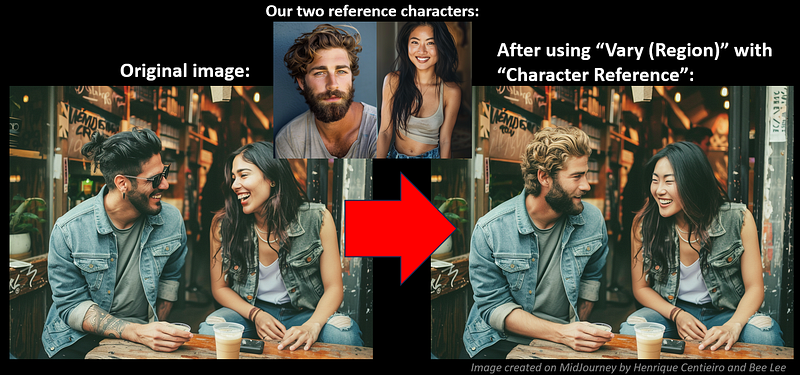
Yay! We have successfully ‘brought’ our two characters into the scene—with the combined power of “Vary (Region)” and “Character Reference.” It’s quite amazing, isn’t it? ✨
Hungry for more examples and bonus tips? Great! Let’s explore some more! 👇🏻
Let me show you two more scenes that I’ve created for our characters + 3 prompting tips!
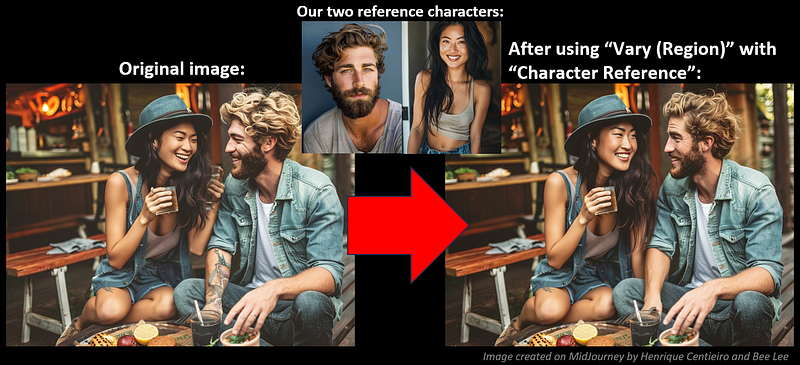
1) Outdoor Restaurant Scene 🍽️
💡 Prompting Tip when creating the initial scene: 🍸
Now that we have the perfect image of our two characters in the coffee shop from the previous section, I will now use the URL of that image as a “Character Reference” to create the initial image of our new scene set in an outdoor restaurant.
Keep in mind that using --cref to create the initial image isn’t essential, and may lead to facial distortion since “Character Reference” is meant for a single character. However, it can sometimes work to bring in certain characteristics of the characters, which means we’ll have less work to do when using “Vary (Region)” to integrate the characters into the scene.
💡 Prompting Tip when introducing new accessories to a character: 👒
In this particular setting, where I want the female character to wear a hat, I’ve adjusted the Character Weight (--cw) to 50 to achieve the desired effect:
Photo of a man and a woman with denim hat and long black hair, at an outdoor restaurant for a small bite --cref https://s.mj.run/xBE6V8p6ITA --cw 50 --ar 4:3 --style rawHere is the final result, which is pretty impressive:
2) An Argument in the Kitchen Scene 😤
Life isn’t all butterflies and rainbows — and neither are the scenes featuring our characters. Let’s immerse them into a scenario where they’re embroiled in an argument in the kitchen!
For this scene, I aim to have our characters display expressions of upset. As in the previous example with the outdoor restaurant, I’ll use the URL of the coffee shop image as a “Character Reference” to help compose the initial image of our new setting.
💡 Prompting Tip for changing a character’s facial and physical expressions: 🎭
If I were to use the same prompting method for our initial image (simply describing the scene and maintaining the Character Weight as --cw 100), it would replicate the characters’ facial expressions from the reference image (which are happy and smiling) in the new creation.
Therefore, when I prompt for this initial image, I specify “both are looking upset” and adjust the Character Weight (--cw) to 0. This instructs MidJourney to significantly alter the facial and physical expressions of our characters to suit the context of the argument:
Photo of a man and a woman with long black hair, having an argument in the kitchen, both are looking upset --cref https://s.mj.run/xBE6V8p6ITA --cw 0 --ar 4:3 --style rawNow, let’s take a look at the final results we’ve achieved:

Not too shabby, isn’t it? I certainly hope our two characters will come to an understanding and find peace soon! 🫣
With these additional prompting tips, it should now be quite easy for you to change your characters’ accessories, facial expressions, and body language across various scenes. 👒👘😀🥺
In the next section, I’ll share an extra bonus tip to enhance the effectiveness of the “Vary (Region)” feature!
🏆 Extra Bonus Tip for Using “Vary (Region)” — How to Maintain Image Coherency
When using the “Vary (Region)” feature, you might occasionally notice that the edited area of the image exhibits slight distortion or a loss of coherency with the rest of the image. But there’s no need to worry — I have a tip to help you avoid that! 😊
Consider this example where I aimed to bring our male character into the scene:
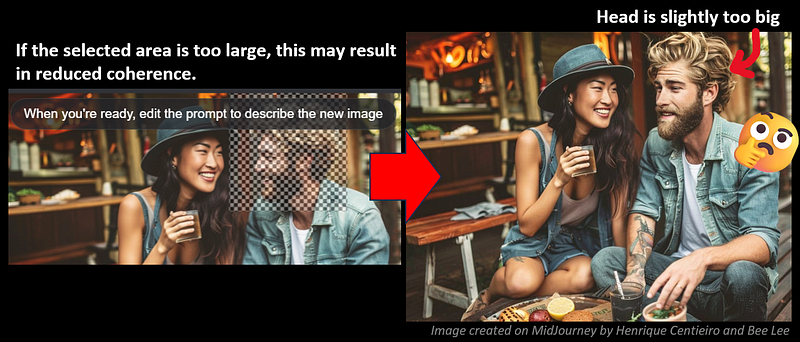
If you select too large an area for the male character’s face, you essentially give MidJourney too much ‘extra room’ to go wrong.
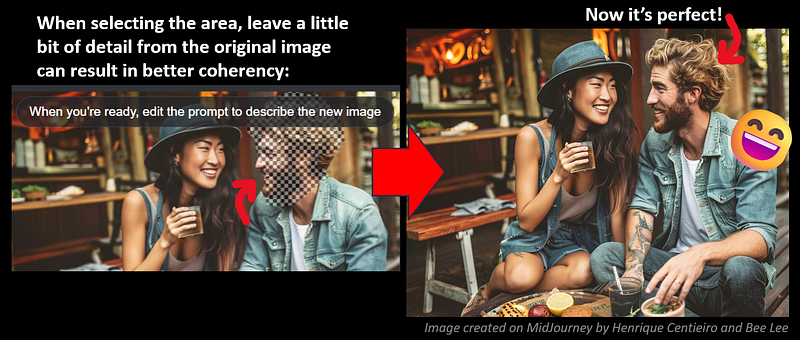
A more effective approach is to select a smaller region, ensuring to include some details (such as the tip of the nose or hair) within the selection. This can guide MidJourney to generate the new character’s face with significantly improved coherency:
🤫 Hey… This Isn’t The End!
This story was meant to share a simple hack I discovered while experimenting with “Character Reference” to achieve consistent multi-character representation across images — a task that is otherwise almost impossible. 🪄🧑🤝👩🏻 → 🖼️ ✨
As I conduct more trials, I will compile an in-depth guide on “Character References” and will also share additional personal pro tips as I discover them.
So, be sure to stay tuned for more insights! 😉
🥰 If you found any value in this article, why not throw me some Medium love? To support my work: Clap up to 50, leave a message to share your thoughts & Be sure to follow for more future content like this one! 💌

🤗 Hiya! I’m Bee Lee — An 8X Top Writer on Medium and a (seriously) Passionate Enthusiast of Generative AI
My passion lies in creating beautiful things and exploring the boundless creative possibilities offered by Generative AI and MidJourney. Sharing the insights and knowledge I’ve accumulated on this incredible journey with you fills me with immense joy! ❤️😊 Why not join me as we dive deeper into the fascinating world of AI together? 🎨🤖⛵ Learn more about me here.

📌 Here is the folder for all the articles in my
📌 Feel free to check out all my other articles here to learn more Tips and Tricks on mastering MidJourney:
📌 To learn more about how to create ultra-photorealistic MidJourney images, this is my highly-rated series where I shared my prompting formula and 100+ cheat codes:
🌞 Stay in touch:


