MLOps with Kubeflow-pipeline V2, mlflow, Seldon Core : Part4
This is last part of the four parts MLOps series.
Part 1: Introduction to the basic concepts and installation on local system.
Part 2: Understanding the kubeflow pipeline and components.
Part 3: Understanding the Mlflow server UI for logging parameters, code versions, metrics, and output files.
Part 4: Deploying model with Seldon core server over kubernetes.
In this section we will see how to deploy our trained model on local kind kubernetes cluster with the help of seldon. With Seldon Core you can build two type of servers: reusable and non-reusable ones. For this example I will be using non-reusable one.
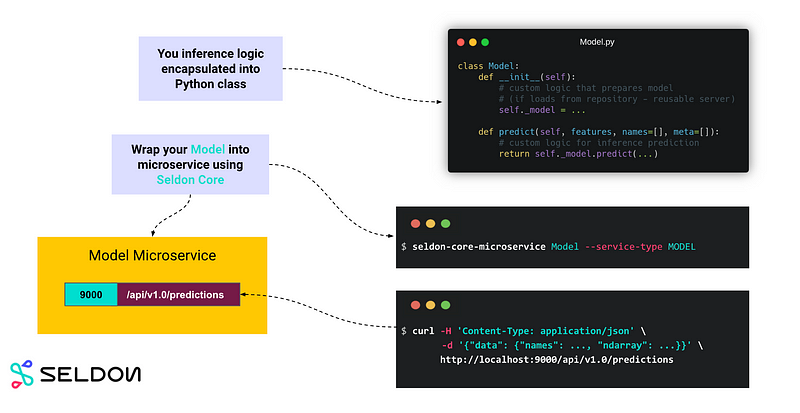
First we need to build a docker image using Python Seldon Core Module provided by the seldon. Your source code should contain a python file which defines a class of the same name as the file. In our case our python file is named Inference.py , hence we put the MODEL_NAME variable to Inference. For more information on this concept please check Link.
➜  ~ cat Dockerfile

FROM python:3.10-slim
WORKDIR /app
RUN apt-get update \
    && rm -rf /var/lib/apt/lists/*

# Install python packages
COPY requirements.txt requirements.txt
RUN pip install -r requirements.txt

# Copy source code
COPY . .

# Port for GRPC
EXPOSE 5000
# Port for REST
EXPOSE 9000

# Define environment variables
ENV MODEL_NAME Inference
ENV SERVICE_TYPE MODEL

# Enviorment variable to be replaced by the model_uri at the runtime in k8s.
ENV MODEL_URI "s3://modeloutput/experiments/1/b3b05490b57b4a5ea7373a77e8b09dcd/artifacts/CNN-TinyVG"
# Changing folder to default user
RUN chown -R 8888 /app

CMD exec seldon-core-microservice $MODEL_NAME --service-type $SERVICE_TYPE
➜ ~ cat Inference.py
import os
import numpy as np
import torch
import mlflow
import model_builder
import random
import base64
import PIL.Image as Image
from io import BytesIO
class Inference(object):
def __init__(self):
self.device = 'cpu'
os.environ["MLFLOW_S3_ENDPOINT_URL"] = "http://minio-service.kubeflow:9000"
os.environ["AWS_ACCESS_KEY_ID"] = "minio"
os.environ["AWS_SECRET_ACCESS_KEY"] = "minio123"
self.model_uri = os.environ['MODEL_URI']
self.model = mlflow.pytorch.load_model(self.model_uri)
self.class_names = ["pizza", "steak", "sushi"]
def predict(self, X, feature_names):
X = X[0].encode()
im_bytes = base64.b64decode(X)
im_file = BytesIO(im_bytes)
img = Image.open(im_file)
img = np.asarray(img.resize((64, 64))).astype(np.float32) / 255.0
if img.ndim == 2:
img = np.stack([img, img, img], axis=-1)
img = np.transpose(img, (-1, 0, 1))
img = np.expand_dims(img, axis=0)
img = torch.from_numpy(img).to(self.device)
with torch.inference_mode():
pred_logits = self.model(img)
pred_prob = torch.softmax(pred_logits, dim=1).numpy()
return [pred_prob.tolist()]
➜ ~ docker image build -t mohitverma1688/seldon_serve:v0.1 .
[+] Building 1.8s (10/10) FINISHED
=> [internal] load build definition from Dockerfile 0.0s
=> => transferring dockerfile: 304B 0.0s
=> [internal] load .dockerignore 0.0s
=> => transferring context: 2B 0.0s
=> [internal] load metadata for docker.io/library/python:3.10-slim 1.7s
=> [auth] library/python:pull token for registry-1.docker.io 0.0s
=> [internal] load build context 0.0s
=> => transferring context: 151B 0.0s
=> [1/4] FROM docker.io/library/python:3.10-slim@sha256:7de57d5840f51e10462ba0eed4c4e8aa26f28b44cedbf0fc8dd7fd77ea59c7d9 0.0s
=> => resolve docker.io/library/python:3.10-slim@sha256:7de57d5840f51e10462ba0eed4c4e8aa26f28b44cedbf0fc8dd7fd77ea59c7d9 0.0s
=> CACHED [2/4] RUN apt-get update && rm -rf /var/lib/apt/lists/* 0.0s
=> CACHED [3/4] COPY requirements.txt requirements.txt 0.0s
=> CACHED [4/4] RUN pip install --no-cache-dir -r requirements.txt --extra-index-url https://download.pytorch.org/whl/cpu 0.0s
=> exporting to image 0.0s
=> => exporting layers 0.0s
=> => writing image sha256:563442d7737f6eb249787c08865279e2a26a9299a21ad53c6f9f9476e90157bf 0.0s
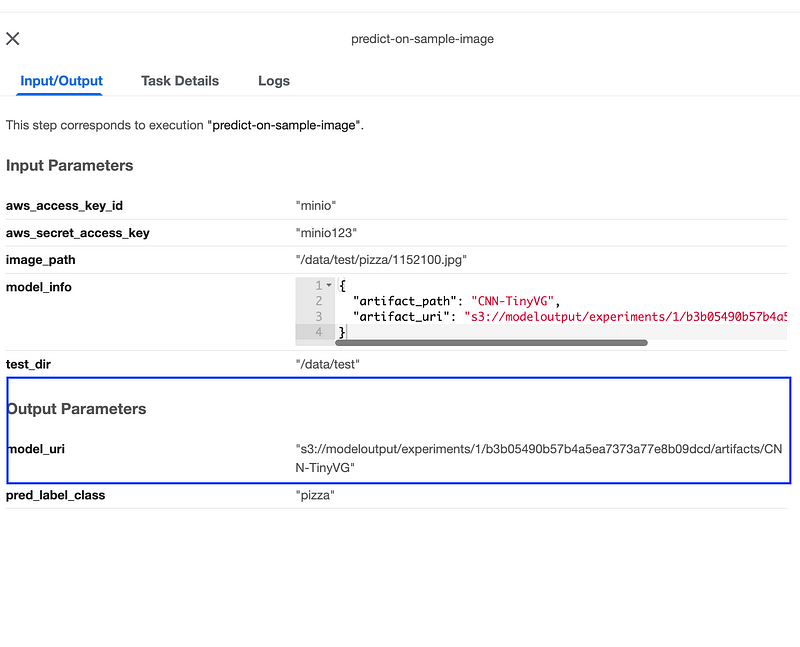
=> => naming to docker.io/mohitverma1688/seldon_serve:v0.1If you remember in the part2, the last component model_eval results in a output parameter with name model_uri. We will need to copy that string and replace in the seldon custom CRD yaml file.
Now we will use the build image tag in previous step and copied model_uri enviornment variable to deploy the seldon deployment CRD.
➜  ~ cat seldon_deployment.yaml
---
apiVersion: machinelearning.seldon.io/v1alpha2
kind: SeldonDeployment
metadata:
  labels:
    app: seldon
  name: cnn-tinyvg-seldon
  namespace: kubeflow
spec:
  annotations:
    project_name: CNN Pipeline
    deployment_version: v1
  name: "cnn-tinvg-v1"
  predictors:
  - componentSpecs:
    - spec:
        containers:
        - image: mohitverma1688/seldon_serve:v0.1
          imagePullPolicy: IfNotPresent
          name: inference
          resources:
            requests:
              memory: 1Mi
          env:
            - name: MODEL_URI
              value: "s3://modeloutput/experiments/1/b3b05490b57b4a5ea7373a77e8b09dcd/artifacts/CNN-TinyVG"
    graph:
      children: []
      name: inference
      endpoint:
        type: REST
      type: MODEL
    name: cnn-tinyvg-v1
    replicas: 1
    annotations:
      predictor_version: "1.0"
      seldon.io/svc-name: tinyvg-svc
Now deploy the crd and wait for the deployment pods to be up and running. This deployment serves the inference requests on its endpoint (default: 9000) http://localhost:9000/api/v1.0/predictions
➜  ~ kubectl create -f seldon_deployment.yaml

➜  ~ kubectl get seldondeployment -n kubeflow

NAME                AGE
cnn-tinyvg-seldon   5m42s

➜  ~ kubectl get pods -n kubeflow | grep seldon
cnn-tinyvg-seldon-cnn-tinyvg-v1-0-inference-6f748bcc7d-fbmcz   2/2     Running     0             3m48s
We have successfully deployed our model, now we will test this model with the custom python script . I have created a python script testing.py which takes two argument to send the request to our server and get the prediction response.
➜  ~ kubectl port-forward svc/cnn-tinyvg-seldon-cnn-tinyvg-v1-inference 8004:9000 -n kubeflow

➜  ~ python3 testing.py http://localhost:8004/api/v1.0/predictions ./1063878.jpg
sending image ./1063878.jpg to http://localhost:8004/api/v1.0/predictions
caught response <Response [200]>
{'data': {'names': ['pizza', 'steak', 'sushi'], 'ndarray': [[[0.370800644159317, 0.33560964465141296, 0.29358971118927]]]}, 'meta': {'requestPath': {'inference': 'mohitverma1688/seldon_serve:v0.1'}}
Finally, we have completed our MLOps steps using kubeflow, Mlflow and Seldon. Happy learning :) .


